

Quick Start Guide
Page 2
Contents What's in the box 1 What is BrightSign 2 Benefits 2 Capabilities 3 Models 4 Connecting a display 5 Using a VGA cable 5 Using an HDMI cable 6 Connecting speakers 7 Getting started with the online Quick Start kit 8 Creating and playing presentations 9 Creating a full-screen playlist presentation 9 Creating a multiple zone playlist presentation 16 Creating an interactive presentation 24 Connecting an input device 33
Contents What's in the box 1 What is BrightSign 2 Benefits 2 Capabilities 3 Models 4 Connecting a display 5 Using a VGA cable 5 Using an HDMI cable 6 Connecting speakers 7 Getting started with the online Quick Start kit 8 Creating and playing presentations 9 Creating a full-screen playlist presentation 9 Creating a multiple zone playlist presentation 16 Creating an interactive presentation 24 Connecting an input device 33

Quick Start Guide
Page 4
What's in the box? 5v Ser RS-232 Control BrightSign Err Upd Pwr Bsy SD / MMC GP/012 Reset USB Power adapter Rubber feet SD slot cover Cable mount Cable tie International prongs TIP: Use the cable mount and cable tie to keep the cables securely attached to your BrightSign. NOTE: The Quick Start Kit is available online at www.brightsign.biz/quickstart. • • 1 •
What's in the box? 5v Ser RS-232 Control BrightSign Err Upd Pwr Bsy SD / MMC GP/012 Reset USB Power adapter Rubber feet SD slot cover Cable mount Cable tie International prongs TIP: Use the cable mount and cable tie to keep the cables securely attached to your BrightSign. NOTE: The Quick Start Kit is available online at www.brightsign.biz/quickstart. • • 1 •
Quick Start Guide
Page 5
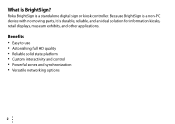
Benefits • Easy to use • Astonishing full HD quality • Reliable solid state platform • Custom interactivity and control • Powerful zones and synchronization • Versatile networking options 2 • • • Because BrightSign is a non-PC device with no moving parts, it is BrightSign? What is durable, reliable, and an ideal solution for information kiosks, retail displays, museum exhibits, and other applications. Roku BrightSign is a standalone digital sign or kiosk controller.
Benefits • Easy to use • Astonishing full HD quality • Reliable solid state platform • Custom interactivity and control • Powerful zones and synchronization • Versatile networking options 2 • • • Because BrightSign is a non-PC device with no moving parts, it is BrightSign? What is durable, reliable, and an ideal solution for information kiosks, retail displays, museum exhibits, and other applications. Roku BrightSign is a standalone digital sign or kiosk controller.

Quick Start Guide
Page 6
... to playback video and images simultaneously • Play live video using the full screen or in a window using a USB video dongle accessory (sold separately) • Schedule content to play at a specific time (hour, day, month, year) • Easily create looping displays • Display RSS feeds and other network information • Run interactive presentations that playback content based on...
... to playback video and images simultaneously • Play live video using the full screen or in a window using a USB video dongle accessory (sold separately) • Schedule content to play at a specific time (hour, day, month, year) • Easily create looping displays • Display RSS feeds and other network information • Run interactive presentations that playback content based on...

Quick Start Guide
Page 7
... wall implementations BrightSign HD210 • All HD110 features • Networking support for remote content update, reporting, live data feeds, and more BrightSign HD810 • All HD410 features • Full interactivity including touch screens and USB devices • Schedule content by time/date • Live video feed • Support for A/V expansion module accessories BrightSign HD1010 • All HD810 features • Networking support...
... wall implementations BrightSign HD210 • All HD110 features • Networking support for remote content update, reporting, live data feeds, and more BrightSign HD810 • All HD410 features • Full interactivity including touch screens and USB devices • Schedule content by time/date • Live video feed • Support for A/V expansion module accessories BrightSign HD1010 • All HD810 features • Networking support...
Quick Start Guide
Page 8
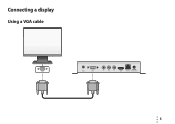
Connecting a display Using a VGA cable Audio VGA Y Pb Pr HDMI Ethernet Power 5.2V 3A VGA • • 5 •
Connecting a display Using a VGA cable Audio VGA Y Pb Pr HDMI Ethernet Power 5.2V 3A VGA • • 5 •
Quick Start Guide
Page 10
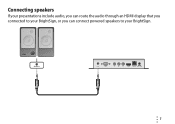
Connecting speakers If your presentations include audio, you can route the audio through an HDMI display that you connected to your BrightSign, or you can connect powered speakers to your BrightSign. Power Volume Audio In Audio VGA Y Pb Pr HDMI Ethernet Power 5.2V 3A • • 7 •
Connecting speakers If your presentations include audio, you can route the audio through an HDMI display that you connected to your BrightSign, or you can connect powered speakers to your BrightSign. Power Volume Audio In Audio VGA Y Pb Pr HDMI Ethernet Power 5.2V 3A • • 7 •

Quick Start Guide
Page 11
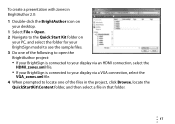
Getting started with the online Quick Start kit This section provides step-by-step instructions on how to create your first BrightSign presentations using BrightAuthor 2.0 and the online Quick Start kit. 1 Download the QuickStart.zip file from www.brightsign.biz/quickstart. 2 Unzip the file to a location on your PC. 3 Double-click the Setup.exe file, and follow the onscreen instructions to install the BrightAuthor 2.0 software. 8 • • •
Getting started with the online Quick Start kit This section provides step-by-step instructions on how to create your first BrightSign presentations using BrightAuthor 2.0 and the online Quick Start kit. 1 Download the QuickStart.zip file from www.brightsign.biz/quickstart. 2 Unzip the file to a location on your PC. 3 Double-click the Setup.exe file, and follow the onscreen instructions to install the BrightAuthor 2.0 software. 8 • • •

Quick Start Guide
Page 12
...using BrightAuthor 2.0 and the sample files provided in a loop. c In the Where field, click Browse to select the folder where you to learn more files in the Quick Start kit. 1 Create a new BrightSign project: a Double-click the BrightAuthor icon on your BrightSign Model, Connector type, and Screen... resolution. d Select your desktop. Creating and playing presentations This guide describes how to store the presentation...
...using BrightAuthor 2.0 and the sample files provided in a loop. c In the Where field, click Browse to select the folder where you to learn more files in the Quick Start kit. 1 Create a new BrightSign project: a Double-click the BrightAuthor icon on your BrightSign Model, Connector type, and Screen... resolution. d Select your desktop. Creating and playing presentations This guide describes how to store the presentation...
Quick Start Guide
Page 15
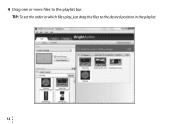
4 Drag one or more files to the desired position in which files play, just drag the files to the playlist bar. TIP: To set the order in the playlist. 12 • • •
4 Drag one or more files to the desired position in which files play, just drag the files to the playlist bar. TIP: To set the order in the playlist. 12 • • •

Quick Start Guide
Page 18
To make changes to the sample full-screen project files: 1 In BrightAuthor, select File > Open. 2 Locate the Quick Start Kit folder and select the folder for your BrightSign model to see the sample project files. 3 Do one of the following: • If your BrightSign is connected to your display via an HDMI connection, select the HDMI_fullscreen.xml file...
To make changes to the sample full-screen project files: 1 In BrightAuthor, select File > Open. 2 Locate the Quick Start Kit folder and select the folder for your BrightSign model to see the sample project files. 3 Do one of the following: • If your BrightSign is connected to your display via an HDMI connection, select the HDMI_fullscreen.xml file...
Quick Start Guide
Page 20
... File > Open. 2 Navigate to the Quick Start Kit folder on your PC, and select the folder for your BrightSign model to see the sample files. 3 Do one of the following to open the BrightAuthor project: • If your BrightSign is connected to your display via an HDMI connection, select the HDMI_zones.xml file. • If your...
... File > Open. 2 Navigate to the Quick Start Kit folder on your PC, and select the folder for your BrightSign model to see the sample files. 3 Do one of the following to open the BrightAuthor project: • If your BrightSign is connected to your display via an HDMI connection, select the HDMI_zones.xml file. • If your...
Quick Start Guide
Page 25
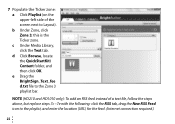
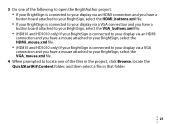
...is the Ticker zone. 7 Populate the Ticker zone: a Click Playlist (on the upper-left side of a text file, follow the steps above, but replace steps 7c -7e with the following: click the RSS tab, drag the New RSS Feed icon to the playlist, and enter the location (URL) for... the feed. (Internet connection required.) 22 • • • e Drag the BrightSign_Text_fee d.txt file to Layout). b Under Zone, click Zone 3; d Click Browse, locate the QuickStartKit\ Content ...
...is the Ticker zone. 7 Populate the Ticker zone: a Click Playlist (on the upper-left side of a text file, follow the steps above, but replace steps 7c -7e with the following: click the RSS tab, drag the New RSS Feed icon to the playlist, and enter the location (URL) for... the feed. (Internet connection required.) 22 • • • e Drag the BrightSign_Text_fee d.txt file to Layout). b Under Zone, click Zone 3; d Click Browse, locate the QuickStartKit\ Content ...

Quick Start Guide
Page 27
... touch screens, mice, keyboards, and barcode scanners, and the HD1010 also supports input for interactivity via the Ethernet port. Creating an interactive presentation With BrightSign HD410, HD810, and HD1010 you can create an interactive presentation that responds to user input from buttons or other GPIO devices, or from USB devices such as motion sensors or devices connected...
... touch screens, mice, keyboards, and barcode scanners, and the HD1010 also supports input for interactivity via the Ethernet port. Creating an interactive presentation With BrightSign HD410, HD810, and HD1010 you can create an interactive presentation that responds to user input from buttons or other GPIO devices, or from USB devices such as motion sensors or devices connected...
Quick Start Guide
Page 28
..., select the VGA_buttons.xml file. • (HD810 and HD1010 only) If your BrightSign is connected to your display via an HDMI connection and you have a mouse attached to your BrightSign, select the HDMI_mouse.xml file. • (HD810 and HD1010 only) If your BrightSign is connected to your display via a VGA connection and you have a mouse attached to your BrightSign...
..., select the VGA_buttons.xml file. • (HD810 and HD1010 only) If your BrightSign is connected to your display via an HDMI connection and you have a mouse attached to your BrightSign, select the HDMI_mouse.xml file. • (HD810 and HD1010 only) If your BrightSign is connected to your display via a VGA connection and you have a mouse attached to your BrightSign...

Quick Start Guide
Page 34
... after each video, the videos will loop indefinitely. • • 31 • d Click the bottom of Zones.mpg. h Double-click Menu_3option.jpg and check the Set as initial state box. f Click the bottom of Interact _mpg. b Click the bottom of the Attract, Interact, and Zones videos to Menu_3option.jpg. c Draw a line... to Menu_3option.jpg. e Draw a line to Menu_3option so that the menu reappears when the videos finish playing. To make the connections: a Click Media End on the event bar. 10...
... after each video, the videos will loop indefinitely. • • 31 • d Click the bottom of Zones.mpg. h Double-click Menu_3option.jpg and check the Set as initial state box. f Click the bottom of Interact _mpg. b Click the bottom of the Attract, Interact, and Zones videos to Menu_3option.jpg. c Draw a line... to Menu_3option.jpg. e Draw a line to Menu_3option so that the menu reappears when the videos finish playing. To make the connections: a Click Media End on the event bar. 10...

Quick Start Guide
Page 36
Connecting an input device To play interactive presentations, you need to connect an input device to connect a button board and touch screen: Button board Control 5v Ser RS-232 Control Err Upd Pwr Bsy SD / MMC Touch screen USB USB Reset GPIO12 • • 33 • The following illustrations show how to your BrightSign.
Connecting an input device To play interactive presentations, you need to connect an input device to connect a button board and touch screen: Button board Control 5v Ser RS-232 Control Err Upd Pwr Bsy SD / MMC Touch screen USB USB Reset GPIO12 • • 33 • The following illustrations show how to your BrightSign.

Quick Start Guide
Page 37
... screen. Download demos at: www.brightsign.biz/support/demos • Downloads: Get the latest BrightSign software, Autoplay script, scripts for manually setting the date & time, and scripts for details on the support website: www.brightsign.biz/support -or- Please contact support@brightsign.biz for testing button boards at: www.brightsign.biz/support/download.php • Support: Get answers to a network, you can update your...
... screen. Download demos at: www.brightsign.biz/support/demos • Downloads: Get the latest BrightSign software, Autoplay script, scripts for manually setting the date & time, and scripts for details on the support website: www.brightsign.biz/support -or- Please contact support@brightsign.biz for testing button boards at: www.brightsign.biz/support/download.php • Support: Get answers to a network, you can update your...

Quick Start Guide
Page 38
...: MP3 Display resolutions 1080p (HDMI) 1080i, 720p, 576p, 480p (HDMI & component) 1360x768, 1024x768 (HDMI & VGA) HD110 X X X HD110 X X X HD110 X X X HD210 X X Ethernet X X X X HD210 X X X HD210 X X X HD410 X X X X X HD410 X X X HD410 X X X HD810 X X X HD1010 X X X X X X X HD810 X X Ethernet X X X X HD1010 X X X HD810 X X X X X HD1010 X X X • • 35 • BrightSign feature comparison Features Looping playlist support Basic interactivity (via GPIO port supporting buttons and LEDs) Advanced interactivity (buttons, touch screens, LEDs, and any USB device such...
...: MP3 Display resolutions 1080p (HDMI) 1080i, 720p, 576p, 480p (HDMI & component) 1360x768, 1024x768 (HDMI & VGA) HD110 X X X HD110 X X X HD110 X X X HD210 X X Ethernet X X X X HD210 X X X HD210 X X X HD410 X X X X X HD410 X X X HD410 X X X HD810 X X X HD1010 X X X X X X X HD810 X X Ethernet X X X X HD1010 X X X HD810 X X X X X HD1010 X X X • • 35 • BrightSign feature comparison Features Looping playlist support Basic interactivity (via GPIO port supporting buttons and LEDs) Advanced interactivity (buttons, touch screens, LEDs, and any USB device such...

Quick Start Guide
Page 39
... out HDMI out (DVI via adaptor) GPIO control port (8 bi-directional) RS232 5V serial mini jack Reset button USB host port Ethernet 10/100 Analog stereo audio out (stereo 1/8" line level) Miscellaneous Dimensions (without mounting brackets or connectors) Weight Power International power supply & regulatory approvals Wall mounting brackets 1 year warranty (parts and labor) HD110 HD210 HD410 HD810 HD1010 X X X X X X X X X X X X X X X X X X X X X X X X X X X X X X X X X X X X X HD110 HD210 HD410 HD810 HD1010...
... out HDMI out (DVI via adaptor) GPIO control port (8 bi-directional) RS232 5V serial mini jack Reset button USB host port Ethernet 10/100 Analog stereo audio out (stereo 1/8" line level) Miscellaneous Dimensions (without mounting brackets or connectors) Weight Power International power supply & regulatory approvals Wall mounting brackets 1 year warranty (parts and labor) HD110 HD210 HD410 HD810 HD1010 X X X X X X X X X X X X X X X X X X X X X X X X X X X X X X X X X X X X X HD110 HD210 HD410 HD810 HD1010...
