Ryobi P1819 Support and Manuals
Get Help and Manuals for this Ryobi item
Ryobi P1819 Videos

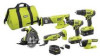
NEW UPDATED RYOBI ONE+ 18-Volt 6 Piece Combo Kit P1819 & 4 Piece Kit P1818 & 2 Piece Kit P1817 P1816
Duration: 17:49
Total Views: 60,279
Duration: 17:49
Total Views: 60,279
RYOBI P1819 - 5 TOOL KIT With Flashlight and Contractor bag NEW
Duration: 3:22
Total Views: 134
Duration: 3:22
Total Views: 134
ryobi-6-tools-combo-model-p1819.
Duration: 5:14
Total Views: 17
Duration: 5:14
Total Views: 17
Popular Ryobi P1819 Manual Pages
Operation Manual - Page 2

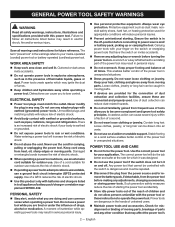
...the switch does not turn it on a ladder or unstable support. Do not use a ground fault circuit interrupter (GFCI) ...TOOL SAFETY WARNINGS
WARNING
Read all safety warnings, instructions, illustrations and specifications provided with the power tool or these are... be repaired.
Disconnect the plug from the power source and/ or remove the battery pack, if detachable, from moving parts.
&#...
Operation Manual - Page 3

... of a source of ignition, such as the specific potential hazards related to be performed by insulated gripping surfaces, when performing an operation where the cutting accessory may be plugged into your hearing. Holding the workpiece by a qualified repair person using your skin, wash immediately with these instructions also.
3 - This will reduce the risk...
Operation Manual - Page 6

... button into
the locked position. Insert the battery pack into place. For complete charging instructions, see the operator's manual for your battery pack and charger. INSTALLING/REMOVING THE SAW BLADE
See Figure 3, page 9.
Do not touch metal parts when cutting into a wall. Make sure hidden electrical wiring, water pipes, and mechanical hazards are...
Parts Diagram - Page 3

... label attached to the motor housing. Always mention the model number in all correspondence regarding your RECIPROCATING SAW or when ordering repair parts. RYOBI 18 VOLT RECIPROCATING SAW - PARTS LIST
KEY PART NO.
NUMBER
1 692177001 2 526010001 3 538481001 4 ...Connecting Rod Assembly (P519VN 1 Logo Label 1 Data Label (P519 1 Data Label (P519VN 1 Warning Label 1
Operator's Manual
3
Parts Diagram - Page 4
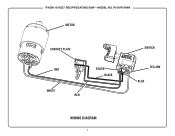
RYOBI 18 VOLT RECIPROCATING SAW - P519/P519VN
MOTOR
CONTACT PLATE
RED
WHITE RED
BLACK BLACK
SWITCH YELLOW
BLUE
WIRING DIAGRAM
4 MODEL NO.
Operation Manual 1 - Page 1

... cause damage to operate the tool better and safer. Do not use them these instructions. If you to your light in contact with soap and water. Please study them with any parts are replaced.
Le non-respect de toutes les instructions ci-dessous peut entraîner un choc électrique, un incendie et...
Operation Manual - Page 3

...SERVICE
Have your arms to another battery pack.
Use power tools only with a "live " and could give the operator an electric shock.
When ripping, always use .
If both hands on auxiliary handle, or motor housing. Contact with specifically...repaired before use a rip fence or straight edge guide...repair person using only identical replacement parts...manual...instructions...
Operation Manual - Page 4

... lower guard should be retracted manually only for special cuts such ... serious personal injury.
Save these instructions also.
4 - English For all angles...lower guard may be serviced before use any cordless ...not engaged into existing walls or other part, in its path. Lower guard may... battery pack. Supports must be bent. Unsharpened or improperly set blades produce narrow...
Operation Manual - Page 8

... part of your body coming in contact with a dull, gummed up, or improperly set ... Use clean, sharp, and properly set
blade. Supporting the workpiece incorrectly. Forcing a cut...must be depressed before you have the guard repaired or replaced. Keep extra blades on the saw :... edge guide when rip cutting. CAUTION:
Never use .
To stop . The depth
setting should occur...
Operation Manual - Page 9

...depth lock knob securely. RIP CUTTING
See Figure 15, page 15. Use a guide when making
a cut. Support the workpiece so that the cut (kerf) is exposed on the underside of... 14.
OPERATION
ADJUSTING BLADE DEPTH
See Figure 10, page 14. Always keep correct blade depth setting. The correct blade depth setting for operating the saw . More blade depth will
not move during the cut. ...
Parts Diagram - Page 3

...PART QTY NO. KEY PART NO. ITEM NUMBER P505
The model number will be found on a label attached to the motor housing. NUMBER
Screw (M5 x 18 mm 1 Rubber Stopper 1 Lock Nut (M5 2 Screw (M5 x 40 mm, Pan Hd 1 Shaft Lock Holder 1 Sealing Pad 1 Shaft Lock Plate 1 Shaft Lock Button 1 Logo Label (End Cap 1 Ryobi... Lock Knob 1 Not Shown Operator's Manual
3 RYOBI 5-1/2 in ., 24T 1 Outer Blade...
Operation Manual 2 - Page 2
...use on a ladder or unstable support.
Protective equipment such as dust...repaired.
Disconnect the plug from the power source and/or remove the battery pack, if detachable, from heat, oil, sharp edges or moving parts.
If devices are provided for future reference. GENERAL POWER TOOL SAFETY WARNINGS
WARNING
Read all safety warnings, instructions, illustrations and specifications...
Operation Manual 2 - Page 3

... using only identical replacement parts. If contact accidentally occurs, flush with water immediately.
3 - Charging improperly or at temperatures outside the temperature range specified in the presence of a source of ignition, such as the specific potential hazards related to fire or temperature above 265° F may cause explosion.
Follow all charging instructions and do...
Operation Manual 2 - Page 6

... and remove the battery pack. INSTALLING ACCESSORIES
See Figures 3 - ... to all instructions for your multitool...manuals for this occurs, cool the tool by running . To release the lock, depress and release the switch trigger. Remove the screw and washer assembly and set aside. Place the desired accessory on the head so that the openings on the accessory fit on the raised parts...
Parts Diagram 2 - Page 3

PARTS LIST
KEY PART
NO. RYOBI 18 VOLT OSCILLATING MULTI-TOOL − MODEL NUMBER P343
The model ...Grit Sanding Sheet 2 36 692496002 Optional Adapter 1
Not Shown: 995000882 Operator's Manual (961153042) 11-12-19 (Rev:02)
3 NUMBER DESCRIPTION
QTY
21 691171001... 1
KEY PART
NO.
Always mention the model number in all correspondence regarding your MULTI-TOOL or when ordering...
Ryobi P1819 Reviews
We have not received any reviews for Ryobi yet.