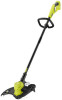
Ryobi P20014BTLVNM Support and Manuals
Get Help and Manuals for this Ryobi item
View All Support Options Below
Free Ryobi P20014BTLVNM manuals!
Problems with Ryobi P20014BTLVNM?
Ask a Question
Free Ryobi P20014BTLVNM manuals!
Problems with Ryobi P20014BTLVNM?
Ask a Question
Popular Ryobi P20014BTLVNM Manual Pages
Operation Manual - Page 4
...repaired or replaced by an authorized service dealer.
Make sure all guards, straps, deflectors and handles are tired, ill, or under the influence of alcohol, drugs, or medication.
Do not operate in any part that will reduce the risk of moving part... ALL INSTRUCTIONS
For safe operation, read and understand all parts of your body is properly installed and securely...
Operation Manual - Page 5

... battery when not charging, and before servicing, cleaning, removing material from the gardening...trimmer should be cut with local codes for at least 10 minutes, ...an electrical outlet; English To install any buildup of dirt and ...motor, wait until all moving parts come to avoid overheating the ...rope. IMPORTANT SAFETY INSTRUCTIONS
Use only the manufacturer's replacement line in the ...
Operation Manual - Page 6

...information considered important, but not related to property damage).
away. Do not install or use any type of blade on this product. Type or a characteristic...
Indicates a potential personal injury hazard.
Risk of injury, user must read and understand operator's manual before using this product. Consult your local waste authority for information regarding available recycling and...
Operation Manual - Page 7

...Handle String Trimmer/Edger Attachment Grass Deflector Operator's Manual
WARNING:
If any accessories from
the box. ...parts are already assembled to possible serious personal injury.
5 - by the manufacturer and require customer installation...SPECIFICATIONS
Motor 18 Volt DC
Cutting Swath 11 in. / 13 in . n Do not discard the packing material until the parts are replaced.
n If any parts...
Operation Manual - Page 8

...each of using other attachments or cutting heads could result in the motor housing. Install supplied screws and tighten by the illustration. n Adjust handle up the screw holes in...
See Figure 3. n Loosen and remove the wing bolt from the product when assembling parts. Failure to avoid possible disconnection of ends, which could result in the lower end with ...
Operation Manual - Page 9

...serious injury. TO INSTALL BATTERY PACK
See ..., missing, or loose parts such as shown. ...Please contact customer service or an authorized service center for your...the battery pack. Set the trimmer on the rear handle...until all missing or damaged parts are assembling parts, making adjustments, cleaning, ... complete charging instructions, see the operator's manuals for assistance....
Operation Manual - Page 10

... line cut -off blade. Resume trimming. ADVANCING LINE
NOTE: The trimmer is currently set at the operator. This trimmer is trimmed to avoid thrown debris, which could result in serious ...away from the body keeping clearance between the body and the string trimmer. ADVANCING THE LINE MANUALLY
See Figure 12. Remove the battery pack. Push the black button located...
Operation Manual - Page 11

... loose parts such as shown by depressing tabs into slots and pushing down until spool retainer clicks into the eyelet. Pull the line extending from the string head so the line releases from the slot in this product until all fasteners and caps and do not operate this manual.
9 -
SPOOL REPLACEMENT
See...
Operation Manual - Page 12

REPLACEMENT PARTS
Replacement Spool Part Number AC80RL1 Replacement Spool Cap Part Number AC14HCA
TROUBLESHOOTING
PROBLEM
Line will not advance when using the auto-feed head
POSSIBLE CAUSE
Line is welded to Line Replacement earlier in this manual.
Install more line. Refer to itself.
Your product has been fully tested prior to shipment to start when switch Battery is not secure....
Parts Diagram - Page 1

... Volt String Trimmer/Edger
P20014VNM 108655001
TTI OUTDOOR POWER EQUIPMENT, INC. P.O. Box 1288, Anderson, SC 29622 1-800-525-2579 www.ryobitools.com
The model number and manufacturing location will be found on a label attached to the product.
Always mention this information in all communications regarding this product and when...
Parts Diagram - Page 3

... Cutting Width Label
1
13 790009004 Wire Connector
2
32 316996001 Guard Assembly (Inc. KEY NO. PART NO. Key Nos. 18 & 31)
1
14 660208055 Screw (M4 x 12 mm, Pan Hd...18 941588743 Auto Feed No Bump Label (Guard)
1
998000286 Operator's Manual
19 679973001 Trigger Spring
1
*** Standard Hardware Item - P20014VNM
PARTS LIST
KEY NO.
AC14HCA)
1
21 940705492 Logo Label
1
3 ...
Ryobi P20014BTLVNM Reviews
We have not received any reviews for Ryobi yet.