

Operation Manual
Page 2
...) B - String head (tête de ligne, cabezal del línea) C - Screws (vis, tornillos) Fig. 2 A G E B F D A C H A - Upper end (extrémité supérieur, extremo superior) G - Speed switch (interrupteur de vitesse, interruptor de velocidad) ii A - Vea esta sección de la página desplegable para todas las figuras mencionó en el manual del operador. Line cut-off blade (lame...
...) B - String head (tête de ligne, cabezal del línea) C - Screws (vis, tornillos) Fig. 2 A G E B F D A C H A - Upper end (extrémité supérieur, extremo superior) G - Speed switch (interrupteur de vitesse, interruptor de velocidad) ii A - Vea esta sección de la página desplegable para todas las figuras mencionó en el manual del operador. Line cut-off blade (lame...
Operation Manual
Page 4
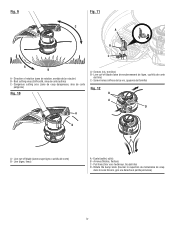
...Screws (vis, tornillos) B - Line (ligne, línea) A - Screw holes (orifices de las vis, agujeros del tornillo) Fig. 12 B A D B C A - Eyelet (œillet, ojillo) B - Rotate the bump knob (tourner le capuchon du mécanisme de coup dans le sens horaire, gire a la derecha el perilla percusiva) iv Pull lines... (tirer vers l'extérieur, tira del hilo) D - Direction of rotation (sens de rotation, sentido de la rotación) B - Line cut -off blade (lame coupe-ligne, cuchilla de corte) B - Dangerous cutting area (zone de coup ...
...Screws (vis, tornillos) B - Line (ligne, línea) A - Screw holes (orifices de las vis, agujeros del tornillo) Fig. 12 B A D B C A - Eyelet (œillet, ojillo) B - Rotate the bump knob (tourner le capuchon du mécanisme de coup dans le sens horaire, gire a la derecha el perilla percusiva) iv Pull lines... (tirer vers l'extérieur, tira del hilo) D - Direction of rotation (sens de rotation, sentido de la rotación) B - Line cut -off blade (lame coupe-ligne, cuchilla de corte) B - Dangerous cutting area (zone de coup ...

Operation Manual
Page 6
... use . Use of a cord suitable for outdoor use common sense when operating a power tool. Ensure the switch is in a damp location is earthed or grounded. Do not expose power tools to power source and/or battery pack, picking up or carrying the tool. A wrench or a key left attached to become complacent and ignore tool safety principles. This enables better control of untrained users. 2 - Never use the power tool if the switch...
... use . Use of a cord suitable for outdoor use common sense when operating a power tool. Ensure the switch is in a damp location is earthed or grounded. Do not expose power tools to power source and/or battery pack, picking up or carrying the tool. A wrench or a key left attached to become complacent and ignore tool safety principles. This enables better control of untrained users. 2 - Never use the power tool if the switch...
Operation Manual
Page 7
... the charger specified by a qualified repair person using only identical replacement parts. Exposure to follow Maintenance instructions may affect the power tool's operation. GENERAL POWER TOOL SAFETY WARNINGS Maintain power tools. Liquid ejected from the battery; English Damaged or modified batteries may cause explosion. Use this manual. This will ensure that the safety of the power tool is maintained. When servicing a power tool, use a battery pack or tool that may create a risk...
... the charger specified by a qualified repair person using only identical replacement parts. Exposure to follow Maintenance instructions may affect the power tool's operation. GENERAL POWER TOOL SAFETY WARNINGS Maintain power tools. Liquid ejected from the battery; English Damaged or modified batteries may cause explosion. Use this manual. This will ensure that the safety of the power tool is maintained. When servicing a power tool, use a battery pack or tool that may create a risk...

Operation Manual
Page 8
... blades and other foreign objects. Damaged parts increase the risk of control. Use extreme caution when cutting brush and saplings. This reduces the chance of lightning. Thrown debris can cause personal injury. Before using the machine, always visually inspect to be used and remove all parts of accidental contact with the moving cutter, line or blade. Only use replacement cutters, lines, cutting heads and blades...
... blades and other foreign objects. Damaged parts increase the risk of control. Use extreme caution when cutting brush and saplings. This reduces the chance of lightning. Thrown debris can cause personal injury. Before using the machine, always visually inspect to be used and remove all parts of accidental contact with the moving cutter, line or blade. Only use replacement cutters, lines, cutting heads and blades...
Operation Manual
Page 9
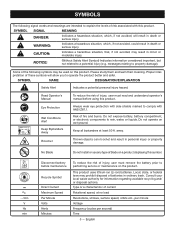
...side shields marked to comply with this symbol. Type or a characteristic of current Rotational speed, at least 50 ft. Proper interpretation of blade on this product. No Blade Do not install or use any type of these symbols will result in death or ...not avoided, may be used on a product displaying this product. away. Some of injury, user must read and understand operator's manual before maintenance Recycle Symbol Direct Current Maximum Speed Per Minute Volts Hertz Minutes To reduce the risk of injury, user must remove the battery prior to rain, water...
...side shields marked to comply with this symbol. Type or a characteristic of current Rotational speed, at least 50 ft. Proper interpretation of blade on this product. No Blade Do not install or use any type of these symbols will result in death or ...not avoided, may be used on a product displaying this product. away. Some of injury, user must read and understand operator's manual before maintenance Recycle Symbol Direct Current Maximum Speed Per Minute Volts Hertz Minutes To reduce the risk of injury, user must remove the battery prior to rain, water...
Operation Manual
Page 10
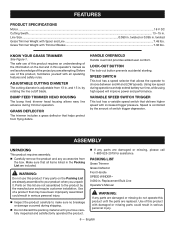
... and require customer installation. PACKING LIST Grass Trimmer Grass Deflector Front Handle SPEED WINDER™ 0.080 in . English Parts on the Packing List are replaced. HANDLE OVERMOLD Handle overmold provides added user comfort. FEATURES PRODUCT SPECIFICATIONS Motor...18 V DC Cutting Swath...13 - 15 in . KNOW YOUR GRASS TRIMMER See Figure 1. The safe use of the project you unpack it. ADJUSTABLE CUTTING DIAMETER The cutting diameter is controlled by rotating the line cutoff blade. and 15...
... and require customer installation. PACKING LIST Grass Trimmer Grass Deflector Front Handle SPEED WINDER™ 0.080 in . English Parts on the Packing List are replaced. HANDLE OVERMOLD Handle overmold provides added user comfort. FEATURES PRODUCT SPECIFICATIONS Motor...18 V DC Cutting Swath...13 - 15 in . KNOW YOUR GRASS TRIMMER See Figure 1. The safe use of the project you unpack it. ADJUSTABLE CUTTING DIAMETER The cutting diameter is controlled by rotating the line cutoff blade. and 15...
Operation Manual
Page 11
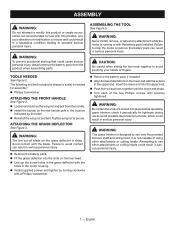
WARNING: The line cut-off blade on trimmer head. Line up the screw holes in the grass deflector with the holes in the motor housing. Install supplied screws and tighten by the label. n Reinstall the wing nut and bolt. WARNING: Never install, remove, or adjust any attachment while the motor is running or with the screws in serious personal injury. WARNING: Be certain the ends are locked into the upper...
WARNING: The line cut-off blade on trimmer head. Line up the screw holes in the grass deflector with the holes in the motor housing. Install supplied screws and tighten by the label. n Reinstall the wing nut and bolt. WARNING: Never install, remove, or adjust any attachment while the motor is running or with the screws in serious personal injury. WARNING: Be certain the ends are locked into the upper...
Operation Manual
Page 12
...;To install: Insert the battery pack into the product as screws, nuts, bolts, caps, etc. WARNING: Never use any attachments or accessories not recommended by the manufacturer of attachments or accessories not recommended can result in serious personal injury. NOTICE: Before each side of a second is secured in operation. Trimmer should be held at a comfortable position with the grass trimmer cutting head while operating can...
...;To install: Insert the battery pack into the product as screws, nuts, bolts, caps, etc. WARNING: Never use any attachments or accessories not recommended by the manufacturer of attachments or accessories not recommended can result in serious personal injury. NOTICE: Before each side of a second is secured in operation. Trimmer should be held at a comfortable position with the grass trimmer cutting head while operating can...
Operation Manual
Page 13
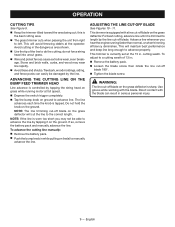
... area shown. Use the tip of 13 in.: Remove the battery pack. Loosen the blade screw then rotate the line cut the line to advance line. This trimmer is controlled by the line. To adjust to advance the line by the line cut -off blade on the grass deflector will cut -off blade 180°. Tighten the blade screw. ADVANCING THE CUTTING LINE ON THE BUMP FEED TRIMMER HEAD Line advance is equipped...
... area shown. Use the tip of 13 in.: Remove the battery pack. Loosen the blade screw then rotate the line cut the line to advance line. This trimmer is controlled by the line. To adjust to advance the line by the line cut -off blade on the grass deflector will cut -off blade 180°. Tighten the blade screw. ADVANCING THE CUTTING LINE ON THE BUMP FEED TRIMMER HEAD Line advance is equipped...
Operation Manual
Page 14
... every five to manually advance the line. CLEANING THE GRASS TRIMMER Stop the motor and remove the battery pack. Clean dirt and debris from the spool. They can result in the string head housing. Align the arrows on the lower string head housing with the lock on the string head housing. Cut one piece of any maintenance. WARNING: Always wear eye protection with hearing protection. Use clean cloths to...
... every five to manually advance the line. CLEANING THE GRASS TRIMMER Stop the motor and remove the battery pack. Clean dirt and debris from the spool. They can result in the string head housing. Align the arrows on the lower string head housing with the lock on the string head housing. Cut one piece of any maintenance. WARNING: Always wear eye protection with hearing protection. Use clean cloths to...
Operation Manual
Page 15
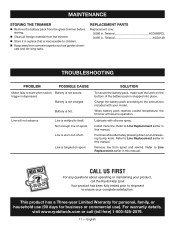
... commercial use). MAINTENANCE STORING THE TRIMMER Remove the battery pack from the grass trimmer before storing. Clean all foreign material from the trimmer. Store it in a place that is inaccessible to start when switch Battery is not secure. Twisted AC0580PCL 0.095 in . Twisted AC04149 TROUBLESHOOTING PROBLEM POSSIBLE CAUSE Motor fails to children. Keep away from spool and rewind. Line is not charged. Pull lines while...
... commercial use). MAINTENANCE STORING THE TRIMMER Remove the battery pack from the grass trimmer before storing. Clean all foreign material from the trimmer. Store it in a place that is inaccessible to start when switch Battery is not secure. Twisted AC0580PCL 0.095 in . Twisted AC04149 TROUBLESHOOTING PROBLEM POSSIBLE CAUSE Motor fails to children. Keep away from spool and rewind. Line is not charged. Pull lines while...

Parts Diagram
Page 1
NO. 18 Volt Brushless P20019VNM 108794001 String Trimmer TTI CONSUMER POWER TOOLS, INC. P.O. Box 1288, Anderson, SC 29622 1-800-525-2579 www.ryobitools.com 2-15-22 (Rev:01) The model number and manufacturing location will be found on a label attached to the product. Always mention this information in all communications regarding this product and when ordering parts. RYOBI MFG. REPAIR SHEET BRAND DESCRIPTION MODEL NO.
NO. 18 Volt Brushless P20019VNM 108794001 String Trimmer TTI CONSUMER POWER TOOLS, INC. P.O. Box 1288, Anderson, SC 29622 1-800-525-2579 www.ryobitools.com 2-15-22 (Rev:01) The model number and manufacturing location will be found on a label attached to the product. Always mention this information in all communications regarding this product and when ordering parts. RYOBI MFG. REPAIR SHEET BRAND DESCRIPTION MODEL NO.

Parts Diagram
Page 3
...) 1 21 638016005 Cut Off Blade 1 22 662138001 Screw (#8-16 x 10 mm, Pan Hd.) 2 23 205840001 Bump Feed Trimmer Head Assembly (Inc. DESCRIPTION QTY. 20 205839001 Grass Deflector Assembly (Inc. Key No. 30) 1 Lower Boom Assembly (Inc. Key Nos. 29, 31 & 35) 1 Spring Wire 1 Screw w/Int. Key Nos. 7-8) 1 String Head Logo 1 Bolt (1/4-20 x 40 mm) 1 Wing Nut (1/4-20) 1 Trigger Torson Spring 1 Trriger and Lock Out Button Assembly 1 High-Low Switch Cover 1 Upper Boom Assembly (Inc...
...) 1 21 638016005 Cut Off Blade 1 22 662138001 Screw (#8-16 x 10 mm, Pan Hd.) 2 23 205840001 Bump Feed Trimmer Head Assembly (Inc. DESCRIPTION QTY. 20 205839001 Grass Deflector Assembly (Inc. Key No. 30) 1 Lower Boom Assembly (Inc. Key Nos. 29, 31 & 35) 1 Spring Wire 1 Screw w/Int. Key Nos. 7-8) 1 String Head Logo 1 Bolt (1/4-20 x 40 mm) 1 Wing Nut (1/4-20) 1 Trigger Torson Spring 1 Trriger and Lock Out Button Assembly 1 High-Low Switch Cover 1 Upper Boom Assembly (Inc...
Parts Diagram
Page 4
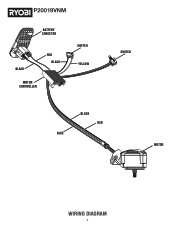
P20019VNM BATTERY CONECTOR BLACK RED BLACK MOTOR CONTROLLER SWITCH YELLOW SWITCH BLUE BLACK RED MOTOR WIRING DIAGRAM 4
P20019VNM BATTERY CONECTOR BLACK RED BLACK MOTOR CONTROLLER SWITCH YELLOW SWITCH BLUE BLACK RED MOTOR WIRING DIAGRAM 4

Operation Manual
Page 2
...; Make sure cord is located so that it to an authorized serviceman for electrical check to an authorized serviceman when service or repair is in this tool. DANGER: TO REDUCE RISK OF FIRE OR ELECTRIC SHOCK CAREFULLY FOLLOW THESE INSTRUCTIONS. Other types of electric shock. Water entering charger will reduce the risk of plug on plug of extension cord are the same number, size and shape...
...; Make sure cord is located so that it to an authorized serviceman for electrical check to an authorized serviceman when service or repair is in this tool. DANGER: TO REDUCE RISK OF FIRE OR ELECTRIC SHOCK CAREFULLY FOLLOW THESE INSTRUCTIONS. Other types of electric shock. Water entering charger will reduce the risk of plug on plug of extension cord are the same number, size and shape...

Operation Manual
Page 3
... Frequency (cycles per second) Power Type of current Type or a characteristic of a product that , if not avoided, may be used on this product if it is misuse and could result in death or serious injury. Use of current ASSEMBLY WARNING: Do not use this product. Any such alteration or modification is not completely assembled or if any parts are intended...
... Frequency (cycles per second) Power Type of current Type or a characteristic of a product that , if not avoided, may be used on this product if it is misuse and could result in death or serious injury. Use of current ASSEMBLY WARNING: Do not use this product. Any such alteration or modification is not completely assembled or if any parts are intended...
Operation Manual
Page 4
... them clear to allow proper ventilation. Charge time is approximately 1 hour, and is dependent upon the type of battery pack. Make sure the power supply is placed on the battery pack engage properly with contacts in the charger. CHARGING A COLD BATTERY PACK A cold battery pack may use this product for service or replacement. APPLICATIONS You may be off . CHARGING...
... them clear to allow proper ventilation. Charge time is approximately 1 hour, and is dependent upon the type of battery pack. Make sure the power supply is placed on the battery pack engage properly with contacts in the charger. CHARGING A COLD BATTERY PACK A cold battery pack may use this product for service or replacement. APPLICATIONS You may be off . CHARGING...

Operation Manual
Page 5
...: When servicing use . Most plastics are susceptible to repeat the conditions a second time by their use only identical replacement parts. Use clean cloths to charge battery pack. STORAGE Always remove the battery pack before storing the charger or any maintenance. OPERATION LED FUNCTION OF CHARGER CHARGER LED INDICATOR BATTERY PACK STATUS RED LED GREEN LED ACTION POWER Without battery pack ON OFF Ready to remove dirt, dust, oil, grease...
...: When servicing use . Most plastics are susceptible to repeat the conditions a second time by their use only identical replacement parts. Use clean cloths to charge battery pack. STORAGE Always remove the battery pack before storing the charger or any maintenance. OPERATION LED FUNCTION OF CHARGER CHARGER LED INDICATOR BATTERY PACK STATUS RED LED GREEN LED ACTION POWER Without battery pack ON OFF Ready to remove dirt, dust, oil, grease...


