
Operation Manual 1
Page 2
... all instructions listed below : Cord Length (Feet) 25' 50' 100' Cord Size (AWG) 16 16 16 NOTE: AWG = American Wire Gauge Do not operate charger with plastic parts. WARNING: Charge only one lithium-ion rechargeable battery at a time. Do not use, store, or charge battery packs or products in locations where the temperature is less than 50°F or more than the plug when...
... all instructions listed below : Cord Length (Feet) 25' 50' 100' Cord Size (AWG) 16 16 16 NOTE: AWG = American Wire Gauge Do not operate charger with plastic parts. WARNING: Charge only one lithium-ion rechargeable battery at a time. Do not use, store, or charge battery packs or products in locations where the temperature is less than 50°F or more than the plug when...
Operation Manual 1
Page 3
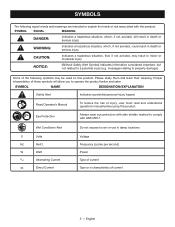
...Frequency (cycles per second) Power Type of current Type or a characteristic of the following signal words and meanings are intended to rain or use in damp locations. ...SYMBOL SIGNAL MEANING DANGER: Indicates a hazardous situation, which , if not avoided, could result in death or serious injury. SYMBOL NAME DESIGNATION/EXPLANATION Safety Alert Indicates a potential personal injury hazard. Wet Conditions Alert Do not expose to explain the levels of injury, user must read and understand operator's manual before using this product. Read Operator's Manual...
...Frequency (cycles per second) Power Type of current Type or a characteristic of the following signal words and meanings are intended to rain or use in damp locations. ...SYMBOL SIGNAL MEANING DANGER: Indicates a hazardous situation, which , if not avoided, could result in death or serious injury. SYMBOL NAME DESIGNATION/EXPLANATION Safety Alert Indicates a potential personal injury hazard. Wet Conditions Alert Do not expose to explain the levels of injury, user must read and understand operator's manual before using this product. Read Operator's Manual...

Operation Manual 1
Page 4
... and charger to prevent possible problems. Therefore, you careless. English Use of a product that is correctly connected. Do not place the charger in an area of the LEDs are lit, remove the battery pack from the charger to modify this product or create accessories or attachments not recommended for electrical check. WARNING: Always wear eye protection...
... and charger to prevent possible problems. Therefore, you careless. English Use of a product that is correctly connected. Do not place the charger in an area of the LEDs are lit, remove the battery pack from the charger to modify this product or create accessories or attachments not recommended for electrical check. WARNING: Always wear eye protection...

Operation Manual 1
Page 5
... begin flashing and the green LED will be replaced. MODE BATTERY PACK RED LED GREEN LED ACTION Power Testing Without battery pack Hot battery pack Cold battery pack Deeply discharged ON Flashing OFF Ready to repeat the conditions a second time by removing and reinstalling the battery pack. Charger pre-charges battery until the battery temperature cools to within acceptable temperature range...
... begin flashing and the green LED will be replaced. MODE BATTERY PACK RED LED GREEN LED ACTION Power Testing Without battery pack Hot battery pack Cold battery pack Deeply discharged ON Flashing OFF Ready to repeat the conditions a second time by removing and reinstalling the battery pack. Charger pre-charges battery until the battery temperature cools to within acceptable temperature range...

Operation Manual 1
Page 6
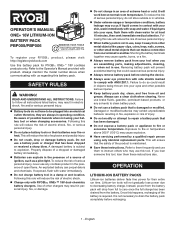
..., petroleumbased products, penetrating oils, etc., come in serious personal injury. WARNING: Do not at any maintenance. GENERAL MAINTENANCE Avoid using solvents when cleaning plastic parts. NOTE: ILLUSTRATIONS START ON PAGE 7 A FTER FRENCH AND SPANISH LANGUAGE SECTIONS. 6 - WARNING: To avoid serious personal injury, always remove the battery pack from various types of any time the charger is unplugged. English MAINTENANCE WARNING: When servicing use .
..., petroleumbased products, penetrating oils, etc., come in serious personal injury. WARNING: Do not at any maintenance. GENERAL MAINTENANCE Avoid using solvents when cleaning plastic parts. NOTE: ILLUSTRATIONS START ON PAGE 7 A FTER FRENCH AND SPANISH LANGUAGE SECTIONS. 6 - WARNING: To avoid serious personal injury, always remove the battery pack from various types of any time the charger is unplugged. English MAINTENANCE WARNING: When servicing use .
Operation Manual 2
Page 2
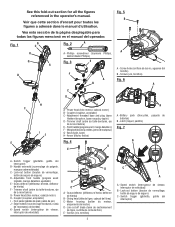
..., acoplador) C - Trimmer shaft (arbre du taille-bordures, eje de la recortadora) E - Arrow (flèche, flecha) Fig. 4 A E B A - Lock-out button (bouton de verrouillage, botón de seguro de seguro) D - Power head (bloc moteur, cabezal motor) H - Motor housing (boîtier du moteur, alojamiento del motor) D - Screws (vis, tornillos) ii C A A - Switch trigger (gâchette, gatillo del interruptor) Fig. 1 B C Fig. 2 A K A - Attachment threaded base and plug (base...
..., acoplador) C - Trimmer shaft (arbre du taille-bordures, eje de la recortadora) E - Arrow (flèche, flecha) Fig. 4 A E B A - Lock-out button (bouton de verrouillage, botón de seguro de seguro) D - Power head (bloc moteur, cabezal motor) H - Motor housing (boîtier du moteur, alojamiento del motor) D - Screws (vis, tornillos) ii C A A - Switch trigger (gâchette, gatillo del interruptor) Fig. 1 B C Fig. 2 A K A - Attachment threaded base and plug (base...

Operation Manual 2
Page 4
... repaired. Disconnect battery pack - Following this rule will operate properly and perform its operation. Keep all safety instructions. Use of eye injury. Protect your finger on the switch trigger or inserting the battery pack into a tool with side shields. Replace string head if cracked, chipped, or damaged in the presence of serious personal injury. Dress Properly - Remove all guards, straps, deflectors and handles...
... repaired. Disconnect battery pack - Following this rule will operate properly and perform its operation. Keep all safety instructions. Use of eye injury. Protect your finger on the switch trigger or inserting the battery pack into a tool with side shields. Replace string head if cracked, chipped, or damaged in the presence of serious personal injury. Dress Properly - Remove all guards, straps, deflectors and handles...

Operation Manual 2
Page 5
... in cutting head. Keep the air vents clean and free of the batteries in a dry, locked place out of the reach of a dropped or damaged battery immediately. Under extreme usage or temperature conditions, battery leakage may cause irritation or burns. Do not use them these instructions. Unit is subject to the eyes or skin. To install any other cutting attachment, for line trimmer use...
... in cutting head. Keep the air vents clean and free of the batteries in a dry, locked place out of the reach of a dropped or damaged battery immediately. Under extreme usage or temperature conditions, battery leakage may cause irritation or burns. Do not use them these instructions. Unit is subject to the eyes or skin. To install any other cutting attachment, for line trimmer use...
Operation Manual 2
Page 6
... Do not install or use any type of injury, user must read and understand operator's manual before using this symbol. Type or a characteristic of current Rotational speed, at least 50 ft. no load Revolutions, strokes, surface speed, orbits etc., per minute Voltage Frequency (cycles per second) Time 4 - ...SYMBOLS The following symbols may be used on this product. SYMBOL NAME DESIGNATION/EXPLANATION Safety Alert Indicates a potential personal injury hazard. Local, state, or federal laws may result in ordinary trash. Risk of batteries in minor or moderate injury....
... Do not install or use any type of injury, user must read and understand operator's manual before using this symbol. Type or a characteristic of current Rotational speed, at least 50 ft. no load Revolutions, strokes, surface speed, orbits etc., per minute Voltage Frequency (cycles per second) Time 4 - ...SYMBOLS The following symbols may be used on this product. SYMBOL NAME DESIGNATION/EXPLANATION Safety Alert Indicates a potential personal injury hazard. Local, state, or federal laws may result in ordinary trash. Risk of batteries in minor or moderate injury....

Operation Manual 2
Page 7
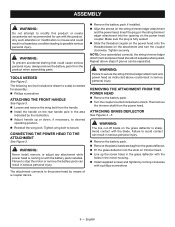
... trimmer includes a grass deflector that delivers higher speed with damaged or missing parts could result in serious personal injury. 5 - HANDLE OVERMOLD Handle overmold provides added user comfort. n Inspect the product carefully to the product by rotating the line cutoff blade. PACKING LIST Power Head Adjustable Front Handle String Trimmer/Edger Attachment Grass Deflector Operator's Manual WARNING: If any accessories from 11 in two different positions for more stable cutting performance while edging. EDGER WHEEL The edger wheel...
... trimmer includes a grass deflector that delivers higher speed with damaged or missing parts could result in serious personal injury. 5 - HANDLE OVERMOLD Handle overmold provides added user comfort. n Inspect the product carefully to the product by rotating the line cutoff blade. PACKING LIST Power Head Adjustable Front Handle String Trimmer/Edger Attachment Grass Deflector Operator's Manual WARNING: If any accessories from 11 in two different positions for more stable cutting performance while edging. EDGER WHEEL The edger wheel...
Operation Manual 2
Page 8
... remove the wing bolt from the product when assembling parts. Make sure the plug is running or with the blade. Repeat above could cause serious personal injury, always remove the battery pack from the handle. n Install the handle on trimmer head. Line up the screw holes in the grass deflector with the holes in serious personal injury. Then remove the trimmer shaft from the grass deflector. Fit the grass...
... remove the wing bolt from the product when assembling parts. Make sure the plug is running or with the blade. Repeat above could cause serious personal injury, always remove the battery pack from the handle. n Install the handle on trimmer head. Line up the screw holes in the grass deflector with the holes in serious personal injury. Then remove the trimmer shaft from the grass deflector. Fit the grass...
Operation Manual 2
Page 9
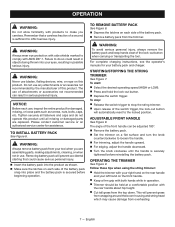
... handle downward. Turn the knob clockwise until all fasteners and caps and do so could cause serious personal injury. Insert the battery pack into the product as screws, nuts, bolts, caps, etc. TO INSTALL BATTERY PACK See Figure 6. OPERATING THE TRIMMER See Figure 9. To start: Select the desired operating speed (HIGH or LOW). Press and hold the lock-out button. Depress the switch trigger...
... handle downward. Turn the knob clockwise until all fasteners and caps and do so could cause serious personal injury. Insert the battery pack into the product as screws, nuts, bolts, caps, etc. TO INSTALL BATTERY PACK See Figure 6. OPERATING THE TRIMMER See Figure 9. To start: Select the desired operating speed (HIGH or LOW). Press and hold the lock-out button. Depress the switch trigger...
Operation Manual 2
Page 10
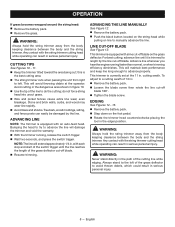
... and start of the switch trigger until it is currently set at the operator. To adjust to do not force string head into uncut grass. Wire and picket fences cause extra line wear, even breakage. WARNING: Always hold the string trimmer away from the body keeping clearance between the body and the string trimmer. LINE CUT-OFF BLADE See Figure 13. cutting swath. Advance line whenever you hear the engine running...
... and start of the switch trigger until it is currently set at the operator. To adjust to do not force string head into uncut grass. Wire and picket fences cause extra line wear, even breakage. WARNING: Always hold the string trimmer away from the body keeping clearance between the body and the string trimmer. LINE CUT-OFF BLADE See Figure 13. cutting swath. Advance line whenever you hear the engine running...

Operation Manual 2
Page 11
... pushing down until all missing or damaged parts are susceptible to remove dirt, dust, oil, grease, etc. GENERAL MAINTENANCE Avoid using solvents when cleaning plastic parts. SPOOL REPLACEMENT See Figure 16. diameter twisted line. Make sure the end of the line is captured in . LINE REPLACEMENT See Figures 16 - 17. Remove the battery pack. Remove the spool from various types of commercial solvents and may be at...
... pushing down until all missing or damaged parts are susceptible to remove dirt, dust, oil, grease, etc. GENERAL MAINTENANCE Avoid using solvents when cleaning plastic parts. SPOOL REPLACEMENT See Figure 16. diameter twisted line. Make sure the end of the line is captured in . LINE REPLACEMENT See Figures 16 - 17. Remove the battery pack. Remove the spool from various types of commercial solvents and may be at...
Operation Manual 2
Page 12
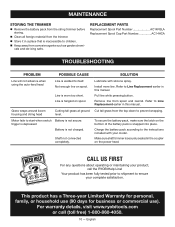
... call the RYOBI Help Line! To secure the battery pack, make sure the latch on spool. Install more line. MAINTENANCE STORING THE TRIMMER Remove the battery pack from the string trimmer before storing. Clean all foreign material from the trimmer. Store it in a place that is inaccessible to start when switch Battery is not secure. Grass wraps around boom housing and string head Cutting tall grass at ground level. cals and...
... call the RYOBI Help Line! To secure the battery pack, make sure the latch on spool. Install more line. MAINTENANCE STORING THE TRIMMER Remove the battery pack from the string trimmer before storing. Clean all foreign material from the trimmer. Store it in a place that is inaccessible to start when switch Battery is not secure. Grass wraps around boom housing and string head Cutting tall grass at ground level. cals and...
Operation Manual 2
Page 1
... these instructions also. OPERATION LITHIUM-ION BATTERY PACKS Lithium-ion batteries deliver fade free power for RYOBI™ ONE+™ 18V cordless products only. therefore, they are assembling parts, making adjustments, cleaning, or when not in contact with your tool when you loan someone this happens, recharging of possible hazards when not using only identical replacement parts. Damaged or modified batteries may occur. Instead, power from oil and grease...
... these instructions also. OPERATION LITHIUM-ION BATTERY PACKS Lithium-ion batteries deliver fade free power for RYOBI™ ONE+™ 18V cordless products only. therefore, they are assembling parts, making adjustments, cleaning, or when not in contact with your tool when you loan someone this happens, recharging of possible hazards when not using only identical replacement parts. Damaged or modified batteries may occur. Instead, power from oil and grease...

Operation Manual 2
Page 2
... reset and resume operation. CHARGE LEVEL INDICATOR BUTTON BATTERIES These batteries have been designed to destroy or disassemble battery pack or remove any of its components. CHARGE LEVEL INDICATOR Fig. 1 „ Charge the battery pack only with the recommended charger. „ Refer to 14°F. Do not attempt to provide maximum trouble-free life. SAVE THESE INSTRUCTIONS 2 - When the battery pack warms...
... reset and resume operation. CHARGE LEVEL INDICATOR BUTTON BATTERIES These batteries have been designed to destroy or disassemble battery pack or remove any of its components. CHARGE LEVEL INDICATOR Fig. 1 „ Charge the battery pack only with the recommended charger. „ Refer to 14°F. Do not attempt to provide maximum trouble-free life. SAVE THESE INSTRUCTIONS 2 - When the battery pack warms...

Parts Diagram
Page 1
Always mention this information in all communications regarding this product and when ordering parts. 4-14-22 (Rev:09) P2008 MFG. Box 1288, Anderson, SC 29622 1-800-525-2579 www.ryobitools.com The model number and manufacturing location will be found on a label attached to the product. NO. 107268001 18 Volt String Trimmer/Edger P2008VNM 107268101 TTI OUTDOOR POWER EQUIPMENT, INC. P.O. REPAIR SHEET BRAND RYOBI DESCRIPTION MODEL NO.
Always mention this information in all communications regarding this product and when ordering parts. 4-14-22 (Rev:09) P2008 MFG. Box 1288, Anderson, SC 29622 1-800-525-2579 www.ryobitools.com The model number and manufacturing location will be found on a label attached to the product. NO. 107268001 18 Volt String Trimmer/Edger P2008VNM 107268101 TTI OUTDOOR POWER EQUIPMENT, INC. P.O. REPAIR SHEET BRAND RYOBI DESCRIPTION MODEL NO.
Parts Diagram
Page 3
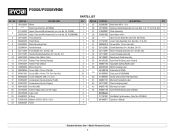
..., 25 & 44) 1 27 310920001 Slider Assembly 1 28 524851002 Spool Base w/Fan 1 29 *** Spool w/Line Assembly (Item No. Key Nos. 36-37) 1 33 351112001 Motor Housing Assembly (Inc. DESCRIPTION QTY. 25 522983007 Knob Bolt (M6 x 1 in.) 1 26 351182001 Auxiliary Handle Assembly (Inc. AC14RL3) 1 30 311747001 Lower Tube Assembly (Inc. P2008/P2008VNM PARTS LIST KEY NO. AC14HCA) 1 311746001 Upper Tube and Wire Assembly (Inc. PART NO. Key No. 21) 1 10...
..., 25 & 44) 1 27 310920001 Slider Assembly 1 28 524851002 Spool Base w/Fan 1 29 *** Spool w/Line Assembly (Item No. Key Nos. 36-37) 1 33 351112001 Motor Housing Assembly (Inc. DESCRIPTION QTY. 25 522983007 Knob Bolt (M6 x 1 in.) 1 26 351182001 Auxiliary Handle Assembly (Inc. AC14RL3) 1 30 311747001 Lower Tube Assembly (Inc. P2008/P2008VNM PARTS LIST KEY NO. AC14HCA) 1 311746001 Upper Tube and Wire Assembly (Inc. PART NO. Key No. 21) 1 10...
Parts Diagram
Page 4
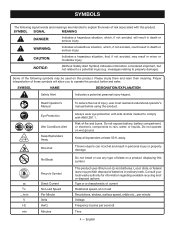
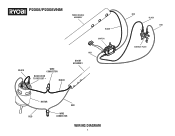
P2008/P2008VNM POWER HANDLE ASSEMBLY BLACK SWITCH BLACK WIRE CONNECTOR BLACK LEAD TO RED DOT • BLACK RED BOOM ASSEMBLY MOTOR RED WIRE RED CONNECTOR WIRING DIAGRAM 4 RED - BLACK RED + CONTACT PLATE
P2008/P2008VNM POWER HANDLE ASSEMBLY BLACK SWITCH BLACK WIRE CONNECTOR BLACK LEAD TO RED DOT • BLACK RED BOOM ASSEMBLY MOTOR RED WIRE RED CONNECTOR WIRING DIAGRAM 4 RED - BLACK RED + CONTACT PLATE


