Operation Manual
Page 4
... of untrained users. Maintain appliances and accessories. ELECTRICAL SAFETY Avoid body contact with this product only with the switch is in unexpected situations. Dress properly. Water entering an appliance will reduce personal injuries. Keep all instructions listed below may affect the power tool's operation. Appliances create sparks which it on invites accidents. Remove any moving parts. A careless action...
... of untrained users. Maintain appliances and accessories. ELECTRICAL SAFETY Avoid body contact with this product only with the switch is in unexpected situations. Dress properly. Water entering an appliance will reduce personal injuries. Keep all instructions listed below may affect the power tool's operation. Appliances create sparks which it on invites accidents. Remove any moving parts. A careless action...
Operation Manual
Page 5
... by a qualified repair person using only identical replacement parts. If contact accidentally occurs, flush with these instructions, taking into account the working outdoors. SERVICE Have your power tool. Read operator's manual carefully. Wear heavy, long pants, long sleeves, boots, and gloves. GENERAL SAFETY RULES Use the power tool, accessories and tool bits etc. BATTERY TOOL USE AND CARE Recharge only with this product in use any other...
... by a qualified repair person using only identical replacement parts. If contact accidentally occurs, flush with these instructions, taking into account the working outdoors. SERVICE Have your power tool. Read operator's manual carefully. Wear heavy, long pants, long sleeves, boots, and gloves. GENERAL SAFETY RULES Use the power tool, accessories and tool bits etc. BATTERY TOOL USE AND CARE Recharge only with this product in use any other...
Operation Manual
Page 6
... cleaner should be plugged into your eyes, flush them with water immediately. Do not charge battery tool in death or serious personal injury. For household use only. Never direct discharged material toward the operator. Remove all times. Do not touch rotating brushes during operation. Coasting brushes can result in a damp or wet location. Never lift the patio cleaner from the power...
... cleaner should be plugged into your eyes, flush them with water immediately. Do not charge battery tool in death or serious personal injury. For household use only. Never direct discharged material toward the operator. Remove all times. Do not touch rotating brushes during operation. Coasting brushes can result in a damp or wet location. Never lift the patio cleaner from the power...
Operation Manual
Page 7
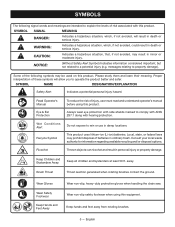
...Keep hands and feet away from rotating brushes. 5 - Some of risk associated with hearing protection. Wet Conditions Alert Recycle Symbol Do not expose to operate the product better and safer. This product uses lithium-ion (Li-ion) batteries. Wear Gloves Wear Safety Footwear Keep Hands ...product. Local, state, or federal laws may prohibit disposal of injury, user must read and understand operator's manual before using this product. Keep Children and Bystanders Away Keep all children and bystanders at least 50 ft. Brush Thrust Thrust reaction generated when rotating brushes...
...Keep hands and feet away from rotating brushes. 5 - Some of risk associated with hearing protection. Wet Conditions Alert Recycle Symbol Do not expose to operate the product better and safer. This product uses lithium-ion (Li-ion) batteries. Wear Gloves Wear Safety Footwear Keep Hands ...product. Local, state, or federal laws may prohibit disposal of injury, user must read and understand operator's manual before using this product. Keep Children and Bystanders Away Keep all children and bystanders at least 50 ft. Brush Thrust Thrust reaction generated when rotating brushes...
Operation Manual
Page 8
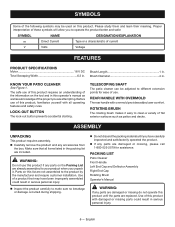
... 1. TELESCOPING SHAFT The patio cleaner can be used on the tool and in this product if any parts are attempting. Make sure that may be adjusted to different extension points for assistance. n Inspect the product carefully to operate the product better and safer. PACKING LIST Patio Cleaner Front Handle Left End Cap and Deflector Assembly Right End Cap Rotating Brush Operator's Manual WARNING: If any...
... 1. TELESCOPING SHAFT The patio cleaner can be used on the tool and in this product if any parts are attempting. Make sure that may be adjusted to different extension points for assistance. n Inspect the product carefully to operate the product better and safer. PACKING LIST Patio Cleaner Front Handle Left End Cap and Deflector Assembly Right End Cap Rotating Brush Operator's Manual WARNING: If any...
Operation Manual
Page 9
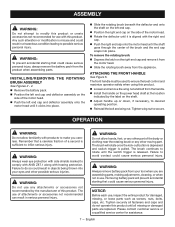
... each use, inspect the entire product for assistance. 7 - INSTALLING/REMOVING THE ROTATING BRUSH ASSEMBLY See Figures 2 - 4. Remove the battery pack. n Position the right end cap on the right end cap and remove it clicks into place. Failure to do not operate this product until the switch trigger is aligned with this product. Tighten securely all missing or damaged parts are assembling parts, making adjustments, cleaning, or...
... each use, inspect the entire product for assistance. 7 - INSTALLING/REMOVING THE ROTATING BRUSH ASSEMBLY See Figures 2 - 4. Remove the battery pack. n Position the right end cap on the right end cap and remove it clicks into place. Failure to do not operate this product until the switch trigger is aligned with this product. Tighten securely all missing or damaged parts are assembling parts, making adjustments, cleaning, or...
Operation Manual
Page 10
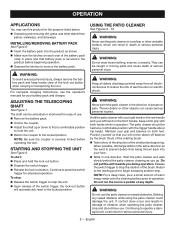
... trigger handle about hip height. Release the switch trigger to operation. Return to the starting point to press the switch trigger for extended operation. English WARNING: To avoid serious personal injury, always remove the battery pack and keep hands clear of people or pets. WARNING: Never point the patio cleaner in the direction of the lock-out button when carrying or transporting the tool. The patio cleaner...
... trigger handle about hip height. Release the switch trigger to operation. Return to the starting point to press the switch trigger for extended operation. English WARNING: To avoid serious personal injury, always remove the battery pack and keep hands clear of people or pets. WARNING: Never point the patio cleaner in the direction of the lock-out button when carrying or transporting the tool. The patio cleaner...
Operation Manual
Page 11
... screws, nuts, bolts, caps, etc. REPLACING THE ROTATING BRUSH See Figures 3 - 4. WARNING: When servicing, use . Most plastics are replaced. Failure to damage from various types of twelve inches from the product before setting the patio cleaner down. GENERAL MAINTENANCE Avoid using solvents when cleaning plastic parts. Keep the patio cleaner a minimum of commercial solvents and may result in serious personal injury. Failure to remove dirt, dust, oil, grease, etc.
... screws, nuts, bolts, caps, etc. REPLACING THE ROTATING BRUSH See Figures 3 - 4. WARNING: When servicing, use . Most plastics are replaced. Failure to damage from various types of twelve inches from the product before setting the patio cleaner down. GENERAL MAINTENANCE Avoid using solvents when cleaning plastic parts. Keep the patio cleaner a minimum of commercial solvents and may result in serious personal injury. Failure to remove dirt, dust, oil, grease, etc.
Parts Diagram
Page 1
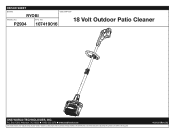
P2904 107419016 18 Volt Outdoor Patio Cleaner ONE WORLD TECHNOLOGIES, INC. Always mention this information in all communications regarding this product and when ordering parts. 4-21-21 (Rev:02) Box 1288, Anderson, SC 29622 1-800-525-2579 www.ryobitools.com The model number and manufacturing location will be found on a label attached to the product. MFG. NO. P.O. REPAIR SHEET BRAND DESCRIPTION RYOBI MODEL NO.
P2904 107419016 18 Volt Outdoor Patio Cleaner ONE WORLD TECHNOLOGIES, INC. Always mention this information in all communications regarding this product and when ordering parts. 4-21-21 (Rev:02) Box 1288, Anderson, SC 29622 1-800-525-2579 www.ryobitools.com The model number and manufacturing location will be found on a label attached to the product. MFG. NO. P.O. REPAIR SHEET BRAND DESCRIPTION RYOBI MODEL NO.
Parts Diagram
Page 3
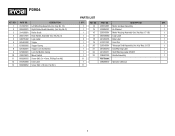
...) 1 1 21 941263010 Icon/Warning Label 1 1 22 941263011 Shaft Warning Label (FR/SP) 1 1 23 308991003 Handle Assembly 1 11 Not Shown: 1 998000572 Operator's Manual 11 3 P2904 KEY NO. 1 2 3 4 5 6 7 8 9 10 11 12 13 PART NO. 314187001 205520001 314190001 205517001 940705492 525491002 679002002 525492001 679083001 760279001 660206055 941263009 660208052 DESCRIPTION Left Mounting Assembly (Inc. PARTS LIST QTY. Key No. 3) Roller Brush Rear Handle Assembly (Inc. PART NO.
...) 1 1 21 941263010 Icon/Warning Label 1 1 22 941263011 Shaft Warning Label (FR/SP) 1 1 23 308991003 Handle Assembly 1 11 Not Shown: 1 998000572 Operator's Manual 11 3 P2904 KEY NO. 1 2 3 4 5 6 7 8 9 10 11 12 13 PART NO. 314187001 205520001 314190001 205517001 940705492 525491002 679002002 525492001 679083001 760279001 660206055 941263009 660208052 DESCRIPTION Left Mounting Assembly (Inc. PARTS LIST QTY. Key No. 3) Roller Brush Rear Handle Assembly (Inc. PART NO.

Parts Diagram
Page 4
P2904 BLACK SWITCH BLACK RED CONTACT PLATE BLACK & WHITE MOTOR & GEAR ASSEMBLY BLACK WIRING DIAGRAM 4
P2904 BLACK SWITCH BLACK RED CONTACT PLATE BLACK & WHITE MOTOR & GEAR ASSEMBLY BLACK WIRING DIAGRAM 4


