

Operation Manual
Page 2
... Other types of batteries may use . WARNING: Do not charge a battery that is in any maintenance or cleaning to instruct others who may burst, causing personal injury or damage. 2 - If cord or charger is damaged, have the charger replaced by an authorized serviceman. Make sure cord is required. Use of electric shock or damage to an authorized serviceman when service or repair is located...
... Other types of batteries may use . WARNING: Do not charge a battery that is in any maintenance or cleaning to instruct others who may burst, causing personal injury or damage. 2 - If cord or charger is damaged, have the charger replaced by an authorized serviceman. Make sure cord is required. Use of electric shock or damage to an authorized serviceman when service or repair is located...

Operation Manual
Page 3
... Frequency (cycles per second) Power Type of current Type or a characteristic of injury, user must read and understand operator's manual before using this product. CAUTION: Indicates a hazardous situation, that is misuse and could result in a hazardous condition leading to rain, water or liquids. Read Operator's Manual To reduce the risk of current ASSEMBLY WARNING: Do not use with this product. WARNING: Do not attempt...
... Frequency (cycles per second) Power Type of current Type or a characteristic of injury, user must read and understand operator's manual before using this product. CAUTION: Indicates a hazardous situation, that is misuse and could result in a hazardous condition leading to rain, water or liquids. Read Operator's Manual To reduce the risk of current ASSEMBLY WARNING: Do not use with this product. WARNING: Do not attempt...
Operation Manual
Page 4
... into your nearest repair center for service or replacement. CHARGING A HOT BATTERY PACK When using a tool continuously, the battery pack may be sure contacts on the charger, the red LED will begin flashing and the green LED will automatically begin charging. 4 - DO NOT insert another battery. KEY HOLE HANGER See Figure 1, page 6. Battery packs are lit, remove the battery pack from the...
... into your nearest repair center for service or replacement. CHARGING A HOT BATTERY PACK When using a tool continuously, the battery pack may be sure contacts on the charger, the red LED will begin flashing and the green LED will automatically begin charging. 4 - DO NOT insert another battery. KEY HOLE HANGER See Figure 1, page 6. Battery packs are lit, remove the battery pack from the...

Operation Manual
Page 5
... remove the battery pack from various types of commercial solvents and may be replaced. OPERATION LED FUNCTION OF CHARGER CHARGER LED INDICATOR BATTERY PACK STATUS RED LED GREEN LED ACTION POWER Without battery pack ON OFF Ready to remove dirt, dust, oil, grease, etc. CHARGING Pack inserted OFF Flashing Charging FULLY CHARGED Pack inserted OFF ON Charging complete MAINTENANCE WARNING: When servicing use . Use clean cloths to charge battery...
... remove the battery pack from various types of commercial solvents and may be replaced. OPERATION LED FUNCTION OF CHARGER CHARGER LED INDICATOR BATTERY PACK STATUS RED LED GREEN LED ACTION POWER Without battery pack ON OFF Ready to remove dirt, dust, oil, grease, etc. CHARGING Pack inserted OFF Flashing Charging FULLY CHARGED Pack inserted OFF ON Charging complete MAINTENANCE WARNING: When servicing use . Use clean cloths to charge battery...
Operation Manual 1
Page 2
... plug or product with charger listed. Keep proper footing and balance at all parts of possible hazards when using the product or when changing accessories. „ Use battery only with wet hands. „ Use extra care when using an electrical appliance, basic precautions should always be caught in operating condition. Close attention is necessary when used for its intended use , keep it away from moving parts, remove battery pack before connecting to power...
... plug or product with charger listed. Keep proper footing and balance at all parts of possible hazards when using the product or when changing accessories. „ Use battery only with wet hands. „ Use extra care when using an electrical appliance, basic precautions should always be caught in operating condition. Close attention is necessary when used for its intended use , keep it away from moving parts, remove battery pack before connecting to power...
Operation Manual 1
Page 3
... with specifically designated battery packs. They contain chemicals that are recommended by a qualified repair person using . Refer to fire or temperature above 265°F may use this product. Exposure to them frequently and use , store or charge battery packs or products in locations where the temperature is dusty. English Accessories that is maintained. „ This product contains no serviceable parts. „ Save these instructions...
... with specifically designated battery packs. They contain chemicals that are recommended by a qualified repair person using . Refer to fire or temperature above 265°F may use this product. Exposure to them frequently and use , store or charge battery packs or products in locations where the temperature is dusty. English Accessories that is maintained. „ This product contains no serviceable parts. „ Save these instructions...
Operation Manual 1
Page 4
... of injury from moving parts, remove battery pack before servicing. „ Save these instructions also. 4 - POWER SCRUBBER SAFETY WARNINGS „ Know your battery tool or when changing accessories. Following this tool. Do not use any cordless product in use this rule will reduce the risk of a dropped or damaged battery immediately. „ Batteries can propel debris and chemicals. Properly dispose of electric shock, fire, or serious...
... of injury from moving parts, remove battery pack before servicing. „ Save these instructions also. 4 - POWER SCRUBBER SAFETY WARNINGS „ Know your battery tool or when changing accessories. Following this tool. Do not use any cordless product in use this rule will reduce the risk of a dropped or damaged battery immediately. „ Batteries can propel debris and chemicals. Properly dispose of electric shock, fire, or serious...
Operation Manual 1
Page 5
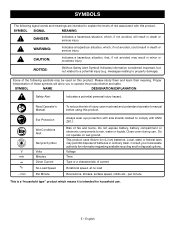
...Alert Indicates a potential personal injury hazard. Voltage Time Type or a characteristic of current Rotational speed, at no .../min Eye Protection Wet Conditions Alert Recycle Symbol Volts Minutes Direct Current No Load Speed Per Minute Always wear eye protection with side shields marked...during use . 5 - Local, state or federal laws may result in death or serious injury. Read Operator's Manual To reduce the risk of fire and burns. Risk of injury, user must read and understand operator's manual before using this product. SYMBOLS The following symbols may be used on wet ground...
...Alert Indicates a potential personal injury hazard. Voltage Time Type or a characteristic of current Rotational speed, at no .../min Eye Protection Wet Conditions Alert Recycle Symbol Volts Minutes Direct Current No Load Speed Per Minute Always wear eye protection with side shields marked...during use . 5 - Local, state or federal laws may result in death or serious injury. Read Operator's Manual To reduce the risk of fire and burns. Risk of injury, user must read and understand operator's manual before using this product. SYMBOLS The following symbols may be used on wet ground...
Operation Manual 1
Page 6
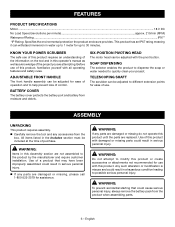
... ease of operation and to quickly clean your project. ASSEMBLY UNPACKING This product requires assembly. „ Carefully remove the tool and any accessories from the product when assembling parts. 6 - Use of control. SOAP DISPENSING The selector enables the product to dispense the soap or water needed to help prevent loss of a product that could result in water up to possible serious personal injury. WARNING: To prevent accidental starting that...
... ease of operation and to quickly clean your project. ASSEMBLY UNPACKING This product requires assembly. „ Carefully remove the tool and any accessories from the product when assembling parts. 6 - Use of control. SOAP DISPENSING The selector enables the product to dispense the soap or water needed to help prevent loss of a product that could result in water up to possible serious personal injury. WARNING: To prevent accidental starting that...
Operation Manual 1
Page 7
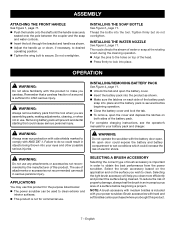
... into place. The nozzle directs the stream of water or soap at the rotating brush during the cleaning operation. „ Align the pins to the holes on both sides of electric shock. For complete charging instructions, see the operator's manuals for commercial use of a surface before beginning operation. „ Close the battery cover and lock the tab. „ To remove, open . An open the battery cover. „ Insert...
... into place. The nozzle directs the stream of water or soap at the rotating brush during the cleaning operation. „ Align the pins to the holes on both sides of electric shock. For complete charging instructions, see the operator's manuals for commercial use of a surface before beginning operation. „ Close the battery cover and lock the tab. „ To remove, open . An open the battery cover. „ Insert...
Operation Manual 1
Page 8
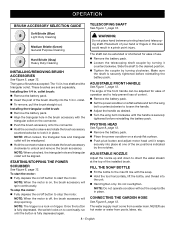
... reinstalling the battery pack. The types of your hand or fingers in this area could result in . English Slide the shaft to continually run until the handle is a lock-on a sturdy flat surface. „ Push pivot button and adjust motor head until it counterclockwise. NOTE: When unlocked, the triangular hole and triangular collet will stop the motor. OPERATION BRUSH ACCESSORY SELECTION GUIDE TELESCOPING...
... reinstalling the battery pack. The types of your hand or fingers in this area could result in . English Slide the shaft to continually run until the handle is a lock-on a sturdy flat surface. „ Push pivot button and adjust motor head until it counterclockwise. NOTE: When unlocked, the triangular hole and triangular collet will stop the motor. OPERATION BRUSH ACCESSORY SELECTION GUIDE TELESCOPING...
Operation Manual 1
Page 9
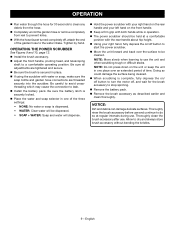
.... „ If using the scrubber with the rear handle about hip height. „ Using your left hand on / off button to turn the motor off, and wait for 30 seconds to clean any debris from the hose. „ Completely uncoil the garden hose or remove completely from reel to prevent kinks. „ With the hose faucet turned completely off button to start the power scrubber. „...
.... „ If using the scrubber with the rear handle about hip height. „ Using your left hand on / off button to turn the motor off, and wait for 30 seconds to clean any debris from the hose. „ Completely uncoil the garden hose or remove completely from reel to prevent kinks. „ With the hose faucet turned completely off button to start the power scrubber. „...
Operation Manual 1
Page 10
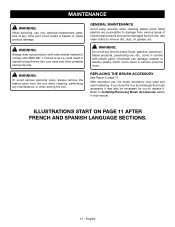
... to remove dirt, dust, oil, grease, etc. If you to Installing/Removing Brush Accessories earlier in contact with ANSI Z87.1. Refer to replace it may wear and need replacing. After extended use, the brush accessory may also be damaged by their use only identical replacement parts. Failure to damage from the tool when cleaning, performing any maintenance, or when storing the tool. GENERAL MAINTENANCE Avoid using solvents when cleaning plastic parts. REPLACING THE BRUSH...
... to remove dirt, dust, oil, grease, etc. If you to Installing/Removing Brush Accessories earlier in contact with ANSI Z87.1. Refer to replace it may wear and need replacing. After extended use, the brush accessory may also be damaged by their use only identical replacement parts. Failure to damage from the tool when cleaning, performing any maintenance, or when storing the tool. GENERAL MAINTENANCE Avoid using solvents when cleaning plastic parts. REPLACING THE BRUSH...
Parts Diagram
Page 1
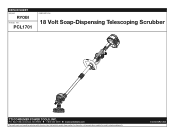
PCL1701 DESCRIPTION 18 Volt Soap-Dispensing Telescoping Scrubber TTI CONSUMER POWER TOOLS, INC. Box 1288, Anderson, SC 29622 1-800-525-2579 www.ryobitools.com The model number and manufacturing location will be found on a label attached to the product. Always mention this information in all communications regarding this product and when ordering parts. 3-22-23 (Rev:02) P.O. REPAIR SHEET BRAND RYOBI MODEL NO.
PCL1701 DESCRIPTION 18 Volt Soap-Dispensing Telescoping Scrubber TTI CONSUMER POWER TOOLS, INC. Box 1288, Anderson, SC 29622 1-800-525-2579 www.ryobitools.com The model number and manufacturing location will be found on a label attached to the product. Always mention this information in all communications regarding this product and when ordering parts. 3-22-23 (Rev:02) P.O. REPAIR SHEET BRAND RYOBI MODEL NO.
Parts Diagram
Page 3
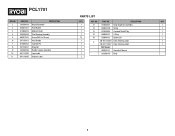
PART NO. PART NO. PCL1701 PARTS LIST KEY NO. KEY NO. DESCRIPTION QTY. 1 204284004 Nozzle Assembly 1 12 319336001 Soap Dispenser Assembly 1 2 545501001 Pivot Button 1 13 906001028 String 1 3 315865003 Medium Brush 1 14 918003645 Overload Shutoff Tag 1 4 204284005 Pivot Housing Assembly 1 15 566484001 O-Ring 1 5 663007002 Screw (M3.5 x 16 mm) 13 16 545494001 Battery Lid 1 6 547150001 Assit Handle 7 674092002 Cap Bolt Pin 1 CN-941124225 Data / Warning...
PART NO. PART NO. PCL1701 PARTS LIST KEY NO. KEY NO. DESCRIPTION QTY. 1 204284004 Nozzle Assembly 1 12 319336001 Soap Dispenser Assembly 1 2 545501001 Pivot Button 1 13 906001028 String 1 3 315865003 Medium Brush 1 14 918003645 Overload Shutoff Tag 1 4 204284005 Pivot Housing Assembly 1 15 566484001 O-Ring 1 5 663007002 Screw (M3.5 x 16 mm) 13 16 545494001 Battery Lid 1 6 547150001 Assit Handle 7 674092002 Cap Bolt Pin 1 CN-941124225 Data / Warning...


