

User Manual (user Manual) (ver.1.0) (English)
Page 3
... 8 Adjusting Your LCD Monitor 9 User Controls 9 Automatic Save 10 Direct-Access Features 10 Brightness 10 Auto Adjustment 11 OSD Lock/Unlock 11 On-Screen Menu System (OSD 12 Accessing the Menu System 12 Appendix 16 PowerSaver 16 Troubleshooting 17 Specifications 19 Pin Assignments 20 Display Modes 21 Changing the Stand 22 Removing the Stand 22 Attaching an Arm-Type Stand or Wall Mount Hanger 23 Maintenance of Your LCD Monitor 23 Regulatory Information See back of Manual English 1
... 8 Adjusting Your LCD Monitor 9 User Controls 9 Automatic Save 10 Direct-Access Features 10 Brightness 10 Auto Adjustment 11 OSD Lock/Unlock 11 On-Screen Menu System (OSD 12 Accessing the Menu System 12 Appendix 16 PowerSaver 16 Troubleshooting 17 Specifications 19 Pin Assignments 20 Display Modes 21 Changing the Stand 22 Removing the Stand 22 Attaching an Arm-Type Stand or Wall Mount Hanger 23 Maintenance of Your LCD Monitor 23 Regulatory Information See back of Manual English 1

User Manual (user Manual) (ver.1.0) (English)
Page 4
... shock, never touch the inside of the LCD Monitor. Safety Instructions 1 Before connecting the AC power cord to the DC adapter outlet, make sure the voltage designation of the DC adapter corresponds to the local electrical supply. 2 Never insert anything to rest on the power cord, and keep it away from heaters, stoves, fireplaces, and other sources of heat. 13 Unplug the LCD Monitor when it is...
... shock, never touch the inside of the LCD Monitor. Safety Instructions 1 Before connecting the AC power cord to the DC adapter outlet, make sure the voltage designation of the DC adapter corresponds to the local electrical supply. 2 Never insert anything to rest on the power cord, and keep it away from heaters, stoves, fireplaces, and other sources of heat. 13 Unplug the LCD Monitor when it is...

User Manual (user Manual) (ver.1.0) (English)
Page 6
...;ection from lights or windows, usually at a right angle to secure your monitor using a Kensington-type security device. Kensington-type security slot location English 4 Monitor location Choose a position that the top of the screen is slightly below before you install your monitor. Figure 2. Workstation height Place your LCD Monitor so that exposes you the opportunity to any window. Refer to a comfortable viewing position. Setting up your LCD Monitor Setting up...
...;ection from lights or windows, usually at a right angle to secure your monitor using a Kensington-type security device. Kensington-type security slot location English 4 Monitor location Choose a position that the top of the screen is slightly below before you install your monitor. Figure 2. Workstation height Place your LCD Monitor so that exposes you the opportunity to any window. Refer to a comfortable viewing position. Setting up your LCD Monitor Setting up...

User Manual (user Manual) (ver.1.0) (English)
Page 7
.... 5 Turn on page 7. English 5 Determine which connection method(s) you need and refer to the instructions below. 2 4 3 Figure 3. If your monitor displays an image, installation is complete. 6 Perform the auto adjustment procedure as described in "Auto Adjustment" on your computer and monitor. Italiano Portuguese Deutsch Español Français English Setting up your LCD Monitor Connecting Your LCD Monitor This monitor offers a method for your monitor to the power port on the power adapter. 4 Plug the power cords of signal cables...
.... 5 Turn on page 7. English 5 Determine which connection method(s) you need and refer to the instructions below. 2 4 3 Figure 3. If your monitor displays an image, installation is complete. 6 Perform the auto adjustment procedure as described in "Auto Adjustment" on your computer and monitor. Italiano Portuguese Deutsch Español Français English Setting up your LCD Monitor Connecting Your LCD Monitor This monitor offers a method for your monitor to the power port on the power adapter. 4 Plug the power cords of signal cables...

User Manual (user Manual) (ver.1.0) (English)
Page 8
.... 7 Turn on your computer and unplug its power cord. 2 Connect the signal cable to the power port on the power adapter. 4 Secure the power adapter cord and the signal cable(s) under the metal prong. 5 Insert the tab on page 7. English 6 If your monitor displays an image, installation is complete. 8 Perform the auto adjustment procedure as described in "Auto Adjustment" on each side of the hinge cover (b) then attach the stand of the monitor. 6 Plug the power cords of your LCD Monitor (b) (a) (1) Figure...
.... 7 Turn on your computer and unplug its power cord. 2 Connect the signal cable to the power port on the power adapter. 4 Secure the power adapter cord and the signal cable(s) under the metal prong. 5 Insert the tab on page 7. English 6 If your monitor displays an image, installation is complete. 8 Perform the auto adjustment procedure as described in "Auto Adjustment" on each side of the hinge cover (b) then attach the stand of the monitor. 6 Plug the power cords of your LCD Monitor (b) (a) (1) Figure...

User Manual (user Manual) (ver.1.0) (English)
Page 9
... Français English Setting up your LCD Monitor Getting Help If your monitor does not display an image, check your cable connections and refer to "Troubleshooting" on your computer and monitor. 2 Push the AUTO button to open the Auto Adjustment OSD. 3 The screen will optimize the display settings for use with the quality of the new VESA® Plug and Play solution eliminates complicated and time consuming setup. It allows you may notice small changes to the screen image.
... Français English Setting up your LCD Monitor Getting Help If your monitor does not display an image, check your cable connections and refer to "Troubleshooting" on your computer and monitor. 2 Push the AUTO button to open the Auto Adjustment OSD. 3 The screen will optimize the display settings for use with the quality of the new VESA® Plug and Play solution eliminates complicated and time consuming setup. It allows you may notice small changes to the screen image.

User Manual (user Manual) (ver.1.0) (English)
Page 10
Failure of any of the computer. 3 Turn on the monitor. your monitor is blinking, run the monitor self-test by performing the following illustration: No Connection Check Signal Cable Figure 5. English 8 If the monitor is functioning properly. If your monitor screen remains blank after using the previous procedure, check your video controller and computer system; If your monitor and computer are red, green and blue. This box also appears during normal operation...
Failure of any of the computer. 3 Turn on the monitor. your monitor is blinking, run the monitor self-test by performing the following illustration: No Connection Check Signal Cable Figure 5. English 8 If the monitor is functioning properly. If your monitor screen remains blank after using the previous procedure, check your video controller and computer system; If your monitor and computer are red, green and blue. This box also appears during normal operation...

User Manual (user Manual) (ver.1.0) (English)
Page 11
... of the image being displayed. saving modes" on and off (See the section on "Direct-Access Features" on page 10.) 4 MENU s Opens the OSD and sub-menus s Selects the highlighted function s Turns the monitor on page 16.) English 9 All of these buttons to easily adjust the characteristics of the selected function s Directly adjusts the brightness level if pressed while the Brightness OSD is off Power button s Glows green during...
... of the image being displayed. saving modes" on and off (See the section on "Direct-Access Features" on page 10.) 4 MENU s Opens the OSD and sub-menus s Selects the highlighted function s Turns the monitor on page 16.) English 9 All of these buttons to easily adjust the characteristics of the selected function s Directly adjusts the brightness level if pressed while the Brightness OSD is off Power button s Glows green during...

User Manual (user Manual) (ver.1.0) (English)
Page 12
... preload modes, one button. Brightness Brightness 99 Follow these instructions to increase the brightness; The brightness display appears. 2 Push the "+" button to adjust the brightness of one for each signal frequency as listed in "Display Modes" on page 21 If you have made , press the EXIT button before the 2 seconds elapse. Once you have made. Adjusting Your LCD Monitor Automatic Save Whenever you open the on -screen menu disappears and the monitor does not save adjustments...
... preload modes, one button. Brightness Brightness 99 Follow these instructions to increase the brightness; The brightness display appears. 2 Push the "+" button to adjust the brightness of one for each signal frequency as listed in "Display Modes" on page 21 If you have made , press the EXIT button before the 2 seconds elapse. Once you have made. Adjusting Your LCD Monitor Automatic Save Whenever you open the on -screen menu disappears and the monitor does not save adjustments...

User Manual (user Manual) (ver.1.0) (English)
Page 13
... EXIT button. OSD Lock/Unlock Use this function to secure the current settings, while allowing you to Lock or Unlock the controls. The automatic adjustment display appears. 2 Follow the directions previously given on page 7. When locked, a "LOCKED" message displays. English 11 Italiano Portuguese Deutsch Español Français English Adjusting Your LCD Monitor Auto Adjustment Auto Adjustment 25 Follow these instructions to enable or disable the automatic screen adjustments for 5 seconds to adjust the Brightness and Contrast, so...
... EXIT button. OSD Lock/Unlock Use this function to secure the current settings, while allowing you to Lock or Unlock the controls. The automatic adjustment display appears. 2 Follow the directions previously given on page 7. When locked, a "LOCKED" message displays. English 11 Italiano Portuguese Deutsch Español Français English Adjusting Your LCD Monitor Auto Adjustment Auto Adjustment 25 Follow these instructions to enable or disable the automatic screen adjustments for 5 seconds to adjust the Brightness and Contrast, so...

User Manual (user Manual) (ver.1.0) (English)
Page 14
... or push the EXIT button 1 or 2 times to view a complete list of functions represented by that icon. English 12 On-Screen Menu (OSD) Accessing the Menu System 1 With the menu off, push the MENU button to open the menu system and display the main function menu. 2 Push the "-" and "+" buttons to move from the OSD. Adjusting Your LCD Monitor On-Screen Menu System (OSD) Function icons Function name Brightness Setting slidebar 99 Numeric value...
... or push the EXIT button 1 or 2 times to view a complete list of functions represented by that icon. English 12 On-Screen Menu (OSD) Accessing the Menu System 1 With the menu off, push the MENU button to open the menu system and display the main function menu. 2 Push the "-" and "+" buttons to move from the OSD. Adjusting Your LCD Monitor On-Screen Menu System (OSD) Function icons Function name Brightness Setting slidebar 99 Numeric value...

User Manual (user Manual) (ver.1.0) (English)
Page 15
... the Position menu to be unstable and jitters or shimmers. Position moves the viewing area around on the screen. If satisfactory results are not obtained using the Fine adjustment, use the Coarse adjustment and then use Fine again. The color hue is most noticeable in the video signal which causes horizontal lines or areas on the screen where the image appears to center the display image on the monitor screen.
... the Position menu to be unstable and jitters or shimmers. Position moves the viewing area around on the screen. If satisfactory results are not obtained using the Fine adjustment, use the Coarse adjustment and then use Fine again. The color hue is most noticeable in the video signal which causes horizontal lines or areas on the screen where the image appears to center the display image on the monitor screen.
User Manual (user Manual) (ver.1.0) (English)
Page 16
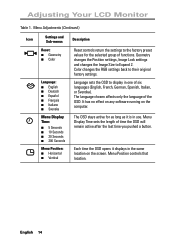
... time you pushed a button. It has no effect on any software running on the screen. Menu Display Time sets the length of the OSD. Each time the OSD opens it is in use. Geometry changes the Position settings, Image Lock settings and changes the Image Size to their original factory settings. Menu Position controls that location. English 14 Color changes the RGB settings back to Expand 2. Menu Adjustments (Continued ) Icon Settings and Sub-menus Description Reset: s Geometry s Color Reset controls return the settings to display in the same...
... time you pushed a button. It has no effect on any software running on the screen. Menu Display Time sets the length of the OSD. Each time the OSD opens it is in use. Geometry changes the Position settings, Image Lock settings and changes the Image Size to their original factory settings. Menu Position controls that location. English 14 Color changes the RGB settings back to Expand 2. Menu Adjustments (Continued ) Icon Settings and Sub-menus Description Reset: s Geometry s Color Reset controls return the settings to display in the same...

User Manual (user Manual) (ver.1.0) (English)
Page 17
... Image Effect optimizes the display for the current signal. Expanded 1 expands the viewing area to use the normal size viewing area for the type of software you are using. Scaling smooths an image which may help the eye to recognize. Select the Normal setting to the full width of the monitor screen. Menu Adjustments (Continued ) Icon Settings and Sub-menus Description Image Size: s Normal s Expanded 1 s Expanded 2 If your computer or video board supplies a signal rate...
... Image Effect optimizes the display for the current signal. Expanded 1 expands the viewing area to use the normal size viewing area for the type of software you are using. Scaling smooths an image which may help the eye to recognize. Select the Normal setting to the full width of the monitor screen. Menu Adjustments (Continued ) Icon Settings and Sub-menus Description Image Size: s Normal s Expanded 1 s Expanded 2 If your computer or video board supplies a signal rate...

User Manual (user Manual) (ver.1.0) (English)
Page 18
... video card installed in power management system called PowerSaver. English 16 PowerSaver operates with VESA DPMS functionality. See Table 2 below for long periods. interval) Less than 5W NOTE: This monitor automatically returns to set up this feature. The available modes are "On", "Standby", "Sleep", and "Deep Sleep". Table 2. Power-saving modes State Horizontal Sync Vertical Sync Video Power Indicator Power Consumption Normal Operation Active Active Active Green 42W (Max.) 40W (Nom.) Power-Saving Function mode...
... video card installed in power management system called PowerSaver. English 16 PowerSaver operates with VESA DPMS functionality. See Table 2 below for long periods. interval) Less than 5W NOTE: This monitor automatically returns to set up this feature. The available modes are "On", "Standby", "Sleep", and "Deep Sleep". Table 2. Power-saving modes State Horizontal Sync Vertical Sync Video Power Indicator Power Consumption Normal Operation Active Active Active Green 42W (Max.) 40W (Nom.) Power-Saving Function mode...

User Manual (user Manual) (ver.1.0) (English)
Page 19
"Video mode not supported" s Check the maximum resolution and the frequency on page 8. Picture is too light or too dark s Adjust the Brightness and Contrast settings. Color is not uniform s Adjust the color settings using the OSD COLOR menu. "No Connection, Check Signal Cable" appears s Check the signal cable connection between the computer and LCD Monitor. s Perform Auto Adjustment (see if you can remedy any problems yourself Table 3. The colors are plugged in and turned on. Italiano Portuguese Deutsch Español Français English Appendix Troubleshooting...
"Video mode not supported" s Check the maximum resolution and the frequency on page 8. Picture is too light or too dark s Adjust the Brightness and Contrast settings. Color is not uniform s Adjust the color settings using the OSD COLOR menu. "No Connection, Check Signal Cable" appears s Check the signal cable connection between the computer and LCD Monitor. s Perform Auto Adjustment (see if you can remedy any problems yourself Table 3. The colors are plugged in and turned on. Italiano Portuguese Deutsch Español Français English Appendix Troubleshooting...

User Manual (user Manual) (ver.1.0) (English)
Page 20
... saving your computer. buttons on your changes to the OSD. Appendix Table 3. Check the power management utility on the front panel You need the monitor driver software s You can download the driver from the internet at http://www.samsungelectronics.com/support/ downloads/monitor/index.html English 18 once The power indicator is blinking green/amber or is blinking amber only s The LCD Monitor is not centered or sized properly s Adjust the Horizontal and Vertical position settings using the OSD. Screen image is using the OSD COLOR menu. Troubleshooting problems...
... saving your computer. buttons on your changes to the OSD. Appendix Table 3. Check the power management utility on the front panel You need the monitor driver software s You can download the driver from the internet at http://www.samsungelectronics.com/support/ downloads/monitor/index.html English 18 once The power indicator is blinking green/amber or is blinking amber only s The LCD Monitor is not centered or sized properly s Adjust the Horizontal and Vertical position settings using the OSD. Screen image is using the OSD COLOR menu. Troubleshooting problems...

User Manual (user Manual) (ver.1.0) (English)
Page 21
... @ 63.3 kHz 1024 Lines @ 60 Hz Active Display Horizontal: 338 ± 3 mm (13.3" ± 0.12") Vertical: 270 ± 3 mm (10.6" ± 0.12") (Active display size is dependent upon signal timing and image size selection.) Input Signal, Terminated Analog video 0.7 Vpp positive at 75 Ω TMDS Separate sync, composite, and sync-ongreen Maximum Pixel Clock 135 MHz 108 MHz Power Adapter AC 90-264 Volt, 60 Hz/50 Hz...
... @ 63.3 kHz 1024 Lines @ 60 Hz Active Display Horizontal: 338 ± 3 mm (13.3" ± 0.12") Vertical: 270 ± 3 mm (10.6" ± 0.12") (Active display size is dependent upon signal timing and image size selection.) Input Signal, Terminated Analog video 0.7 Vpp positive at 75 Ω TMDS Separate sync, composite, and sync-ongreen Maximum Pixel Clock 135 MHz 108 MHz Power Adapter AC 90-264 Volt, 60 Hz/50 Hz...

User Manual (user Manual) (ver.1.0) (English)
Page 25
... not disassemble the monitor cabinet (except for the antistatic coating. s To clean your LCD Monitor or any other electrical apparatus. s To clean the monitor cabinet, use a special screen cleaning tissue or solution suitable for gaining access to the cable connectors as explained below: Unplug the monitor from the power outlet before cleaning. User maintenance is restricted to clean your LCD Monitor screen, lightly dampen a soft, clean cloth with the Arm-type Stand or Wall Mount...
... not disassemble the monitor cabinet (except for the antistatic coating. s To clean your LCD Monitor or any other electrical apparatus. s To clean the monitor cabinet, use a special screen cleaning tissue or solution suitable for gaining access to the cable connectors as explained below: Unplug the monitor from the power outlet before cleaning. User maintenance is restricted to clean your LCD Monitor screen, lightly dampen a soft, clean cloth with the Arm-type Stand or Wall Mount...

User Manual (user Manual) (ver.1.0) (English)
Page 26
... installation. Before making the connection, make sure the voltage rating of the computer convenience outlet is the same as the monitor and that the ampere rating of the computer convenience outlet is available from that interference will not occur in accordance with the instructions, may find the booklet called How to Identify and Resolve Radio/TV Interference Problems helpful...
... installation. Before making the connection, make sure the voltage rating of the computer convenience outlet is the same as the monitor and that the ampere rating of the computer convenience outlet is available from that interference will not occur in accordance with the instructions, may find the booklet called How to Identify and Resolve Radio/TV Interference Problems helpful...


