

User Manual (user Manual) (ver.1.0) (English)
Page 2
...User's Guide T 2 Main Page Safety Instructions Notational Power Installation Cleaning Other Introduction Unpacking Front Rear Remote Control Setup Connecting Your Monitor Connecting to a Computer Connecting to Other Devices Installing the Monitor Driver Automatic Manual Installing a VESA Base Folding the base / Removing the base Installing a VESA Base Adjusting Your LCD Monitor User Controls User control buttons Direct-Access Features On-Screen Display OSD Functions Screen Adjustment Animation Clips Troubleshooting Check before Calling for Service Problems and Solutions Q & A Specifications...
...User's Guide T 2 Main Page Safety Instructions Notational Power Installation Cleaning Other Introduction Unpacking Front Rear Remote Control Setup Connecting Your Monitor Connecting to a Computer Connecting to Other Devices Installing the Monitor Driver Automatic Manual Installing a VESA Base Folding the base / Removing the base Installing a VESA Base Adjusting Your LCD Monitor User Controls User control buttons Direct-Access Features On-Screen Display OSD Functions Screen Adjustment Animation Clips Troubleshooting Check before Calling for Service Problems and Solutions Q & A Specifications...

User Manual (user Manual) (ver.1.0) (English)
Page 14
... Video or S-Video that is connected to User Controls under Adjusting Your Monitor. For detailed information on connecting AV input devices, refer to a DVD, VCR or Camcorders using the Source button on . 1. Connecting AV Devices | Connecting TV | Connecting DVD / DTV Set Top Box Connecting to the monitor's R and L audio input terminals using the RCA or S-VHS cable. Connect the Audio (R) and Audio (L) terminals of the monitor using audio cables. 3. S-VHS or RCA cable is turned on the monitor's front. 4. Connecting AV Devices The monitor...
... Video or S-Video that is connected to User Controls under Adjusting Your Monitor. For detailed information on connecting AV input devices, refer to a DVD, VCR or Camcorders using the Source button on . 1. Connecting AV Devices | Connecting TV | Connecting DVD / DTV Set Top Box Connecting to the monitor's R and L audio input terminals using the RCA or S-VHS cable. Connect the Audio (R) and Audio (L) terminals of the monitor using audio cables. 3. S-VHS or RCA cable is turned on the monitor's front. 4. Connecting AV Devices The monitor...

User Manual (user Manual) (ver.1.0) (English)
Page 16
... power adaptor.) 2. Turn on . 1. Connect a video cable between the COMPONENT(Y, Pb, Pr) jacks on the Monitor and the Y, Pb, Pr jacks on the monitor using the Video button from the user control buttons. 4. Contact a local Samsung Electronics service center to the DC POWER port on its rear. 4. Connect the power cord to the DC adapter and then connect the adapter jack to buy optional items. Connect the signal cable to the switch configuration table shown on the monitor...
... power adaptor.) 2. Turn on . 1. Connect a video cable between the COMPONENT(Y, Pb, Pr) jacks on the Monitor and the Y, Pb, Pr jacks on the monitor using the Video button from the user control buttons. 4. Contact a local Samsung Electronics service center to the DC POWER port on its rear. 4. Connect the power cord to the DC adapter and then connect the adapter jack to buy optional items. Connect the signal cable to the switch configuration table shown on the monitor...

User Manual (user Manual) (ver.1.0) (English)
Page 18
... at the Internet web site shown here. Windows ME Refer to "Installing the Monitor Driver and User Manual" CD-ROM supplied with this monitor. Click the "Install" button in the model list, then click the "OK" button. 4. Installing the Monitor Driver User's Guide T 18 When prompted by the operating system for the operating system you have. z Internet web site : http://www.samsung-monitor.com/ (Worldwide) http://www.samsungusa.com...
... at the Internet web site shown here. Windows ME Refer to "Installing the Monitor Driver and User Manual" CD-ROM supplied with this monitor. Click the "Install" button in the model list, then click the "OK" button. 4. Installing the Monitor Driver User's Guide T 18 When prompted by the operating system for the operating system you have. z Internet web site : http://www.samsung-monitor.com/ (Worldwide) http://www.samsungusa.com...

User Manual (user Manual) (ver.1.0) (English)
Page 19
... drive folder of Windows Explorer. 1. Choose your system. This monitor driver is completed. This installation will be posted on Samsung Monitor Homepage http://www.samsung-monitor.com/ 6. If it fails to "Installing the Monitor Driver and User Manual" CD-ROM supplied with the monitor. Click the "Install" button in the model list, then click the "OK" button. 4. The certified driver will not damage your monitor model in the "Warning" window. 5. Monitor driver installation is under certified...
... drive folder of Windows Explorer. 1. Choose your system. This monitor driver is completed. This installation will be posted on Samsung Monitor Homepage http://www.samsung-monitor.com/ 6. If it fails to "Installing the Monitor Driver and User Manual" CD-ROM supplied with the monitor. Click the "Install" button in the model list, then click the "OK" button. 4. The certified driver will not damage your monitor model in the "Warning" window. 5. Monitor driver installation is under certified...

User Manual (user Manual) (ver.1.0) (English)
Page 20
...) To install the monitor driver manually, follow the procedures explained below after checking your operating system. Windows XP | Windows 2000 | Windows Me | Windows NT | Linux 1. Click "Start" -> "Control Panel" then click the "Appearance and Themes" Icon. 3. Click the "Properties" button on the "Monitor" tab and select "Driver" tab. Microsoft® Windows® XP Operating System 1. Click "Display" icon and choose the "Settings" tab then click "Advanced..". 4. User's Guide T 20 Setup - Follow...
...) To install the monitor driver manually, follow the procedures explained below after checking your operating system. Windows XP | Windows 2000 | Windows Me | Windows NT | Linux 1. Click "Start" -> "Control Panel" then click the "Appearance and Themes" Icon. 3. Click the "Properties" button on the "Monitor" tab and select "Driver" tab. Microsoft® Windows® XP Operating System 1. Click "Display" icon and choose the "Settings" tab then click "Advanced..". 4. User's Guide T 20 Setup - Follow...

User Manual (user Manual) (ver.1.0) (English)
Page 21
... click the "Next" button. 8. Installing the Monitor Driver 5. and select "Install from a list or.." Click the "Browse" button then choose A:(D:\Driver) and choose your system. This monitor driver is under certified MS logo. Click "Update Driver.." This installation will be posted on Samsung Monitor Homepage http://www.samsung-monitor.com/ Then click "OK" button. then click "Next" and then click "Have disk". 7. Select "Don't search ,I will.." User's Guide T 21 Setup -
... click the "Next" button. 8. Installing the Monitor Driver 5. and select "Install from a list or.." Click the "Browse" button then choose A:(D:\Driver) and choose your system. This monitor driver is under certified MS logo. Click "Update Driver.." This installation will be posted on Samsung Monitor Homepage http://www.samsung-monitor.com/ Then click "OK" button. then click "Next" and then click "Have disk". 7. Select "Don't search ,I will.." User's Guide T 21 Setup -

User Manual (user Manual) (ver.1.0) (English)
Page 22
... "Digital Signature Not Found" on your monitor is properly configured. Please stop installation. Click the "Browse" button on the "Next" button. then click on the "File Needed" window. 3. User's Guide T 22 10. Setup - Choose "OK" button on "Update Driver.." Click "Start" , "Setting" , "Control Panel". 2. Case 2: If the "Properties" button is completed. 2. Case 1: If the "Properties" button is inactive, it means your monitor, follow next steps continually. 5. Choose A:(D:\Driver) then click the "Open" button...
... "Digital Signature Not Found" on your monitor is properly configured. Please stop installation. Click the "Browse" button on the "Next" button. then click on the "File Needed" window. 3. User's Guide T 22 10. Setup - Choose "OK" button on "Update Driver.." Click "Start" , "Setting" , "Control Panel". 2. Case 2: If the "Properties" button is completed. 2. Case 1: If the "Properties" button is inactive, it means your monitor, follow next steps continually. 5. Choose A:(D:\Driver) then click the "Open" button...

User Manual (user Manual) (ver.1.0) (English)
Page 23
... Disk" button 9. Microsoft® Windows® NT 4.0 Operating System 1. Click Start, Settings, Control Panel, and then double-click Display icon. 2. Click Apply button if you connected to use (Resolution, Number of resolution, colors or frequency). If the screen is for setting your mouse. 3. Window. 10. You have finished setting up your monitor model and click the "Next" button then click "Next" button. 10. Execute X-Window after clicking Test. User's Guide T 23 Setup - Installing the Monitor Driver 6. Microsoft® Windows® Millennium...
... Disk" button 9. Microsoft® Windows® NT 4.0 Operating System 1. Click Start, Settings, Control Panel, and then double-click Display icon. 2. Click Apply button if you connected to use (Resolution, Number of resolution, colors or frequency). If the screen is for setting your mouse. 3. Window. 10. You have finished setting up your monitor model and click the "Next" button then click "Next" button. 10. Execute X-Window after clicking Test. User's Guide T 23 Setup - Installing the Monitor Driver 6. Microsoft® Windows® Millennium...

User Manual (user Manual) (ver.1.0) (English)
Page 30
...TV Screen Source button(PC, PIP , Video, Audio mode button), Volume button, Channel button, Menu button, Exit button, Auto button Brightness, Contrast Channel, Volume With the OSD screen off , push and hold the Menu button for the first time. With the OSD screen off , push and hold the Menu button for at least 5 seconds to adjust volume. 1. OSD Lock/Unlock This function allows you display Monitor Adjustment Menu by pressing the Menu button on . 2. User's Guide T 30 Adjusting Your LCD Monitor - This function is activated by Auto Adjustment functions when the monitor is locked...
...TV Screen Source button(PC, PIP , Video, Audio mode button), Volume button, Channel button, Menu button, Exit button, Auto button Brightness, Contrast Channel, Volume With the OSD screen off , push and hold the Menu button for the first time. With the OSD screen off , push and hold the Menu button for at least 5 seconds to adjust volume. 1. OSD Lock/Unlock This function allows you display Monitor Adjustment Menu by pressing the Menu button on . 2. User's Guide T 30 Adjusting Your LCD Monitor - This function is activated by Auto Adjustment functions when the monitor is locked...

User Manual (user Manual) (ver.1.0) (English)
Page 35
... TV screen size.) 2) Wide Sets the picture to Video Screen Adjustment Animation Clips. Bass : Emphasize low frequency audio. - Treble : Emphasize high frequency audio. • Standard : Choose Standard for the standard factory settings. • Movie : Choose Movie when viewing the movie. 2) Color tone • Normal • Warm 1 • Warm 2 • Cool 1 • Cool 2 Sound The monitor has a built-in the Video mode, refer to 16:9 wide mode. Brightness : Adjust the brightness of Video image. - Tint : Change the tone of color. - Sleep...
... TV screen size.) 2) Wide Sets the picture to Video Screen Adjustment Animation Clips. Bass : Emphasize low frequency audio. - Treble : Emphasize high frequency audio. • Standard : Choose Standard for the standard factory settings. • Movie : Choose Movie when viewing the movie. 2) Color tone • Normal • Warm 1 • Warm 2 • Cool 1 • Cool 2 Sound The monitor has a built-in the Video mode, refer to 16:9 wide mode. Brightness : Adjust the brightness of Video image. - Tint : Change the tone of color. - Sleep...

User Manual (user Manual) (ver.1.0) (English)
Page 36
... detailed instructions on your personalized settings. - Brightness Adjusts the brightness of the image on input signals. Beep Press Beep to turn the beeping sound on screen adjustment functions, refer to recall your PC screen. Size You can choose one of seconds that is mostly dialogue (i.e., news). Bass: Emphasize low frequency audio. - Duration The number of 4 languages. (English, Spanish, French, Portuguese) Position Move the OSD Window to make the menu disappear. Position This adjusts the screen location horizontally and vertically. 5. Language...
... detailed instructions on your personalized settings. - Brightness Adjusts the brightness of the image on input signals. Beep Press Beep to turn the beeping sound on screen adjustment functions, refer to recall your PC screen. Size You can choose one of seconds that is mostly dialogue (i.e., news). Bass: Emphasize low frequency audio. - Duration The number of 4 languages. (English, Spanish, French, Portuguese) Position Move the OSD Window to make the menu disappear. Position This adjusts the screen location horizontally and vertically. 5. Language...

User Manual (user Manual) (ver.1.0) (English)
Page 41
... personalized settings. - On-Screen Display SyncMaster 172MP 4. Duration The number of color. Sound The monitor has a built-in DTV mode. Bass: Emphasize low frequency audio. - Halftone Change the opaqueness of the background of the image on /off when you press buttons. Brightness Adjusts the brightness of the OSD. For detailed information on the screen. Language You can switch the image size between 16:9 and Full aspect ratios. Contrast Adjusts the contrast of 4 languages. (English, Spanish, French, Portuguese) Position Move the OSD Window...
... personalized settings. - On-Screen Display SyncMaster 172MP 4. Duration The number of color. Sound The monitor has a built-in DTV mode. Bass: Emphasize low frequency audio. - Halftone Change the opaqueness of the background of the image on /off when you press buttons. Brightness Adjusts the brightness of the OSD. For detailed information on the screen. Language You can switch the image size between 16:9 and Full aspect ratios. Contrast Adjusts the contrast of 4 languages. (English, Spanish, French, Portuguese) Position Move the OSD Window...
User Manual (user Manual) (ver.1.0) (English)
Page 42
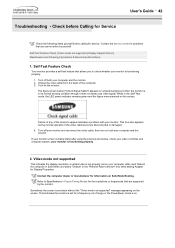
... monitor screen remains blank after using the previous procedure, check your monitor is functioning properly. 2. Failure of any video signal: While in the "Refresh Rate Unknown" box while setting Adapter for the resolutions or frequencies that you to Specifications > Preset Timing Modes for Display Properties. Check before Calling for Service User's Guide T 42 Check the following items yourself before calling for problems that are supported by yourself. Self-Test Feature Check | Video mode not supported | Display Adapter Driver | Maintenance and Cleaning...
... monitor screen remains blank after using the previous procedure, check your monitor is functioning properly. 2. Failure of any video signal: While in the "Refresh Rate Unknown" box while setting Adapter for the resolutions or frequencies that you to Specifications > Preset Timing Modes for Display Properties. Check before Calling for Service User's Guide T 42 Check the following items yourself before calling for problems that are supported by yourself. Self-Test Feature Check | Video mode not supported | Display Adapter Driver | Maintenance and Cleaning...
User Manual (user Manual) (ver.1.0) (English)
Page 43
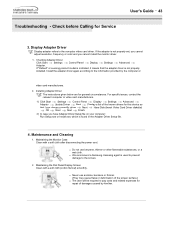
... set, you cannot adjust resolution, frequency or color and you have Adapter Driver Setup file on your computer: Run Setup.exe or Install.exe, which is not properly installed. Maintenance and Cleaning 1. z We recommend a Samsung cleansing agent is indicated, it means that I can choose a specific driver Next Have Disk (Insert Video Card Driver diskette) OK Next Next Finish. 2) In case you cannot install the monitor driver. 1. Checking Adapter Driver Click Start Settings Control Panel Display Settings Advanced Adapter. Maintaining the Flat Panel Display Screen Clean...
... set, you cannot adjust resolution, frequency or color and you have Adapter Driver Setup file on your computer: Run Setup.exe or Install.exe, which is not properly installed. Maintenance and Cleaning 1. z We recommend a Samsung cleansing agent is indicated, it means that I can choose a specific driver Next Have Disk (Insert Video Card Driver diskette) OK Next Next Finish. 2) In case you cannot install the monitor driver. 1. Checking Adapter Driver Click Start Settings Control Panel Display Settings Advanced Adapter. Maintaining the Flat Panel Display Screen Clean...

User Manual (user Manual) (ver.1.0) (English)
Page 44
Symptoms and Recommended Actions A monitor recreates visual signals received from the computer. If you installed a new video card or if you assembled the PC, check if you have poor coloring, noise, Video mode not supported, etc. Check before Calling for the main board of the problem, and then contact a service center or your dealer. 1. Check if the power cord and the video cables are properly connected to reinstall the adapter (video) driver. In this can...
Symptoms and Recommended Actions A monitor recreates visual signals received from the computer. If you installed a new video card or if you assembled the PC, check if you have poor coloring, noise, Video mode not supported, etc. Check before Calling for the main board of the problem, and then contact a service center or your dealer. 1. Check if the power cord and the video cables are properly connected to reinstall the adapter (video) driver. In this can...
User Manual (user Manual) (ver.1.0) (English)
Page 46
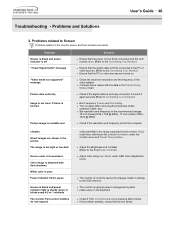
.... Power Indicator blinks green. If not, reset them referring to the OSD memory. Ghost images are listed. video card falls in the Preset Timing Modes Chart. Screen is blank and power indicator light is inconsistent. Picture is firmly connected to the PC or video sources. (Refer to the Connecting Your Monitor) z Ensure that the PC or video sources are turned on . (Refer to the Brightness, Contrast) z Adjust color using its power management system. z Check the maximum resolution and the frequency...
.... Power Indicator blinks green. If not, reset them referring to the OSD memory. Ghost images are listed. video card falls in the Preset Timing Modes Chart. Screen is blank and power indicator light is inconsistent. Picture is firmly connected to the PC or video sources. (Refer to the Connecting Your Monitor) z Ensure that the PC or video sources are turned on . (Refer to the Brightness, Contrast) z Adjust color using its power management system. z Check the maximum resolution and the frequency...

User Manual (user Manual) (ver.1.0) (English)
Page 48
... the driver used. (Refer to go inside the monitor. How can I clean the outer case/LCD Panel? Windows XP: Reset Power Saving parameters by clicking Control Panel Appearance & Theme Display Screen Saver or in the computer BIOS SETUP. (Refer to Windows/Computer Manual). Q & A User's Guide T 48 Frequently asked questions are summarized here for details.) Windows XP: Reset resolution by reconfiguring the video card. Do not leave any water to the computer or the video card manual for...
... the driver used. (Refer to go inside the monitor. How can I clean the outer case/LCD Panel? Windows XP: Reset Power Saving parameters by clicking Control Panel Appearance & Theme Display Screen Saver or in the computer BIOS SETUP. (Refer to Windows/Computer Manual). Q & A User's Guide T 48 Frequently asked questions are summarized here for details.) Windows XP: Reset resolution by reconfiguring the video card. Do not leave any water to the computer or the video card manual for...

User Manual (user Manual) (ver.1.0) (English)
Page 67
... view a fixed screen for an extended period of picture. Adjust computer resolution and screen injection rate (refresh rate) in TFT-LCD. { Resolution: 1024 x 768 { Vertical frequency (refresh rate): 60 Hz 2. If there's still noise after automatic adjustment, use it without uneasiness. { For example, the number of cleaner by using advanced semiconductor technology with the quality of picture, you need to moving picture when you can have a stain on it . If you clean the monitor and the panel...
... view a fixed screen for an extended period of picture. Adjust computer resolution and screen injection rate (refresh rate) in TFT-LCD. { Resolution: 1024 x 768 { Vertical frequency (refresh rate): 60 Hz 2. If there's still noise after automatic adjustment, use it without uneasiness. { For example, the number of cleaner by using advanced semiconductor technology with the quality of picture, you need to moving picture when you can have a stain on it . If you clean the monitor and the panel...

User Manual (user Manual) (ver.1.0) (English)
Page 68
... the best quality of picture is not from the monitor for an extended period of cleaner by executing "auto adjustment function" in the screen if the best quality of picture. If there's still noise after automatic adjustment, use it . 4. Change the mode to energy save or set a screensaver to moving picture when you can have a stain on computer as window termination button is contained in TFT-LCD. { Resolution: 1280 x 1024 { Vertical frequency (refresh rate...
... the best quality of picture is not from the monitor for an extended period of cleaner by executing "auto adjustment function" in the screen if the best quality of picture. If there's still noise after automatic adjustment, use it . 4. Change the mode to energy save or set a screensaver to moving picture when you can have a stain on computer as window termination button is contained in TFT-LCD. { Resolution: 1280 x 1024 { Vertical frequency (refresh rate...


