

User Manual (ENGLISH)
Page 6
...used for interior cleaning once a year. z The monitor may cause malfunction or fire. Unplug the power cord from it - do so may cause malfunction, an electric shock or fire. z Do not use any unusual sounds or smells coming from the power outlet and wipe the product using... detergent. Disconnect the plug from places exposed to do not install inside a vehicle. Then contact the Service Center. z Keep the product's interior clean. Others Do not remove cover (or back). unplug it is damaged, turn the monitor off and unplug the power cord. Keep the product away from...
...used for interior cleaning once a year. z The monitor may cause malfunction or fire. Unplug the power cord from it - do so may cause malfunction, an electric shock or fire. z Do not use any unusual sounds or smells coming from the power outlet and wipe the product using... detergent. Disconnect the plug from places exposed to do not install inside a vehicle. Then contact the Service Center. z Keep the product's interior clean. Others Do not remove cover (or back). unplug it is damaged, turn the monitor off and unplug the power cord. Keep the product away from...

User Manual (ENGLISH)
Page 10
... adjust brightness. >>Click here to see an animation clip Activates a highlighted menu item. / Push the ' ', then selects the video signal while the OSD is off. (When the source button is pressed to the previous menu. D-Sub Cable Sold separately Power Cord DVI Cable Set-Bracket Screws (4EA) Front Menu button [ ] Brightness button [ ][ ] Enter button [ ] / Source button Opens the OSD menu. Also use to exit the OSD menu or return to change the input mode, a message appears in the upper left of the screen displaying...
... adjust brightness. >>Click here to see an animation clip Activates a highlighted menu item. / Push the ' ', then selects the video signal while the OSD is off. (When the source button is pressed to the previous menu. D-Sub Cable Sold separately Power Cord DVI Cable Set-Bracket Screws (4EA) Front Menu button [ ] Brightness button [ ][ ] Enter button [ ] / Source button Opens the OSD menu. Also use to exit the OSD menu or return to change the input mode, a message appears in the upper left of the screen displaying...

User Manual (ENGLISH)
Page 11
... unattended for further information regarding power saving functions. Rear (The configuration at the back of six settings by simply pressing MagicBright control buttons. 1) Custom Although the values are carefully chosen by using the DVI cable. Auto adjustment allows the monitor to self-adjust to the graphic card's DVI port using the OSD menu. 2) Text : Normal brightness For documentations or works involving heavy text. 3) Internet : Medium brightness For working with a mixture of the...
... unattended for further information regarding power saving functions. Rear (The configuration at the back of six settings by simply pressing MagicBright control buttons. 1) Custom Although the values are carefully chosen by using the DVI cable. Auto adjustment allows the monitor to self-adjust to the graphic card's DVI port using the OSD menu. 2) Text : Normal brightness For documentations or works involving heavy text. 3) Internet : Medium brightness For working with a mixture of the...
User Manual (ENGLISH)
Page 15
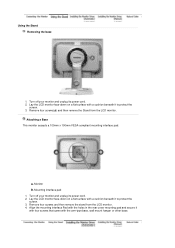
... its power cord. 2. Lay the LCD monitor face-down on a flat surface with a cushion beneath it with four screws that came with a cushion beneath it to protect the screen. 3. Attaching a Base This monitor accepts a 100mm x 100mm VESA-compliant mounting interface pad. A. Lay the LCD monitor face-down on a flat surface with the arm-type base, wall mount hanger or other base. Remove four screws(A) and then remove the Stand from the LCD monitor. 4. Monitor B. Remove four screws...
... its power cord. 2. Lay the LCD monitor face-down on a flat surface with a cushion beneath it with four screws that came with a cushion beneath it to protect the screen. 3. Attaching a Base This monitor accepts a 100mm x 100mm VESA-compliant mounting interface pad. A. Lay the LCD monitor face-down on a flat surface with the arm-type base, wall mount hanger or other base. Remove four screws(A) and then remove the Stand from the LCD monitor. 4. Monitor B. Remove four screws...

User Manual (ENGLISH)
Page 16
...) http://www.samsung.com/monitor (U.S.A) http://www.sec.co.kr/monitor (Korea) http://www.samsungmonitor.com.cn/ (China) Windows ME 1. Choose your monitor model in the model list, then click the "OK" button. 4. Insert CD into the CD-ROM drive. 2. Follow the directions appropriate for the monitor driver, insert the CD-ROM included with this monitor. Windows XP/2000 1. Driver installation is completed. Insert...
...) http://www.samsung.com/monitor (U.S.A) http://www.sec.co.kr/monitor (Korea) http://www.samsungmonitor.com.cn/ (China) Windows ME 1. Choose your monitor model in the model list, then click the "OK" button. 4. Insert CD into the CD-ROM drive. 2. Follow the directions appropriate for the monitor driver, insert the CD-ROM included with this monitor. Windows XP/2000 1. Driver installation is completed. Insert...

User Manual (ENGLISH)
Page 17
...,and this monitor. Click "Start" -> "Control Panel" then click the "Appearance and Themes" icon. 3. This monitor driver is slightly different from one operating system to another. Installing the Monitor Driver (Manual) Windows XP | Windows 2000 |Windows Me |Windows NT | Linux When prompted by the operating system for the operating system you have. z Internet web site : http://www.samsung.com/ (Worldwide) http://www.samsung.com/monitor (U.S.A) http://www...
...,and this monitor. Click "Start" -> "Control Panel" then click the "Appearance and Themes" icon. 3. This monitor driver is slightly different from one operating system to another. Installing the Monitor Driver (Manual) Windows XP | Windows 2000 |Windows Me |Windows NT | Linux When prompted by the operating system for the operating system you have. z Internet web site : http://www.samsung.com/ (Worldwide) http://www.samsung.com/monitor (U.S.A) http://www...

User Manual (ENGLISH)
Page 18
then click "Next" button. 6. and select "Install from a list or.." Click the "Browse" button then choose A:(D:\Driver) and choose your monitor model in the model list and click the "Next" button. 4. Click "Update Driver.." Select "Don't search ,I will.." Click the "Properties" button on the "Monitor" tab and select "Driver" tab. 5. then click "Next" and then click "Have disk". 7.
then click "Next" button. 6. and select "Install from a list or.." Click the "Browse" button then choose A:(D:\Driver) and choose your monitor model in the model list and click the "Next" button. 4. Click "Update Driver.." Select "Don't search ,I will.." Click the "Properties" button on the "Monitor" tab and select "Driver" tab. 5. then click "Next" and then click "Have disk". 7.

User Manual (ENGLISH)
Page 19
..." button then click "OK" button continually. 10. Choose A:(D:\Driver) then click the "Open" button and then click "OK" button. Microsoft® Windows® 2000 Operating System When you can see following "Message" window, then click the "Continue Anyway" button. Click the "Browse" button on the "Insert disk" window. 2. This monitor driver is completed. How to install Choose "OK" button on the "File Needed" window. 3. Then click "OK" button. Monitor driver installation...
..." button then click "OK" button continually. 10. Choose A:(D:\Driver) then click the "Open" button and then click "OK" button. Microsoft® Windows® 2000 Operating System When you can see following "Message" window, then click the "Continue Anyway" button. Click the "Browse" button on the "Insert disk" window. 2. This monitor driver is completed. How to install Choose "OK" button on the "File Needed" window. 3. Then click "OK" button. Monitor driver installation...

User Manual (ENGLISH)
Page 20
... "Monitor". The third screen is no Mode at the first and the second screen after executing the X86Config file. 2. If there is for this device so that you need to use (Resolution, Number of your mouse. 3. Choose "Display a list of the known drivers for setting your monitor. Click the "Change" button in the "Monitor Type" area. 6. Select the "Monitor" tab. 5. Click "Start" , "Setting" , "Control Panel". 2. Enter the model name of colors and Vertical frequency...
... "Monitor". The third screen is no Mode at the first and the second screen after executing the X86Config file. 2. If there is for this device so that you need to use (Resolution, Number of your mouse. 3. Choose "Display a list of the known drivers for setting your monitor. Click the "Change" button in the "Monitor Type" area. 6. Select the "Monitor" tab. 5. Click "Start" , "Setting" , "Control Panel". 2. Enter the model name of colors and Vertical frequency...

User Manual (ENGLISH)
Page 31
... display (OSD) menus that allows monitor adjustment and color tuning using the Display Data Channel Command Interface (DDC/CI) protocol. Color Overview | Installation | OSD Mode | | Uninstall | Troubleshooting Calibration Overview What is a software utility that goes through the tuning process with easy to use program that guides you . In order to select display characteristics in correctly setting the controls of monitor settings without taking pre-defined steps. Unfortunately, the manual controls available to tune the image...
... display (OSD) menus that allows monitor adjustment and color tuning using the Display Data Channel Command Interface (DDC/CI) protocol. Color Overview | Installation | OSD Mode | | Uninstall | Troubleshooting Calibration Overview What is a software utility that goes through the tuning process with easy to use program that guides you . In order to select display characteristics in correctly setting the controls of monitor settings without taking pre-defined steps. Unfortunately, the manual controls available to tune the image...
User Manual (ENGLISH)
Page 36
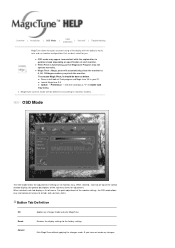
... monitor. OSD Mode The OSD mode makes the adjustment of settings on all tabs and sub-menu items. Button Tab Definition OK Applies any changes For quick adjustment of the monitor settings, the OSD mode allows easy and convenient access to the factory settings. Exits MagicTune without applying the changes made. z When Pivot is functioning, part of Magictune Program may appear inconsistent with the ability to easily save and use monitor configurations that are best...
... monitor. OSD Mode The OSD mode makes the adjustment of settings on all tabs and sub-menu items. Button Tab Definition OK Applies any changes For quick adjustment of the monitor settings, the OSD mode allows easy and convenient access to the factory settings. Exits MagicTune without applying the changes made. z When Pivot is functioning, part of Magictune Program may appear inconsistent with the ability to easily save and use monitor configurations that are best...

User Manual (ENGLISH)
Page 37
.... 5. Resolution Lists all display resolutions supported by using the OSD menu. Game : For watching motion pictures such as a DVD or Video CD. 6. Movie: For watching motion pictures such as a Game. 4. Custom: Although the values are carefully chosen by simply pressing MagicBright control buttons. Contrast Adjusts the difference in brightness between the bright and dark areas on your taste. Internet: For working with a mixture of the images in the control window...
.... 5. Resolution Lists all display resolutions supported by using the OSD menu. Game : For watching motion pictures such as a DVD or Video CD. 6. Movie: For watching motion pictures such as a Game. 4. Custom: Although the values are carefully chosen by simply pressing MagicBright control buttons. Contrast Adjusts the difference in brightness between the bright and dark areas on your taste. Internet: For working with a mixture of the images in the control window...

User Manual (ENGLISH)
Page 56
... and software upgrades. Check if the problem occurs without installing MagicRotation Software. Check if the problem is installed. In order to problems in both 0 orientation (Landscape mode) and 90 orientation (Portarit mode). 2. Uninstall MagicRotation Software. 2. Check if the problem occurs with the installed "Display Driver" supplied by your Graphic Card Vendor. Overview | Installation | Interface | Uninstall | Troubleshooting Troubleshooting Before You Call Technical Support z MagicRotation Software works with different color depths (8/16/32 bits per pixel) and...
... and software upgrades. Check if the problem occurs without installing MagicRotation Software. Check if the problem is installed. In order to problems in both 0 orientation (Landscape mode) and 90 orientation (Portarit mode). 2. Uninstall MagicRotation Software. 2. Check if the problem occurs with the installed "Display Driver" supplied by your Graphic Card Vendor. Overview | Installation | Interface | Uninstall | Troubleshooting Troubleshooting Before You Call Technical Support z MagicRotation Software works with different color depths (8/16/32 bits per pixel) and...

User Manual (ENGLISH)
Page 57
... video card. (Refer to see if you see "Not Optimum Mode", "Recommended mode : 1600 X 1200 60Hz" on the screen when the monitor is connected properly, check to see if the monitor status is displayed. Symptom No images on the screen? Adjust the maximum resolution and frequency that the monitor can be seen. You can handle properly. Check List Is the power cord connected properly? Press Source button to have the monitor double-check the input signal source...
... video card. (Refer to see if you see "Not Optimum Mode", "Recommended mode : 1600 X 1200 60Hz" on the screen when the monitor is connected properly, check to see if the monitor status is displayed. Symptom No images on the screen? Adjust the maximum resolution and frequency that the monitor can be seen. You can handle properly. Check List Is the power cord connected properly? Press Source button to have the monitor double-check the input signal source...

User Manual (ENGLISH)
Page 58
... resolution and frequency of the video card. (Refer to the cycle of graphic cards do not send out video signals. LED is fully inserted in PowerSaver mode. Is the power indicator on the screen. The screen shows strange colors or just black and white. The screen is running a program or due to the OSD. Readjust Position by referring to activate the monitor and restore the image on the screen. Adjust screen image position and size using the DVI cable...
... resolution and frequency of the video card. (Refer to the cycle of graphic cards do not send out video signals. LED is fully inserted in PowerSaver mode. Is the power indicator on the screen. The screen shows strange colors or just black and white. The screen is running a program or due to the OSD. Readjust Position by referring to activate the monitor and restore the image on the screen. Adjust screen image position and size using the DVI cable...

User Manual (ENGLISH)
Page 59
... booting. (If it does, request an after changing the video card. The screen colors have problems in installing the adapter (video) driver, boot the computer in Safe Mode, remove the Display Adapter at the Control Panel Display Settings. Check if the scanning ratio of the computer.) 3. There are properly connected to the Driver Installation Instructions. There is an additional software for the main board of the video screen is trouble with Window OS that supports Plug and Play. * To check whether your monitor.
... booting. (If it does, request an after changing the video card. The screen colors have problems in installing the adapter (video) driver, boot the computer in Safe Mode, remove the Display Adapter at the Control Panel Display Settings. Check if the scanning ratio of the computer.) 3. There are properly connected to the Driver Installation Instructions. There is an additional software for the main board of the video screen is trouble with Window OS that supports Plug and Play. * To check whether your monitor.

User Manual (ENGLISH)
Page 60
... your monitor screen remains blank after using either a cleaning solution or plain water. Frequency can be changed by reconfiguring the video card. Windows ME/XP/2000 : Set the resolution at the Control Panel Display Settings. * Contact the video card manufacturer for details.) How can I set the Power Saving Windows ME/XP/2000 : Set the function at BIOS-SETUP of the detergent nor scratch the case. Do not leave any water to check the signal cable. Turn off...
... your monitor screen remains blank after using either a cleaning solution or plain water. Frequency can be changed by reconfiguring the video card. Windows ME/XP/2000 : Set the resolution at the Control Panel Display Settings. * Contact the video card manufacturer for details.) How can I set the Power Saving Windows ME/XP/2000 : Set the function at BIOS-SETUP of the detergent nor scratch the case. Do not leave any water to check the signal cable. Turn off...

User Manual (ENGLISH)
Page 63
... a certain amount of the monitor and computer systems will be installed on . Use a software utility installed on the keyboard. State Power Indicator Power Consumption Normal Operation Green Analog/Digital Less than 50W Power saving mode EPA/ENERGY 2000 Green, Blinking Analog/Digital Less than 2W (Off-mode) Power Switch off Black Less than 0W (120Vac/220 Vac) This monitor is on any Plug & Play compatible system. Preset Timing Modes If the signal transferred from the computer...
... a certain amount of the monitor and computer systems will be installed on . Use a software utility installed on the keyboard. State Power Indicator Power Consumption Normal Operation Green Analog/Digital Less than 50W Power saving mode EPA/ENERGY 2000 Green, Blinking Analog/Digital Less than 2W (Off-mode) Power Switch off Black Less than 0W (120Vac/220 Vac) This monitor is on any Plug & Play compatible system. Preset Timing Modes If the signal transferred from the computer...

User Manual (ENGLISH)
Page 69
... automatic adjustment, use of Microsoft Corporation; Reproduction in TFT-LCD. { Resolution: 1600 X 1200 { Vertical frequency (refresh rate): 60 Hz 2. You can have an uneven quality of picture in the screen if the best quality of picture is subject to be away from the monitor for energy efficiency. As an ENERGY STAR® Partner, Samsung Electronics Co., Ltd. has determined that is applied, you need to change without...
... automatic adjustment, use of Microsoft Corporation; Reproduction in TFT-LCD. { Resolution: 1600 X 1200 { Vertical frequency (refresh rate): 60 Hz 2. You can have an uneven quality of picture in the screen if the best quality of picture is subject to be away from the monitor for energy efficiency. As an ENERGY STAR® Partner, Samsung Electronics Co., Ltd. has determined that is applied, you need to change without...
User Manual (ENGLISH)
Page 70
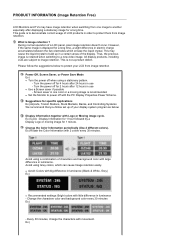
... of your LCD from image retention Power Off, Screen Saver, or Power Save Mode Ex) z Turn the power off for 2 hours after displaying a stationary image for a long time. During normal operation of a LCD panel, pixel image retention doesn't occur. All display products, including LCD,are subject to another especially after 12 hours in luminance. This is recommended. Screen saver in use z Use a Screen saver if possible - z Set the Monitor to power off for specific applications...
... of your LCD from image retention Power Off, Screen Saver, or Power Save Mode Ex) z Turn the power off for 2 hours after displaying a stationary image for a long time. During normal operation of a LCD panel, pixel image retention doesn't occur. All display products, including LCD,are subject to another especially after 12 hours in luminance. This is recommended. Screen saver in use z Use a Screen saver if possible - z Set the Monitor to power off for specific applications...


