User Manual
Page 13
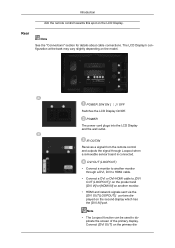
... screen of the primary display. Introduction Aim the remote control towards this spot on the primary dis- Rear Note See the "Connections" section for details about cable connections. Connect [DVI OUT] on the LCD Display. Note • The Loopout function can be used to another monitor. • HDMI and network signals sent via the [DVI OUT(LOOPOUT)] port are displayed on the model. POWER The power...
... screen of the primary display. Introduction Aim the remote control towards this spot on the primary dis- Rear Note See the "Connections" section for details about cable connections. Connect [DVI OUT] on the LCD Display. Note • The Loopout function can be used to another monitor. • HDMI and network signals sent via the [DVI OUT(LOOPOUT)] port are displayed on the model. POWER The power...
User Manual
Page 16
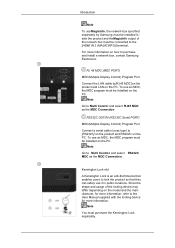
... device that enables users to the [HDMI IN 2 (MAGICINFO)] terminal. For more information on the PC. To use an MDC, the MDC program must be installed on how to Multi Control and select RS232C MDC as the MDC Connection. Note Go to purchase and install a network box, contact Samsung Electronics. Since the shape and usage of the network box must be installed on the model and the...
... device that enables users to the [HDMI IN 2 (MAGICINFO)] terminal. For more information on the PC. To use an MDC, the MDC program must be installed on how to Multi Control and select RS232C MDC as the MDC Connection. Note Go to purchase and install a network box, contact Samsung Electronics. Since the shape and usage of the network box must be installed on the model and the...
User Manual
Page 30
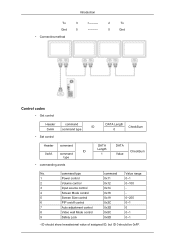
Tx Gnd • Connecting method Introduction 3
Tx Gnd • Connecting method Introduction 3
User Manual
Page 34
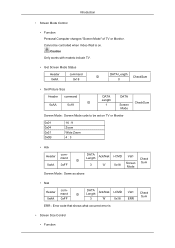
Caution Only works with models include TV. • Get Screen Mode Status Header 0xAA command 0x18 DATA Length ID CheckSum 0 • Set Picture Size Header command ID 0xAA 0x18 DATA Length 1 DATA Screen Mode Screen Mode : Screen Mode code to be controlled when Video Wall is on TV or Monitor 0x01 0x04 0x31 0x0B 16 : 9 Zoom Wide Zoom 4 : 3 CheckSum • Ack Header 0xAA command 0xFF...
Caution Only works with models include TV. • Get Screen Mode Status Header 0xAA command 0x18 DATA Length ID CheckSum 0 • Set Picture Size Header command ID 0xAA 0x18 DATA Length 1 DATA Screen Mode Screen Mode : Screen Mode code to be controlled when Video Wall is on TV or Monitor 0x01 0x04 0x31 0x0B 16 : 9 Zoom Wide Zoom 4 : 3 CheckSum • Ack Header 0xAA command 0xFF...
User Manual
Page 48
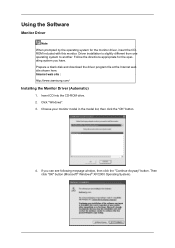
...monitor model in the model list, then click the "OK" button. 4. Prepare a blank disk and download the driver program file at the Internet web site shown here. Insert CD into the CD-ROM drive. 2. Follow the directions appropriate for the monitor driver, insert the CDROM included with this monitor.... Click "Windows". 3. Then click "OK" button (Microsoft® Windows® XP/2000 Operating System). Internet web site : http://www.samsung.com/ Installing the Monitor Driver (Automatic) 1. Using the Software Monitor Driver ...
...monitor model in the model list, then click the "OK" button. 4. Prepare a blank disk and download the driver program file at the Internet web site shown here. Insert CD into the CD-ROM drive. 2. Follow the directions appropriate for the monitor driver, insert the CDROM included with this monitor.... Click "Windows". 3. Then click "OK" button (Microsoft® Windows® XP/2000 Operating System). Internet web site : http://www.samsung.com/ Installing the Monitor Driver (Automatic) 1. Using the Software Monitor Driver ...
User Manual
Page 49
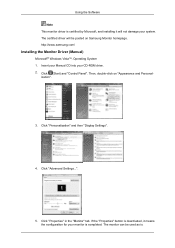
... monitor driver is certified by Microsoft, and installing it means the configuration for your monitor is . Click (Start) and "Control Panel". Click "Personalization" and then "Display Settings". 4. If the "Properties" button is deactivated, it will be used as is completed. Insert your Manual CD into your system. ization". 3. Click "Properties" in the "Monitor" tab. Click "Advanced Settings...". 5. http://www.samsung.com/ Installing the Monitor Driver (Manual...
... monitor driver is certified by Microsoft, and installing it means the configuration for your monitor is . Click (Start) and "Control Panel". Click "Personalization" and then "Display Settings". 4. If the "Properties" button is deactivated, it will be used as is completed. Insert your Manual CD into your system. ization". 3. Click "Properties" in the "Monitor" tab. Click "Advanced Settings...". 5. http://www.samsung.com/ Installing the Monitor Driver (Manual...
User Manual
Page 50
... select the folder (for driver software" checkbox and click "Let me pick from a list of device drivers on Samsung Monitor homepage. Click "Have Disk..." The certified driver will not damage your system. Note This monitor driver is under certifying MS logo, and this installation will be posted on my computer". 8. Using the Software If the message "Windows needs..." Click "Update Driver..."
... select the folder (for driver software" checkbox and click "Let me pick from a list of device drivers on Samsung Monitor homepage. Click "Have Disk..." The certified driver will not damage your system. Note This monitor driver is under certifying MS logo, and this installation will be posted on my computer". 8. Using the Software If the message "Windows needs..." Click "Update Driver..."
User Manual
Page 52
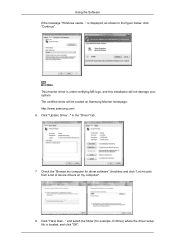
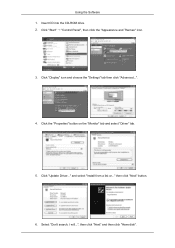
Click "Display" icon and choose the "Settings" tab then click "Advanced...". 4. Select "Don't search, I will...", then click "Next" and then click "Have disk". then click "Next" button. 6. Click the "Properties" button on the "Monitor" tab and select "Driver" tab. 5. Click "Update Driver..." and select "Install from a list or..." Insert CD into the CD-ROM drive. 2. Using the Software 1. Click "Start" "Control Panel", then click the "Appearance and Themes" icon. 3.
Click "Display" icon and choose the "Settings" tab then click "Advanced...". 4. Select "Don't search, I will...", then click "Next" and then click "Have disk". then click "Next" button. 6. Click the "Properties" button on the "Monitor" tab and select "Driver" tab. 5. Click "Update Driver..." and select "Install from a list or..." Insert CD into the CD-ROM drive. 2. Using the Software 1. Click "Start" "Control Panel", then click the "Appearance and Themes" icon. 3.
User Manual
Page 54
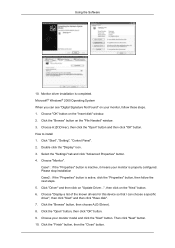
... "Advanced Properties" button. 4. Click "Start", "Setting", "Control Panel". 2. Case1 : If the "Properties" button is inactive, it means your monitor is active, click the "Properties" button, then follow these steps. 1. Click "Driver" and then click on "Update Driver...", then click on the "File Needed" window. 3. Monitor driver installation is completed. Choose "OK" button on your monitor model and click the "Next" button...
... "Advanced Properties" button. 4. Click "Start", "Setting", "Control Panel". 2. Case1 : If the "Properties" button is inactive, it means your monitor is active, click the "Properties" button, then follow these steps. 1. Click "Driver" and then click on "Update Driver...", then click on the "File Needed" window. 3. Monitor driver installation is completed. Choose "OK" button on your monitor model and click the "Next" button...
User Manual
Page 75
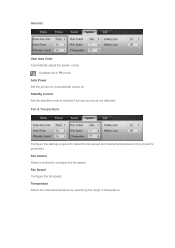
Fan Speed Configure the fan speed. Fan & Temperature Configure the settings required to activate if an input source is not detected. Standby Control Set the standby mode to detect the fan speed and internal temperature for the product's protection. General User Auto Color Automatically adjust the screen colors. Fan Control Select a method to automatically power on. Auto Power Set the product to configure the fan speed. Temperature Detect the internal temperature by specifying the range of temperature. Available only in PC mode.
Fan Speed Configure the fan speed. Fan & Temperature Configure the settings required to activate if an input source is not detected. Standby Control Set the standby mode to detect the fan speed and internal temperature for the product's protection. General User Auto Color Automatically adjust the screen colors. Fan Control Select a method to automatically power on. Auto Power Set the product to configure the fan speed. Temperature Detect the internal temperature by specifying the range of temperature. Available only in PC mode.
User Manual
Page 94
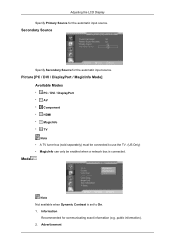
... LCD Display Specify Primary Source for the automatic input source. Advertisement Picture [PC / DVI / DisplayPort / MagicInfo Mode] Available Modes • PC / DVI / DisplayPort • AV • Component • HDMI • MagicInfo • TV Note • A TV tuner box (sold separately) must be connected to use the TV. (US Only) • MagicInfo can only be enabled when a network box is set to...
... LCD Display Specify Primary Source for the automatic input source. Advertisement Picture [PC / DVI / DisplayPort / MagicInfo Mode] Available Modes • PC / DVI / DisplayPort • AV • Component • HDMI • MagicInfo • TV Note • A TV tuner box (sold separately) must be connected to use the TV. (US Only) • MagicInfo can only be enabled when a network box is set to...
User Manual
Page 97
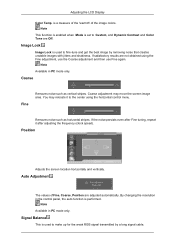
... Adjusts the screen location horizontally and vertically. Signal Balance This is set to make up for the weak RGB signal transmitted by removing noise that creates unstable images with jitters and shakiness. Note This function is enabled when Mode is used to the center using the Fine adjustment, use the Coarse adjustment and then use Fine again...
... Adjusts the screen location horizontally and vertically. Signal Balance This is set to make up for the weak RGB signal transmitted by removing noise that creates unstable images with jitters and shakiness. Note This function is enabled when Mode is used to the center using the Fine adjustment, use the Coarse adjustment and then use Fine again...
User Manual
Page 102
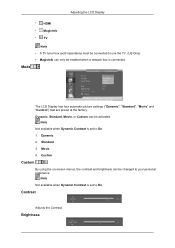
... enabled when a network box is connected. The LCD Display has four automatic picture settings ("Dynamic", "Standard", "Movie" and "Custom") that are preset at the factory. Standard 3. Adjusting the LCD Display • HDMI • MagicInfo • TV Mode Note • A TV tuner box (sold separately) must be connected to On. Note Not available when Dynamic Contrast is set to use the TV...
... enabled when a network box is connected. The LCD Display has four automatic picture settings ("Dynamic", "Standard", "Movie" and "Custom") that are preset at the factory. Standard 3. Adjusting the LCD Display • HDMI • MagicInfo • TV Mode Note • A TV tuner box (sold separately) must be connected to On. Note Not available when Dynamic Contrast is set to use the TV...
User Manual
Page 104
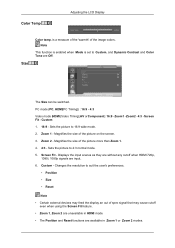
... LCD Display Size Color temp. is set to suit the user's preferences. • Position • Size • Reset Note • Certain external devices may cause cutoff even when using the Screen Fit feature. • Zoom 1, Zoom 2 are unavailable in HDMI mode. • The Position and Reset functions are available in Zoom 1 or Zoom 2 modes. Custom 1. 16:9 - Zoom 2 - PC mode (PC, HDMI[PC...
... LCD Display Size Color temp. is set to suit the user's preferences. • Position • Size • Reset Note • Certain external devices may cause cutoff even when using the Screen Fit feature. • Zoom 1, Zoom 2 are unavailable in HDMI mode. • The Position and Reset functions are available in Zoom 1 or Zoom 2 modes. Custom 1. 16:9 - Zoom 2 - PC mode (PC, HDMI[PC...
User Manual
Page 108
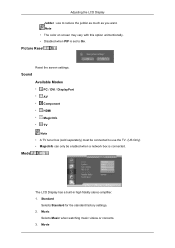
.... 3. Sound Available Modes • PC / DVI / DisplayPort • AV • Component • HDMI • MagicInfo • TV Mode Note • A TV tuner box (sold separately) must be enabled when a network box is connected. Standard Selects Standard for the standard factory settings. 2. Adjusting the LCD Display Judder : use the TV. (US Only) • MagicInfo can only be connected to On. Picture Reset Reset the screen settings.
.... 3. Sound Available Modes • PC / DVI / DisplayPort • AV • Component • HDMI • MagicInfo • TV Mode Note • A TV tuner box (sold separately) must be enabled when a network box is connected. Standard Selects Standard for the standard factory settings. 2. Adjusting the LCD Display Judder : use the TV. (US Only) • MagicInfo can only be connected to On. Picture Reset Reset the screen settings.
User Manual
Page 111
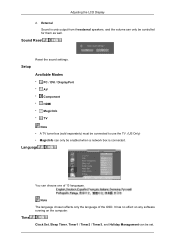
... can be set. Setup Available Modes • PC / DVI / DisplayPort • AV • Component • HDMI • MagicInfo • TV Note • A TV tuner box (sold separately) must be connected to use the TV. (US Only) • MagicInfo can only be enabled when a network box is only output from theexternal speakers, and the volume can only be controlled for them...
... can be set. Setup Available Modes • PC / DVI / DisplayPort • AV • Component • HDMI • MagicInfo • TV Note • A TV tuner box (sold separately) must be connected to use the TV. (US Only) • MagicInfo can only be enabled when a network box is only output from theexternal speakers, and the volume can only be controlled for them...
User Manual
Page 124
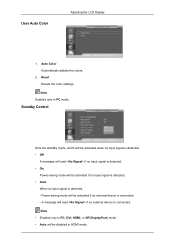
... Power-saving mode will be activated if an external device is connected. - A message will be disabled in HDMI mode. Note • Enabled only in PC mode. Reset Resets the color settings. Auto Color Automatically adjusts the colors. 2. Standby Control Sets the standby mode, which will be activated if no input signal is detected. • Auto When no external device is detected, - User Auto...
... Power-saving mode will be activated if an external device is connected. - A message will be disabled in HDMI mode. Note • Enabled only in PC mode. Reset Resets the color settings. Auto Color Automatically adjusts the colors. 2. Standby Control Sets the standby mode, which will be activated if no input signal is detected. • Auto When no external device is detected, - User Auto...
User Manual
Page 127
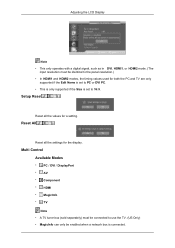
... when a network box is connected. Setup Reset Reset all the settings for a setting. Reset All Reset all the values for the display. Multi Control Available Modes • PC / DVI / DisplayPort • AV • Component • HDMI • MagicInfo • TV Note • A TV tuner box (sold separately) must be identical to the panel resolution.) • In HDMI1 and HDMI2 modes, the timing values used for both...
... when a network box is connected. Setup Reset Reset all the settings for a setting. Reset All Reset all the values for the display. Multi Control Available Modes • PC / DVI / DisplayPort • AV • Component • HDMI • MagicInfo • TV Note • A TV tuner box (sold separately) must be identical to the panel resolution.) • In HDMI1 and HDMI2 modes, the timing values used for both...
User Manual
Page 128
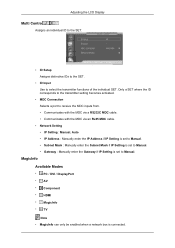
... Mask if IP Setting is set to Manual. • Gateway : Manually enter the Gateway if IP Setting is connected. MagicInfo Available Modes • PC / DVI / DisplayPort • AV • Component • HDMI • MagicInfo • TV Note • MagicInfo can only be enabled when a network box is set to select the transmitter functions of the individual SET. Adjusting the LCD Display Multi Control Assigns an individual...
... Mask if IP Setting is set to Manual. • Gateway : Manually enter the Gateway if IP Setting is connected. MagicInfo Available Modes • PC / DVI / DisplayPort • AV • Component • HDMI • MagicInfo • TV Note • MagicInfo can only be enabled when a network box is set to select the transmitter functions of the individual SET. Adjusting the LCD Display Multi Control Assigns an individual...
User Manual
Page 133
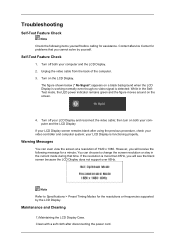
... Specifications > Preset Timing Modes for a minute; Troubleshooting Self-Test Feature Check Note Check the following message for the resolutions or frequencies supported by yourself. then turn on both your computer and the LCD Display. 2. Clean with a soft cloth after using the previous procedure, check your LCD Display and reconnect the video cable; Turn off your video controller and computer system; Turn...
... Specifications > Preset Timing Modes for a minute; Troubleshooting Self-Test Feature Check Note Check the following message for the resolutions or frequencies supported by yourself. then turn on both your computer and the LCD Display. 2. Clean with a soft cloth after using the previous procedure, check your LCD Display and reconnect the video cable; Turn off your video controller and computer system; Turn...


