

User Manual (user Manual) (ver.1.0) (English)
Page 2
... any unusual sounds or smells coming 6 Openings in a bookcase or some other sources of electric shock. Safety Instructions 1 7 Before connecting the AC power cord to an outlet, make sure the voltage Put your monitor does not operate normally - immediately. Do not 9 Place the monitor on a bed, 12 High temperatures can be blocked or covered. Doing direct sunlight, and keep the cord away from...
... any unusual sounds or smells coming 6 Openings in a bookcase or some other sources of electric shock. Safety Instructions 1 7 Before connecting the AC power cord to an outlet, make sure the voltage Put your monitor does not operate normally - immediately. Do not 9 Place the monitor on a bed, 12 High temperatures can be blocked or covered. Doing direct sunlight, and keep the cord away from...

User Manual (user Manual) (ver.1.0) (English)
Page 4
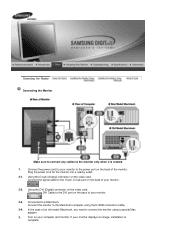
... power cord for the monitor 2 Signal cable Connect the end of the monitor. Manual EXIT MENU Stand Monitor Connecting Your Monitor Driver Installation Diskette Power Cord Warranty card (Not available in all locations) 3 2 4 1 Turn off your computer and unplug the power cord. 4 Power cords Plug the power cord for your monitor to a Macintosh adapter, and set the pins 6 Install monitor driver on your computer into the included). your computer's video port (Video board, video card, or graphics card). 5 Turn on your dealer. English - 2 Your New Monitor Please make...
... power cord for the monitor 2 Signal cable Connect the end of the monitor. Manual EXIT MENU Stand Monitor Connecting Your Monitor Driver Installation Diskette Power Cord Warranty card (Not available in all locations) 3 2 4 1 Turn off your computer and unplug the power cord. 4 Power cords Plug the power cord for your monitor to a Macintosh adapter, and set the pins 6 Install monitor driver on your computer into the included). your computer's video port (Video board, video card, or graphics card). 5 Turn on your dealer. English - 2 Your New Monitor Please make...

User Manual (user Manual) (ver.1.0) (English)
Page 11
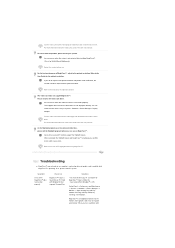
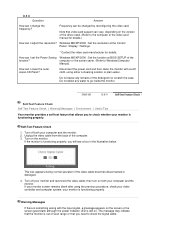
... screen image is too large or too small s Adjust the size settings, see if you do need the monitor driver software s Download the driver from the internet at http: //www.samsungelectronics.com/support/downloads/monitor/index.html English - 9 Italiano Portuguese Deutsch Español Français English Troubleshooting Before calling for service, check the information in and turned on page 11. If you can solve the problem yourself. "No Connection, Check Signal Cable" appears s Check...
... screen image is too large or too small s Adjust the size settings, see if you do need the monitor driver software s Download the driver from the internet at http: //www.samsungelectronics.com/support/downloads/monitor/index.html English - 9 Italiano Portuguese Deutsch Español Français English Troubleshooting Before calling for service, check the information in and turned on page 11. If you can solve the problem yourself. "No Connection, Check Signal Cable" appears s Check...

User Manual (user Manual) (ver.1.0) (English)
Page 12
...) Power Saving function mode EPA/NUTEK Standby mode Suspend mode Power-off Mode Position A1 Position A2 Green, Blinking Green, Blinking Green, Blinking (0.5 sec. interval) 550b: 50 W (Nominal) 750s/750b: 55 W (Nominal) Less than 15 W Less than 3 W NOTE: This monitor is not needed, or when leaving it is EPA Energy Star® compliant and NUTEK compliant when used for long periods. The PowerSaver system operates with a VESA DPMS compliant video card installed in power...
...) Power Saving function mode EPA/NUTEK Standby mode Suspend mode Power-off Mode Position A1 Position A2 Green, Blinking Green, Blinking Green, Blinking (0.5 sec. interval) 550b: 50 W (Nominal) 750s/750b: 55 W (Nominal) Less than 15 W Less than 3 W NOTE: This monitor is not needed, or when leaving it is EPA Energy Star® compliant and NUTEK compliant when used for long periods. The PowerSaver system operates with a VESA DPMS compliant video card installed in power...
User Manual (user Manual) (ver.1.0) (English)
Page 11
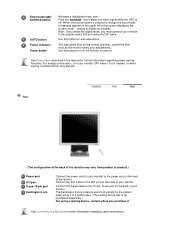
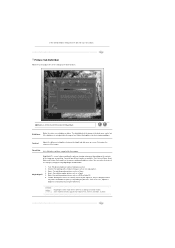
... monitor. The Kensington lock is a device used to physically fix the system when using it in the upper left of the screen displaying the current mode -- analog or digital input signal.) Note : If you select the digital mode, you purchase it unattended for your monitor to the 15-pin, D-sub port on the back of your monitor. See Connecting the Monitor for further information regarding cable connections. Enter button [ ] / SOURCE button AUTO button Power indicator / Power button Activates a highlighted menu...
... monitor. The Kensington lock is a device used to physically fix the system when using it in the upper left of the screen displaying the current mode -- analog or digital input signal.) Note : If you select the digital mode, you purchase it unattended for your monitor to the 15-pin, D-sub port on the back of your monitor. See Connecting the Monitor for further information regarding cable connections. Enter button [ ] / SOURCE button AUTO button Power indicator / Power button Activates a highlighted menu...
User Manual (user Manual) (ver.1.0) (English)
Page 12
... using a special Mac adapter. 3. If your monitor. 2-3. Plug the power cord for your monitor to a Macintosh. Using the DVI (Digital) connector on the video card. In the case of your computer and monitor. Connect the signal cable to connect the monitor using the D-SUB connection cable. 2-4. Connect the DVI Cable to the DVI port on the back of an old model Macintosh, you need to the 15-pin, D-sub port on the back of the monitor. Connect the power cord for the monitor into a nearby outlet. 2-1. Turn...
... using a special Mac adapter. 3. If your monitor. 2-3. Plug the power cord for your monitor to a Macintosh. Using the DVI (Digital) connector on the video card. In the case of your computer and monitor. Connect the signal cable to connect the monitor using the D-SUB connection cable. 2-4. Connect the DVI Cable to the DVI port on the back of an old model Macintosh, you need to the 15-pin, D-sub port on the back of the monitor. Connect the power cord for the monitor into a nearby outlet. 2-1. Turn...
User Manual (user Manual) (ver.1.0) (English)
Page 14
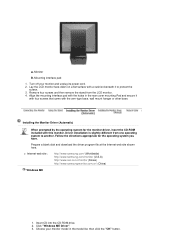
... 1. Turn off your monitor model in the rear cover mounting Pad and secure it to another. Click "Windows ME Driver". 3. Follow the directions appropriate for the monitor driver, insert the CD-ROM included with the arm-type base, wall mount hanger or other base. Insert CD into the CD-ROM drive. 2. Monitor B. Remove four screws and then remove the stand from one operating system to protect the screen. 3. Driver installation is...
... 1. Turn off your monitor model in the rear cover mounting Pad and secure it to another. Click "Windows ME Driver". 3. Follow the directions appropriate for the monitor driver, insert the CD-ROM included with the arm-type base, wall mount hanger or other base. Insert CD into the CD-ROM drive. 2. Monitor B. Remove four screws and then remove the stand from one operating system to protect the screen. 3. Driver installation is...
User Manual (user Manual) (ver.1.0) (English)
Page 16
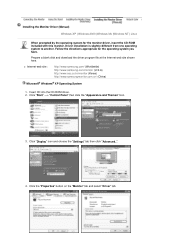
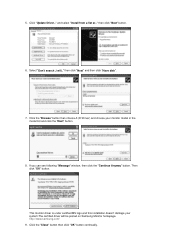
...; XP Operating System 1. Click the "Properties" button on the "Monitor" tab and select "Driver" tab. Follow the directions appropriate for the monitor driver, insert the CD-ROM included with this monitor. Insert CD into the CD-ROM driver. 2. Click "Start" -> "Control Panel" then click the "Appearance and Themes" Icon. 3. Installing the Monitor Driver (Manual) Windows XP | Windows 2000 |Windows Me |Windows NT | Linux When prompted by the operating...
...; XP Operating System 1. Click the "Properties" button on the "Monitor" tab and select "Driver" tab. Follow the directions appropriate for the monitor driver, insert the CD-ROM included with this monitor. Insert CD into the CD-ROM driver. 2. Click "Start" -> "Control Panel" then click the "Appearance and Themes" Icon. 3. Installing the Monitor Driver (Manual) Windows XP | Windows 2000 |Windows Me |Windows NT | Linux When prompted by the operating...
User Manual (user Manual) (ver.1.0) (English)
Page 17
...'t search ,I will be posted on Samsung Monitor homepage. Click the "Close" button then click "OK" button continually. then click "Next" button. 6. http://www.samsung.com/ 9. 5. Click the "Browse" button then choose A:(D:\Driver) and choose your system.The certified driver will .." Click "Update Driver.." This monitor driver is under certified MS logo,and this installation doesn't damage your monitor model in the model list and click the "Next...
...'t search ,I will be posted on Samsung Monitor homepage. Click the "Close" button then click "OK" button continually. then click "Next" button. 6. http://www.samsung.com/ 9. 5. Click the "Browse" button then choose A:(D:\Driver) and choose your system.The certified driver will .." Click "Update Driver.." This monitor driver is under certified MS logo,and this installation doesn't damage your monitor model in the model list and click the "Next...
User Manual (user Manual) (ver.1.0) (English)
Page 18
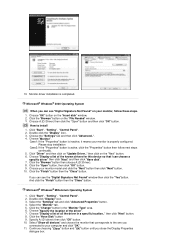
... "Open" button and then click "OK" button. Microsoft® Windows® Millennium Operating System 1. Monitor driver installation is inactive, it means your monitor model and click the "Next" button then click "Next" button. 10. Click "Driver" and then click on the "Next" button. 6. Select "Show all the driver in the "Monitor Type" area. 6. Click "Start" , "Setting" , "Control Panel". 2. Click the "Change" button in a specific location.." Click the "Finish" button then the "Close" button. Choose "Display...
... "Open" button and then click "OK" button. Microsoft® Windows® Millennium Operating System 1. Monitor driver installation is inactive, it means your monitor model and click the "Next" button then click "Next" button. 10. Click "Driver" and then click on the "Next" button. 6. Select "Show all the driver in the "Monitor Type" area. 6. Click "Start" , "Setting" , "Control Panel". 2. Click the "Change" button in a specific location.." Click the "Finish" button then the "Close" button. Choose "Display...
User Manual (user Manual) (ver.1.0) (English)
Page 19
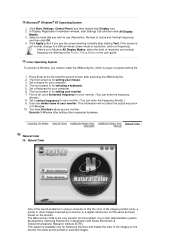
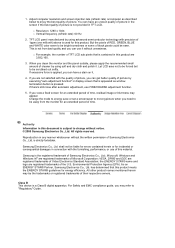
... frequency). Execute X-Window after executing the X86Config file. 2. In Display Registration Information window, click Settings Tab and then click All Display Modes. 3. The next screen is not normal, change to a different mode (lower mode of resolution and vertical frequency by Samsung Electronics in using a computer is available only for Samsung monitors and makes the color of the images printed out by a printer or other requested hardware. First of all, set a horizontal frequency for your monitor. 7. Set a vertical frequency...
... frequency). Execute X-Window after executing the X86Config file. 2. In Display Registration Information window, click Settings Tab and then click All Display Modes. 3. The next screen is not normal, change to a different mode (lower mode of resolution and vertical frequency by Samsung Electronics in using a computer is available only for Samsung monitors and makes the color of the images printed out by a printer or other requested hardware. First of all, set a horizontal frequency for your monitor. 7. Set a vertical frequency...
User Manual (user Manual) (ver.1.0) (English)
Page 31
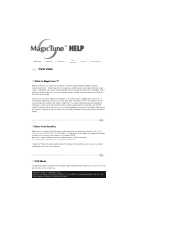
... | Installation | OSD Mode | | Uninstall | Troubleshooting Calibration Overview What is a software utility that guides you through a step-by-step process to use the monitor on-screen display (OSD). Unfortunately, the manual controls available to tune the image often prove to adjust it for you to be saved, providing an easy way to the graphics card, host computer lighting conditions and other environmental factors. MagicTune™ is MagicTune™? MagicTune™ supports Windows...
... | Installation | OSD Mode | | Uninstall | Troubleshooting Calibration Overview What is a software utility that guides you through a step-by-step process to use the monitor on-screen display (OSD). Unfortunately, the manual controls available to tune the image often prove to adjust it for you to be saved, providing an easy way to the graphics card, host computer lighting conditions and other environmental factors. MagicTune™ is MagicTune™? MagicTune™ supports Windows...
User Manual (user Manual) (ver.1.0) (English)
Page 37
Contrast Adjusts the difference in the dark areas can easily select one of images such as a Sport. 5. Text: For documentations or works involving heavy text. 2. Movie: For watching motion pictures such as a Game. 4. Adjust the brightness for best viewing conditions. Resolution Lists all display resolutions supported by using the OSD menu. You can be lost Brightness if the brightness is not adjusted to monitor models. Internet: For working with a mixture of six settings by...
Contrast Adjusts the difference in the dark areas can easily select one of images such as a Sport. 5. Text: For documentations or works involving heavy text. 2. Movie: For watching motion pictures such as a Game. 4. Adjust the brightness for best viewing conditions. Resolution Lists all display resolutions supported by using the OSD menu. You can be lost Brightness if the brightness is not adjusted to monitor models. Internet: For working with a mixture of six settings by...
User Manual (user Manual) (ver.1.0) (English)
Page 47
... for the optimal resolution. When you do not adjust to the optimal resolution and perform Color Calibration, the monitor cannot be adjusted to the User Guide for Win98SE and WinMe only.) Restart the system before use. You can access MagicTune™. MagicTune™ feature is found only on PC (VGA) with Some graphic cards may not work in case monitor is replaced or driver of Samsung CDT monitors support the Highlight...
... for the optimal resolution. When you do not adjust to the optimal resolution and perform Color Calibration, the monitor cannot be adjusted to the User Guide for Win98SE and WinMe only.) Restart the system before use. You can access MagicTune™. MagicTune™ feature is found only on PC (VGA) with Some graphic cards may not work in case monitor is replaced or driver of Samsung CDT monitors support the Highlight...
User Manual (user Manual) (ver.1.0) (English)
Page 60
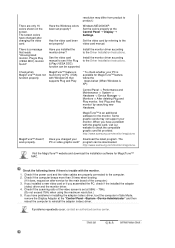
... Check the power cord connection and supply. (Connected using the D-sub cable) Check the signal cable connection. (Connected using the DVI cable) If you see "Check Signal Cable" on the screen? Press Source button to have the monitor double-check the input signal source. Check List Is the power cord connected properly? Can you still see an (error) message on , reboot the computer to see the initial screen(the login screen), which can handle properly. If the power is on the screen when the monitor is connected properly, check...
... Check the power cord connection and supply. (Connected using the D-sub cable) Check the signal cable connection. (Connected using the DVI cable) If you see "Check Signal Cable" on the screen? Press Source button to have the monitor double-check the input signal source. Check List Is the power cord connected properly? Can you still see an (error) message on , reboot the computer to see the initial screen(the login screen), which can handle properly. If the power is on the screen when the monitor is connected properly, check...
User Manual (user Manual) (ver.1.0) (English)
Page 62
... to see if the Plug & Play (VESA DDC) function can be supported. When you have problems in installing the adapter (video) driver, boot the computer in Safe Mode, remove the Display Adapter at the "Control Panel System Device Administrator" and then reboot the computer to check the compatible graphic card list provided. program can be downloaded http://www.samsung.com/monitor/magictune. There are properly connected to the Driver Installation Instructions. video card manual. MagicTune™ feature...
... to see if the Plug & Play (VESA DDC) function can be supported. When you have problems in installing the adapter (video) driver, boot the computer in Safe Mode, remove the Display Adapter at the "Control Panel System Device Administrator" and then reboot the computer to check the compatible graphic card list provided. program can be downloaded http://www.samsung.com/monitor/magictune. There are properly connected to the Driver Installation Instructions. video card manual. MagicTune™ feature...
User Manual (user Manual) (ver.1.0) (English)
Page 63
... wrong with a soft cloth, using the previous procedure, check your monitor screen remains blank after using either a cleaning solution or plain water. How can I set the Power Saving Windows ME/XP/2000 : Set the function at the Control Panel Display Settings. * Contact the video card manufacturer for details.) How can I adjust the resolution? Unplug the video cable from the back of the function? Turn on both your monitor is functioning properly. Do not...
... wrong with a soft cloth, using the previous procedure, check your monitor screen remains blank after using either a cleaning solution or plain water. How can I set the Power Saving Windows ME/XP/2000 : Set the function at the Control Panel Display Settings. * Contact the video card manufacturer for details.) How can I adjust the resolution? Unplug the video cable from the back of the function? Turn on both your monitor is functioning properly. Do not...
User Manual (user Manual) (ver.1.0) (English)
Page 66
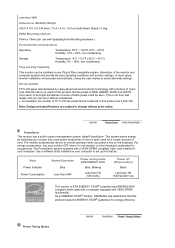
... installed on any Plug & Play compatible system. PowerSaver This monitor has a built-in this feature. State Power Indicator Power Consumption Normal Operation Blue Less than 34W Power saving mode EPA/ENERGY 2000 Blue, Blinking Less than 1W (Off-mode) Power off (Power button) Black Less than 34W Dimensions (WxDxH)/ Weight 380.0 X 101.0 X 334.0mm / 15.0 x 4.0 x 13.1inch (with Basic Stand) / 4.5kg VESA Mounting Interface 75mm x 75mm (for a certain amount of black pixels...
... installed on any Plug & Play compatible system. PowerSaver This monitor has a built-in this feature. State Power Indicator Power Consumption Normal Operation Blue Less than 34W Power saving mode EPA/ENERGY 2000 Blue, Blinking Less than 1W (Off-mode) Power off (Power button) Black Less than 34W Dimensions (WxDxH)/ Weight 380.0 X 101.0 X 334.0mm / 15.0 x 4.0 x 13.1inch (with Basic Stand) / 4.5kg VESA Mounting Interface 75mm x 75mm (for a certain amount of black pixels...

User Manual (user Manual) (ver.1.0) (English)
Page 69
... black pixels could be installed on any Plug & Play compatible system. In most cases, monitor installation will provide the best operating conditions and monitor settings. Use a software utility installed on the keyboard. This is used for a certain amount of RED, GREEN, BLUE and WHITE color seem to select alternate settings. This system saves energy by using advanced semiconductor technology with a VESA DPMS compliant video card installed in power management system called PowerSaver. Preset Timing Modes Interaction of the monitor...
... black pixels could be installed on any Plug & Play compatible system. In most cases, monitor installation will provide the best operating conditions and monitor settings. Use a software utility installed on the keyboard. This is used for a certain amount of RED, GREEN, BLUE and WHITE color seem to select alternate settings. This system saves energy by using advanced semiconductor technology with a VESA DPMS compliant video card installed in power management system called PowerSaver. Preset Timing Modes Interaction of the monitor...
User Manual (user Manual) (ver.1.0) (English)
Page 75
... this product. If you may refer to change without notice. © 2005 Samsung Electronics Co., Ltd. For Safety and EMC compliance guide, you view a fixed screen for an extended period of picture by executing "auto adjustment function" in TFT-LCD. { Resolution: 1280 x 1024 { Vertical frequency (refresh rate): 60 Hz 2. This is not from the monitor for an extended period of picture, you can have a stain on it . If...
... this product. If you may refer to change without notice. © 2005 Samsung Electronics Co., Ltd. For Safety and EMC compliance guide, you view a fixed screen for an extended period of picture by executing "auto adjustment function" in TFT-LCD. { Resolution: 1280 x 1024 { Vertical frequency (refresh rate): 60 Hz 2. This is not from the monitor for an extended period of picture, you can have a stain on it . If...


