

User Manual (user Manual) (ver.1.0) (English)
Page 1
SyncMaster 550b SyncMaster 750s SyncMaster 750b Color Monitor Owner's Instructions
SyncMaster 550b SyncMaster 750s SyncMaster 750b Color Monitor Owner's Instructions

User Manual (user Manual) (ver.1.0) (English)
Page 2
...OF ELECTRIC SHOCK DO NOT OPEN CAUTION: TO REDUCE THE RISK OF ELECTRIC SHOCK, DO NOT REMOVE COVER (OR BACK). Also, avoid using the monitor on your monitor from areas where people can be blocked or covered. period of glass and can trip over it is going to be left unused for... ventilation. in a location with a damp cloth when necessary, but be sure to provide adequate 13 Unplug the monitor when it . You can cause problems. Don't use it away so may accidentally gets wet, unplug it immediately and contact an authorized dealer or service...
...OF ELECTRIC SHOCK DO NOT OPEN CAUTION: TO REDUCE THE RISK OF ELECTRIC SHOCK, DO NOT REMOVE COVER (OR BACK). Also, avoid using the monitor on your monitor from areas where people can be blocked or covered. period of glass and can trip over it is going to be left unused for... ventilation. in a location with a damp cloth when necessary, but be sure to provide adequate 13 Unplug the monitor when it . You can cause problems. Don't use it away so may accidentally gets wet, unplug it immediately and contact an authorized dealer or service...

User Manual (user Manual) (ver.1.0) (English)
Page 3
... 11 Index 12 English - 1 Italiano Portuguese Deutsch Español Français English Table of Contents Your New Monitor 2 Connecting Your Monitor 2 Front Panel 3 Direct Access Buttons 3 Operation 4 On-screen Menu System 4 Monitor function control 5 Brightness 5 Contrast 5 Horizontal Position 5 Vertical Position 5 Horizontal Size 5 Vertical Size 5 Pincushion 6 Geometry 6 Trapezoid 6 Parallelogram 6 Rotation 6 Pinbalance 6 V-Linearity...
... 11 Index 12 English - 1 Italiano Portuguese Deutsch Español Français English Table of Contents Your New Monitor 2 Connecting Your Monitor 2 Front Panel 3 Direct Access Buttons 3 Operation 4 On-screen Menu System 4 Monitor function control 5 Brightness 5 Contrast 5 Horizontal Position 5 Vertical Position 5 Horizontal Size 5 Vertical Size 5 Pincushion 6 Geometry 6 Trapezoid 6 Parallelogram 6 Rotation 6 Pinbalance 6 V-Linearity...

User Manual (user Manual) (ver.1.0) (English)
Page 4
...into a nearby outlet. A PC-compatible computer A drive. computer, connect the cable to and the power cord for your computer and monitor. Manual EXIT MENU Stand Monitor Connecting Your Monitor Driver Installation Diskette Power Cord Warranty card (Not available in all locations) 3 2 4 1 Turn off your computer and unplug the power... the power port on the back of the signal cable to a Macintosh adapter, and set the pins 6 Install monitor driver on your computer into the included). your computer's video port (Video board, video card, or graphics card). 5 Turn ...
...into a nearby outlet. A PC-compatible computer A drive. computer, connect the cable to and the power cord for your computer and monitor. Manual EXIT MENU Stand Monitor Connecting Your Monitor Driver Installation Diskette Power Cord Warranty card (Not available in all locations) 3 2 4 1 Turn off your computer and unplug the power... the power port on the back of the signal cable to a Macintosh adapter, and set the pins 6 Install monitor driver on your computer into the included). your computer's video port (Video board, video card, or graphics card). 5 Turn ...

User Manual (user Manual) (ver.1.0) (English)
Page 5
...MENU 23 4 1 EXIT ( ) button Closes the on -screen menu. The power indicator light value of the selected Power button The power button turns the monitor function. When adjusting an item using used to return to select and adjust items using the on-screen menu system. 3 MENU ( ) button Opens the ... see page 10 for the Contrast and Brightness Direct Access Buttons EXIT MENU Most of your monitor. The Contrast and Brightness features can also be accessed directly from the front of your monitor will be accessed through the on -screen menu, the button lowers the value of the ...
...MENU 23 4 1 EXIT ( ) button Closes the on -screen menu. The power indicator light value of the selected Power button The power button turns the monitor function. When adjusting an item using used to return to select and adjust items using the on-screen menu system. 3 MENU ( ) button Opens the ... see page 10 for the Contrast and Brightness Direct Access Buttons EXIT MENU Most of your monitor. The Contrast and Brightness features can also be accessed directly from the front of your monitor will be accessed through the on -screen menu, the button lowers the value of the ...

User Manual (user Manual) (ver.1.0) (English)
Page 6
... on -screen adjustment icons. If you to adjust characteristics of the screen image. Operation On-screen Menu System Your monitor has an on-screen menu system, accessed by on the front of your monitor, that allows you are in a sub-menu, use the or button to highlight the feature you want to...
... on -screen adjustment icons. If you to adjust characteristics of the screen image. Operation On-screen Menu System Your monitor has an on-screen menu system, accessed by on the front of your monitor, that allows you are in a sub-menu, use the or button to highlight the feature you want to...

User Manual (user Manual) (ver.1.0) (English)
Page 8
... image left + Rotates entire screen right Pinbalance -- Curves vertical lines to left + Curves vertical lines to right Trapezoid 2. + - : Select Function : Previous Menu V-Linearity -- Operation Icon Monitor Function Control Pincushion Straightens screen vertical edges. -- Curves image inward + Curves image outward Geometry Trapezoid Width of top and bottom of screen. --
... image left + Rotates entire screen right Pinbalance -- Curves vertical lines to left + Curves vertical lines to right Trapezoid 2. + - : Select Function : Previous Menu V-Linearity -- Operation Icon Monitor Function Control Pincushion Straightens screen vertical edges. -- Curves image inward + Curves image outward Geometry Trapezoid Width of top and bottom of screen. --

User Manual (user Manual) (ver.1.0) (English)
Page 9
... signal level -- Off + On English - 7 and + scroll through on -screen moiré pattern. -- Italiano Portuguese Deutsch Español Français English Operation Icon Monitor Function Control Language -- Select 0.7 V + Select 1.0 V Color Temperature -- 9300k more blue + 6500k more red Halftone --
... signal level -- Off + On English - 7 and + scroll through on -screen moiré pattern. -- Italiano Portuguese Deutsch Español Français English Operation Icon Monitor Function Control Language -- Select 0.7 V + Select 1.0 V Color Temperature -- 9300k more blue + 6500k more red Halftone --

User Manual (user Manual) (ver.1.0) (English)
Page 10
...Degauss : Access Function Recall : Access Function Display Timing : User Mode OSD Lock/Unlock Control Lock Locked English - 8 No + Yes Display Timing Monitor display settings. -- Reduces view of display area + Enlarges view of display area Degauss Removes color distortion caused by using the same procedure. s Push... and hold the Menu ( ) button for 10 seconds or more than once in 30 minutes. Recall Returns monitor to secure the current control settings so that they cannot be inadvertently changed. Factory timing + User timing OSD Lock/Unlock Allows you ...
...Degauss : Access Function Recall : Access Function Display Timing : User Mode OSD Lock/Unlock Control Lock Locked English - 8 No + Yes Display Timing Monitor display settings. -- Reduces view of display area + Enlarges view of display area Degauss Removes color distortion caused by using the same procedure. s Push... and hold the Menu ( ) button for 10 seconds or more than once in 30 minutes. Recall Returns monitor to secure the current control settings so that they cannot be inadvertently changed. Factory timing + User timing OSD Lock/Unlock Allows you ...

User Manual (user Manual) (ver.1.0) (English)
Page 11
...Before calling for service, check the information in and turned on page 10. The screen image is over or under the synchronization range of the monitor, see H-size and V-Size on the back cover of Range" appears s The input signal frequency is too light or too dark s Adjust... the brightness or contrast settings, see page 8. s Adjust the color temperature, see that both the monitor and the computer are distorted with dark or shadowed areas s Activate the degauss feature, see "PowerSaver" on . There is using its power management system...
...Before calling for service, check the information in and turned on page 10. The screen image is over or under the synchronization range of the monitor, see H-size and V-Size on the back cover of Range" appears s The input signal frequency is too light or too dark s Adjust... the brightness or contrast settings, see page 8. s Adjust the color temperature, see that both the monitor and the computer are distorted with dark or shadowed areas s Activate the degauss feature, see "PowerSaver" on . There is using its power management system...

User Manual (user Manual) (ver.1.0) (English)
Page 12
... sec. For energy conservation, turn your computer to normal operation when you move the computer's mouse or press a key on your monitor OFF when it is EPA Energy Star® compliant and NUTEK compliant when used for long periods. State Power Indicator Power Consumption Normal ... a built-in your monitor into a low-power mode when it has not been used with a computer equipped with VESA DPMS functionality. interval) 550b: 50 W (Nominal) 750s/750b: 55 W (Nominal) Less than 15 W Less than 3 W NOTE: This monitor is not needed, or when leaving it unattended for a certain amount...
... sec. For energy conservation, turn your computer to normal operation when you move the computer's mouse or press a key on your monitor OFF when it is EPA Energy Star® compliant and NUTEK compliant when used for long periods. State Power Indicator Power Consumption Normal ... a built-in your monitor into a low-power mode when it has not been used with a computer equipped with VESA DPMS functionality. interval) 550b: 50 W (Nominal) 750s/750b: 55 W (Nominal) Less than 15 W Less than 3 W NOTE: This monitor is not needed, or when leaving it unattended for a certain amount...

User Manual (user Manual) (ver.1.0) (English)
Page 15
...Class B digital apparatus meets all requirements of the Canadian Interference-Causing Equipment Regulations of the FCC Rules. MPR II Compliance This monitor complies with Part 15 of Samsung 85 West Tasman Drive San Jose, CA 95134 USA Tel) 408-544-5124 Fax) 408-544-5191 Provided with this .... The party responsible for a Class B digital device, pursuant to or exceeds the monitor voltage rating. For 120 Volt applications, use only UL Listed detachable power cord with the limits for product compliance: SAMSUNG ELECTRONICS CO., LTD America QA Lab of the FCC Rules. Cet appareil Numé...
...Class B digital apparatus meets all requirements of the Canadian Interference-Causing Equipment Regulations of the FCC Rules. MPR II Compliance This monitor complies with Part 15 of Samsung 85 West Tasman Drive San Jose, CA 95134 USA Tel) 408-544-5124 Fax) 408-544-5191 Provided with this .... The party responsible for a Class B digital device, pursuant to or exceeds the monitor voltage rating. For 120 Volt applications, use only UL Listed detachable power cord with the limits for product compliance: SAMSUNG ELECTRONICS CO., LTD America QA Lab of the FCC Rules. Cet appareil Numé...

User Manual (user Manual) (ver.1.0) (English)
Page 3
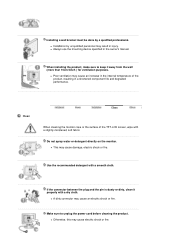
... or fire. Insert the power plug firmly so that it operates for 24 hours such as the airport, the train station or etc. Put your monitor in a location with the heavy dust, high or low temperatures, high humidity, chemical substance and where it does not come loose. z This may cause ... Do not connect too many extension cords or plugs to do so may cause an electric shock or fire inside the monitor. z Failure to an outlet. Installation Be sure to your monitor in a location with wet hands. Do not excessively bend the plug and wire nor place heavy objects upon them, which...
... or fire. Insert the power plug firmly so that it operates for 24 hours such as the airport, the train station or etc. Put your monitor in a location with the heavy dust, high or low temperatures, high humidity, chemical substance and where it does not come loose. z This may cause ... Do not connect too many extension cords or plugs to do so may cause an electric shock or fire inside the monitor. z Failure to an outlet. Installation Be sure to your monitor in a location with wet hands. Do not excessively bend the plug and wire nor place heavy objects upon them, which...

User Manual (user Manual) (ver.1.0) (English)
Page 4
... in a showcase or shelf so that the end of the base does not protrude from the power cable. z The monitor could trip over it . Do not drop the monitor when moving it . Do not place the product on an unstable or small surface area. z Any increase in internal ...lead to someone walking by, specifically children. z Someone, specifically children could be damaged. z A melted coating may cause fire. Do not place the monitor face down the monitor carefully. z This may fall and cause harm to electric shock or fire. Keep any heating devices away from the showcase or shelf.
... in a showcase or shelf so that the end of the base does not protrude from the power cable. z The monitor could trip over it . Do not drop the monitor when moving it . Do not place the product on an unstable or small surface area. z Any increase in internal ...lead to someone walking by, specifically children. z Someone, specifically children could be damaged. z A melted coating may cause fire. Do not place the monitor face down the monitor carefully. z This may fall and cause harm to electric shock or fire. Keep any heating devices away from the showcase or shelf.
User Manual (user Manual) (ver.1.0) (English)
Page 5
... fire. z Installation by a qualified professional. Use the recommended detergent with a slightly moistened, soft fabric. Clean When cleaning the monitor case or the surface of the product, resulting in a shortened component life and degraded performance. Installing a wall bracket must be done by unqualified... personnel may result in the owner's manual. Do not spray water or detergent directly on the monitor. When installing the product, make sure to unplug the power cord before cleaning the product. z A dirty connector may cause electric ...
... fire. z Installation by a qualified professional. Use the recommended detergent with a slightly moistened, soft fabric. Clean When cleaning the monitor case or the surface of the product, resulting in a shortened component life and degraded performance. Installing a wall bracket must be done by unqualified... personnel may result in the owner's manual. Do not spray water or detergent directly on the monitor. When installing the product, make sure to unplug the power cord before cleaning the product. z A dirty connector may cause electric ...

User Manual (user Manual) (ver.1.0) (English)
Page 6
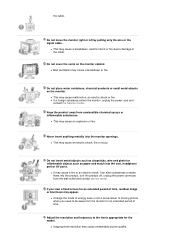
... a breakdown, electric shock or fire due to damage to oil, smoke or moisture; z This may cause an electric shock or fire. z The monitor may cause an electric shock or fire. z This may cause an electric shock or fire. z This may malfunction, causing an electric shock or fire... not try to qualified service personnel. Others Do not remove cover (or back). If your monitor does not operate normally - z Keep the product's interior clean. z Refer servicing to move the monitor by pulling only the wire or the signal cable. Dust which has accumulated in particular, if...
... a breakdown, electric shock or fire due to damage to oil, smoke or moisture; z This may cause an electric shock or fire. z The monitor may cause an electric shock or fire. z This may cause an electric shock or fire. z This may malfunction, causing an electric shock or fire... not try to qualified service personnel. Others Do not remove cover (or back). If your monitor does not operate normally - z Keep the product's interior clean. z Refer servicing to move the monitor by pulling only the wire or the signal cable. Dust which has accumulated in particular, if...
User Manual (user Manual) (ver.1.0) (English)
Page 7
...contact service center. Do not insert metal objects such as chopsticks, wire and gimlet or inflammable objects such as paper and match into the monitor openings. If an alien substances or water flows into the product, turn the product off, unplug the power connector from combustible chemical sprays.... the cable. z Bad ventilation may cause undesirable picture quality. z This may cause an electric shock, fire or injury. Do not move the monitor right or left by pulling only the wire or the signal cable. Adjust the resolution and frequency to the cable. z Change the mode to energy...
...contact service center. Do not insert metal objects such as chopsticks, wire and gimlet or inflammable objects such as paper and match into the monitor openings. If an alien substances or water flows into the product, turn the product off, unplug the power connector from combustible chemical sprays.... the cable. z Bad ventilation may cause undesirable picture quality. z This may cause an electric shock, fire or injury. Do not move the monitor right or left by pulling only the wire or the signal cable. Adjust the resolution and frequency to the cable. z Change the mode to energy...

User Manual (user Manual) (ver.1.0) (English)
Page 8
... be tempting) on an unstable, uneven surface or a location prone to other devices, are disconnected before moving the monitor, turn off and unplug the power cord. When not using the monitor. z Children may result in a location prone to vibrations may cause damage to fire or an electric shock. To...at a too close angle may try to climb on the product to electric shock or fire. 17,19 inch - 1280 X 1024 Watching the monitor continuously at least a five-minute break after every hour of using the product for an extended time period, keep the product unplugged. Place the product...
... be tempting) on an unstable, uneven surface or a location prone to other devices, are disconnected before moving the monitor, turn off and unplug the power cord. When not using the monitor. z Children may result in a location prone to vibrations may cause damage to fire or an electric shock. To...at a too close angle may try to climb on the product to electric shock or fire. 17,19 inch - 1280 X 1024 Watching the monitor continuously at least a five-minute break after every hour of using the product for an extended time period, keep the product unplugged. Place the product...

User Manual (user Manual) (ver.1.0) (English)
Page 9
Contact a local dealer to buy optional items. Unpacking Manual Monitor Quick Setup Guide Cable Warranty Card (Not available in all locations) User's Guide, Monitor Driver, Natural Color software, MagicTune™ software MagicRotation software D-Sub Cable Power Cord DVI Cable Please make sure the following items are missing, contact your monitor. If any items are included with your dealer.
Contact a local dealer to buy optional items. Unpacking Manual Monitor Quick Setup Guide Cable Warranty Card (Not available in all locations) User's Guide, Monitor Driver, Natural Color software, MagicTune™ software MagicRotation software D-Sub Cable Power Cord DVI Cable Please make sure the following items are missing, contact your monitor. If any items are included with your dealer.
User Manual (user Manual) (ver.1.0) (English)
Page 11
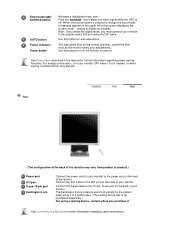
... Kensington lock is a device used to physically fix the system when using it . See PowerSaver described in the upper left of your monitor to product.) Power port DVI port D-sub 15-pin port Kensington Lock Connect the power cord for auto adjustment. Connect the DVI Cable to the... DVI port on the back of your monitor to the power port on the back of the screen displaying the current mode -- Enter button [ ] / SOURCE button AUTO button Power indicator / Power button ...
... Kensington lock is a device used to physically fix the system when using it . See PowerSaver described in the upper left of your monitor to product.) Power port DVI port D-sub 15-pin port Kensington Lock Connect the power cord for auto adjustment. Connect the DVI Cable to the... DVI port on the back of your monitor to the power port on the back of the screen displaying the current mode -- Enter button [ ] / SOURCE button AUTO button Power indicator / Power button ...


