

Owner Instructions
Page 1
OWNER'S INSTRUCTIONS AW0500/AW0500A AW0510/AW0510C/AW0510D AW0510A/AW0510B AW0600/AW0610A WINDOW-TYPE ROOM AIR CONDITIONER ( Cool ) E S DB68-00864A(8)
OWNER'S INSTRUCTIONS AW0500/AW0500A AW0510/AW0510C/AW0510D AW0510A/AW0510B AW0600/AW0610A WINDOW-TYPE ROOM AIR CONDITIONER ( Cool ) E S DB68-00864A(8)
Owner Instructions
Page 2
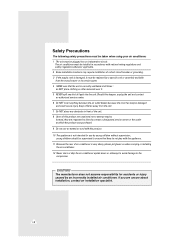
...is damaged, it must be plugged into the unit. CAUTION The manufacturer does not assume responsibility for use by an incorrectly installed air conditioner. The air conditioner must be installed in front of the unit. 8 Users of this happen, unplug the unit and contact an authorized service center.... 6 Do NOT insert anything between the air outlet blades because the inner fan may require installation of air conditioner is very sharp, please put gloves on when carrying or installing the air conditioner. 12 Never store or ship the air conditioner upside down or sideways to avoid damage to...
...is damaged, it must be plugged into the unit. CAUTION The manufacturer does not assume responsibility for use by an incorrectly installed air conditioner. The air conditioner must be installed in front of the unit. 8 Users of this happen, unplug the unit and contact an authorized service center.... 6 Do NOT insert anything between the air outlet blades because the inner fan may require installation of air conditioner is very sharp, please put gloves on when carrying or installing the air conditioner. 12 Never store or ship the air conditioner upside down or sideways to avoid damage to...

Owner Instructions
Page 3
Contents x PREPARING YOUR AIR CONDITIONER s Safety Precautions 2 s Description of Each Component 4 s Getting Started 5 x OPERATING YOUR AIR CONDITIONER s Cooling Your Room 6 s Ventilating Your Room 7 s Adjusting the Air Flow Direction Horizontally 7 x RECOMMENDATIONS FOR USE s Power Failure 8 s Temperature and Humidity Range 8 s Cleaning Your Air Conditioner 9 s Solving Common Problems 10 s Technical Specifications 11 x INSTALLATION ...12 E-3
Contents x PREPARING YOUR AIR CONDITIONER s Safety Precautions 2 s Description of Each Component 4 s Getting Started 5 x OPERATING YOUR AIR CONDITIONER s Cooling Your Room 6 s Ventilating Your Room 7 s Adjusting the Air Flow Direction Horizontally 7 x RECOMMENDATIONS FOR USE s Power Failure 8 s Temperature and Humidity Range 8 s Cleaning Your Air Conditioner 9 s Solving Common Problems 10 s Technical Specifications 11 x INSTALLATION ...12 E-3

Owner Instructions
Page 5
Your Owner's Instructions contain much valuable information on using your Owner's Instructions. E-5 Getting Started You have just purchased a Samsung window-type room air conditioner which should be installed following your air conditioner. Please take the time to read them as they will help you take full advantage of the unit's features.
Your Owner's Instructions contain much valuable information on using your Owner's Instructions. E-5 Getting Started You have just purchased a Samsung window-type room air conditioner which should be installed following your air conditioner. Please take the time to read them as they will help you take full advantage of the unit's features.

Owner Instructions
Page 6
... cooling if the room temperature is higher than the selected temperature. 3 To control the direction of the air flow, refer to the desired position. E-6 Result: x The air conditioner starts up in cool mode. Note x You can change modes at any time. 81˚F ~ 73˚F 81˚F ~ 84˚F 73˚F ~ 64˚...
... cooling if the room temperature is higher than the selected temperature. 3 To control the direction of the air flow, refer to the desired position. E-6 Result: x The air conditioner starts up in cool mode. Note x You can change modes at any time. 81˚F ~ 73˚F 81˚F ~ 84˚F 73˚F ~ 64˚...

Owner Instructions
Page 7
.... 3 To control the direction of the air conditioner. 1 The side by side air direction louvers are together and are controlled by a lever. Result: x The air simply circulates inside the room circulates and stale air is stale, you wish to discharge stale air, push the ventilation switch on the front ...the room. 2 Turn the SELECTOR and set it to the section below. Result: x The air conditioner starts up in your room is discharged outside. Adjusting the Air Flow Direction Horizontally The air flow direction blades can ventilate the room using the Fan feature. 1 If you can be adjusted...
.... 3 To control the direction of the air conditioner. 1 The side by side air direction louvers are together and are controlled by a lever. Result: x The air simply circulates inside the room circulates and stale air is stale, you wish to discharge stale air, push the ventilation switch on the front ...the room. 2 Turn the SELECTOR and set it to the section below. Result: x The air conditioner starts up in your room is discharged outside. Adjusting the Air Flow Direction Horizontally The air flow direction blades can ventilate the room using the Fan feature. 1 If you can be adjusted...

Owner Instructions
Page 8
... long periods at ... Temperature and Humidity Range The following table indicates the temperature and humidity ranges within which the air conditioner can be triggered and the air conditioner stopped. Mode Indoor Temperature Outdoor Temperature Cooling 70˚F to 90˚F approx. 70˚F to OFF. ...Then... When the power comes back on, wait five minutes before turning the unit back on and drip from the surface of the air conditioner. If a power failure occurs, set the SELECTOR to 110˚F approx. Higher temperature The automatic protection feature may happen if the...
... long periods at ... Temperature and Humidity Range The following table indicates the temperature and humidity ranges within which the air conditioner can be triggered and the air conditioner stopped. Mode Indoor Temperature Outdoor Temperature Cooling 70˚F to 90˚F approx. 70˚F to OFF. ...Then... When the power comes back on, wait five minutes before turning the unit back on and drip from the surface of the air conditioner. If a power failure occurs, set the SELECTOR to 110˚F approx. Higher temperature The automatic protection feature may happen if the...

Owner Instructions
Page 9
...(The service life of the air conditioner is lengthened when the dew formed on the heat exchanger is removed before storage.) x Turn off the air conditioner, and pull out the power plug. x Check the cleanliness of time. Cleaning Your Air Conditioner Be sure to clean the air filter periodically to the right ...side. 2 Remove the dust on the air filter using a vacuum cleaner and brush. 3 Insert the air filter back into its original position. 4 Wipe the surface...
...(The service life of the air conditioner is lengthened when the dew formed on the heat exchanger is removed before storage.) x Turn off the air conditioner, and pull out the power plug. x Check the cleanliness of time. Cleaning Your Air Conditioner Be sure to clean the air filter periodically to the right ...side. 2 Remove the dust on the air filter using a vacuum cleaner and brush. 3 Insert the air filter back into its original position. 4 Wipe the surface...

Owner Instructions
Page 10
...of an unnecessary call. x Check to the outside the room. - Block the sunlight with foreign substances. - Do not use the air conditioner together with any electric device generating heat. - x Check the voltage. (See the technical specifications) x Check the power plug for ... to page 8 for disconnection. x Check to see whether there is any heating device. E-10 The air comes out smoothly, but cooling is any direct sunlight facing the air conditioner. - Solving Common Problems Before contacting an authorized service center, perform the following simple checks. They may...
...of an unnecessary call. x Check to the outside the room. - Block the sunlight with foreign substances. - Do not use the air conditioner together with any electric device generating heat. - x Check the voltage. (See the technical specifications) x Check the power plug for ... to page 8 for disconnection. x Check to see whether there is any heating device. E-10 The air comes out smoothly, but cooling is any direct sunlight facing the air conditioner. - Solving Common Problems Before contacting an authorized service center, perform the following simple checks. They may...

Owner Instructions
Page 12
...will be enough clearance around the cabinet to be modified for windows other than the standard double-hung type. x Install the air conditioner in order after considering the installation area and drain hose. Note All supporting parts should be properly grounded. x Follow national ...supply. - Checkpoints prior to installation 1 Check the cabinet and front grille of the unit for accident or injury caused by an incorrectly installed air conditioner. x Do not change the plug on the label attached to 36" 12 7/8" min E-12 Before installation, please read the INSTALLATION instructions...
...will be enough clearance around the cabinet to be modified for windows other than the standard double-hung type. x Install the air conditioner in order after considering the installation area and drain hose. Note All supporting parts should be properly grounded. x Follow national ...supply. - Checkpoints prior to installation 1 Check the cabinet and front grille of the unit for accident or injury caused by an incorrectly installed air conditioner. x Do not change the plug on the label attached to 36" 12 7/8" min E-12 Before installation, please read the INSTALLATION instructions...
Owner Instructions
Page 14
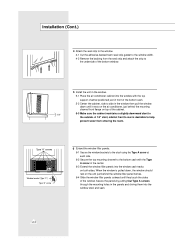
...window should rest on the unit just behind the window filler panel frames. 6-4 Slide the window filler panels outward until it rests on the air conditioner, just behind the mounting channel front flange on top of the cabinet. 1/4" 5-3 Make sure the cabinet maintains a slightly downward slant to the...water from the seal strip and attach the strip to the underside of the bottom window. 5 Install the unit in the window. 5-1 Place the air conditioner cabinet into the window with the Type A screw in the center. 6-3 Extend the window filler panels into the window stool and sash. Installation ...
...window should rest on the unit just behind the window filler panel frames. 6-4 Slide the window filler panels outward until it rests on the air conditioner, just behind the mounting channel front flange on top of the cabinet. 1/4" 5-3 Make sure the cabinet maintains a slightly downward slant to the...water from the seal strip and attach the strip to the underside of the bottom window. 5 Install the unit in the window. 5-1 Place the air conditioner cabinet into the window with the Type A screw in the center. 6-3 Extend the window filler panels into the window stool and sash. Installation ...
Owner Instructions
Page 15
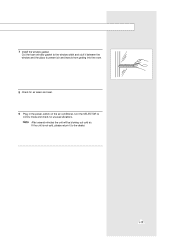
E-15 Cut the foam window gasket to the window width and stuff it to COOL mode and check for air leaks and seal. 9 Plug in the power, switch on the air conditioner, turn the SELECTOR to the dealer. Note After several minutes the unit will be blowing out cold air. If the unit is not cold, please return it between the window and the glass to prevent air and insects from getting into the room. ;;;;;;; 8 Check for unusual vibrations. 7 Install the window gasket.
E-15 Cut the foam window gasket to the window width and stuff it to COOL mode and check for air leaks and seal. 9 Plug in the power, switch on the air conditioner, turn the SELECTOR to the dealer. Note After several minutes the unit will be blowing out cold air. If the unit is not cold, please return it between the window and the glass to prevent air and insects from getting into the room. ;;;;;;; 8 Check for unusual vibrations. 7 Install the window gasket.

Owner Instructions
Page 17
... or problems which occurs in shipment; To obtain warranty service, please contact SAMSUNG at no charge, as stipulated herein, with altered serial numbers; SAMSUNG ROOM AIR CONDITIONER LIMITED WARRANTY TO ORIGINAL PURCHASER This SAMSUNG brand product, as supplied and distributed by SAMSUNG ELECTRONICS AMERICA, INC. (SAMSUNG) and delivered new, in the original carton to the original consumer...
... or problems which occurs in shipment; To obtain warranty service, please contact SAMSUNG at no charge, as stipulated herein, with altered serial numbers; SAMSUNG ROOM AIR CONDITIONER LIMITED WARRANTY TO ORIGINAL PURCHASER This SAMSUNG brand product, as supplied and distributed by SAMSUNG ELECTRONICS AMERICA, INC. (SAMSUNG) and delivered new, in the original carton to the original consumer...


