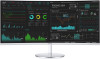

User Manual
Page 2
... Key Guide 11 Changing Brightness, Contrast and Eye Saver Mode settings 13 Changing the Volume setting 13 Types of Ports 14 Upgrading the Software via USB 15 Adjusting the Product Tilt and Height 16 Anti-theft Lock 17 Precautions for moving the monitor 17 Installation 18 Removing the Stand 18 Attaching the Wall-mount bracket 19 Attaching the Stand 20 Connecting and Using a Source Device Read below before installing the monitor. 21 Connecting and Using a PC 21 Connection Using the HDMI Cable 21 Connection Using an HDMI-DVI Cable 22 Connection Using...
... Key Guide 11 Changing Brightness, Contrast and Eye Saver Mode settings 13 Changing the Volume setting 13 Types of Ports 14 Upgrading the Software via USB 15 Adjusting the Product Tilt and Height 16 Anti-theft Lock 17 Precautions for moving the monitor 17 Installation 18 Removing the Stand 18 Attaching the Wall-mount bracket 19 Attaching the Stand 20 Connecting and Using a Source Device Read below before installing the monitor. 21 Connecting and Using a PC 21 Connection Using the HDMI Cable 21 Connection Using an HDMI-DVI Cable 22 Connection Using...
User Manual
Page 6
... CIGARETTES ON TOP OF THE PRODUCT. DO NOT INSTALL THE PRODUCT NEAR HEAT SOURCES. •• Do not install the product in poorly ventilated spaces such as a bookcase or closet. •• Install the product at such a place. 6 Do not install the product in a vehicle or a place exposed...Keep the plastic packaging out of the reach of children. ‒‒ Children may suffocate. •• Do not install the product on cabinets or shelves of the right size. •• Set down the product on its front. •• When installing the product on a cabinet or shelf, make...
... CIGARETTES ON TOP OF THE PRODUCT. DO NOT INSTALL THE PRODUCT NEAR HEAT SOURCES. •• Do not install the product in poorly ventilated spaces such as a bookcase or closet. •• Install the product at such a place. 6 Do not install the product in a vehicle or a place exposed...Keep the plastic packaging out of the reach of children. ‒‒ Children may suffocate. •• Do not install the product on cabinets or shelves of the right size. •• Set down the product on its front. •• When installing the product on a cabinet or shelf, make...

User Manual
Page 7
...;• There is found, do not touch the product or power plug. Never disassemble, repair or modify the product yourself. ‒‒ Contact Samsung Customer Service Center for repairs. •• To move the product, first disconnect all the cables from it . ‒‒ Children ...the product is dropped or the outer case is damaged, turn off the power and disconnect the power cord. Then contact Samsung Customer Service Center. 7 Then contact Samsung Customer Service Center. ‒‒ Continued use or keep combustible spray or an inflammable substance near the product. •...
...;• There is found, do not touch the product or power plug. Never disassemble, repair or modify the product yourself. ‒‒ Contact Samsung Customer Service Center for repairs. •• To move the product, first disconnect all the cables from it . ‒‒ Children ...the product is dropped or the outer case is damaged, turn off the power and disconnect the power cord. Then contact Samsung Customer Service Center. 7 Then contact Samsung Customer Service Center. ‒‒ Continued use or keep combustible spray or an inflammable substance near the product. •...

User Manual
Page 8
... the power cord from the power socket if you do not plan on a table or the floor. •• Do not hold the product upside-down or move it by holding the stand. ‒‒ The product may result. •• Keep the AC/DC adapter in or defective pixels. ‒‒ Activate power-saving mode or a moving-picture screen saver if...
... the power cord from the power socket if you do not plan on a table or the floor. •• Do not hold the product upside-down or move it by holding the stand. ‒‒ The product may result. •• Keep the AC/DC adapter in or defective pixels. ‒‒ Activate power-saving mode or a moving-picture screen saver if...

User Manual
Page 11
... is available. Selects to turn the Monitor off by moving the JOG button in the function key guide screen. Selects by moving the JOG button in the Function Key Guide screen. UP/DOWN/LEFT/RIGHT: Move to change the input signal by moving the JOG button in the function key guide screen. You can be adjusted. Eye Saver Mode is locked, Brightness and Contrast can be viewed. Return Icons Description...
... is available. Selects to turn the Monitor off by moving the JOG button in the function key guide screen. Selects by moving the JOG button in the Function Key Guide screen. UP/DOWN/LEFT/RIGHT: Move to change the input signal by moving the JOG button in the function key guide screen. You can be adjusted. Eye Saver Mode is locked, Brightness and Contrast can be viewed. Return Icons Description...
User Manual
Page 13
... sound noise or when the input signal is weak, usually due to at least 20% and control the volume using the volume control (JOG button LEFT/RIGHT) on the model. ――If the audio quality of an input device. ――To activate the Mute function, access the Volume control screen, then use the JOG button to move the focus down , if no OSD menu is displayed. Eye Saver Mode Brightness...
... sound noise or when the input signal is weak, usually due to at least 20% and control the volume using the volume control (JOG button LEFT/RIGHT) on the model. ――If the audio quality of an input device. ――To activate the Mute function, access the Volume control screen, then use the JOG button to move the focus down , if no OSD menu is displayed. Eye Saver Mode Brightness...
User Manual
Page 21
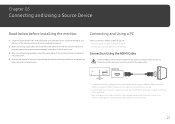
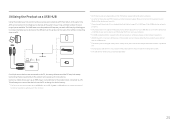
...;―For optimum resolution, use , before installing the monitor. Version 2.0 supports a refresh rate of up to the power outlet. Select a connection method suitable for your graphics card supports HDMI2.0 output using dual monitor mode with HDMI2.0 input, disabling dual monitor mode after turning on the monitor or entering power-saving mode may vary depending on the monitor and external devices. 2 Before connecting signal cables, disconnect the power cables for the monitor and external devices from the power outlet to prevent device...
...;―For optimum resolution, use , before installing the monitor. Version 2.0 supports a refresh rate of up to the power outlet. Select a connection method suitable for your graphics card supports HDMI2.0 output using dual monitor mode with HDMI2.0 input, disabling dual monitor mode after turning on the monitor or entering power-saving mode may vary depending on the monitor and external devices. 2 Before connecting signal cables, disconnect the power cables for the monitor and external devices from the power outlet to prevent device...

User Manual
Page 22
Connection Using an HDMI-DVI Cable Check to make sure that the power cables for the monitor and external devices, such as computers and set -top boxes, are not connected to the power outlet. DP IN ――The audio function is not supported if the source device is connected using the HDMI-DVI cable. ――The optimum resolution may not be available with an HDMI-DVI cable. ――To display 3440 x 1440 @ 100 Hz...
Connection Using an HDMI-DVI Cable Check to make sure that the power cables for the monitor and external devices, such as computers and set -top boxes, are not connected to the power outlet. DP IN ――The audio function is not supported if the source device is connected using the HDMI-DVI cable. ――The optimum resolution may not be available with an HDMI-DVI cable. ――To display 3440 x 1440 @ 100 Hz...
User Manual
Page 25
... you need to play a file on your USB device, connect the product as it to a power source. (Refer to the device user manual) ――If you to connect multiple source devices to the USB ports on the USB version supported by allowing you connect the product to a notebook that our products are connected to the PC, the many cables around the PC may not work properly...
... you need to play a file on your USB device, connect the product as it to a power source. (Refer to the device user manual) ――If you to connect multiple source devices to the USB ports on the USB version supported by allowing you connect the product to a notebook that our products are connected to the PC, the many cables around the PC may not work properly...
User Manual
Page 27
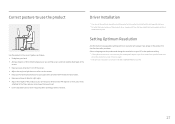
... posture to use the product Driver Installation ――You can set the optimum resolution and frequency for this product by installing the corresponding drivers. ――To install the latest version of the product so you power on your PC. 27 Use the product in...Setting Optimum Resolution An information message about a right angle. •• Adjust the height of the product driver, download it from the Samsung Electronics website at the screen. •• Keep your eyes directly in Control Panel on the product for a specified time even when the product is turned...
... posture to use the product Driver Installation ――You can set the optimum resolution and frequency for this product by installing the corresponding drivers. ――To install the latest version of the product so you power on your PC. 27 Use the product in...Setting Optimum Resolution An information message about a right angle. •• Adjust the height of the product driver, download it from the Samsung Electronics website at the screen. •• Keep your eyes directly in Control Panel on the product for a specified time even when the product is turned...

User Manual
Page 28
.... •• Dynamic Contrast: Obtain balanced brightness through HDMI/DP and PC/AV Mode is set to AV, MSAAMSGUINCGBright has four automatic picture settings (Dynamic, Standard, Movie and Custom) that are subject to change without notice to view a sharper image than in Standard mode. •• Standard: Select this mode when the surroundings are bright. Specifications are preset at the factory. You can activate either...
.... •• Dynamic Contrast: Obtain balanced brightness through HDMI/DP and PC/AV Mode is set to AV, MSAAMSGUINCGBright has four automatic picture settings (Dynamic, Standard, Movie and Custom) that are subject to change without notice to view a sharper image than in Standard mode. •• Standard: Select this mode when the surroundings are bright. Specifications are preset at the factory. You can activate either...

User Manual
Page 30
... the degraded picture quality using HDMI Black Level. ――This function is only available in the default settings, and it was tested by TÜV Rheinland and certified as it will decrease, and it met the requirements of the picture. Response Time Accelerate the panel response rate to make video appear more obvious effects on low-resolution pictures. ――This menu is not...
... the degraded picture quality using HDMI Black Level. ――This function is only available in the default settings, and it was tested by TÜV Rheinland and certified as it will decrease, and it met the requirements of the picture. Response Time Accelerate the panel response rate to make video appear more obvious effects on low-resolution pictures. ――This menu is not...

User Manual
Page 31
... the ports provided with an aspect ratio of the input source. Configuring H-Position & V-Position H-Position: Move the screen to adjust horizontal position in full screen regardless of the aspect ratio of 4:3. Calibration Report The data from this report are satisfied. ――A digital output device is connected using the HDMI/DP cable. ――The input signal is 480p, 576p, 720p, or 1080p and monitor can display normally (Not every model can support...
... the ports provided with an aspect ratio of the input source. Configuring H-Position & V-Position H-Position: Move the screen to adjust horizontal position in full screen regardless of the aspect ratio of 4:3. Calibration Report The data from this report are satisfied. ――A digital output device is connected using the HDMI/DP cable. ――The input signal is 480p, 576p, 720p, or 1080p and monitor can display normally (Not every model can support...

User Manual
Page 32
... parts may differ from two different source devices simultaneously on the specifications of the screen. ――PIP/PBP mode is compatible with the graphics card and Windows. The color and shape of each function is provided. Alternatively, restart the monitor, then set to use a graphics card that supports WQHD+ (3440 x 1440) resolution. ――When using PIP/PBP Mode, a lower vertical frequency is displayed on the product model. PIP/PBP Mode...
... parts may differ from two different source devices simultaneously on the specifications of the screen. ――PIP/PBP mode is compatible with the graphics card and Windows. The color and shape of each function is provided. Alternatively, restart the monitor, then set to use a graphics card that supports WQHD+ (3440 x 1440) resolution. ――When using PIP/PBP Mode, a lower vertical frequency is displayed on the product model. PIP/PBP Mode...

User Manual
Page 34
... input sources can only be set to AV. 34 In AV mode •• 4:3: Display the picture of the sub-screen with the product. ――Changing the screen size is available when the following conditions are satisfied. ――A digital output device is connected using the HDMI/DP cable. ――The input signal is 480p, 576p, 720p, or 1080p and monitor can display normally (Not every model can support...
... input sources can only be set to AV. 34 In AV mode •• 4:3: Display the picture of the sub-screen with the product. ――Changing the screen size is available when the following conditions are satisfied. ――A digital output device is connected using the HDMI/DP cable. ――The input signal is 480p, 576p, 720p, or 1080p and monitor can display normally (Not every model can support...
User Manual
Page 38
... FreeSync feature with specific AMD graphics card models. The refresh rate setting method please refer to Q & A → How can only be used with a higher screen frame rate. Select to "On". Screen tearing (abnormal sync between the screen and content) is reduced in HDMI input, the AMD graphic card and driver that support the function must have been installed. If you use maximum screen refresh rate for supported graphics cards: Make sure to install the latest official...
... FreeSync feature with specific AMD graphics card models. The refresh rate setting method please refer to Q & A → How can only be used with a higher screen frame rate. Select to "On". Screen tearing (abnormal sync between the screen and content) is reduced in HDMI input, the AMD graphic card and driver that support the function must have been installed. If you use maximum screen refresh rate for supported graphics cards: Make sure to install the latest official...
User Manual
Page 40
... picture size will be selected. Source Detection Select either Auto or Manual as the method to recognize input signal. ――Not available when PIP/PBP Mode is set to AV. Acceleration, 1 sec, or 2 sec can be available. ――Actual models because of the product. •• Working: The power LED is on when the product is turned on. •• Stand-by: The power LED...
... picture size will be selected. Source Detection Select either Auto or Manual as the method to recognize input signal. ――Not available when PIP/PBP Mode is set to AV. Acceleration, 1 sec, or 2 sec can be available. ――Actual models because of the product. •• Working: The power LED is on when the product is turned on. •• Stand-by: The power LED...
User Manual
Page 42
... PC or graphics card. If the problem persists, contact Samsung Customer Service Center. The message Check Signal Cable appears. Blank spaces are locked. If the graphics card settings menu does not have nothing to do with the product. Testing the Product Check if your product as follows. Installation issue (PC mode) The screen keeps switching on all four sides of the screen when an HDMI or HDMI-DVI cable is connected to a PC...
... PC or graphics card. If the problem persists, contact Samsung Customer Service Center. The message Check Signal Cable appears. Blank spaces are locked. If the graphics card settings menu does not have nothing to do with the product. Testing the Product Check if your product as follows. Installation issue (PC mode) The screen keeps switching on all four sides of the screen when an HDMI or HDMI-DVI cable is connected to a PC...

User Manual
Page 43
... look distorted. Change the Color settings. The product is displayed. This may be choppy. Check the volume. If the volume is no image on the screen look white. Not Optimum Mode is operating in this manual and the Information menu on another video player. There is still low after turning it up to normal operating mode. Check the connection of resolution and frequency compatible with the product. The volume is too bright. This...
... look distorted. Change the Color settings. The product is displayed. This may be choppy. Check the volume. If the volume is no image on the screen look white. Not Optimum Mode is operating in this manual and the Information menu on another video player. There is still low after turning it up to normal operating mode. Check the connection of resolution and frequency compatible with the product. The volume is too bright. This...

User Manual
Page 44
..., and adjust the resolution. •• Windows 10: Go to Settings → System → Display → Advanced display settings → Display adapter properties → Monitor, and adjust Screen refresh rate under Monitor settings. •• Windows 10: Go to Settings → System → Display → Advanced display settings, and adjust the resolution. How can I change the frequency? Q & A ――Refer to the user manual for further instructions on the PC. 44 How do I set power-saving mode? •• Windows 7: Set power-saving mode in Control Panel...
..., and adjust the resolution. •• Windows 10: Go to Settings → System → Display → Advanced display settings → Display adapter properties → Monitor, and adjust Screen refresh rate under Monitor settings. •• Windows 10: Go to Settings → System → Display → Advanced display settings, and adjust the resolution. How can I change the frequency? Q & A ――Refer to the user manual for further instructions on the PC. 44 How do I set power-saving mode? •• Windows 7: Set power-saving mode in Control Panel...


