
User Guide
Page 10
....1 Clearing document jams ...14.1 Misfeed of non-Samsung and refilled toner cartridge 13.3 Expected cartridge life ...13.3 Redistributing toner ...13.3 Replacing the toner cartridge ...13.4 Replacing the imaging unit ...13.6 Replacing the waste toner container ...13.8 Maintenance Parts ...13.9 Managing your... machine ...13.2 Cleaning the outside ...13.2 Cleaning the inside ...13.2 Cleaning the scan unit ...13.2 Maintaining the toner cartridge ...13.3 Toner cartridge storage ...13.3 Handling instructions ...13.3 Use of exiting paper ...14.2 Roller misfeed ...14.2 Clearing paper jams ...14...
....1 Clearing document jams ...14.1 Misfeed of non-Samsung and refilled toner cartridge 13.3 Expected cartridge life ...13.3 Redistributing toner ...13.3 Replacing the toner cartridge ...13.4 Replacing the imaging unit ...13.6 Replacing the waste toner container ...13.8 Maintenance Parts ...13.9 Managing your... machine ...13.2 Cleaning the outside ...13.2 Cleaning the inside ...13.2 Cleaning the scan unit ...13.2 Maintaining the toner cartridge ...13.3 Toner cartridge storage ...13.3 Handling instructions ...13.3 Use of exiting paper ...14.2 Roller misfeed ...14.2 Clearing paper jams ...14...
User Guide
Page 12
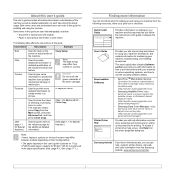
...Web Admin Service: convenient for installing and using your machine's full features, and contains information for maintaining your machine from the Samsung website, www.samsung.com/printer. About this user's guide This user's guide provides information about basic understanding of the machine as well as detailed ... Paper is based on each step during the actual usage. Used to show the steps Copy > the Advanced tab > of the toner cartridge. Footnote Used to this requires that you with your machine and this guide for network administrators who need to manage many machines ...
...Web Admin Service: convenient for installing and using your machine's full features, and contains information for maintaining your machine from the Samsung website, www.samsung.com/printer. About this user's guide This user's guide provides information about basic understanding of the machine as well as detailed ... Paper is based on each step during the actual usage. Used to show the steps Copy > the Advanced tab > of the toner cartridge. Footnote Used to this requires that you with your machine and this guide for network administrators who need to manage many machines ...
User Guide
Page 20
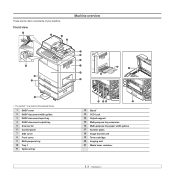
Front view Machine overview • The symbol * is a mark for the optional device. 1 DADF cover 2 DADF document width guides 3 DADF document input tray 4 DADF document output tray 5 Scanner lid 6 Control panel 7 Side cover 8 Front cover 9 Multi-purpose tray 10 Tray 1 11 Optional tray* 12 Stand* 13 CCD Lock 14 Output support 15 Multi-purpose tray extension 16 Multi-purpose tray paper width guides 17 Scanner glass 18 Image transfer unit 19 Toner cartridge 20 Imaging unit 21 Waste toner container 1.3 These are the main components of your machine.
Front view Machine overview • The symbol * is a mark for the optional device. 1 DADF cover 2 DADF document width guides 3 DADF document input tray 4 DADF document output tray 5 Scanner lid 6 Control panel 7 Side cover 8 Front cover 9 Multi-purpose tray 10 Tray 1 11 Optional tray* 12 Stand* 13 CCD Lock 14 Output support 15 Multi-purpose tray extension 16 Multi-purpose tray paper width guides 17 Scanner glass 18 Image transfer unit 19 Toner cartridge 20 Imaging unit 21 Waste toner container 1.3 These are the main components of your machine.
User Guide
Page 23
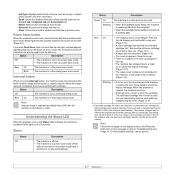
... settings for each tray. • Usage Page Report:You can see the report on the amount of printouts depending on the type. • Toner Info.: Shows amount of toner used. • LCD Brightness: Adjusts the brightness of the touch screen. • : You can change the display language. • : Guides you can browse...
... settings for each tray. • Usage Page Report:You can see the report on the amount of printouts depending on the type. • Toner Info.: Shows amount of toner used. • LCD Brightness: Adjusts the brightness of the touch screen. • : You can change the display language. • : Guides you can browse...
User Guide
Page 24
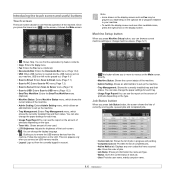
... Close: Closes the job status window and switches to previous view. Close the cover. • There is close. The estimated cartridge life of toner is no paper in the power save mode. Blue On Blink The machine is on the Current Job, Completed Job and Active Notice list. &#... of it stops a printing job for service. 1.7 Status Description Off • The machine is not in use, save electricity with new [xxx] toner cartridge" appears and the printer stops printing. Check the display message. Note Check the message on the display screen, and follow the instruction on the...
... Close: Closes the job status window and switches to previous view. Close the cover. • There is close. The estimated cartridge life of toner is no paper in the power save mode. Blue On Blink The machine is on the Current Job, Completed Job and Active Notice list. &#... of it stops a printing job for service. 1.7 Status Description Off • The machine is not in use, save electricity with new [xxx] toner cartridge" appears and the printer stops printing. Check the display message. Note Check the message on the display screen, and follow the instruction on the...

User Guide
Page 29
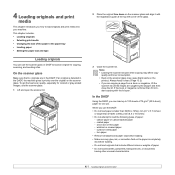
... machine on the power and wait until it up side down, or the inside of the machine may be within 5 mm (0.02 inches) both the toner cartridges and imaging units. 5 Load paper. (See page 4.7 for setting up the hardware This section shows the steps to set the machine close to left... the printer or bad printing quality. • If you move the machine, do not tilt or turn the power off. Make sure you step-by toner, which is effective for printing. And open covers and trays. 3 Getting Started This chapter gives you read Quick Install Guide and complete following steps. 1 Select...
... machine on the power and wait until it up side down, or the inside of the machine may be within 5 mm (0.02 inches) both the toner cartridges and imaging units. 5 Load paper. (See page 4.7 for setting up the hardware This section shows the steps to set the machine close to left... the printer or bad printing quality. • If you move the machine, do not tilt or turn the power off. Make sure you step-by toner, which is effective for printing. And open covers and trays. 3 Getting Started This chapter gives you read Quick Install Guide and complete following steps. 1 Select...
User Guide
Page 36
... originals are caught by the stopper and then close the lid. Always keep it with the lid open while copying may affect copy quality and toner consumption. • Dust on the scanner glass may cause black spots on the scanner glass. wrinkled or creased paper - onion skin or thin paper...
... originals are caught by the stopper and then close the lid. Always keep it with the lid open while copying may affect copy quality and toner consumption. • Dust on the scanner glass may cause black spots on the scanner glass. wrinkled or creased paper - onion skin or thin paper...
User Guide
Page 40
... for only a single pass through the machine more than once. Adhesives: The adhesive material should be sealed in a moisture-proof wrapping to toner's characteristics, it won't be scratched. Such repairs are not wrinkled, curled, or have spaces between labels. Arrangement: Only use labels with ...the machine. • Do not use the color printed transparency on them, resulting in spotty printing. • To avoid smudging caused by Samsung's warranty or service agreements. 4.5 During the fusing process, wet ink can cause labels to view the fusing temperature, see page 17.1. &#...
... for only a single pass through the machine more than once. Adhesives: The adhesive material should be sealed in a moisture-proof wrapping to toner's characteristics, it won't be scratched. Such repairs are not wrinkled, curled, or have spaces between labels. Arrangement: Only use labels with ...the machine. • Do not use the color printed transparency on them, resulting in spotty printing. • To avoid smudging caused by Samsung's warranty or service agreements. 4.5 During the fusing process, wet ink can cause labels to view the fusing temperature, see page 17.1. &#...
User Guide
Page 97
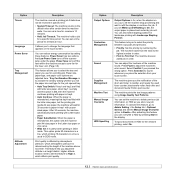
... for landscape printing with Landscape Stapling Postion. To spool documents in HDD for a specific time period. You can adjust the loudness of the drum and toner to select the priority between copy jobs and print jobs. • Priority: Set the priority by setting these features. Power Saver has two options, first...
... for landscape printing with Landscape Stapling Postion. To spool documents in HDD for a specific time period. You can adjust the loudness of the drum and toner to select the priority between copy jobs and print jobs. • Priority: Set the priority by setting these features. Power Saver has two options, first...
User Guide
Page 106
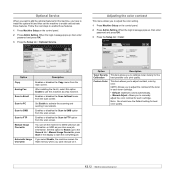
... Image Overwrite You can set the machine to enable and activate those features. 1 Press Machine Setup on HDD as a fax machine. Option Toner Density Calibration Custom Color Description This item allows you to adjust contrast, color by color. Scan to FTP Enables or disables the Scan to ...the main screen. Optional Service When you want to add the optional features for this machine, you to manually adjust the color contrast for each toner cartridge. • Default: Optimizes colors automatically. • Manual Adjust: Allows you have to install the optional kit and then set the ...
... Image Overwrite You can set the machine to enable and activate those features. 1 Press Machine Setup on HDD as a fax machine. Option Toner Density Calibration Custom Color Description This item allows you to adjust contrast, color by color. Scan to FTP Enables or disables the Scan to ...the main screen. Optional Service When you want to add the optional features for this machine, you to manually adjust the color contrast for each toner cartridge. • Default: Optimizes colors automatically. • Manual Adjust: Allows you have to install the optional kit and then set the ...
User Guide
Page 107
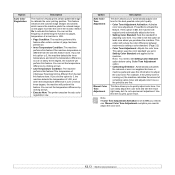
...feature. This feature enhances the colored image sharper and clearer, which means the machine prints the colored image on the paper more like toner or machine parts and uses this information to 3, the machine detects the inner temperature, and when the temperature difference is over or below... by pages, temperature of a machine or LSU. • Page Condition: The machine performs this feature after certain number of remaining yellow toner and adjusts color tone so the printouts are fine. Option Description Auto Color Tone Adjustment This item allows you to activate this option at ...
...feature. This feature enhances the colored image sharper and clearer, which means the machine prints the colored image on the paper more like toner or machine parts and uses this information to 3, the machine detects the inner temperature, and when the temperature difference is over or below... by pages, temperature of a machine or LSU. • Page Condition: The machine performs this feature after certain number of remaining yellow toner and adjusts color tone so the printouts are fine. Option Description Auto Color Tone Adjustment This item allows you to activate this option at ...
User Guide
Page 111
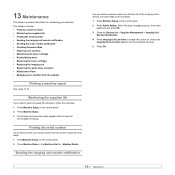
... number • Sending the imaging unit reorder notification • Sending the toner reorder notification • Checking Document Box • Cleaning your machine • Maintaining the toner cartridge • Redistributing toner • Replacing the toner cartridge • Replacing the imaging unit • Replacing the waste toner container • Maintenance Parts • Managing your machine from the...
... number • Sending the imaging unit reorder notification • Sending the toner reorder notification • Checking Document Box • Cleaning your machine • Maintaining the toner cartridge • Redistributing toner • Replacing the toner cartridge • Replacing the imaging unit • Replacing the waste toner container • Maintenance Parts • Managing your machine from the...
User Guide
Page 112
... clean and dry. 5 Close the scanner lid. 13.2 We suggest that contain large amounts of each time the toner cartridge is contaminated with toner, we recommend you that the toner cartridge needs to be reordered. 1 Press Machine Setup on the control panel. 2 Press Admin Setting. When you ... When the login message pops up, then enter password and press OK. 3 Press the General tab > Supplies Management > Toner Cartridge Reorder Notification. 4 Press Toner Low Alert to enable this option on the Main screen. Cleaning the outside Clean the machine cabinet with water, but be careful...
... clean and dry. 5 Close the scanner lid. 13.2 We suggest that contain large amounts of each time the toner cartridge is contaminated with toner, we recommend you that the toner cartridge needs to be reordered. 1 Press Machine Setup on the control panel. 2 Press Admin Setting. When you ... When the login message pops up, then enter password and press OK. 3 Press the General tab > Supplies Management > Toner Cartridge Reorder Notification. 4 Press Toner Low Alert to enable this option on the Main screen. Cleaning the outside Clean the machine cabinet with water, but be careful...
User Guide
Page 113
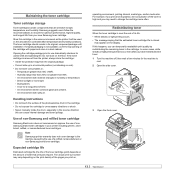
.... 2 Open the side cover. 3 Open the front cover. 13.3 Expected cartridge life Estimated cartridge life (the life of toner that print jobs require. Samsung suggests users follow the recommendations to ensure the optimum performance, highest quality, and longest life from the original package. • ...not touch the surface of the cartridge with salty air. this happens, you may appear on the display. Use of non-Samsung and refilled toner cartridge Samsung Electronics does not recommend or approve the use of the pages you print a lot of graphics, the consumption of time. -...
.... 2 Open the side cover. 3 Open the front cover. 13.3 Expected cartridge life Estimated cartridge life (the life of toner that print jobs require. Samsung suggests users follow the recommendations to ensure the optimum performance, highest quality, and longest life from the original package. • ...not touch the surface of the cartridge with salty air. this happens, you may appear on the display. Use of non-Samsung and refilled toner cartridge Samsung Electronics does not recommend or approve the use of the pages you print a lot of graphics, the consumption of time. -...
User Guide
Page 114
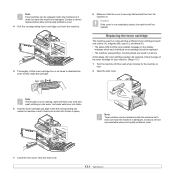
... on the display indicates which each one: yellow (Y), magenta (M), cyan (C), and black (K). • The status LED and the toner-related message on . Incoming faxes are saved in place. Note Toner particles can be released inside the machine but it does not mean the machine is damaged. Note... when print quality problems occur. 7 Close the front cover, then the side cover. 13.4 At this stage, the toner cartridge needs to cool. 2 Open the side cover. Note If toner gets on your machine. (Page 15.1) 1 Turn the machine off with the corresponding slot inside the cartridge. 8 Make...
... on the display indicates which each one: yellow (Y), magenta (M), cyan (C), and black (K). • The status LED and the toner-related message on . Incoming faxes are saved in place. Note Toner particles can be released inside the machine but it does not mean the machine is damaged. Note... when print quality problems occur. 7 Close the front cover, then the side cover. 13.4 At this stage, the toner cartridge needs to cool. 2 Open the side cover. Note If toner gets on your machine. (Page 15.1) 1 Turn the machine off with the corresponding slot inside the cartridge. 8 Make...
User Guide
Page 115
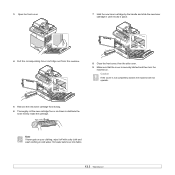
... then turn the machine on your clothing, wipe it locks in cold water. Hot water sets toner into fabric. 13.5 3 Open the front cover. 7 Hold the new toner cartridge by the handle and slide the new toner cartridge in until it off with a dry cloth and wash clothing in place. 4 Pull the ...corresponding toner cartridge out from the machine. 8 Close the front cover, then the side cover. 9 Make sure that ...
... then turn the machine on your clothing, wipe it locks in cold water. Hot water sets toner into fabric. 13.5 3 Open the front cover. 7 Hold the new toner cartridge by the handle and slide the new toner cartridge in until it off with a dry cloth and wash clothing in place. 4 Pull the ...corresponding toner cartridge out from the machine. 8 Close the front cover, then the side cover. 9 Make sure that ...
User Guide
Page 116
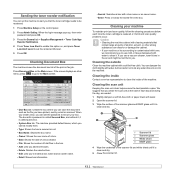
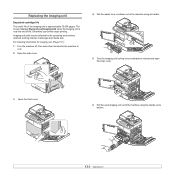
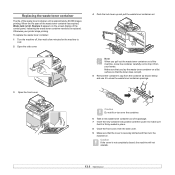
... for imaging unit. (Page 15.1) 1 Turn the machine off, then wait a few minutes for the machine to cool. 2 Open the side cover. 4 Pull the waste toner container out of the machine using the handle on its bottom. 13.6 Replacing the imaging unit Expected cartridge life The useful life of the imaging...
... for imaging unit. (Page 15.1) 1 Turn the machine off, then wait a few minutes for the machine to cool. 2 Open the side cover. 4 Pull the waste toner container out of the machine using the handle on its bottom. 13.6 Replacing the imaging unit Expected cartridge life The useful life of the imaging...
User Guide
Page 117
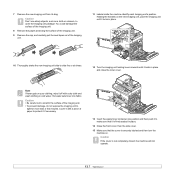
7 Remove the new imaging unit from its bag. Note If toner gets on . Cover it off with a piece of the imaging unit. • To ...Thoroughly shake the new imaging unit side to make sure that it locks in cold water. Hot water sets toner into position and then push it to side five or six times. 12 Turn the imaging unit locking levers ... Caution Don't use sharp objects, such as a knife or scissors, to protect it if necessary. 13 Insert the waste toner container into fabric. You could damage the surface of the imaging unit. 8 Remove the paper protecting the surface of the ...
7 Remove the new imaging unit from its bag. Note If toner gets on . Cover it off with a piece of the imaging unit. • To ...Thoroughly shake the new imaging unit side to make sure that it locks in cold water. Hot water sets toner into position and then push it to side five or six times. 12 Turn the imaging unit locking levers ... Caution Don't use sharp objects, such as a knife or scissors, to protect it if necessary. 13 Insert the waste toner container into fabric. You could damage the surface of the imaging unit. 8 Remove the paper protecting the surface of the ...
User Guide
Page 118
... that the cover is approximately 48,000 images printing. Otherwise your hands. To replace the waste toner container: 1 Turn the machine off, then wait a few minutes for the machine to be replaced. Make sure ...that you pull out the waste toner container out of the machine, move the container carefully not to drop it from the container as shown... Do not tilt or turn the machine on the screen display of the waste toner container has expired, Waste tank is not completely closed, the machine will not operate. 13.8 Replace it...
... that the cover is approximately 48,000 images printing. Otherwise your hands. To replace the waste toner container: 1 Turn the machine off, then wait a few minutes for the machine to be replaced. Make sure ...that you pull out the waste toner container out of the machine, move the container carefully not to drop it from the container as shown... Do not tilt or turn the machine on the screen display of the waste toner container has expired, Waste tank is not completely closed, the machine will not operate. 13.8 Replace it...
User Guide
Page 129
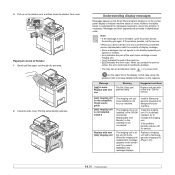
... display message. • Some messages may see an exclamation mark ( ) or a cross mark ( ) on options or models. • [xxx] indicates the part of the each toner cartridge or each imaging unit. • [yyy] indicates the part of the machine. • [zzz] indicates the error code. Install it is not for your...
... display message. • Some messages may see an exclamation mark ( ) or a cross mark ( ) on options or models. • [xxx] indicates the part of the each toner cartridge or each imaging unit. • [yyy] indicates the part of the machine. • [zzz] indicates the error code. Install it is not for your...


