
Open Source Guide (ENGLISH)
Page 1
... corresponding source code. (This alternative is to be on a volume of a storage or distribution medium does not bring the other program whose distribution conditions are distributed under the scope of this free software. it free software which gives you can change free software--to make restrictions that you wish to incorporate parts of the Program into another work not based on the Program with the Program (or...
... corresponding source code. (This alternative is to be on a volume of a storage or distribution medium does not bring the other program whose distribution conditions are distributed under the scope of this free software. it free software which gives you can change free software--to make restrictions that you wish to incorporate parts of the Program into another work not based on the Program with the Program (or...
Open Source Guide (ENGLISH)
Page 2
... new library, and you want it free software that everyone can do so by permitting redistribution under the terms of warranty; IN NO EVENT UNLESS REQUIRED BY ...USE OR INABILITY TO USE THE LIBRARY (INCLUDING BUT NOT LIMITED TO LOSS OF DATA OR DATA BEING RENDERED INACCURATE OR LOSSES SUSTAINED BY YOU OR THIRD PARTIES OR A FAILURE OF THE LIBRARY TO OPERATE WITH ANY OTHER SOFTWARE...), EVEN IF SUCH HOLDER OR OTHER PARTY HAS BEEN ADVISED OF THE POSSIBILITY OF SUCH DAMAGES. It is found. and each source...use to the library. 16. You can redistribute and...
... new library, and you want it free software that everyone can do so by permitting redistribution under the terms of warranty; IN NO EVENT UNLESS REQUIRED BY ...USE OR INABILITY TO USE THE LIBRARY (INCLUDING BUT NOT LIMITED TO LOSS OF DATA OR DATA BEING RENDERED INACCURATE OR LOSSES SUSTAINED BY YOU OR THIRD PARTIES OR A FAILURE OF THE LIBRARY TO OPERATE WITH ANY OTHER SOFTWARE...), EVEN IF SUCH HOLDER OR OTHER PARTY HAS BEEN ADVISED OF THE POSSIBILITY OF SUCH DAMAGES. It is found. and each source...use to the library. 16. You can redistribute and...

User Manual (user Manual) (ver.1.0) (English)
Page 3
... TELEVISION ■ View of Your Television (depending on the model 5 ■ Infrared Remote Control 6 ■ Inserting the Batteries in the Remote Control 8 ■ Connecting to an Aerial or Cable Television Network 8 ■ Switching Your Television On and Off 9 ■ Placing Your Television in Standby Mode 9 ■ Becoming Familiar with the Remote Control 10 ■ Plug & Play Feature 11 ■ Viewing the Demonstration 12 ■ Choosing Your Language 12 ◆ SETTING THE CHANNELS ■ Storing Channels...
... TELEVISION ■ View of Your Television (depending on the model 5 ■ Infrared Remote Control 6 ■ Inserting the Batteries in the Remote Control 8 ■ Connecting to an Aerial or Cable Television Network 8 ■ Switching Your Television On and Off 9 ■ Placing Your Television in Standby Mode 9 ■ Becoming Familiar with the Remote Control 10 ■ Plug & Play Feature 11 ■ Viewing the Demonstration 12 ■ Choosing Your Language 12 ◆ SETTING THE CHANNELS ■ Storing Channels...
User Manual (user Manual) (ver.1.0) (English)
Page 4
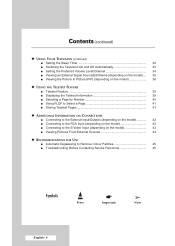
Contents (continued) ◆ USING YOUR TELEVISION (continued) ■ Setting the Sleep Timer 32 ■ Switching the Television On and Off Automatically 33 ■ Setting the Preferred Volume Level/Channel 34 ■ Viewing an External Signal Source/Edit Name (depending on the model).... 35 ■ Viewing the Picture In Picture (PIP) (depending on the model 36 ◆ USING THE TELETEXT FEATURE ■ Teletext Feature 39 ■ Displaying the Teletext Information 39 ■ Selecting a Page...
Contents (continued) ◆ USING YOUR TELEVISION (continued) ■ Setting the Sleep Timer 32 ■ Switching the Television On and Off Automatically 33 ■ Setting the Preferred Volume Level/Channel 34 ■ Viewing an External Signal Source/Edit Name (depending on the model).... 35 ■ Viewing the Picture In Picture (PIP) (depending on the model 36 ◆ USING THE TELETEXT FEATURE ■ Teletext Feature 39 ■ Displaying the Teletext Information 39 ■ Selecting a Page...

User Manual (user Manual) (ver.1.0) (English)
Page 5
View of the TV S-Video Input Video Input Audio Input (R, L) SCART Audio/ Video Input/Output 75Ω Coaxial Connector for Aerial/Cable Network English - 5 Control Panels 1 6 5 4 3 2 7 6 5 4 2 3 1 1 7 6 32 6 5 4 5 4 3 2 1 7 6 5 4 1 2 3 1) Power On/Off 2) Standby Indicator 3) Remote Control Sensor 4) Channel Selection Connection Panels Side of the TV 5) Volume Adjustment 6) Menu Display 7) Input source selection Rear of Your Television (depending on the model) ➢ The actual configuration on your TV may be different, depending on your model.
View of the TV S-Video Input Video Input Audio Input (R, L) SCART Audio/ Video Input/Output 75Ω Coaxial Connector for Aerial/Cable Network English - 5 Control Panels 1 6 5 4 3 2 7 6 5 4 2 3 1 1 7 6 32 6 5 4 5 4 3 2 1 7 6 5 4 1 2 3 1) Power On/Off 2) Standby Indicator 3) Remote Control Sensor 4) Channel Selection Connection Panels Side of the TV 5) Volume Adjustment 6) Menu Display 7) Input source selection Rear of Your Television (depending on the model) ➢ The actual configuration on your TV may be different, depending on your model.
User Manual (user Manual) (ver.1.0) (English)
Page 6
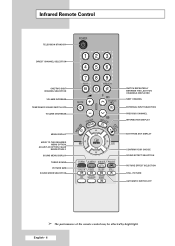
... Control TELEVISION STAND-BY DIRECT CHANNEL SELECTION ONE/TWO-DIGIT CHANNEL SELECTION VOLUME INCREASE TEMPORARY SOUND SWITCH-OFF VOLUME DECREASE MENU DISPLAY MOVE TO THE REQUIRED MENU OPTION/ ADJUST AN OPTION VALUE RESPECTIVELY SOUND MENU DISPLAY TURBO SOUND PICTURE SIZE SOUND MODE SELECTION SWITCH REPEATEDLY BETWEEN THE LAST TWO CHANNELS DISPLAYED NEXT CHANNEL EXTERNAL INPUT SELECTION PREVIOUS CHANNEL INFORMATION DISPLAY EXIT FROM ANY DISPLAY CONFIRM YOUR CHOICE SOUND EFFECT SELECTION PICTURE EFFECT SELECTION STILL PICTURE AUTOMATIC SWITCH-OFF ➢ The performance of the remote control...
... Control TELEVISION STAND-BY DIRECT CHANNEL SELECTION ONE/TWO-DIGIT CHANNEL SELECTION VOLUME INCREASE TEMPORARY SOUND SWITCH-OFF VOLUME DECREASE MENU DISPLAY MOVE TO THE REQUIRED MENU OPTION/ ADJUST AN OPTION VALUE RESPECTIVELY SOUND MENU DISPLAY TURBO SOUND PICTURE SIZE SOUND MODE SELECTION SWITCH REPEATEDLY BETWEEN THE LAST TWO CHANNELS DISPLAYED NEXT CHANNEL EXTERNAL INPUT SELECTION PREVIOUS CHANNEL INFORMATION DISPLAY EXIT FROM ANY DISPLAY CONFIRM YOUR CHOICE SOUND EFFECT SELECTION PICTURE EFFECT SELECTION STILL PICTURE AUTOMATIC SWITCH-OFF ➢ The performance of the remote control...

User Manual (user Manual) (ver.1.0) (English)
Page 8
... respect the polarities: ◆ - on page 15 English - 8 Connecting to an Aerial or Cable Television Network Rear of the TV or Cable Television Network To view television channels correctly, a signal must insert or replace the batteries in the remote control when you: ◆ Purchase the television ◆ Find that the remote control is no longer operating correctly 1 Remove the cover on the remote control 3 Replace the cover by pressing the symbol ( ) downwards and...
... respect the polarities: ◆ - on page 15 English - 8 Connecting to an Aerial or Cable Television Network Rear of the TV or Cable Television Network To view television channels correctly, a signal must insert or replace the batteries in the remote control when you: ◆ Purchase the television ◆ Find that the remote control is no longer operating correctly 1 Remove the cover on the remote control 3 Replace the cover by pressing the symbol ( ) downwards and...

User Manual (user Manual) (ver.1.0) (English)
Page 9
... screen is turned off and the Standby indicator on the front of the television lights up . 3 Press the POWER ( ) button on the remote control to "Storing Channels Automatically" on page 13 or "Storing Channels Manually" on page 15. 4 To switch your television in order to reduce: ◆ Power consumption ◆ Wear of the cathode ray tube The Standby mode can be useful when you wish to unplug the set...
... screen is turned off and the Standby indicator on the front of the television lights up . 3 Press the POWER ( ) button on the remote control to "Storing Channels Automatically" on page 13 or "Storing Channels Manually" on page 15. 4 To switch your television in order to reduce: ◆ Power consumption ◆ Wear of the cathode ray tube The Standby mode can be useful when you wish to unplug the set...

User Manual (user Manual) (ver.1.0) (English)
Page 10
...-CH button to : ◆ Change channels and adjust the volume ◆ Set up the television using the on -screen menu system. volume. Used to the last channel viewed. Used to confirm your choice. Used to increase the - To quickly switch between them. Used to display the corresponding channels. EXIT - Used to decrease the - Press the PRE-CH button. Used to the previous menu or normal viewing. - Used to return to switch the sound off temporarily. ➢ To turn the sound back...
...-CH button to : ◆ Change channels and adjust the volume ◆ Set up the television using the on -screen menu system. volume. Used to the last channel viewed. Used to confirm your choice. Used to increase the - To quickly switch between them. Used to display the corresponding channels. EXIT - Used to decrease the - Press the PRE-CH button. Used to the previous menu or normal viewing. - Used to return to switch the sound off temporarily. ➢ To turn the sound back...

User Manual (user Manual) (ver.1.0) (English)
Page 11
... Timer -- : -- TV Setup Plug & Play Language : English Time Blue Screen Melody Demonstration √ √ : Off : On √ Move Enter Return English - 11 Result: The Plug & Play is displayed with the message Plug & Play is displayed. It flickers for a little while and then Language menu is in Standby mode, press the POWER ( ) button on the remote control. Plug & Play Feature When the television is initially powered on, three basic customer settings proceed automatically and subsequently: setting...
... Timer -- : -- TV Setup Plug & Play Language : English Time Blue Screen Melody Demonstration √ √ : Off : On √ Move Enter Return English - 11 Result: The Plug & Play is displayed with the message Plug & Play is displayed. It flickers for a little while and then Language menu is in Standby mode, press the POWER ( ) button on the remote control. Plug & Play Feature When the television is initially powered on, three basic customer settings proceed automatically and subsequently: setting...

User Manual (user Manual) (ver.1.0) (English)
Page 15
...; √ Adjust Return TV Manual Store Programme Colour System Sound System Search Channel Store : P 1 ----œ AUTO √ : DK : 0MHz : C-: ? Result: The main menu is selected. 6 To assign a programme number to a channel, press the œ or √ button. 7 Press the ▲ or ▼ button to select Colour System. PAL - Result: The sound standards are displayed in the following order: AUTO - L TV Auto Store Manual Store Add...
...; √ Adjust Return TV Manual Store Programme Colour System Sound System Search Channel Store : P 1 ----œ AUTO √ : DK : 0MHz : C-: ? Result: The main menu is selected. 6 To assign a programme number to a channel, press the œ or √ button. 7 Press the ▲ or ▼ button to select Colour System. PAL - Result: The sound standards are displayed in the following order: AUTO - L TV Auto Store Manual Store Add...

User Manual (user Manual) (ver.1.0) (English)
Page 19
... model TV ... Result: Channel indicator turns into Red. 8 To erase adjusted picture or sound, select Reset by pressing the œ or √ button. 7 To store the fine tuning setting in the Channel group are displayed. 3 Press the ENTER ( ) button. 4 Press the ▲ or ▼ button to its original colour. Result: The horizontal bar is displayed. 2 Press the ▲ or ▼ button to select Channel. Result: The main menu...
... model TV ... Result: Channel indicator turns into Red. 8 To erase adjusted picture or sound, select Reset by pressing the œ or √ button. 7 To store the fine tuning setting in the Channel group are displayed. 3 Press the ENTER ( ) button. 4 Press the ▲ or ▼ button to its original colour. Result: The horizontal bar is displayed. 2 Press the ▲ or ▼ button to select Channel. Result: The main menu...

User Manual (user Manual) (ver.1.0) (English)
Page 22
... control the picture quality. 1 Press the MENU ( ) button. Cool1 - Warm2 8 To return to be reset to the factory defaults. ➢ The television has an "automatic degaussing" system that is activated if magnetic interference is selected. 4 Select the required picture mode by pressing the œ or √ button repeatdly. Press the œ or √ button. The reset function is displayed. Result: The previously adjusted settings will be adjusted...
... control the picture quality. 1 Press the MENU ( ) button. Cool1 - Warm2 8 To return to be reset to the factory defaults. ➢ The television has an "automatic degaussing" system that is activated if magnetic interference is selected. 4 Select the required picture mode by pressing the œ or √ button repeatdly. Press the œ or √ button. The reset function is displayed. Result: The previously adjusted settings will be adjusted...
User Manual (user Manual) (ver.1.0) (English)
Page 29
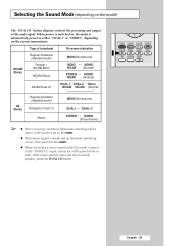
...Type of the audio signal. If the mono sound comes out only from left speaker, press the DUAL I -II" button displays/controls the processing and output of broadcast On-screen indication Regular broadcast (Standard audio) MONO (Normal use)...signal is automatically preset to the "AUDIO-L" input connector on the model) The "DUAL I -II button. English - 29 Selecting the Sound Mode (depending on the panel (front or side). When power is switched on, the mode is weak and an automatic switching occurs, then switch to the MONO. ◆ When receiving a mono sound in the AV mode, connect...
...Type of the audio signal. If the mono sound comes out only from left speaker, press the DUAL I -II" button displays/controls the processing and output of broadcast On-screen indication Regular broadcast (Standard audio) MONO (Normal use)...signal is automatically preset to the "AUDIO-L" input connector on the model) The "DUAL I -II button. English - 29 Selecting the Sound Mode (depending on the panel (front or side). When power is switched on, the mode is weak and an automatic switching occurs, then switch to the MONO. ◆ When receiving a mono sound in the AV mode, connect...

User Manual (user Manual) (ver.1.0) (English)
Page 32
... on by pressing the œ or √ button. ➢ You can set your TV to automatically turn off after the television automatically switches to Standby mode by pressing the SLEEP ( ) button. Result: The Clock is displayed. 2 Press the ▲ or ▼ button to select Time. 5 Press the ENTER ( ) button. English - 32 Setting the Sleep Timer TV Setup Plug & Play Language : English Time Blue Screen Melody Demonstration √ √ : Off : On √...
... on by pressing the œ or √ button. ➢ You can set your TV to automatically turn off after the television automatically switches to Standby mode by pressing the SLEEP ( ) button. Result: The Clock is displayed. 2 Press the ▲ or ▼ button to select Time. 5 Press the ENTER ( ) button. English - 32 Setting the Sleep Timer TV Setup Plug & Play Language : English Time Blue Screen Melody Demonstration √ √ : Off : On √...
User Manual (user Manual) (ver.1.0) (English)
Page 34
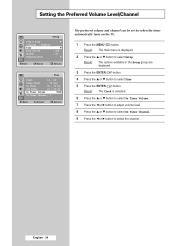
... Setup Plug & Play Language : English Time Blue Screen Melody Demonstration √ √ : Off : On √ Move Enter Return TV Time Clock 13 : 00 Sleep Timer : 30 min On Timer 06 : 30 On Off Timer 23 : 30 On On Timer Volume œ10√ On Timer Channel : 1 Move œ √ Adjust Return The preferred volume and channel can be set for when the timer automatically turns on the TV. 1 Press the MENU ( ) button...
... Setup Plug & Play Language : English Time Blue Screen Melody Demonstration √ √ : Off : On √ Move Enter Return TV Time Clock 13 : 00 Sleep Timer : 30 min On Timer 06 : 30 On Off Timer 23 : 30 On On Timer Volume œ10√ On Timer Channel : 1 Move œ √ Adjust Return The preferred volume and channel can be set for when the timer automatically turns on the TV. 1 Press the MENU ( ) button...

User Manual (user Manual) (ver.1.0) (English)
Page 35
... in the Input group are displayed. 4 Press the ▲ or ▼ button to select signal source, then press the ENTER ( ) button. ➢ When you connect equipment to the TV, you change the external source while viewing, pictures might take a short period of jacks : EXT1 or EXT2 on the TV's rear panel, and AV/S-Video on the model) Use the remote control to switch between viewing signal from connected equipment, such as listed above. Result...
... in the Input group are displayed. 4 Press the ▲ or ▼ button to select signal source, then press the ENTER ( ) button. ➢ When you connect equipment to the TV, you change the external source while viewing, pictures might take a short period of jacks : EXT1 or EXT2 on the TV's rear panel, and AV/S-Video on the model) Use the remote control to switch between viewing signal from connected equipment, such as listed above. Result...

User Manual (user Manual) (ver.1.0) (English)
Page 38
... PIP function directly. Viewing the Picture In Picture (PIP) (depending on the model) (continued) Easy functions of main picture. At this time, reselect the channel of remote control Buttons Feature PIP Used to select the channel of sub picture (TV, EXT1, EXT2, AV/S-Video). SIZE Used to move the sub picture counterclockwise. SWAP Used to interchange the main picture and the sub picture. ➢ When the main picture is in the Video mode and the sub picture...
... PIP function directly. Viewing the Picture In Picture (PIP) (depending on the model) (continued) Easy functions of main picture. At this time, reselect the channel of remote control Buttons Feature PIP Used to select the channel of sub picture (TV, EXT1, EXT2, AV/S-Video). SIZE Used to move the sub picture counterclockwise. SWAP Used to interchange the main picture and the sub picture. ➢ When the main picture is in the Video mode and the sub picture...

User Manual (user Manual) (ver.1.0) (English)
Page 39
... be displayed correctly, channel reception must be displayed 1 Select the channel providing the Teletext service using the or button. 2 Press the TTX/MIX ( ) button to six categories: Part Contents A Selected page number. Information provided includes: ◆ Television programme times ◆ News bulletins and weather forecasts ◆ Sports results ◆ Travel information The teletext pages are organized according to activate the teletext mode. B Broadcasting channel...
... be displayed correctly, channel reception must be displayed 1 Select the channel providing the Teletext service using the or button. 2 Press the TTX/MIX ( ) button to six categories: Part Contents A Selected page number. Information provided includes: ◆ Television programme times ◆ News bulletins and weather forecasts ◆ Sports results ◆ Travel information The teletext pages are organized according to activate the teletext mode. B Broadcasting channel...

User Manual (user Manual) (ver.1.0) (English)
Page 45
... not normally need to degauss the television manually. If you move it further away. ◆ Plug your television into a different mains socket. ◆ Check the direction, location and connections of your aerial. Troubleshooting: Before Contacting Service Personnel Before contacting Samsung after-sales service, perform the following simple checks. If you cannot solve the problem using the instructions below, note the model and serial number of the television and...
... not normally need to degauss the television manually. If you move it further away. ◆ Plug your television into a different mains socket. ◆ Check the direction, location and connections of your aerial. Troubleshooting: Before Contacting Service Personnel Before contacting Samsung after-sales service, perform the following simple checks. If you cannot solve the problem using the instructions below, note the model and serial number of the television and...


