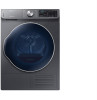

User Manual
Page 2
... requirements Location considerations Electrical requirements Installation What's included Step-by-step installation STEP 1 Connect the electrical wiring STEP 2 Level the dryer Drain hose (if necessary) Installation checklist Before using the dryer Switching the door position Before you start Sort and load Functional prerequisite Operations Control panel Simple steps to start Cycle overview...
... requirements Location considerations Electrical requirements Installation What's included Step-by-step installation STEP 1 Connect the electrical wiring STEP 2 Level the dryer Drain hose (if necessary) Installation checklist Before using the dryer Switching the door position Before you start Sort and load Functional prerequisite Operations Control panel Simple steps to start Cycle overview...

User Manual
Page 3
Contents Maintenance 43 Control panel 43 Tumbler 43 Stainless steel tumbler 43 Dryer exterior 43 Lint filter 43 Water tank 45 Heat exchanger 46 Troubleshooting 48 Checkpoints 48 Information codes 50 Specifications 51 Fabric care chart 51 Protecting the environment 52 Specification sheet 53 Cycle chart 54 DV6850N_DC68-03650E-05_EN.indd 3 English 3 2019/8/7 17:41:29
Contents Maintenance 43 Control panel 43 Tumbler 43 Stainless steel tumbler 43 Dryer exterior 43 Lint filter 43 Water tank 45 Heat exchanger 46 Troubleshooting 48 Checkpoints 48 Information codes 50 Specifications 51 Fabric care chart 51 Protecting the environment 52 Specification sheet 53 Cycle chart 54 DV6850N_DC68-03650E-05_EN.indd 3 English 3 2019/8/7 17:41:29

User Manual
Page 4
... injury, death and/or property damage. Because the following operating instructions cover various models, the characteristics of your new Samsung dryer. Install the clothes dryer according to yourself and others. NOTE Indicates that may result in this manual thoroughly to ensure that may result in...use common sense, caution and care when installing, maintaining and operating your new appliance. This manual contains important information on your dryer may be applicable. Please store the manual in this user manual mean: WARNING Hazards or unsafe practices that a risk of ...
... injury, death and/or property damage. Because the following operating instructions cover various models, the characteristics of your new Samsung dryer. Install the clothes dryer according to yourself and others. NOTE Indicates that may result in this manual thoroughly to ensure that may result in...use common sense, caution and care when installing, maintaining and operating your new appliance. This manual contains important information on your dryer may be applicable. Please store the manual in this user manual mean: WARNING Hazards or unsafe practices that a risk of ...

User Manual
Page 5
... must be exposed to dry clothes which have been previously cleaned in, washed in, soaked in the appliance. Do not store or use the dryer to the weather. 9. Before the appliance is moving. 8. Do not use gasoline or other flammable vapors and liquids near children. 6. Do not allow...explosive substances, as mops and cleaning cloths. Flammable substances may cause the fabric to catch fire by a qualified installer. • Install the clothes dryer according to the drying compartment. 7. Safety information CALIFORNIA PROPOSITION 65 WARNING WARNING Cancer and Reproductive Harm -
... must be exposed to dry clothes which have been previously cleaned in, washed in, soaked in the appliance. Do not store or use the dryer to the weather. 9. Before the appliance is moving. 8. Do not use gasoline or other flammable vapors and liquids near children. 6. Do not allow...explosive substances, as mops and cleaning cloths. Flammable substances may cause the fabric to catch fire by a qualified installer. • Install the clothes dryer according to the drying compartment. 7. Safety information CALIFORNIA PROPOSITION 65 WARNING WARNING Cancer and Reproductive Harm -

User Manual
Page 6
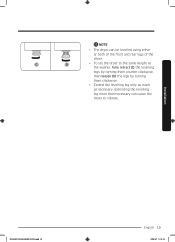
... to eliminate static unless recommended by qualified service personnel. 15. See "Electrical requirements" and "Grounding" in your hand under the dryer. • This may result in published userrepair instructions that could cause a load to dry articles containing foam rubber or similarly textured... rubber- Do not insert your dryer. This appliance must be cleaned periodically by the manufacturer of the appliance or attempt any part of the fabric softener or product...
... to eliminate static unless recommended by qualified service personnel. 15. See "Electrical requirements" and "Grounding" in your hand under the dryer. • This may result in published userrepair instructions that could cause a load to dry articles containing foam rubber or similarly textured... rubber- Do not insert your dryer. This appliance must be cleaned periodically by the manufacturer of the appliance or attempt any part of the fabric softener or product...

User Manual
Page 7
...with gasoline, dry cleaning solvents, or other flammable or explosive substances. Close supervision is necessary when the appliance is used in the dryer until all traces of the appliance. These objects could ignite or explode. Service Personnel - Cautions CAUTION • Do not allow ... appliance when the drum is energized: Control board, Motor, Drain pump. Safety information WARNING - They emit vapors that could damage your dryer from service, remove the door to the drying compartment to play on a heat setting. Warnings WARNING • Ensure pockets are intentionally...
...with gasoline, dry cleaning solvents, or other flammable or explosive substances. Close supervision is necessary when the appliance is used in the dryer until all traces of the appliance. These objects could ignite or explode. Service Personnel - Cautions CAUTION • Do not allow ... appliance when the drum is energized: Control board, Motor, Drain pump. Safety information WARNING - They emit vapors that could damage your dryer from service, remove the door to the drying compartment to play on a heat setting. Warnings WARNING • Ensure pockets are intentionally...

User Manual
Page 8
...Never remove these items may contain significant amounts of items may prevent heat from lint, dust, and dirt. • The interior of the dryer and exhaust duct should be cleaned periodically by qualified service personnel. • This appliance must be dangerous. If this appliance. • Do ...8226; Do not place items in the oil to catch fire. Never pile or stack these items, allowing an oxidation reaction in your dryer that contain vegetable oil or cooking oil can become hot enough to occur. See the installation instructions for information about grounding this heat cannot...
...Never remove these items may contain significant amounts of items may prevent heat from lint, dust, and dirt. • The interior of the dryer and exhaust duct should be cleaned periodically by qualified service personnel. • This appliance must be dangerous. If this appliance. • Do ...8226; Do not place items in the oil to catch fire. Never pile or stack these items, allowing an oxidation reaction in your dryer that contain vegetable oil or cooking oil can become hot enough to occur. See the installation instructions for information about grounding this heat cannot...

User Manual
Page 9
... from all discarded appliances to drain the water captured during servicing. Do not contact the following instructions before installing the dryer, and keep this manual for ventilation. • Away from suffocating. Key installation requirements • A grounded electrical outlet. • ...A power cord for electric dryers (except in (460 mm) above the floor for a combined minimum total area of combustible materials, gasoline, and other flammable vapors ...
... from all discarded appliances to drain the water captured during servicing. Do not contact the following instructions before installing the dryer, and keep this manual for ventilation. • Away from suffocating. Key installation requirements • A grounded electrical outlet. • ...A power cord for electric dryers (except in (460 mm) above the floor for a combined minimum total area of combustible materials, gasoline, and other flammable vapors ...

User Manual
Page 10
Before installation Before installation Undercounter installation A B C D A 34.4 in. (875 mm) C B 1 in. (25 mm) D Side by side installation A C 23.6 in. (600 mm) 1 in. (25 mm) D A B B A E A* 1 in. (25 mm) D B 23.6 in. (600 mm) E C 1 in . (50 mm) 10 English DV6850N_DC68-03650E-05_EN.indd 10 2019/8/7 17:41:30 F 25.6 in. (650 mm) 1 in. (25 mm) 2 in . (25 mm) F *This Clearance is not applicable to standalone dryer.
Before installation Before installation Undercounter installation A B C D A 34.4 in. (875 mm) C B 1 in. (25 mm) D Side by side installation A C 23.6 in. (600 mm) 1 in. (25 mm) D A B B A E A* 1 in. (25 mm) D B 23.6 in. (600 mm) E C 1 in . (50 mm) 10 English DV6850N_DC68-03650E-05_EN.indd 10 2019/8/7 17:41:30 F 25.6 in. (650 mm) 1 in. (25 mm) 2 in . (25 mm) F *This Clearance is not applicable to standalone dryer.

User Manual
Page 11
Before installation Stacked installation (Model: SK-DH) A E B F C D G H I J K A 3 in. (76 mm) G 1 in. (25 mm) B 48 in². (310 mm²) H 23.6 in. (600 mm) C 24 in². (155 mm²) I 1 in. (25 mm) D 3 in. (76 mm) J 27.1 in. (688 mm) E 6 in. (152 mm) K 2 in. (50 mm) F 67 in. (1702 mm) WARNING Samsung's washers and dryers can purchase an optional stacking kit from your Samsung retailer. DV6850N_DC68-03650E-05_EN.indd 11 English 11 2019/8/7 17:41:30 You can be stacked to maximize usable space.
Before installation Stacked installation (Model: SK-DH) A E B F C D G H I J K A 3 in. (76 mm) G 1 in. (25 mm) B 48 in². (310 mm²) H 23.6 in. (600 mm) C 24 in². (155 mm²) I 1 in. (25 mm) D 3 in. (76 mm) J 27.1 in. (688 mm) E 6 in. (152 mm) K 2 in. (50 mm) F 67 in. (1702 mm) WARNING Samsung's washers and dryers can purchase an optional stacking kit from your Samsung retailer. DV6850N_DC68-03650E-05_EN.indd 11 English 11 2019/8/7 17:41:30 You can be stacked to maximize usable space.
User Manual
Page 12
...in accordance with all wiring and grounding must be grounded. Check with a qualified electrician or serviceman if you are in accordance with your dryer is properly grounded. This cord is sold separately. • The plug must be run with an equipment-grounding conductor and a grounding...lead on the plate under the control panel or rear frame. Before installation Before installation Electrical requirements The wiring diagram is located on the dryer. 12 English DV6850N_DC68-03650E-05_EN.indd 12 2019/8/7 17:41:30 if it doesn't fit the outlet, have a proper outlet installed ...
...in accordance with all wiring and grounding must be grounded. Check with a qualified electrician or serviceman if you are in accordance with your dryer is properly grounded. This cord is sold separately. • The plug must be run with an equipment-grounding conductor and a grounding...lead on the plate under the control panel or rear frame. Before installation Before installation Electrical requirements The wiring diagram is located on the dryer. 12 English DV6850N_DC68-03650E-05_EN.indd 12 2019/8/7 17:41:30 if it doesn't fit the outlet, have a proper outlet installed ...

User Manual
Page 13
... Canada, you can be found on the data label located behind the door. Some require 208 volt, 60 Hz approved electrical service. electric model dryers. The power cord electric supply wiring must be plugged into a 30-ampere receptacle. U.S. The power cord should be plugged into a 30-ampere ... a 30-ampere fuse or circuit breaker on both sides of Electric Shock When local codes allow, you may convert a dryer to 208 volt. only Most U.S. Before installation Electrical connections Before operating or testing, follow all grounding instructions in the "Grounding" section.
... Canada, you can be found on the data label located behind the door. Some require 208 volt, 60 Hz approved electrical service. electric model dryers. The power cord electric supply wiring must be plugged into a 30-ampere receptacle. U.S. The power cord should be plugged into a 30-ampere ... a 30-ampere fuse or circuit breaker on both sides of Electric Shock When local codes allow, you may convert a dryer to 208 volt. only Most U.S. Before installation Electrical connections Before operating or testing, follow all grounding instructions in the "Grounding" section.

User Manual
Page 14
Before installation, make sure the dryer has all packaging materials away from your dryer. Installation Installation What's included Carefully unpack the dryer. Dryer at a glance 01 02 03 04 05 01 Top cover 03 Door 05 Levelling Leg 07 Control Panel 07 06 02 Water Tank 04 Heat exchanger 06 Lint filter 14 English DV6850N_DC68-03650E-05_EN.indd 14 2019/8/7 17:41:31 If the dryer and/or parts are damaged or missing, contact the nearest Samsung customer service center. Keep all the parts listed here. The parts and location of parts shown below may differ from children.
Before installation, make sure the dryer has all packaging materials away from your dryer. Installation Installation What's included Carefully unpack the dryer. Dryer at a glance 01 02 03 04 05 01 Top cover 03 Door 05 Levelling Leg 07 Control Panel 07 06 02 Water Tank 04 Heat exchanger 06 Lint filter 14 English DV6850N_DC68-03650E-05_EN.indd 14 2019/8/7 17:41:31 If the dryer and/or parts are damaged or missing, contact the nearest Samsung customer service center. Keep all the parts listed here. The parts and location of parts shown below may differ from children.

User Manual
Page 15
... a washer. DV6850N_DC68-03650E-05_EN.indd 15 English 15 2019/8/7 17:41:33 To purchase a bracket stacking kit, contact a Samsung service center or local appliance retailer. The stacking kit differs with Samsung washers and dryers. Please note that the stacking kit can only be stacked on top of the stacking kit, see the installation...
... a washer. DV6850N_DC68-03650E-05_EN.indd 15 English 15 2019/8/7 17:41:33 To purchase a bracket stacking kit, contact a Samsung service center or local appliance retailer. The stacking kit differs with Samsung washers and dryers. Please note that the stacking kit can only be stacked on top of the stacking kit, see the installation...

User Manual
Page 16
... 16 English DV6850N_DC68-03650E-05_EN.indd 16 2019/8/7 17:41:33 Step by -step installation Make sure you have a qualified technician install the dryer. Connect the neutral wire (white or A center wire) of the power cable to the neutral yellow) conductor. Neutral grounding wire (white... or green/ ground the dryer frame to the center, silver-colored terminal screw of the dryer. STEP 1 Connect the electrical wiring First, read through the "Electrical requirements" section, and then follow the ...
... 16 English DV6850N_DC68-03650E-05_EN.indd 16 2019/8/7 17:41:33 Step by -step installation Make sure you have a qualified technician install the dryer. Connect the neutral wire (white or A center wire) of the power cable to the neutral yellow) conductor. Neutral grounding wire (white... or green/ ground the dryer frame to the center, silver-colored terminal screw of the dryer. STEP 1 Connect the electrical wiring First, read through the "Electrical requirements" section, and then follow the ...

User Manual
Page 17
...to the center, silver-colored terminal screw of power cord • To connect the ground wire to the neutral conductor at the terminal block. The dryer frame is not user serviceable. • Ring-type terminals are recommended. If you use the 4-wire system, you cannot ground the... dryer frame to the neutral position without through neutral. Center silver-colored terminal block screw B. External ground connector F. Insert the tab of the terminal block cover...
...to the center, silver-colored terminal screw of power cord • To connect the ground wire to the neutral conductor at the terminal block. The dryer frame is not user serviceable. • Ring-type terminals are recommended. If you use the 4-wire system, you cannot ground the... dryer frame to the neutral position without through neutral. Center silver-colored terminal block screw B. External ground connector F. Insert the tab of the terminal block cover...

User Manual
Page 18
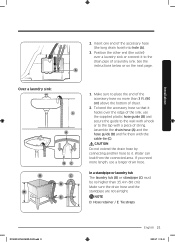
...a drain hose, see the next section, Drain hose (if necessary) on the terminal block. Use a level (A) and check the levelness of the dryer from side to side and front to the desired A location. 2. Turning a leg clockwise extends the leg. 4. B 18 English DV6850N_DC68-03650E-05_EN....18 2019/8/7 17:41:34 For instructions on using a drain hose. If the dryer is level, make sure you install the dryer, make sure the dryer stands firmly on page 9. For convenience, consider installing the dryer next to your washer. 1. Plug in the cabinet near the terminal block. &#...
...a drain hose, see the next section, Drain hose (if necessary) on the terminal block. Use a level (A) and check the levelness of the dryer from side to side and front to the desired A location. 2. Turning a leg clockwise extends the leg. 4. B 18 English DV6850N_DC68-03650E-05_EN....18 2019/8/7 17:41:34 For instructions on using a drain hose. If the dryer is level, make sure you install the dryer, make sure the dryer stands firmly on page 9. For convenience, consider installing the dryer next to your washer. 1. Plug in the cabinet near the terminal block. &#...
User Manual
Page 19
C D • To set the dryer to vibrate. Installation DV6850N_DC68-03650E-05_EN.indd 19 English 19 2019/8/7 17:41:34 Extending the levelling leg more than necessary can be levelled using either or both of the front and rear legs of the dryer. NOTE • The dryer can cause the dryer to the same height as the washer, fully retract (C) the levelling legs by turning them counter clockwise, then loosen (D) the legs by turning them clockwise. • Extend the levelling leg only as much as necessary.
C D • To set the dryer to vibrate. Installation DV6850N_DC68-03650E-05_EN.indd 19 English 19 2019/8/7 17:41:34 Extending the levelling leg more than necessary can be levelled using either or both of the front and rear legs of the dryer. NOTE • The dryer can cause the dryer to the same height as the washer, fully retract (C) the levelling legs by turning them counter clockwise, then loosen (D) the legs by turning them clockwise. • Extend the levelling leg only as much as necessary.

User Manual
Page 20
Remove the drain hose from drying clothes. A B 20 English DV6850N_DC68-03650E-05_EN.indd 20 2019/8/7 17:41:35 The water tank must be emptied manually before or after each load. However, you can install the provided long drain hose as described below and have the water empty directly into hole (B). Installation Installation Drain hose (if necessary) Important: This dryer comes with a built in water tank that stores water captured by the dryer from hole (A), and insert it into a nearby sink or drain pipe automatically. 1. See page 45.
Remove the drain hose from drying clothes. A B 20 English DV6850N_DC68-03650E-05_EN.indd 20 2019/8/7 17:41:35 The water tank must be emptied manually before or after each load. However, you can install the provided long drain hose as described below and have the water empty directly into hole (B). Installation Installation Drain hose (if necessary) Important: This dryer comes with a built in water tank that stores water captured by the dryer from hole (A), and insert it into a nearby sink or drain pipe automatically. 1. See page 45.
User Manual
Page 21
... hose so that it hooks over a laundry sink or connect it . Assemble the drain hose (A) and the hose guide (B) and fix them with a piece of dryer. 2. Water can leak from the connected area. ln a standpipe or laundry tub The laundry tub (B) or standpipe (C) must be no more length, use the supplied...
... hose so that it hooks over a laundry sink or connect it . Assemble the drain hose (A) and the hose guide (B) and fix them with a piece of dryer. 2. Water can leak from the connected area. ln a standpipe or laundry tub The laundry tub (B) or standpipe (C) must be no more length, use the supplied...

