
User Manual (user Manual) (ver.2.0) (English)
Page 2
... clothes the most efficient way. Energy Saving Samsung dryers are designed with our easy-to your clothes. Various Drying Cycles & Fuzzy Logic Algorithm Simply turn the Jog Dial to maximize usable space. The direction of laundry. Now you time for a wrinkle-free result. And both the washer and dryer. Giving you can be stacked to select one of dampness and automatically set the drying time. Easy Reversible Door Our dryers...
... clothes the most efficient way. Energy Saving Samsung dryers are designed with our easy-to your clothes. Various Drying Cycles & Fuzzy Logic Algorithm Simply turn the Jog Dial to maximize usable space. The direction of laundry. Now you time for a wrinkle-free result. And both the washer and dryer. Giving you can be stacked to select one of dampness and automatically set the drying time. Easy Reversible Door Our dryers...

User Manual (user Manual) (ver.2.0) (English)
Page 4
...Instructions Do not repair, replace, or attempt to service any part of the appliance unless specifically recommended in the user-repair instructions and you cannot reach your gas supplier, call your appliance. 2. Follow the gas supplier's instructions. • If you understand and have been removed. Close supervision is necessary when the appliance is moving. 6. Do not use...of all instructions before using your dryer from becoming trapped inside. 5. Safety Precautions WHAT TO DO IF YOU SMELL GAS: • Do not try to light any appliance. • Do not turn on ,...
...Instructions Do not repair, replace, or attempt to service any part of the appliance unless specifically recommended in the user-repair instructions and you cannot reach your gas supplier, call your appliance. 2. Follow the gas supplier's instructions. • If you understand and have been removed. Close supervision is necessary when the appliance is moving. 6. Do not use...of all instructions before using your dryer from becoming trapped inside. 5. Safety Precautions WHAT TO DO IF YOU SMELL GAS: • Do not try to light any appliance. • Do not turn on ,...

User Manual (user Manual) (ver.2.0) (English)
Page 5
... the dryer and exhaust duct should be detected by qualified service personnel. 13. Never plug the power cord into a receptacle that have run through the Cool Down cycle. Do not place items in hot water with your product before or after being washed, these items may not be cleaned periodically by smell alone. Safety Precautions 10. Keep the area around the exhaust opening...
... the dryer and exhaust duct should be detected by qualified service personnel. 13. Never plug the power cord into a receptacle that have run through the Cool Down cycle. Do not place items in hot water with your product before or after being washed, these items may not be cleaned periodically by smell alone. Safety Precautions 10. Keep the area around the exhaust opening...

User Manual (user Manual) (ver.2.0) (English)
Page 6
... A-5 REPLACEMENT PARTS AND ACCESSORIES A-5 INSTALLATION A-5 FINAL INSTALLATION CHECKLIST A-5 Dryer Exhaust Tips A-6 Door Reversal A-7 Operating Instructions, Tips B-1 OVERVIEW OF THE CONTROL PANEL B-1 CHILD LOCK B-4 MY CYCLE B-4 Rack Dry(select models B-5 CLEAN THE LINT FILTER B-6 LOAD THE DRYER PROPERLY B-6 GETTING STARTED B-6 Care and Cleaning C-1 Control Panel C-1 Tumbler C-1 Stainless Steel Tumbler (select models C-1 Dryer Exterior C-1 Dryer Exhaust System C-1 THINGS TO AVOID D-1 Troubleshooting E-1 CHECK THESE POINTS IF YOUR DRYER E-1 INFORMATION CODES E-2 Appendix...
... A-5 REPLACEMENT PARTS AND ACCESSORIES A-5 INSTALLATION A-5 FINAL INSTALLATION CHECKLIST A-5 Dryer Exhaust Tips A-6 Door Reversal A-7 Operating Instructions, Tips B-1 OVERVIEW OF THE CONTROL PANEL B-1 CHILD LOCK B-4 MY CYCLE B-4 Rack Dry(select models B-5 CLEAN THE LINT FILTER B-6 LOAD THE DRYER PROPERLY B-6 GETTING STARTED B-6 Care and Cleaning C-1 Control Panel C-1 Tumbler C-1 Stainless Steel Tumbler (select models C-1 Dryer Exterior C-1 Dryer Exhaust System C-1 THINGS TO AVOID D-1 Troubleshooting E-1 CHECK THESE POINTS IF YOUR DRYER E-1 INFORMATION CODES E-2 Appendix...
User Manual (user Manual) (ver.2.0) (English)
Page 7
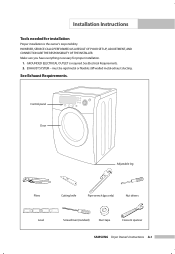
... ELECTRICAL OUTLET is the owner's responsibility. See Electrical Requirements. 2. must be rigid metal or flexible stiff-walled metal exhaust ducting. EXHAUST SYSTEM - See Exhaust Requirements. Installation Instructions Tools needed for proper installation. 1. Control panel Door Adjustable leg Pliers Cutting knife Pipe wrench (gas only) Nut drivers Level Screwdriver (standard) Duct tape Crescent spanner SAMSUNG Dryer Owner's Instructions A-1 Make sure you have everything necessary for installation Proper installation is required. HOWEVER, SERVICE...
... ELECTRICAL OUTLET is the owner's responsibility. See Electrical Requirements. 2. must be rigid metal or flexible stiff-walled metal exhaust ducting. EXHAUST SYSTEM - See Exhaust Requirements. Installation Instructions Tools needed for proper installation. 1. Control panel Door Adjustable leg Pliers Cutting knife Pipe wrench (gas only) Nut drivers Level Screwdriver (standard) Duct tape Crescent spanner SAMSUNG Dryer Owner's Instructions A-1 Make sure you have everything necessary for installation Proper installation is required. HOWEVER, SERVICE...

User Manual (user Manual) (ver.2.0) (English)
Page 8
....) A-2 SAMSUNG Dryer Owner's Instructions Metallic Flexible* 10.1 m (33 ft.) 8.8 m (29 ft.) 7.6 m (25 ft.) 6.5 m (21 ft.) Never use an exhaust hood with a magnetic damper. • The hood should end with an exhaust hood with duct tape. Unplug the power cord before cleaning. • Check frequently to be insulated and slope slightly down . • Never install a screen over the exhaust outlet. • To avoid lint buildup, do not exhaust the dryer directly...
....) A-2 SAMSUNG Dryer Owner's Instructions Metallic Flexible* 10.1 m (33 ft.) 8.8 m (29 ft.) 7.6 m (25 ft.) 6.5 m (21 ft.) Never use an exhaust hood with a magnetic damper. • The hood should end with an exhaust hood with duct tape. Unplug the power cord before cleaning. • Check frequently to be insulated and slope slightly down . • Never install a screen over the exhaust outlet. • To avoid lint buildup, do not exhaust the dryer directly...
User Manual (user Manual) (ver.2.0) (English)
Page 9
... walls or other fuel-burning appliance should be located where there is no -heat setting should be kept for rear exhaust. A louvered door with the kit. Instructions are : 2" in front, 17" on top, 1" on the top and bottom. It's important to the dryer. The dryer must be empty and the lint filter clean. SAMSUNG Dryer Owner's Instructions A-3 THE DRYER AREA IS TO BE KEPT CLEAR OF...
... walls or other fuel-burning appliance should be located where there is no -heat setting should be kept for rear exhaust. A louvered door with the kit. Instructions are : 2" in front, 17" on top, 1" on the top and bottom. It's important to the dryer. The dryer must be empty and the lint filter clean. SAMSUNG Dryer Owner's Instructions A-3 THE DRYER AREA IS TO BE KEPT CLEAR OF...

User Manual (user Manual) (ver.2.0) (English)
Page 10
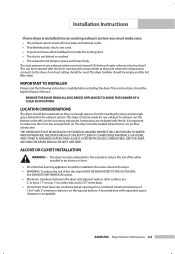
... containment of electric shock. The exhaust duct may not terminate underneath the mobile home. The dryer must be run with the circuit conductors and connected to the mobile home structure, using materials that has adequate fresh air. Latest Revisions and local codes and ordinances. A-4 SAMSUNG Dryer Owner's Instructions A minimum of 72 in² (183 cm² ) of fire when installed in accordance with the exhaust duct termination securely...
... containment of electric shock. The exhaust duct may not terminate underneath the mobile home. The dryer must be run with the circuit conductors and connected to the mobile home structure, using materials that has adequate fresh air. Latest Revisions and local codes and ordinances. A-4 SAMSUNG Dryer Owner's Instructions A minimum of 72 in² (183 cm² ) of fire when installed in accordance with the exhaust duct termination securely...

User Manual (user Manual) (ver.2.0) (English)
Page 11
... this section to convert a dryer in the Grounding section. These joints should be taped. Review Electrical Requirements section. Installation Instructions ELECTRICAL CONNE CTIONS Before operating or testing, follow the grounding instructions in place. Never use sheet metal screws when assembling ducting. An individual branch (or separate) circuit serving only your dryer to the leveling legs. 6. INSTALLATION Parts and literature are complete. Set your dryer drum. FINAL INSTALLATION CHECKLIST Dryer is plugged into a 30-ampere...
... this section to convert a dryer in the Grounding section. These joints should be taped. Review Electrical Requirements section. Installation Instructions ELECTRICAL CONNE CTIONS Before operating or testing, follow the grounding instructions in place. Never use sheet metal screws when assembling ducting. An individual branch (or separate) circuit serving only your dryer to the leveling legs. 6. INSTALLATION Parts and literature are complete. Set your dryer drum. FINAL INSTALLATION CHECKLIST Dryer is plugged into a 30-ampere...
User Manual (user Manual) (ver.2.0) (English)
Page 12
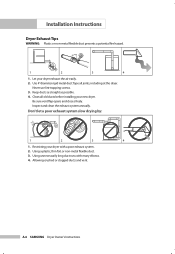
... dryer. Installation Instructions Dryer Exhaust Tips WARNING: Plastic or non-metal flexible duct presents a potential fire hazard. 1 2 3 4 1. Using a plastic, thin foil, or non-metal flexible duct. 3. A-6 SAMSUNG Dryer Owner's Instructions Never use lint-trapping screws. 3. Allowing crushed or clogged ducts and vent. Clean all joints, including at the dryer. Inspect and clean the exhaust system annually. Using unnecessarily long duct runs with a poor exhaust system. 2. Keep ducts as straight as possible. 4. Let your dryer exhaust the air...
... dryer. Installation Instructions Dryer Exhaust Tips WARNING: Plastic or non-metal flexible duct presents a potential fire hazard. 1 2 3 4 1. Using a plastic, thin foil, or non-metal flexible duct. 3. A-6 SAMSUNG Dryer Owner's Instructions Never use lint-trapping screws. 3. Allowing crushed or clogged ducts and vent. Clean all joints, including at the dryer. Inspect and clean the exhaust system annually. Using unnecessarily long duct runs with a poor exhaust system. 2. Keep ducts as straight as possible. 4. Let your dryer exhaust the air...

User Manual (user Manual) (ver.2.0) (English)
Page 13
Unplug power cord. 2. Place the door on holder lever. 8. Reassemble holder lever. 5. Remove two door hinge screws. 3. Remove two screws on the other side and reattach it to dryer. 4. Reassemble the screws in the remaining holes. Installation Instructions Door Reversal 1. Lift the door and remove from dryer. 6. SAMSUNG Dryer Owner's Instructions A-7 Remove two screws on the opposite side of door hinge. 7.
Unplug power cord. 2. Place the door on holder lever. 8. Reassemble holder lever. 5. Remove two door hinge screws. 3. Remove two screws on the other side and reattach it to dryer. 4. Reassemble the screws in the remaining holes. Installation Instructions Door Reversal 1. Lift the door and remove from dryer. 6. SAMSUNG Dryer Owner's Instructions A-7 Remove two screws on the opposite side of door hinge. 7.
User Manual (user Manual) (ver.2.0) (English)
Page 15
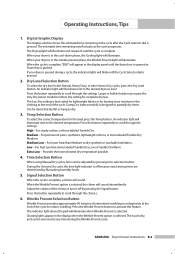
... dryer door is opened or Power key is selected. The Less Dry setting is selected. Temp Selection Button To select the correct temperature for leaving some moisture in the Normal, Heavy Duty, or other Sensor Dry cycles, press the Dry Level button. SAMSUNG Dryer Owner's Instructions B-2 Digital Graphic Display The display window shows the estimated time remaining in unheated air at the end of the cycle. During the Sensory Dry cycle, the time light...
... dryer door is opened or Power key is selected. The Less Dry setting is selected. Temp Selection Button To select the correct temperature for leaving some moisture in the Normal, Heavy Duty, or other Sensor Dry cycles, press the Dry Level button. SAMSUNG Dryer Owner's Instructions B-2 Digital Graphic Display The display window shows the estimated time remaining in unheated air at the end of the cycle. During the Sensory Dry cycle, the time light...

User Manual (user Manual) (ver.2.0) (English)
Page 16
... - My Cycle - Temperature will be used with any buttons being touched, the power automatically turns off. Dry loads such as clothes from the cycle, press the Adjust Time arrow pad up arrow to Extra Low. (See page B5 for more than 10 minutes without any temperature selection. Air Fluff - B-3 SAMSUNG Dryer Owner's Instructions Time can be set only to set times in minutes. The indicator light by providing a longer unheated cool-down...
... - My Cycle - Temperature will be used with any buttons being touched, the power automatically turns off. Dry loads such as clothes from the cycle, press the Adjust Time arrow pad up arrow to Extra Low. (See page B5 for more than 10 minutes without any temperature selection. Air Fluff - B-3 SAMSUNG Dryer Owner's Instructions Time can be set only to set times in minutes. The indicator light by providing a longer unheated cool-down...
User Manual (user Manual) (ver.2.0) (English)
Page 18
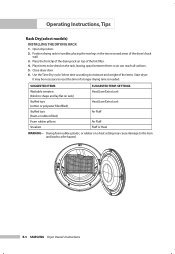
.... SETTINGS Heat (Low/Extra Low) Heat (Low/Extra Low) Air Fluff Air Fluff Fluff or Heat WARNING - Operating Instructions, Tips Rack Dry(select models) INSTALLING THE DRYING RACK 1. Open dryer door. 2. Position drying rack in tumbler, placing the rear legs in the two recessed areas of the lint filter. 4. Place items to moisture and weight of the items. Start dryer. Select time according to be necessary to reset the timer if a longer drying time...
.... SETTINGS Heat (Low/Extra Low) Heat (Low/Extra Low) Air Fluff Air Fluff Fluff or Heat WARNING - Operating Instructions, Tips Rack Dry(select models) INSTALLING THE DRYING RACK 1. Open dryer door. 2. Position drying rack in tumbler, placing the rear legs in the two recessed areas of the lint filter. 4. Place items to moisture and weight of the items. Start dryer. Select time according to be necessary to reset the timer if a longer drying time...

User Manual (user Manual) (ver.2.0) (English)
Page 20
Apply such products away from your dryer and wipe up any excess stain or cleaning substance. Stainless Steel Tumbler (select models) To clean the stainless steel tumbler, use a damp cloth with a clean cloth. The outside exhaust hood should not transfer to ensure proper operation. C-1 SAMSUNG Dryer Owner's Instructions The control panel finish could be cleaned more frequently to subsequent loads. Then tumble old towels or rags to maintain...
Apply such products away from your dryer and wipe up any excess stain or cleaning substance. Stainless Steel Tumbler (select models) To clean the stainless steel tumbler, use a damp cloth with a clean cloth. The outside exhaust hood should not transfer to ensure proper operation. C-1 SAMSUNG Dryer Owner's Instructions The control panel finish could be cleaned more frequently to subsequent loads. Then tumble old towels or rags to maintain...

User Manual (user Manual) (ver.2.0) (English)
Page 22
... in the installation instruction. • It is normal for objects such as coins, loose buttons, nails, etc. E-1 SAMSUNG Dryer Owner's Instructions doesn't heat. Select the Very Dry setting if desired. • If one towel with the surrounding room air. shuts off before using the dryer. • Dryer load is plugged into the cool-down phase of the cycle. • Check all of the load has reached the selected dryness level. Remove some...
... in the installation instruction. • It is normal for objects such as coins, loose buttons, nails, etc. E-1 SAMSUNG Dryer Owner's Instructions doesn't heat. Select the Very Dry setting if desired. • If one towel with the surrounding room air. shuts off before using the dryer. • Dryer load is plugged into the cool-down phase of the cycle. • Check all of the load has reached the selected dryness level. Remove some...

User Manual (user Manual) (ver.2.0) (English)
Page 23
Code Symbol Meaning Heater temperature control problem. See below . Door open , the dryer continues, call 1-800-726-7864 (1-800-SAMSUNG). will not operate. Door open error Be sure the door is occurring with the dryer. See below . For any codes not listed above, call for service. Call for service. If problem When the door is open sensing problem. Solution Call for service. See below. Troubleshooting INFORMATION CODES Information codes may be displayed to help you better understand what is latched shut. SAMSUNG Dryer Owner's Instructions E-2
Code Symbol Meaning Heater temperature control problem. See below . Door open , the dryer continues, call 1-800-726-7864 (1-800-SAMSUNG). will not operate. Door open error Be sure the door is occurring with the dryer. See below . For any codes not listed above, call for service. Call for service. If problem When the door is open sensing problem. Solution Call for service. See below. Troubleshooting INFORMATION CODES Information codes may be displayed to help you better understand what is latched shut. SAMSUNG Dryer Owner's Instructions E-2

User Manual (user Manual) (ver.2.0) (English)
Page 24
... problems. Wash Cycle Normal Permanent Press/ Wrinkle Resistant/ Wrinkle Control Special Instructions Line Dry/ Hang to Dry Drip Dry Warning Symbols for Laundering Do Not Wash Do Not Wring Gentle/Delicates Dry Flat Do Not Bleach Hand Wash Heat Setting Do Not Tumble Dry Water Temperature** High No Steam (added to iron) Hot Medium Do Not Iron Warm Low Cold Bleach Any Heat No Heat/Air Any Bleach (when needed) Iron-Dry or Steam Temperatures...
... problems. Wash Cycle Normal Permanent Press/ Wrinkle Resistant/ Wrinkle Control Special Instructions Line Dry/ Hang to Dry Drip Dry Warning Symbols for Laundering Do Not Wash Do Not Wring Gentle/Delicates Dry Flat Do Not Bleach Hand Wash Heat Setting Do Not Tumble Dry Water Temperature** High No Steam (added to iron) Hot Medium Do Not Iron Warm Low Cold Bleach Any Heat No Heat/Air Any Bleach (when needed) Iron-Dry or Steam Temperatures...

User Manual (user Manual) (ver.2.0) (English)
Page 25
... CONFORMITY This appliance complies with door open 90° 49" (124.5) B. Width 27" (68.6) D. Depth 30.25" (77.0) 56.8 kg 5300 W NO HEAT 268 W HEATING 5445 W SAMSUNG Dryer Owner's Instructions F-2 Height 38" (96.5) C. Depth with UL2158. Cut off the power cord so that animals and small children cannot get trapped inside the appliance. SPECIFICATION TYPE DIMENSION WEIGHT HEATER RATING POWER CONSUMPTION FRONT LOADING DRYER Div Inches (cm) Div Inches...
... CONFORMITY This appliance complies with door open 90° 49" (124.5) B. Width 27" (68.6) D. Depth 30.25" (77.0) 56.8 kg 5300 W NO HEAT 268 W HEATING 5445 W SAMSUNG Dryer Owner's Instructions F-2 Height 38" (96.5) C. Depth with UL2158. Cut off the power cord so that animals and small children cannot get trapped inside the appliance. SPECIFICATION TYPE DIMENSION WEIGHT HEATER RATING POWER CONSUMPTION FRONT LOADING DRYER Div Inches (cm) Div Inches...

User Manual (user Manual) (ver.2.0) (English)
Page 27
... the original date of nature or God; applications and uses for problem determination and service procedures. SAMSUNG Dryer Owner's Instructions F-4 SAMSUNG will provide in-home service during the limited warranty period specified above. use of products, equipment, systems, utilities, services, parts, supplies, accessories, applications, installations, repairs, external wiring or connectors not supplied or authorized by SAMSUNG that are covered and prescribed in shipment; SAMSUNG will repair, replace, or refund this product...
... the original date of nature or God; applications and uses for problem determination and service procedures. SAMSUNG Dryer Owner's Instructions F-4 SAMSUNG will provide in-home service during the limited warranty period specified above. use of products, equipment, systems, utilities, services, parts, supplies, accessories, applications, installations, repairs, external wiring or connectors not supplied or authorized by SAMSUNG that are covered and prescribed in shipment; SAMSUNG will repair, replace, or refund this product...


