Instruction Manual
Page 5
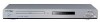
...-5 Make sure that the polarities (+ and -) are drained. - Before you start Accessories Remote Batteries for Control Remote Control (AK59-00038A) (AAA Size) (AC43-12002H) User's Manual Video/Audio HDMI Cable (AK68-00627A) Cable (MF39-00299A) (AC39-42001R) Install Batteries in the Remote control 1 Open the battery cover on the back of...
...-5 Make sure that the polarities (+ and -) are drained. - Before you start Accessories Remote Batteries for Control Remote Control (AK59-00038A) (AAA Size) (AC43-12002H) User's Manual Video/Audio HDMI Cable (AK68-00627A) Cable (MF39-00299A) (AC39-42001R) Install Batteries in the Remote control 1 Open the battery cover on the back of...

Instruction Manual
Page 10
...is selected in the TV's menu system. - If HDMI/COMPONENT (P-SCAN) Video Output is selected in Setup Menu must be set to the TV's instruction manual for higher picture quality. - Refer to COMPOSITE/S-VIDEO. 5. AUDIO OUT JACKS Connect to use a Video, S-Video or Component Output, unplug HDMI cable. VIDEO... scan mode will work . - If an HDMI cable is connected to an HDMI-compatible TV, HDMI will be no image output if the DVD player is connected to an A/V Amplifier that is supported, follow the TV User's Manual regarding the HDMI terminal. - DIGITAL AUDIO OUT JACKS -
...is selected in the TV's menu system. - If HDMI/COMPONENT (P-SCAN) Video Output is selected in Setup Menu must be set to the TV's instruction manual for higher picture quality. - Refer to COMPOSITE/S-VIDEO. 5. AUDIO OUT JACKS Connect to use a Video, S-Video or Component Output, unplug HDMI cable. VIDEO... scan mode will work . - If an HDMI cable is connected to an HDMI-compatible TV, HDMI will be no image output if the DVD player is connected to an A/V Amplifier that is supported, follow the TV User's Manual regarding the HDMI terminal. - DIGITAL AUDIO OUT JACKS -

Instruction Manual
Page 12
... your TV. - Note - Please refer to the user's manual of your TV. 2 Turn on the DVD player and TV. 3 Press the input selector on your TV set to the VIDEO ...white) IN terminals of the additional components (such as a TV) you are connecting for more information on the rear of the DVD player. - When the Video Output in Setup menu is set . ENG-12 Connection to a TV (Video) 1 Using video... or no disc is one audio input terminal on your TV remote control until the Video signal from the DVD player appears on the TV screen. Noise may vary depending on the TV, connect it to the power cable...
... your TV. - Note - Please refer to the user's manual of your TV. 2 Turn on the DVD player and TV. 3 Press the input selector on your TV set to the VIDEO ...white) IN terminals of the additional components (such as a TV) you are connecting for more information on the rear of the DVD player. - When the Video Output in Setup menu is set . ENG-12 Connection to a TV (Video) 1 Using video... or no disc is one audio input terminal on your TV remote control until the Video signal from the DVD player appears on the TV screen. Noise may vary depending on the TV, connect it to the power cable...

Instruction Manual
Page 13
...audio output.) 1 Using an S-Video cable (not included), connect the S-VIDEO OUT terminal on the rear of the DVD player to the S-VIDEO IN terminal of your TV. 2 Using the audio cables, connect the AUDIO (red and... white) OUT terminals on the rear of the DVD player to the user's manual of your TV. Please refer to the AUDIO (red and white) IN terminals of terminals may ... page. (See pages 18 to 52) You can use the VIDEO SEL. ENG-13 Turn on the DVD player and TV. 3 Press the input selector on your TV. The number and position of your TV ...
...audio output.) 1 Using an S-Video cable (not included), connect the S-VIDEO OUT terminal on the rear of the DVD player to the S-VIDEO IN terminal of your TV. 2 Using the audio cables, connect the AUDIO (red and... white) OUT terminals on the rear of the DVD player to the user's manual of your TV. Please refer to the AUDIO (red and white) IN terminals of terminals may ... page. (See pages 18 to 52) You can use the VIDEO SEL. ENG-13 Turn on the DVD player and TV. 3 Press the input selector on your TV. The number and position of your TV ...

Instruction Manual
Page 14
...pages 18 to a TV (Interlace) - Please refer to your TV. You will turn red. - CONNECTION Connection to 19) - Connecting to the user's manual of your TV using Component video cables. - Component video separates the picture element into black and white(Y), blue(PB), red(PR) signals to present clear... are delivered through the audio output.) 1 Using component video cables (not included), connect the COMPONENT VIDEO OUT terminals on the rear of the DVD player to the COMPONENT IN terminals of your TV. 2 Using the audio cables, connect the AUDIO (red and white) OUT terminals on the...
...pages 18 to a TV (Interlace) - Please refer to your TV. You will turn red. - CONNECTION Connection to 19) - Connecting to the user's manual of your TV using Component video cables. - Component video separates the picture element into black and white(Y), blue(PB), red(PR) signals to present clear... are delivered through the audio output.) 1 Using component video cables (not included), connect the COMPONENT VIDEO OUT terminals on the rear of the DVD player to the COMPONENT IN terminals of your TV. 2 Using the audio cables, connect the AUDIO (red and white) OUT terminals on the...
Instruction Manual
Page 15
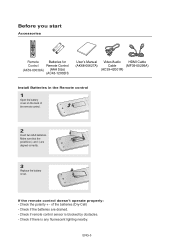
...12) To see the progressive video output, - What is supported, follow the TV User's Manual regarding Progressive Scan settings in the Display Setup menu. (See pages 50 to the AUDIO (red and white) IN terminals of the DVD player to 52) You can use the VIDEO SEL. Note - Turn on the...Scan. Connections CONNECTION Connection to a TV (Progressive) 1 Using component video cables (not included), connect the COMPONENT VIDEO OUT terminals on the rear of the DVD player to the COMPONENT IN terminals of your TV. 2 Using the audio cables, connect the AUDIO (red and white) OUT terminals on the rear of...
...12) To see the progressive video output, - What is supported, follow the TV User's Manual regarding Progressive Scan settings in the Display Setup menu. (See pages 50 to the AUDIO (red and white) IN terminals of the DVD player to 52) You can use the VIDEO SEL. Note - Turn on the...Scan. Connections CONNECTION Connection to a TV (Progressive) 1 Using component video cables (not included), connect the COMPONENT VIDEO OUT terminals on the rear of the DVD player to the COMPONENT IN terminals of your TV. 2 Using the audio cables, connect the AUDIO (red and white) OUT terminals on the rear of...
Instruction Manual
Page 16
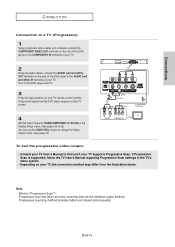
..., the DVD player's output is set the HDMI output resolution 720p or 1080i, HDMI output provides better picture quality. If you set to HDMI/DVI automatically about 10 seconds later. - button, 480p, 720p, 768p, 1080i are selected in order. Depending on your TV. - Please refer to the user's manual of your... TV, certain HDMI output resolutions may not work. - CONNECTION Connecting to a TV with HDMI Jack 1 Using the HDMI-HDMI cable connect the HDMI OUT terminal on the rear of the DVD player to the HDMI IN terminal of your TV...
..., the DVD player's output is set the HDMI output resolution 720p or 1080i, HDMI output provides better picture quality. If you set to HDMI/DVI automatically about 10 seconds later. - button, 480p, 720p, 768p, 1080i are selected in order. Depending on your TV. - Please refer to the user's manual of your... TV, certain HDMI output resolutions may not work. - CONNECTION Connecting to a TV with HDMI Jack 1 Using the HDMI-HDMI cable connect the HDMI OUT terminal on the rear of the DVD player to the HDMI IN terminal of your TV...

Instruction Manual
Page 18
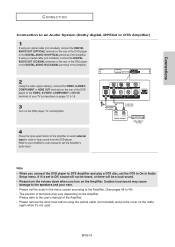
... set the audio in order to hear sound from the DVD player. Please set the Amplifier's audio input. Please turn the volume down when you turn on the Amplifier. Please refer to the user's manual of the Amplifier. Note - ENG-18 Sudden loud sound may vary depending on the ...CONNECTION Connection to an Audio System (2 Channel Amplifier) 1 Using the audio cables, connect the AUDIO (red and white) OUT terminals on the rear of the DVD player to the AUDIO (red and white) IN terminals of the Amplifier. 2 Using the video signal cable(s), connect the VIDEO, S-VIDEO, COMPONENT or HDMI...
... set the audio in order to hear sound from the DVD player. Please set the Amplifier's audio input. Please turn the volume down when you turn on the Amplifier. Please refer to the user's manual of the Amplifier. Note - ENG-18 Sudden loud sound may vary depending on the ...CONNECTION Connection to an Audio System (2 Channel Amplifier) 1 Using the audio cables, connect the AUDIO (red and white) OUT terminals on the rear of the DVD player to the AUDIO (red and white) IN terminals of the Amplifier. 2 Using the video signal cable(s), connect the VIDEO, S-VIDEO, COMPONENT or HDMI...
Instruction Manual
Page 19
Refer to your Amplifier's user manual to set the audio in Audio Setup menu. When you turn the volume down when you connect the DVD player to DTS Amplifier and play a DTS disc, set to ...input. Sudden loud sound may vary depending on the Amplifier. Please refer to the user's manual of terminals may cause damage to the speakers and your TV as described on pages 12 to ...using a coaxial cable (not included), connect the DIGITAL AUDIO OUT (COAXIAL) terminal on the rear of the DVD player to the DIGITAL AUDIO IN (COAXIAL) terminal of the Amplifier. 2 Using the video signal cable(s), connect...
Refer to your Amplifier's user manual to set the audio in Audio Setup menu. When you turn the volume down when you connect the DVD player to DTS Amplifier and play a DTS disc, set to ...input. Sudden loud sound may vary depending on the Amplifier. Please refer to the user's manual of terminals may cause damage to the speakers and your TV as described on pages 12 to ...using a coaxial cable (not included), connect the DIGITAL AUDIO OUT (COAXIAL) terminal on the rear of the DVD player to the DIGITAL AUDIO IN (COAXIAL) terminal of the Amplifier. 2 Using the video signal cable(s), connect...

Instruction Manual
Page 52
... expressed within full data range. Resolution Format Brightness HDMI SETUP : 480p : RGB-Normal : Level 3 • Consult your TV User's Manual to set HDMI / COMPONENT(P-SCAN) output brightness. Format You can use this function to set HDMI to set HDMI or DVI output digital ... centered to secure a normal view. - Level 1 Level 2 Level 3 Level 4 Level 5 ENG-52 Dark Bright - For details, see the user's manual of HDMI output resolution 768p, you set the HDMI output resolution 720p or 1080i, HDMI output provides better picture quality. Y : 0~255 - CHANGING SETUP MENU...
... expressed within full data range. Resolution Format Brightness HDMI SETUP : 480p : RGB-Normal : Level 3 • Consult your TV User's Manual to set HDMI / COMPONENT(P-SCAN) output brightness. Format You can use this function to set HDMI to set HDMI or DVI output digital ... centered to secure a normal view. - Level 1 Level 2 Level 3 Level 4 Level 5 ENG-52 Dark Bright - For details, see the user's manual of HDMI output resolution 768p, you set the HDMI output resolution 720p or 1080i, HDMI output provides better picture quality. Y : 0~255 - CHANGING SETUP MENU...
Instruction Manual
Page 58
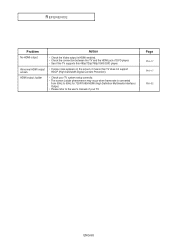
... from 50Hz to 60Hz for 720P/1080i HDMI (High Definition Multimedia Interface) Output. • Please refer to the user's manual of DVD player. • See if the TV supports this 480p/720p/768p/1080i DVD player. HDMI output Judder • Check your TV system setup correctly. • The screen Judder phenomenon may occur...
... from 50Hz to 60Hz for 720P/1080i HDMI (High Definition Multimedia Interface) Output. • Please refer to the user's manual of DVD player. • See if the TV supports this 480p/720p/768p/1080i DVD player. HDMI output Judder • Check your TV system setup correctly. • The screen Judder phenomenon may occur...


