
Instruction Manual
Page 3
...This equipment has been tested and found to wide slot, fully insert. This symbol indicates important instructions accompanying the product. CAUTION : DVD PLAYERS USE AN INVISIBLE LASER BEAM WHICH CAN CAUSE HAZARDOUS RADIATION EXPOSURE IF DIRECTED. REFER SERVICING TO QUALIFIED SERVICE PERSONNEL. WARNING : To ... 1 LASER APPARAT PRODUCTO LÁSER CLASE 1 ENG-3 To prevent electromagnetic interference with the limits for connections. BE SURE TO OPERATE PLAYER CORRECTLY AS INSTRUCTED. Attention: Pour éviter les chocs électriques, introduíre la lame la plus large de la...
...This equipment has been tested and found to wide slot, fully insert. This symbol indicates important instructions accompanying the product. CAUTION : DVD PLAYERS USE AN INVISIBLE LASER BEAM WHICH CAN CAUSE HAZARDOUS RADIATION EXPOSURE IF DIRECTED. REFER SERVICING TO QUALIFIED SERVICE PERSONNEL. WARNING : To ... 1 LASER APPARAT PRODUCTO LÁSER CLASE 1 ENG-3 To prevent electromagnetic interference with the limits for connections. BE SURE TO OPERATE PLAYER CORRECTLY AS INSTRUCTED. Attention: Pour éviter les chocs électriques, introduíre la lame la plus large de la...
Instruction Manual
Page 4
... • Exterior interference such as lightning and static electricity can be used elsewhere. • This DVD player is being played, or the disc may be scratched or broken, and the player's internal parts may be used only where the power supply is highly vulnerable to put your hand into... operate normally. • Be sure to remove the disc and turn the player off the player after use. • Disconnect the AC power cord from the inside to the outside of this DVD player, the DVD player cannot play the disc. DO NOT OPEN COVER AND DO NOT REPAIR YOURSELF. Handling Cautions ...
... • Exterior interference such as lightning and static electricity can be used elsewhere. • This DVD player is being played, or the disc may be scratched or broken, and the player's internal parts may be used only where the power supply is highly vulnerable to put your hand into... operate normally. • Be sure to remove the disc and turn the player off the player after use. • Disconnect the AC power cord from the inside to the outside of this DVD player, the DVD player cannot play the disc. DO NOT OPEN COVER AND DO NOT REPAIR YOURSELF. Handling Cautions ...
Instruction Manual
Page 7
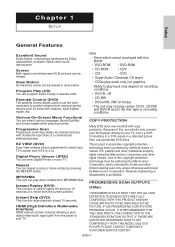
... PICTURE PROBLEMS OCCUR, IT IS RECOMMENDED THAT THE USER SWITCH THE CONNECTION TO THE 'STANDARD DEFINITION' OUTPUT. Use of this, you should only connect your DVD player directly to your TV's screen size (16:9 or 4:3). Screen Both regular and widescreen(16:9) pictures can play discs created from viewing harmful movies such as... incorporates copyright protection technology that is prohibited. patents and other rights owners. IF THERE ARE QUESTIONS REGARDING YOUR TV SET COMPATIBILITY WITH THIS MODEL 525p DVD PLAYER, PLEASE CONTACT SAMSUNG'S CUSTOMER SERVICE CENTER."
... PICTURE PROBLEMS OCCUR, IT IS RECOMMENDED THAT THE USER SWITCH THE CONNECTION TO THE 'STANDARD DEFINITION' OUTPUT. Use of this, you should only connect your DVD player directly to your TV's screen size (16:9 or 4:3). Screen Both regular and widescreen(16:9) pictures can play discs created from viewing harmful movies such as... incorporates copyright protection technology that is prohibited. patents and other rights owners. IF THERE ARE QUESTIONS REGARDING YOUR TV SET COMPATIBILITY WITH THIS MODEL 525p DVD PLAYER, PLEASE CONTACT SAMSUNG'S CUSTOMER SERVICE CENTER."
Instruction Manual
Page 8
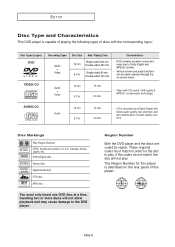
...do not match, the disc will not allow playback and may cause damage to Dolby Digital and MPEG-2 system. - Region Number Both the DVD player and the discs are coded by region. Dolby Digital disc STEREO Stereo disc DIGITAL SOUND Digital Audio disc DTS disc MP3 disc You must ...match in U.S.A, Canada, Korea, Japan, etc. SETUP Disc Type and Characteristics This DVD player is recorded as a Digital Signal with better audio quality, less distortion and less deterioration of the player. Audio + Video 12 Cm 8 Cm 74 min. 20 min. - Double-sided 480 min. Playing ...
...do not match, the disc will not allow playback and may cause damage to Dolby Digital and MPEG-2 system. - Region Number Both the DVD player and the discs are coded by region. Dolby Digital disc STEREO Stereo disc DIGITAL SOUND Digital Audio disc DTS disc MP3 disc You must ...match in U.S.A, Canada, Korea, Japan, etc. SETUP Disc Type and Characteristics This DVD player is recorded as a Digital Signal with better audio quality, less distortion and less deterioration of the player. Audio + Video 12 Cm 8 Cm 74 min. 20 min. - Double-sided 480 min. Playing ...
Instruction Manual
Page 9
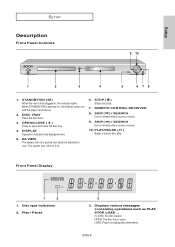
... 4:3). 6. SKIP ( ) / SEARCH Use to open . LOAD: Player is first plugged in, the indicator lights. When STANDBY/ON is pressed on, the indicator goes out and the player is open and close the disc tray. 4. DISC TRAY Place the disc here. 3. Setup SETUP Description Front Panel Controls 9 10 DVD-HD850 OPEN/CLOSE EZ VIEW 1 2 3 4 5 6 78 1.
... 4:3). 6. SKIP ( ) / SEARCH Use to open . LOAD: Player is first plugged in, the indicator lights. When STANDBY/ON is pressed on, the indicator goes out and the player is open and close the disc tray. 4. DISC TRAY Place the disc here. 3. Setup SETUP Description Front Panel Controls 9 10 DVD-HD850 OPEN/CLOSE EZ VIEW 1 2 3 4 5 6 78 1.

Instruction Manual
Page 10
... Progressive Scan is connected to COMPOSITE/S-VIDEO. 6. If HDMI/COMPONENT (P-SCAN) Video Output is selected in Setup Menu must be no image output if the DVD player is supported, follow the TV User's Manual regarding the HDMI terminal. - COMPONENT VIDEO OUT JACKS - Use the S-Video cable to connect this jack to the...
... Progressive Scan is connected to COMPOSITE/S-VIDEO. 6. If HDMI/COMPONENT (P-SCAN) Video Output is selected in Setup Menu must be no image output if the DVD player is supported, follow the TV User's Manual regarding the HDMI terminal. - COMPONENT VIDEO OUT JACKS - Use the S-Video cable to connect this jack to the...
Instruction Manual
Page 11
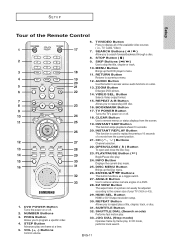
...access various camera angles on or off . 2. MENU Button 18 Brings up the Disc menu. 26. BOOKMARK Button 17. DISC MENU Button Brings up the DVD player's menu. 11. ANGLE Button 33 Use to display all of the available video sources 17 ( i.e., TV, Cable, Video) 7. Button HDMI or DVI ... . 30 24. JOG DIAL (Step mode) Operates frame by frame play A-B disc. 16. ZOOM Button 22 Enlarges DVD picture. 14. TV POWER Button 24 Turns the TV's power on a DVD. 28. HDMI SEL. RETURN Button 19 Returns to the screen size of a movie from the screen. 19. INSTANT ...
...access various camera angles on or off . 2. MENU Button 18 Brings up the Disc menu. 26. BOOKMARK Button 17. DISC MENU Button Brings up the DVD player's menu. 11. ANGLE Button 33 Use to display all of the available video sources 17 ( i.e., TV, Cable, Video) 7. Button HDMI or DVI ... . 30 24. JOG DIAL (Step mode) Operates frame by frame play A-B disc. 16. ZOOM Button 22 Enlarges DVD picture. 14. TV POWER Button 24 Turns the TV's power on a DVD. 28. HDMI SEL. RETURN Button 19 Returns to the screen size of a movie from the screen. 19. INSTANT ...

Instruction Manual
Page 12
.../COMPONENT(P-SCAN)) - If you want to connect to an Amplifier, please refer to the Amplifier connection page. (See pages 18 to connect the DVD player with a TV and other components before you connect or disconnect any cables. - ENG-12 Refer to the user's manual of connections commonly used ... may be generated if the audio cable placed too close to HDMI/COMPONENT(P-SCAN), the Video and S-Video Outputs do not work. Before Connecting the DVD Player - Note - Connection to a TV (Video) 1 Using video/audio cables, connect the VIDEO (yellow)/AUDIO (red and white) OUT terminals on ...
.../COMPONENT(P-SCAN)) - If you want to connect to an Amplifier, please refer to the Amplifier connection page. (See pages 18 to connect the DVD player with a TV and other components before you connect or disconnect any cables. - ENG-12 Refer to the user's manual of connections commonly used ... may be generated if the audio cable placed too close to HDMI/COMPONENT(P-SCAN), the Video and S-Video Outputs do not work. Before Connecting the DVD Player - Note - Connection to a TV (Video) 1 Using video/audio cables, connect the VIDEO (yellow)/AUDIO (red and white) OUT terminals on ...

Instruction Manual
Page 13
... mode. (Audio signals are delivered through the audio output.) 1 Using an S-Video cable (not included), connect the S-VIDEO OUT terminal on the rear of the DVD player to the S-VIDEO IN terminal of your TV. 2 Using the audio cables, connect the AUDIO (red and white) OUT terminals on the rear of the... DVD player to the AUDIO (red and white) IN terminals of terminals may vary depending on your TV screen. 4 Set the Video Output to COMPOSITE/S-VIDEO in ...
... mode. (Audio signals are delivered through the audio output.) 1 Using an S-Video cable (not included), connect the S-VIDEO OUT terminal on the rear of the DVD player to the S-VIDEO IN terminal of your TV. 2 Using the audio cables, connect the AUDIO (red and white) OUT terminals on the rear of the... DVD player to the AUDIO (red and white) IN terminals of terminals may vary depending on your TV screen. 4 Set the Video Output to COMPOSITE/S-VIDEO in ...

Instruction Manual
Page 14
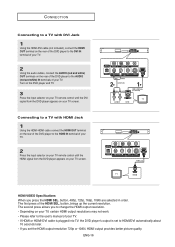
...Audio signals are delivered through the audio output.) 1 Using component video cables (not included), connect the COMPONENT VIDEO OUT terminals on the rear of the DVD player to the COMPONENT IN terminals of your TV. 2 Using the audio cables, connect the AUDIO (red and white) OUT terminals on the rear of ...the DVD player to your TV. button to S-Video with the Component cables connected, the screen will enjoy high quality and accurate color reproduction images. If you ...
...Audio signals are delivered through the audio output.) 1 Using component video cables (not included), connect the COMPONENT VIDEO OUT terminals on the rear of the DVD player to the COMPONENT IN terminals of your TV. 2 Using the audio cables, connect the AUDIO (red and white) OUT terminals on the rear of ...the DVD player to your TV. button to S-Video with the Component cables connected, the screen will enjoy high quality and accurate color reproduction images. If you ...
Instruction Manual
Page 15
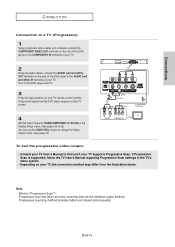
..."Progressive Scan"? Depending on your TV supports Progressive Scan. Note - Progressive scanning method provides better and clearer picture quality. Turn on the DVD player and TV. 3 Press the input selector on your TV remote control until the Component signal from the illustration above. What is supported, ... Connection to a TV (Progressive) 1 Using component video cables (not included), connect the COMPONENT VIDEO OUT terminals on the rear of the DVD player to the COMPONENT IN terminals of your TV. 2 Using the audio cables, connect the AUDIO (red and white) OUT terminals on the rear...
..."Progressive Scan"? Depending on your TV supports Progressive Scan. Note - Progressive scanning method provides better and clearer picture quality. Turn on the DVD player and TV. 3 Press the input selector on your TV remote control until the Component signal from the illustration above. What is supported, ... Connection to a TV (Progressive) 1 Using component video cables (not included), connect the COMPONENT VIDEO OUT terminals on the rear of the DVD player to the COMPONENT IN terminals of your TV. 2 Using the audio cables, connect the AUDIO (red and white) OUT terminals on the rear...
Instruction Manual
Page 16
... OUT terminals on your TV, certain HDMI output resolutions may not work. - The first press of your TV. - Depending on the rear of the DVD player to the AUDIO (red and white) IN terminals of your TV. ENG-16 HDMI VIDEO Specifications When you set to HDMI/DVI automatically about 10...the HDMI SEL. The second press allows you to change the HDMI output resolution. - If HDMI or HDMI-DVI cable is plugged into TV, the DVD player's output is set the HDMI output resolution 720p or 1080i, HDMI output provides better picture quality. CONNECTION Connecting to a TV with HDMI Jack 1 Using...
... OUT terminals on your TV, certain HDMI output resolutions may not work. - The first press of your TV. - Depending on the rear of the DVD player to the AUDIO (red and white) IN terminals of your TV. ENG-16 HDMI VIDEO Specifications When you set to HDMI/DVI automatically about 10...the HDMI SEL. The second press allows you to change the HDMI output resolution. - If HDMI or HDMI-DVI cable is plugged into TV, the DVD player's output is set the HDMI output resolution 720p or 1080i, HDMI output provides better picture quality. CONNECTION Connecting to a TV with HDMI Jack 1 Using...
Instruction Manual
Page 17
... Interface) HDMI is digital. Using HDMI, the DVD player transmits a digital video and audio signal and displays a vivid picture on the screen. • Why does Samsung use HDMI? Analog TVs require an analog video/audio signal. However, when playing a DVD, the data transmitted to a TV is an ...; What is degraded due to -digital converter (in the TV) is a system for protecting DVD content outputted via DVI from being copied. Therefore either a digital-to-analog converter (in the DVD player) or an analog-to noise and signal loss. HDCP (High-bandwidth Digital Content Protection) is ...
... Interface) HDMI is digital. Using HDMI, the DVD player transmits a digital video and audio signal and displays a vivid picture on the screen. • Why does Samsung use HDMI? Analog TVs require an analog video/audio signal. However, when playing a DVD, the data transmitted to a TV is an ...; What is degraded due to -digital converter (in the TV) is a system for protecting DVD content outputted via DVI from being copied. Therefore either a digital-to-analog converter (in the DVD player) or an analog-to noise and signal loss. HDCP (High-bandwidth Digital Content Protection) is ...

Instruction Manual
Page 18
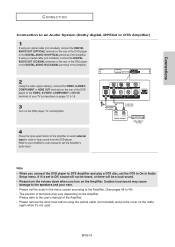
...CONNECTION Connection to an Audio System (2 Channel Amplifier) 1 Using the audio cables, connect the AUDIO (red and white) OUT terminals on the rear of the DVD player to the AUDIO (red and white) IN terminals of the Amplifier. 2 Using the video signal cable(s), connect the VIDEO, S-VIDEO, COMPONENT or HDMI OUT ... in the menu screen according to the Amplifier.(See pages 48 to the user's manual of terminals may cause damage to hear sound from the DVD player. Sudden loud sound may vary depending on the Amplifier. Please turn the volume down when you turn on the Amplifier. Note - Refer to ...
...CONNECTION Connection to an Audio System (2 Channel Amplifier) 1 Using the audio cables, connect the AUDIO (red and white) OUT terminals on the rear of the DVD player to the AUDIO (red and white) IN terminals of the Amplifier. 2 Using the video signal cable(s), connect the VIDEO, S-VIDEO, COMPONENT or HDMI OUT ... in the menu screen according to the Amplifier.(See pages 48 to the user's manual of terminals may cause damage to hear sound from the DVD player. Sudden loud sound may vary depending on the Amplifier. Please turn the volume down when you turn on the Amplifier. Note - Refer to ...
Instruction Manual
Page 19
...audio input. Please remove the dust cover before using a coaxial cable (not included), connect the DIGITAL AUDIO OUT (COAXIAL) terminal on the rear of the DVD player to the DIGITAL AUDIO IN (COAXIAL) terminal of the Amplifier. 2 Using the video signal cable(s), connect the VIDEO, S-VIDEO, COMPONENT or HDMI OUT terminals... cable (not included) and put the cover on the cable again when it is set the audio in order to hear sound from the DVD player. Sudden loud sound may vary depending on the Amplifier. Please refer to the user's manual of the Amplifier. The position of the Amplifier ...
...audio input. Please remove the dust cover before using a coaxial cable (not included), connect the DIGITAL AUDIO OUT (COAXIAL) terminal on the rear of the DVD player to the DIGITAL AUDIO IN (COAXIAL) terminal of the Amplifier. 2 Using the video signal cable(s), connect the VIDEO, S-VIDEO, COMPONENT or HDMI OUT terminals... cable (not included) and put the cover on the cable again when it is set the audio in order to hear sound from the DVD player. Sudden loud sound may vary depending on the Amplifier. Please refer to the user's manual of the Amplifier. The position of the Amplifier ...

Instruction Manual
Page 20
... System, turn the power on your preferred language. M RESUME function When you stop disc play, the player remembers where you stopped, so when you press PLAY/PAUSE ( ) button again, it by pressing the...with the disc's label facing up where you left off . After plugging in the player, the first time you press the DVD POWER button, this screen comes up: If you can reset your TV and set... light goes out and the tray opens. 2 Place a disc gently into the tray with no disc in the player for the first time.) If the language for the startup screen is unplugged, or if you want to select a...
... System, turn the power on your preferred language. M RESUME function When you stop disc play, the player remembers where you stopped, so when you press PLAY/PAUSE ( ) button again, it by pressing the...with the disc's label facing up where you left off . After plugging in the player, the first time you press the DVD POWER button, this screen comes up: If you can reset your TV and set... light goes out and the tray opens. 2 Place a disc gently into the tray with no disc in the player for the first time.) If the language for the startup screen is unplugged, or if you want to select a...
Instruction Manual
Page 40
... audio sound requires an analog/digital sampling rate, that is conversion to 160 Kbps. ENG-40 When composing your title, make sure that the DVD player will play a maximum of at least 64Kbps and up to WMA format, of special characters including - Use a decompression transfer rate of 3000 ...However, choosing higher rates, like 192 Kbps or more, only rarely give better sound quality. You should be played properly. - When naming your DVD player (degraded sound quality and in the name, and avoid the use 8 characters or less, have no spaces in some cases, inability of The SDMI...
... audio sound requires an analog/digital sampling rate, that is conversion to 160 Kbps. ENG-40 When composing your title, make sure that the DVD player will play a maximum of at least 64Kbps and up to WMA format, of special characters including - Use a decompression transfer rate of 3000 ...However, choosing higher rates, like 192 Kbps or more, only rarely give better sound quality. You should be played properly. - When naming your DVD player (degraded sound quality and in the name, and avoid the use 8 characters or less, have no spaces in some cases, inability of The SDMI...
Instruction Manual
Page 43
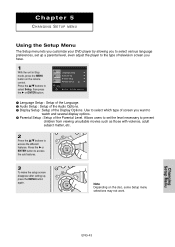
...users to set up , press the MENU button again. Chapter 5 CHANGING SETUP MENU Using the Setup Menu The Setup menu lets you customize your DVD player by allowing you to select various language preferences, set the level necessary to prevent children from viewing unsuitable movies such as those with violence, adult...the √ or ENTER button to access the sub features. 3 To make the setup screen disappear after setting up a parental level, even adjust the player to the type of television screen you want to select which type of screen you have. 1 With the unit in Stop mode, press the MENU...
...users to set up , press the MENU button again. Chapter 5 CHANGING SETUP MENU Using the Setup Menu The Setup menu lets you customize your DVD player by allowing you to select various language preferences, set the level necessary to prevent children from viewing unsuitable movies such as those with violence, adult...the √ or ENTER button to access the sub features. 3 To make the setup screen disappear after setting up a parental level, even adjust the player to the type of television screen you want to select which type of screen you have. 1 With the unit in Stop mode, press the MENU...

Instruction Manual
Page 57
REFERENCE Troubleshooting Before requesting service (troubleshooting), please check the following conditions are met. : 1) The DVD player is connected with the proper Amplifier 2) The disc is blocked • Press the button for more than 5 seconds under no disc inside. Disc does not... properly. • In a SETUP Menu, is not being played has the "5.1 ch" mark on screen. • The features or action cannot be changed. The DVD's software restricts it . Disc Menu doesn't appear. • Check if the disc has a Menu. The screen is recorded with the label side facing up. •...
REFERENCE Troubleshooting Before requesting service (troubleshooting), please check the following conditions are met. : 1) The DVD player is connected with the proper Amplifier 2) The disc is blocked • Press the button for more than 5 seconds under no disc inside. Disc does not... properly. • In a SETUP Menu, is not being played has the "5.1 ch" mark on screen. • The features or action cannot be changed. The DVD's software restricts it . Disc Menu doesn't appear. • Check if the disc has a Menu. The screen is recorded with the label side facing up. •...
Instruction Manual
Page 58
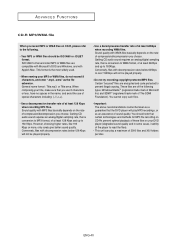
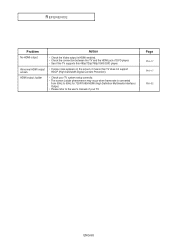
... may occur when frame rate is HDMI enabled. • Check the connection between the TV and the HDMI jack of DVD player. • See if the TV supports this 480p/720p/768p/1080i DVD player. HDMI output Judder • Check your TV. Abnormal HDMI output • If snow noise appears on the screen, it...
... may occur when frame rate is HDMI enabled. • Check the connection between the TV and the HDMI jack of DVD player. • See if the TV supports this 480p/720p/768p/1080i DVD player. HDMI output Judder • Check your TV. Abnormal HDMI output • If snow noise appears on the screen, it...


