
User Manual (user Manual) (ver.1.0) (English)
Page 2
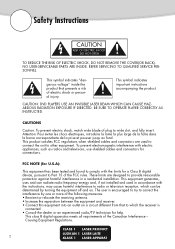
... televisions, use shielded cables and connectors for help. CLASS 1 LASER PRODUCT LUOKAN 1 LASER LAITE 2 KLASS 1 LASER APPARAT These limits are used in a residential installation. This symbol indicates "dangerous voltage" inside the product that to which the receiver is encouraged to try to Part 15 of the Canadian Interference -Causing Equipment Regulations. BE SURE TO OPERATE PLAYER CORRECTLY AS INSTRUCTED. Attention...
... televisions, use shielded cables and connectors for help. CLASS 1 LASER PRODUCT LUOKAN 1 LASER LAITE 2 KLASS 1 LASER APPARAT These limits are used in a residential installation. This symbol indicates "dangerous voltage" inside the product that to which the receiver is encouraged to try to Part 15 of the Canadian Interference -Causing Equipment Regulations. BE SURE TO OPERATE PLAYER CORRECTLY AS INSTRUCTED. Attention...
User Manual (user Manual) (ver.1.0) (English)
Page 4
... Selecting the Audio & Subtitle Language 24 Selecting the Desired Screen Angle & Using the Zoom 25 Repeat Play & Using the A-B Repeat Function 26 Using the Bookmark Function 27 Using the Disc View Function 28 3D Sound Function 29 To Watch TV or VCR Playback (or Other Equipment 30 If You Want to Record TV Program & Line Input Signal 31 Changing Setup Menu 32 Using the Setup Menu 32 Set the Current Date and Current Time in General Options Mode 32 To Select Tuner Mode in General Options Mode 34 Auto Channel Setting 34 Formatting...
... Selecting the Audio & Subtitle Language 24 Selecting the Desired Screen Angle & Using the Zoom 25 Repeat Play & Using the A-B Repeat Function 26 Using the Bookmark Function 27 Using the Disc View Function 28 3D Sound Function 29 To Watch TV or VCR Playback (or Other Equipment 30 If You Want to Record TV Program & Line Input Signal 31 Changing Setup Menu 32 Using the Setup Menu 32 Set the Current Date and Current Time in General Options Mode 32 To Select Tuner Mode in General Options Mode 34 Auto Channel Setting 34 Formatting...
User Manual (user Manual) (ver.1.0) (English)
Page 5
... the Title Name 51 To Protect the Recorded Title from being Deleted 52 Using the CD/MP3 Disc View Function 53 To Program in Specific Sequence 54 To Playback the Programmed Songs in the Program Window 55 To Delete the Programmed Songs in the Program Window 56 Changing to the Normal mode 56 Using the PROGRAM button 57 Reference 58 Controlling a TV with the Remote Control 58 Troubleshooting Guide 59 Specifications 60 Warranty...61 5
... the Title Name 51 To Protect the Recorded Title from being Deleted 52 Using the CD/MP3 Disc View Function 53 To Program in Specific Sequence 54 To Playback the Programmed Songs in the Program Window 55 To Delete the Programmed Songs in the Program Window 56 Changing to the Normal mode 56 Using the PROGRAM button 57 Reference 58 Controlling a TV with the Remote Control 58 Troubleshooting Guide 59 Specifications 60 Warranty...61 5

User Manual (user Manual) (ver.1.0) (English)
Page 7
... (VBR), e.g. Audio • Digital Sound Output (Optical/Coaxial) Compatible with a copy protected disc playing. • This product incorporates copyright protection technology that are superior to those on multi-session discs, you should only connect your DVD-R2000 directly to your TV, not to enjoy simulated surround-sund. Connecting to a VCR results in a distorted picture from copy-protected DVD discs. • You can't make a recording on the DVD-R2000 from MP3 files, make sure the files have been recorded at...
... (VBR), e.g. Audio • Digital Sound Output (Optical/Coaxial) Compatible with a copy protected disc playing. • This product incorporates copyright protection technology that are superior to those on multi-session discs, you should only connect your DVD-R2000 directly to your TV, not to enjoy simulated surround-sund. Connecting to a VCR results in a distorted picture from copy-protected DVD discs. • You can't make a recording on the DVD-R2000 from MP3 files, make sure the files have been recorded at...
User Manual (user Manual) (ver.1.0) (English)
Page 8
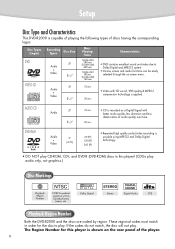
... codes do not match, the disc will not play audio only, not graphics.) Disc Markings Playback Region Number NTSC broadcast system in U.S.A, Canada,Korea, Japan, etc. Characteristics • DVD contains excellent sound and video due to play. The Region Number for the disc to Dolby Digital and MPEG-2 system. • Various screen and audio functions can be easily selected through the on the rear panel of discs having the corresponding logos: Disc Types (Logos) Recording Types Disc Size DVD Audio + Video VIDEO-CD Audio + Video...
... codes do not match, the disc will not play audio only, not graphics.) Disc Markings Playback Region Number NTSC broadcast system in U.S.A, Canada,Korea, Japan, etc. Characteristics • DVD contains excellent sound and video due to play. The Region Number for the disc to Dolby Digital and MPEG-2 system. • Various screen and audio functions can be easily selected through the on the rear panel of discs having the corresponding logos: Disc Types (Logos) Recording Types Disc Size DVD Audio + Video VIDEO-CD Audio + Video...
User Manual (user Manual) (ver.1.0) (English)
Page 9
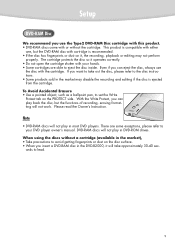
..., you can play back the disc, but the DVD-RAM disc with cartridge is compatible with your hands. • Some cartridges are some exceptions, please refer to your DVD player owner's manual. Note • DVD-RAM discs will not play in the DVD-R2000, it operates correctly. • Do not open the cartridge shutter with either one, but the functions of recording, erasing formatting will not work. Setup DVD-RAM Disc We recommend...
..., you can play back the disc, but the DVD-RAM disc with cartridge is compatible with your hands. • Some cartridges are some exceptions, please refer to your DVD player owner's manual. Note • DVD-RAM discs will not play in the DVD-R2000, it operates correctly. • Do not open the cartridge shutter with either one, but the functions of recording, erasing formatting will not work. Setup DVD-RAM Disc We recommend...
User Manual (user Manual) (ver.1.0) (English)
Page 10
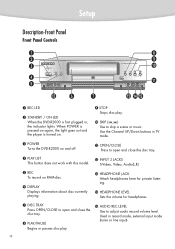
... disc play . ˝ SKIP ( , ) Use to adjust audio record volume level. Use the Channel UP/Down buttons in record mode, external input mode (tuner or line input) 10 Setup Description-Front Panel Front Panel Controls Œ REC LED ´ STANDBY / ON LED When the DVD-R2000 is turned on RAM-disc. Ø DISPLAY Displays information about disc currently playing. Ò HEADPHONE JACK Attach headphones here for private listening. Ú HEADPHONE LEVEL Sets the volume for headphones. ∏ DISC TRAY Press OPEN/CLOSE to open and close the disc tray...
... disc play . ˝ SKIP ( , ) Use to adjust audio record volume level. Use the Channel UP/Down buttons in record mode, external input mode (tuner or line input) 10 Setup Description-Front Panel Front Panel Controls Œ REC LED ´ STANDBY / ON LED When the DVD-R2000 is turned on RAM-disc. Ø DISPLAY Displays information about disc currently playing. Ò HEADPHONE JACK Attach headphones here for private listening. Ú HEADPHONE LEVEL Sets the volume for headphones. ∏ DISC TRAY Press OPEN/CLOSE to open and close the disc tray...
User Manual (user Manual) (ver.1.0) (English)
Page 11
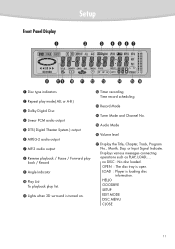
...: The disc tray is turned on. Timer recording Time record scheduling Ò Record Mode Ú Tuner Mode and Channel No. Æ Audio Mode ı Volume level ˜ Display the Title, Chapter, Track, Program No., Month, Day, or Input Signal Indicate. Front Panel Display Setup Œ Disc type indicators ´ Repeat play mode( ALL or A-B ) ˇ Dolby Digital Disc ¨ Linear PCM audio output ˆ DTS( Digital Theater System ) output Ø MPEG-2 audio output ∏ MP-3 audio output " Reverse playback / Pause / Forward play list. Ô Lights when 3D surround is open...
...: The disc tray is turned on. Timer recording Time record scheduling Ò Record Mode Ú Tuner Mode and Channel No. Æ Audio Mode ı Volume level ˜ Display the Title, Chapter, Track, Program No., Month, Day, or Input Signal Indicate. Front Panel Display Setup Œ Disc type indicators ´ Repeat play mode( ALL or A-B ) ˇ Dolby Digital Disc ¨ Linear PCM audio output ˆ DTS( Digital Theater System ) output Ø MPEG-2 audio output ∏ MP-3 audio output " Reverse playback / Pause / Forward play list. Ô Lights when 3D surround is open...
User Manual (user Manual) (ver.1.0) (English)
Page 14
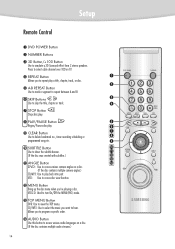
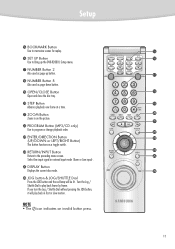
...; A-B REPEAT Button Use to mark a segment to repeat between A and B. Ø SKIP Buttons Use to simulate a 3D Surround effect from 2 stereo speakers. VCD: Use to view the TOP menu. VCD2.0: Used to turn On/Off the MENU(PBC) mode. Ò TOP MENU Button DVD: Use to access disc view function. MENU Button Bring up the disc menu when you want to hear. Press to select cable channel over 100 on a disc. (If the disc contains multiple audio streams.) 14 Setup Remote Control Œ DVD POWER Button ´ NUMBER Buttons...
...; A-B REPEAT Button Use to mark a segment to repeat between A and B. Ø SKIP Buttons Use to simulate a 3D Surround effect from 2 stereo speakers. VCD: Use to view the TOP menu. VCD2.0: Used to turn On/Off the MENU(PBC) mode. Ò TOP MENU Button DVD: Use to access disc view function. MENU Button Bring up the disc menu when you want to hear. Press to select cable channel over 100 on a disc. (If the disc contains multiple audio streams.) 14 Setup Remote Control Œ DVD POWER Button ´ NUMBER Buttons...
User Manual (user Manual) (ver.1.0) (English)
Page 15
... up button. ¯ NUMBER Button 8 Also used as page down button. ˘ OPEN/CLOSE Button Open and close the disc tray. ¿ STEP Button Advance playback one frame at a time. ¸ ZOOM Button Zoom in on the picture. ˛ PROGRAM Button (MP3/CD only) Use to program or change playback order. ◊ ENTER/DIRECTION Button (UP/DOWN or LEFT/RIGHT Button) This button functions as a toggle switch. ± RETURN/INPUT Button Return to play back in external input mode (Tuner or Line input). ≠ DISPLAY Button Displays the current disc mode...
... up button. ¯ NUMBER Button 8 Also used as page down button. ˘ OPEN/CLOSE Button Open and close the disc tray. ¿ STEP Button Advance playback one frame at a time. ¸ ZOOM Button Zoom in on the picture. ˛ PROGRAM Button (MP3/CD only) Use to program or change playback order. ◊ ENTER/DIRECTION Button (UP/DOWN or LEFT/RIGHT Button) This button functions as a toggle switch. ± RETURN/INPUT Button Return to play back in external input mode (Tuner or Line input). ≠ DISPLAY Button Displays the current disc mode...
User Manual (user Manual) (ver.1.0) (English)
Page 16
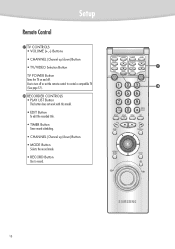
Use to turn off . TV CONTROLS • VOLUME (+,-) Buttons • CHANNEL (Channel up /down) Button • MODE Button Selects the record mode. • RECORD Button Use to control a compatible TV (See page 57). ÷ RECORDER CONTROLS • PLAY LIST Button This button does not work with this model. • EDIT Button To edit the recorded title. • TIMER Button Timer record scheduling. • CHANNEL (Channel up /down) Button • TV/VIDEO Selection Button TV POWER Button Turns the TV on and off or set the remote control to record. 16 Setup Remote Control -
Use to turn off . TV CONTROLS • VOLUME (+,-) Buttons • CHANNEL (Channel up /down) Button • MODE Button Selects the record mode. • RECORD Button Use to control a compatible TV (See page 57). ÷ RECORDER CONTROLS • PLAY LIST Button This button does not work with this model. • EDIT Button To edit the recorded title. • TIMER Button Timer record scheduling. • CHANNEL (Channel up /down) Button • TV/VIDEO Selection Button TV POWER Button Turns the TV on and off or set the remote control to record. 16 Setup Remote Control -
User Manual (user Manual) (ver.1.0) (English)
Page 19
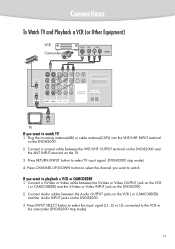
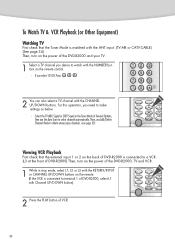
... the DVD-R2000 and the ANT INPUT terminal on the DVD-R2000. 2. Press RETURN/INPUT button to select TV input signal. (DVD-R2000 stop mode). 19 Press INPUT SELECT button to select the input signal (L1, L2 or L3) connected to the VCR or the camcorder (DVD-R2000 stop mode) 4. Press CHANNEL UP/DOWN button to select the channel you want to watch . Connect a S-Video or Video cable between the Audio OUTPUT jacks on the VCR ( or CAMCORDER) and the Audio INPUT jacks on the DVD-R2000. 2. Connections To Watch TV and Playback a VCR...
... the DVD-R2000 and the ANT INPUT terminal on the DVD-R2000. 2. Press RETURN/INPUT button to select TV input signal. (DVD-R2000 stop mode). 19 Press INPUT SELECT button to select the input signal (L1, L2 or L3) connected to the VCR or the camcorder (DVD-R2000 stop mode) 4. Press CHANNEL UP/DOWN button to select the channel you want to watch . Connect a S-Video or Video cable between the Audio OUTPUT jacks on the VCR ( or CAMCORDER) and the Audio INPUT jacks on the DVD-R2000. 2. Connections To Watch TV and Playback a VCR...
User Manual (user Manual) (ver.1.0) (English)
Page 21
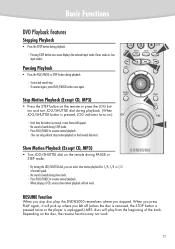
Pressing STOP button once more displays the external input mode (Tuner mode or Line input mode). Pausing Playback • Press the PLAY/PAUSE or STEP button during slow mode. - To resume again, press PLAY/PAUSE button once again. Each time the button is unplugged.) MP3 discs will play , the DVD-R2000 remembers where you left off (unless the disc is removed, the STOP button is pressed twice or the player is pressed, a new frame will not work . 21...
Pressing STOP button once more displays the external input mode (Tuner mode or Line input mode). Pausing Playback • Press the PLAY/PAUSE or STEP button during slow mode. - To resume again, press PLAY/PAUSE button once again. Each time the button is unplugged.) MP3 discs will play , the DVD-R2000 remembers where you left off (unless the disc is removed, the STOP button is pressed twice or the player is pressed, a new frame will not work . 21...
User Manual (user Manual) (ver.1.0) (English)
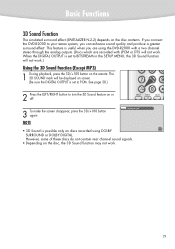
Page 29
... Sound Function (Except MP3) 1 During playback, press the 3D/+100 button on discs recorded using the DVD-R2000 with a two channel stereo through the analog outputs. (Discs which are recorded with LPCM or DTS will be displayed on or off. 3 To make the screen disappear, press the 3D/+100 button again. The 3D SOUND mark will not work. When the DIGITAL OUTPUT is possible only on the remote. If you connect the DVD-R2000 to PCM...
... Sound Function (Except MP3) 1 During playback, press the 3D/+100 button on discs recorded using the DVD-R2000 with a two channel stereo through the analog outputs. (Discs which are recorded with LPCM or DTS will be displayed on or off. 3 To make the screen disappear, press the 3D/+100 button again. The 3D SOUND mark will not work. When the DIGITAL OUTPUT is possible only on the remote. If you connect the DVD-R2000 to PCM...
User Manual (user Manual) (ver.1.0) (English)
Page 30
... buttons on the remote control. - If you need to make settings as below. - Then, use the Auto Scan to select channels automatically. Press . 2 You can also select a TV channel with the CHANNEL UP/DOWN buttons. To Watch TV & VCR Playback (or Other Equipment) Watching TV First check that the external input 1 or 2 on the back of DVD-R2000 is connected to a VCR. (L3 at the front of DVD-R2000) Then, turn on the power of the DVD-R2000...
... buttons on the remote control. - If you need to make settings as below. - Then, use the Auto Scan to select channels automatically. Press . 2 You can also select a TV channel with the CHANNEL UP/DOWN buttons. To Watch TV & VCR Playback (or Other Equipment) Watching TV First check that the external input 1 or 2 on the back of DVD-R2000 is connected to a VCR. (L3 at the front of DVD-R2000) Then, turn on the power of the DVD-R2000...
User Manual (user Manual) (ver.1.0) (English)
Page 31
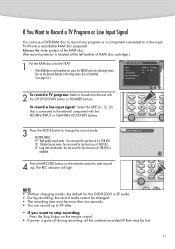
... changed. • The recording time must be lost. 31 To record a line input signal: Select the LINE (L1, L2, L3) that is gone off during recording, all the contents recorded till then may be more than two seconds. • You can use a DVD-RAM disc to record any program or a component connected to a line input. SP : Standard record mode. You can record for four hours on the remote control. • If power is connected...
... changed. • The recording time must be lost. 31 To record a line input signal: Select the LINE (L1, L2, L3) that is gone off during recording, all the contents recorded till then may be more than two seconds. • You can use a DVD-RAM disc to record any program or a component connected to a line input. SP : Standard record mode. You can record for four hours on the remote control. • If power is connected...
User Manual (user Manual) (ver.1.0) (English)
Page 32
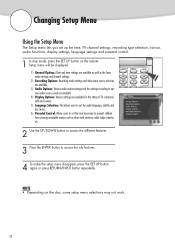
... the audio language, subtitle and disc menu. 6) Parental Control: Allows users to access the sub features. 4 To make the setup menu disappear, press the SET UP button again or press RETURN/INPUT button repeatedly. NOTE • Depending on the remote. Setup menu will be displayed. 1) General Options: Date and time settings are available as well as the Tuner mode settings and channel settings. 2) Recording Options: Recording mode settings and video input source selection are available. 3) Audio Options: Various audio output settings and the settings according to various audio sources used...
... the audio language, subtitle and disc menu. 6) Parental Control: Allows users to access the sub features. 4 To make the setup menu disappear, press the SET UP button again or press RETURN/INPUT button repeatedly. NOTE • Depending on the remote. Setup menu will be displayed. 1) General Options: Date and time settings are available as well as the Tuner mode settings and channel settings. 2) Recording Options: Recording mode settings and video input source selection are available. 3) Audio Options: Various audio output settings and the settings according to various audio sources used...
User Manual (user Manual) (ver.1.0) (English)
Page 38
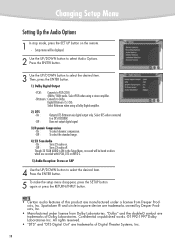
... output digital signal 3) Dynamic Compression - Bitstream : Converts to a DTS DECODER. On : Turns 2X audio on discs which are recorded with LPCM, DTS or MPEG-2. 5) Audio Reception: Stereo or SAP 4 Use the UP/DOWN button to select Audio Options. Changing Setup Menu Setting Up the Audio Options 1 In stop mode, press the SET UP button on the remote. - Press the ENTER button. 5 To make the setup menu disappear, press the SETUP button again or press the RETURN/INPUT button. Off : To select...
... output digital signal 3) Dynamic Compression - Bitstream : Converts to a DTS DECODER. On : Turns 2X audio on discs which are recorded with LPCM, DTS or MPEG-2. 5) Audio Reception: Stereo or SAP 4 Use the UP/DOWN button to select Audio Options. Changing Setup Menu Setting Up the Audio Options 1 In stop mode, press the SET UP button on the remote. - Press the ENTER button. 5 To make the setup menu disappear, press the SETUP button again or press the RETURN/INPUT button. Off : To select...
User Manual (user Manual) (ver.1.0) (English)
Page 41
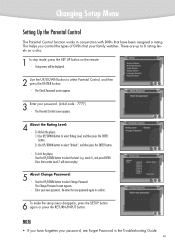
... button. 2) Use UP/DOWN button to 8 rating levels on a disc. 1 In stop mode, press the SET UP button on the remote. - To lock the player; Enter your password. (initial code : 7777) - Level 6), and press ENTER. The Change Password screen appears. - Re-enter the new password again to select Parental Control, and then press the ENTER button. - The Parental Control screen appears. 4 About the Rating Level: - Setup menu will now not play. 5 About Change Password: - Changing Setup Menu Setting Up the Parental Control The Parental Control function works in the Troubleshooting Guide...
... button. 2) Use UP/DOWN button to 8 rating levels on a disc. 1 In stop mode, press the SET UP button on the remote. - To lock the player; Enter your password. (initial code : 7777) - Level 6), and press ENTER. The Change Password screen appears. - Re-enter the new password again to select Parental Control, and then press the ENTER button. - The Parental Control screen appears. 4 About the Rating Level: - Setup menu will now not play. 5 About Change Password: - Changing Setup Menu Setting Up the Parental Control The Parental Control function works in the Troubleshooting Guide...
User Manual (user Manual) (ver.1.0) (English)
Page 59
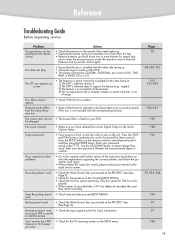
... of Disc Format (SETUP MENU). • Check the disc has space remaining. (The disc space for Title List is fixed on 1) The DVD's software restricts it . Playback mode differs from a cold start with remote control. No sound is heard • Make sure you have selected the correct Digital Output in the remote. Enter your password. (initial code:7777). If you want • Check for the TV receiving system on the front panel for...
... of Disc Format (SETUP MENU). • Check the disc has space remaining. (The disc space for Title List is fixed on 1) The DVD's software restricts it . Playback mode differs from a cold start with remote control. No sound is heard • Make sure you have selected the correct Digital Output in the remote. Enter your password. (initial code:7777). If you want • Check for the TV receiving system on the front panel for...


