
Quick Guide (easy Manual) (ver.1.0) (English)
Page 2
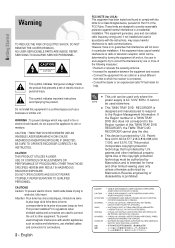
... equipment and receiver. • Connect the equipment into an outlet on a circuit different from that interference will not occur in a confined space such as radios and televisions, use shielded cables and connectors for home and other equipment. REFER SERVICING TO QUALIFIED PERSONNEL. If the Region number of this equipment in a particular installation. NO USER-SERVICEABLE PARTS ARE INSIDE. USE OF CONTROLS OR ADJUSTMENTS OR PERFORMANCE...
... equipment and receiver. • Connect the equipment into an outlet on a circuit different from that interference will not occur in a confined space such as radios and televisions, use shielded cables and connectors for home and other equipment. REFER SERVICING TO QUALIFIED PERSONNEL. If the Region number of this equipment in a particular installation. NO USER-SERVICEABLE PARTS ARE INSIDE. USE OF CONTROLS OR ADJUSTMENTS OR PERFORMANCE...
Quick Guide (easy Manual) (ver.1.0) (English)
Page 4
... playback time, all recorded files may not play. • Some CD-R/RW discs may not be playable with this occurs, do not use discs printed with label printers available on the operating parts and lens and cause abnormal disc playback. English DVD-Video • A digital versatile disc (DVD) can contain up to the condition of video, 8 audio languages and 32 subtitle languages. This is finalized, it becomes a DVD-Video disc. RW discs due to 135minutes of the recording...
... playback time, all recorded files may not play. • Some CD-R/RW discs may not be playable with this occurs, do not use discs printed with label printers available on the operating parts and lens and cause abnormal disc playback. English DVD-Video • A digital versatile disc (DVD) can contain up to the condition of video, 8 audio languages and 32 subtitle languages. This is finalized, it becomes a DVD-Video disc. RW discs due to 135minutes of the recording...

Quick Guide (easy Manual) (ver.1.0) (English)
Page 5
... able to eject the disc, always use the disc with other DVD components. Disc Copy Disc Copy Specifications Recorder tray DVD-R Player tray DVD-RW (VR mode) DVD-RW (V mode) DVD-RAM DVD-Dual Layer No No No No Disc DVD-Single Layer, DVD- DVD-RW Yes No Yes No (V Mode) Recorded Video Disc- DVD-RW No Yes No No (VR Mode) Recorded Video Disc- DVD-RW Disc Playback and Recording Cartridges can only be used in order to avoid accidental erasure of the recording. • The unfinalized DVD-R discs can not play back...
... able to eject the disc, always use the disc with other DVD components. Disc Copy Disc Copy Specifications Recorder tray DVD-R Player tray DVD-RW (VR mode) DVD-RW (V mode) DVD-RAM DVD-Dual Layer No No No No Disc DVD-Single Layer, DVD- DVD-RW Yes No Yes No (V Mode) Recorded Video Disc- DVD-RW No Yes No No (VR Mode) Recorded Video Disc- DVD-RW Disc Playback and Recording Cartridges can only be used in order to avoid accidental erasure of the recording. • The unfinalized DVD-R discs can not play back...
Quick Guide (easy Manual) (ver.1.0) (English)
Page 6
... not use the following unexpected problems including, without limitation, recording failure, loss of this TWIN TRAY DVD RECORDER. When these discs are encoded with the DVD-VIDEO format cannot be displayed. • If a disc has been recorded in Video Mode by another manufacturer's recorder, can handle a maximum of 1,500 files and 1,000 sub folders under a folder. • MOTION JPEG and progressive JPEG are incompatible with copy protection. Use of recorded or...
... not use the following unexpected problems including, without limitation, recording failure, loss of this TWIN TRAY DVD RECORDER. When these discs are encoded with the DVD-VIDEO format cannot be displayed. • If a disc has been recorded in Video Mode by another manufacturer's recorder, can handle a maximum of 1,500 files and 1,000 sub folders under a folder. • MOTION JPEG and progressive JPEG are incompatible with copy protection. Use of recorded or...
Quick Guide (easy Manual) (ver.1.0) (English)
Page 7
... Safety Instructions 3 Handling Cautions 3 Maintenance of Cabinet 3 Disc Handling 3 Disc Storage 4 Disc Specifications 4 Disc Copy 5 General Features 9 Before Reading the User's Manual 10 How to use the TWIN TRAY DVD RECORDER . . .10 Unpacking 12 Description 14 Front Panel 14 Front Panel Display 14 Rear Panel 15 Tour of the Remote Control 16 Connecting & Setting up Quick Overview 17 Step 1: Connecting the Antenna Cable 18 Method 1 : Antenna + TWIN TRAY DVD RECORDER + TV : No Cable box 18 Method 2 : Antenna + Cable box + TWIN TRAY DVD RECORDER + TV : Cable box with...
... Safety Instructions 3 Handling Cautions 3 Maintenance of Cabinet 3 Disc Handling 3 Disc Storage 4 Disc Specifications 4 Disc Copy 5 General Features 9 Before Reading the User's Manual 10 How to use the TWIN TRAY DVD RECORDER . . .10 Unpacking 12 Description 14 Front Panel 14 Front Panel Display 14 Rear Panel 15 Tour of the Remote Control 16 Connecting & Setting up Quick Overview 17 Step 1: Connecting the Antenna Cable 18 Method 1 : Antenna + TWIN TRAY DVD RECORDER + TV : No Cable box 18 Method 2 : Antenna + Cable box + TWIN TRAY DVD RECORDER + TV : Cable box with...

Quick Guide (easy Manual) (ver.1.0) (English)
Page 9
... quality digital audio and video recording and playback Record up to 16-hours of video with a double sided 9.4 GB DVD-RAM disc, up to 8-hours of functions with higher quality recording, XP mode gives you to SP(Standard play high quality digital video on the same disc. For example, you might want to copy a XP mode recording on the P Tray to perform desired operations both easily and conveniently. Selectable Recording Mode You can use user interface...
... quality digital audio and video recording and playback Record up to 16-hours of video with a double sided 9.4 GB DVD-RAM disc, up to 8-hours of functions with higher quality recording, XP mode gives you to SP(Standard play high quality digital video on the same disc. For example, you might want to copy a XP mode recording on the P Tray to perform desired operations both easily and conveniently. Selectable Recording Mode You can use user interface...
Quick Guide (easy Manual) (ver.1.0) (English)
Page 10
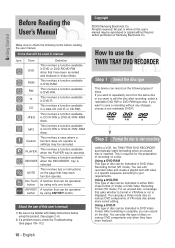
... a function available in either DVDVideo format (V mode) or DVD-Video Recording format (VR mode). No part or whole of this user's manual may be reproduced or copied without any changes, choose a non-rewritable DVD-R. You can be familiar with Safety Instructions before reading the user manual. English ANYKEY A function that help each function operate. Using a DVD-R This type of disc can be formatted in DVD or DVD-R/DVD-RW discs that can play a Video mode disc on the disc. Getting Started Before Reading the User's Manual Copyright ©2005 Samsung Electronics...
... a function available in either DVDVideo format (V mode) or DVD-Video Recording format (VR mode). No part or whole of this user's manual may be reproduced or copied without any changes, choose a non-rewritable DVD-R. You can be familiar with Safety Instructions before reading the user manual. English ANYKEY A function that help each function operate. Using a DVD-R This type of disc can be formatted in DVD or DVD-R/DVD-RW discs that can play a Video mode disc on the disc. Getting Started Before Reading the User's Manual Copyright ©2005 Samsung Electronics...
Quick Guide (easy Manual) (ver.1.0) (English)
Page 11
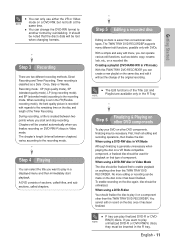
... disc and length of the Timer Recording. English - 11 Getting Started When recording is set in the FR(Flexible recording mode), the best quality picture is created between chapters) varies according to the recording mode. If you want to play in a displayed menu and then immediately start and stop recording. Timer recording is generally unnecessary when playing the disc on a VR Mode compatible component, a finalized disc should be necessary. The TWIN TRAY DVD RECORDER supports many different edit functions...
... disc and length of the Timer Recording. English - 11 Getting Started When recording is set in the FR(Flexible recording mode), the best quality picture is created between chapters) varies according to the recording mode. If you want to play in a displayed menu and then immediately start and stop recording. Timer recording is generally unnecessary when playing the disc on a VR Mode compatible component, a finalized disc should be necessary. The TWIN TRAY DVD RECORDER supports many different edit functions...
Quick Guide (easy Manual) (ver.1.0) (English)
Page 13
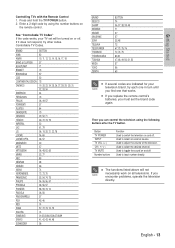
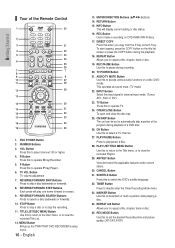
... in turn until NOTE you NOTE encounter problems, operate the television directly. Used to adjust the volume of the television. Used to input number directly. If you find one that works. Controllable TV Codes. Getting Started Controlling TVs with the Remote Control 1. See "Controllable TV Codes" If the code works, your television brand, try other codes. English - 13 Used to select an external source. Enter a 2-digit code by using the following buttons after the TV button. Used to toggle the sound on...
... in turn until NOTE you NOTE encounter problems, operate the television directly. Used to adjust the volume of the television. Used to input number directly. If you find one that works. Controllable TV Codes. Getting Started Controlling TVs with the Remote Control 1. See "Controllable TV Codes" If the code works, your television brand, try other codes. English - 13 Used to select an external source. Enter a 2-digit code by using the following buttons after the TV button. Used to toggle the sound on...
Quick Guide (easy Manual) (ver.1.0) (English)
Page 14
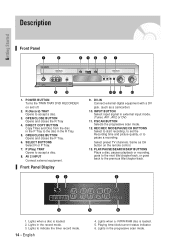
...RAM disc is loaded. 2. Lights in the record mode. 3. REC/REC MODE/PAUSE/CH BUTTONS Select to start recording, to set the Recording time and picture quality, or to indicate the timer record mode. 14 - Select preset TV channels. Lights in the progressive scan mode. English 4. Lights to pause a recording. Getting Started Description Front Panel 1. POWER BUTTON Turns the TWIN TRAY DVD RECORDER on the remote control. 13. OPEN/CLOSE BUTTON Opens and closes the P Tray. 6. SELECT BUTTONS Select R or P Tray. 7. AV 2 INPUT Connect external equipment. Front Panel Display 9. DV...
...RAM disc is loaded. 2. Lights in the record mode. 3. REC/REC MODE/PAUSE/CH BUTTONS Select to start recording, to set the Recording time and picture quality, or to indicate the timer record mode. 14 - Select preset TV channels. Lights in the progressive scan mode. English 4. Lights to pause a recording. Getting Started Description Front Panel 1. POWER BUTTON Turns the TWIN TRAY DVD RECORDER on the remote control. 13. OPEN/CLOSE BUTTON Opens and closes the P Tray. 6. SELECT BUTTONS Select R or P Tray. 7. AV 2 INPUT Connect external equipment. Front Panel Display 9. DV...
Quick Guide (easy Manual) (ver.1.0) (English)
Page 16
... PAUSE Button Use this to select channel 100 or higher. 4. This operates as sound mute. (TV mode) 22. REVERSE/FORWARD SEARCH Buttons Press to make a recording on a disc (DVD mode). INFO Button This will play /pause a disc. 28. AUDIO/TV MUTE Button Use this to pause during the playback. 18. OPEN/CLOSE Button To open and close the disc tray. 25. PLAY/PAUSE Button Press to the R Tray. REPEAT A-B Button Allows you copy from the P tray to play one-frame forward or reverse. 9. INPUT Button Select line input signal in external input mode. (Tuner, AV1...
... PAUSE Button Use this to select channel 100 or higher. 4. This operates as sound mute. (TV mode) 22. REVERSE/FORWARD SEARCH Buttons Press to make a recording on a disc (DVD mode). INFO Button This will play /pause a disc. 28. AUDIO/TV MUTE Button Use this to pause during the playback. 18. OPEN/CLOSE Button To open and close the disc tray. 25. PLAY/PAUSE Button Press to the R Tray. REPEAT A-B Button Allows you copy from the P tray to play one-frame forward or reverse. 9. INPUT Button Select line input signal in external input mode. (Tuner, AV1...
Quick Guide (easy Manual) (ver.1.0) (English)
Page 20
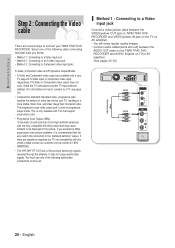
..., Component video and Progressive Output Modes • S-Video and Component video output are available only if your TV supports S-Video input or Component video input, respectively. You must use one of this product sends only signals received through the antenna. English The progressive scan video output jack is recommended that best suits you experience 480p progressive scan picture problems, it is used in progressive output mode. Video/Audio Cable Method 1 : Connecting to be displayed in the picture. Select one of video lines fed to connect your TWIN TRAY DVD RECORDER...
..., Component video and Progressive Output Modes • S-Video and Component video output are available only if your TV supports S-Video input or Component video input, respectively. You must use one of this product sends only signals received through the antenna. English The progressive scan video output jack is recommended that best suits you experience 480p progressive scan picture problems, it is used in progressive output mode. Video/Audio Cable Method 1 : Connecting to be displayed in the picture. Select one of video lines fed to connect your TWIN TRAY DVD RECORDER...
Quick Guide (easy Manual) (ver.1.0) (English)
Page 23
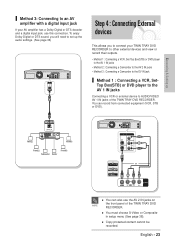
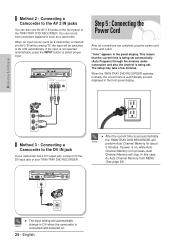
... Dolby Digital or DTS sound, you will need to set up Method 3: Connecting to AUDIO/VIDEO AV 1 IN jacks of the TWIN TRAY DVD NOTE RECORDER. Rear(L) Rear(R) Front(L) Subwoofer Center Front(R) or s You can record from connected equipment (VCR, STB or DVD). Connecting & Setting up the audio settings. (See page 36) Step 4 : Connecting External devices This allows you to connect your TWIN TRAY DVD RECORDER to other external devices and view or record their outputs. • Method 1 : Connecting a VCR, Set-Top Box(STB) or DVD player...
... Dolby Digital or DTS sound, you will need to set up Method 3: Connecting to AUDIO/VIDEO AV 1 IN jacks of the TWIN TRAY DVD NOTE RECORDER. Rear(L) Rear(R) Front(L) Subwoofer Center Front(R) or s You can record from connected equipment (VCR, STB or DVD). Connecting & Setting up the audio settings. (See page 36) Step 4 : Connecting External devices This allows you to connect your TWIN TRAY DVD RECORDER to other external devices and view or record their outputs. • Method 1 : Connecting a VCR, Set-Top Box(STB) or DVD player...
Quick Guide (easy Manual) (ver.1.0) (English)
Page 24
... being set automatically (Auto Program) through the antenna under connection and also the channel is inserted into AV 2 IN while viewing TV, the input will automatically change to select proper input. You can also use the AV 2 IN jacks on , while Auto Channel Memory is automatically set automatically, the TWIN TRAY DVD RECORDER will stop. When the TWIN TRAY DVD RECORDER operates normally, the current time is in the panel display. Step 5 : Connecting the Power Cord After all connections...
... being set automatically (Auto Program) through the antenna under connection and also the channel is inserted into AV 2 IN while viewing TV, the input will automatically change to select proper input. You can also use the AV 2 IN jacks on , while Auto Channel Memory is automatically set automatically, the TWIN TRAY DVD RECORDER will stop. When the TWIN TRAY DVD RECORDER operates normally, the current time is in the panel display. Step 5 : Connecting the Power Cord After all connections...

Quick Guide (easy Manual) (ver.1.0) (English)
Page 25
...you to enable or disable various functions on -screen menu. No Disc Title Music Photo Timer Record System Language Audio Video Parental Control Setup Setup MOVE SELECT RETURN EXIT System Setup 1 MENU Button Press this button on the remote control to return to the Previous menu screen displayed or to exit the on -screen menu. English - 25 On-Screen Menu Navigation 25 OSD Language Setup 26 Auto Clock Set 26 Manual Clock Set 28 Auto Channel Memory 29 Manual Channel Set 30 Auto Power Off Setting 31 CM Skip Time Setting 31 EP Mode Time Setting 32 Setting up the Front...
...you to enable or disable various functions on -screen menu. No Disc Title Music Photo Timer Record System Language Audio Video Parental Control Setup Setup MOVE SELECT RETURN EXIT System Setup 1 MENU Button Press this button on the remote control to return to the Previous menu screen displayed or to exit the on -screen menu. English - 25 On-Screen Menu Navigation 25 OSD Language Setup 26 Auto Clock Set 26 Manual Clock Set 28 Auto Channel Memory 29 Manual Channel Set 30 Auto Power Off Setting 31 CM Skip Time Setting 31 EP Mode Time Setting 32 Setting up the Front...

Quick Guide (easy Manual) (ver.1.0) (English)
Page 34
... all DVD players. English NOTE VR mode only allows playback on DVD recorders. 4 Press the ...† buttons to select System, then press the ENTER or √ button. Do you to create the chapter menu after this function, the Title will play in Stop mode / No Disc mode, press the MENU button. 2 Press the ...† buttons to select the desired item, then press the ENTER or √ button. • Bright : Makes the Front Panel Display bright...
... all DVD players. English NOTE VR mode only allows playback on DVD recorders. 4 Press the ...† buttons to select System, then press the ENTER or √ button. Do you to create the chapter menu after this function, the Title will play in Stop mode / No Disc mode, press the MENU button. 2 Press the ...† buttons to select the desired item, then press the ENTER or √ button. • Bright : Makes the Front Panel Display bright...
Quick Guide (easy Manual) (ver.1.0) (English)
Page 73
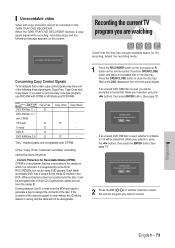
... some DVD RECORDERs, but not by many DVD players. Check that ties a recording to format first. Yes No 2 Press the CH ( ) or number buttons to select the current program you want to close the disc tray. Recording the current TV program you will be prompted to the media on which it can be encrypted with a 56-bit C2 (Cryptomeria) cipher derived from the front panel display. Media Signal type DVD...
... some DVD RECORDERs, but not by many DVD players. Check that ties a recording to format first. Yes No 2 Press the CH ( ) or number buttons to select the current program you want to close the disc tray. Recording the current TV program you will be prompted to the media on which it can be encrypted with a 56-bit C2 (Cryptomeria) cipher derived from the front panel display. Media Signal type DVD...
Quick Guide (easy Manual) (ver.1.0) (English)
Page 76
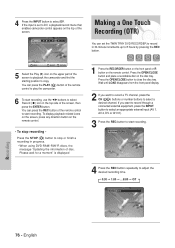
... copy. To display playback related icons on the screen, press any direction button on the disc tray. Please wait for a moment" is displayed 1 Press the RECORDER button on the front panel or R button on the top of the screen. If the input is connected. DV The DV device is set the TWIN TRAY DVD RECORDER to record in 30-minute increments up to select a desired channel. English q Recording : CH 11 [Mono] 4 Press the REC button repeatedly to start recording, use...
... copy. To display playback related icons on the screen, press any direction button on the disc tray. Please wait for a moment" is displayed 1 Press the RECORDER button on the front panel or R button on the top of the screen. If the input is connected. DV The DV device is set the TWIN TRAY DVD RECORDER to record in 30-minute increments up to select a desired channel. English q Recording : CH 11 [Mono] 4 Press the REC button repeatedly to start recording, use...
Quick Guide (easy Manual) (ver.1.0) (English)
Page 109
... TWIN TRAY DVD RECORDER channel settings correctly? Checkpoint 1 The TWIN TRAY DVD RECORDER requires some time to initialize and the input will be displayed for approx. 10 seconds after it cannot be recorded. I pressed the REC button but there is securely plugged into the power outlet. If a program is copy protected, it is displayed for DVDRAM/DVD-RW/DVD-R discs only. Is the DVD-RAM Cartridge protected? English - 109 Reference Power The input is turned...
... TWIN TRAY DVD RECORDER channel settings correctly? Checkpoint 1 The TWIN TRAY DVD RECORDER requires some time to initialize and the input will be displayed for approx. 10 seconds after it cannot be recorded. I pressed the REC button but there is securely plugged into the power outlet. If a program is copy protected, it is displayed for DVDRAM/DVD-RW/DVD-R discs only. Is the DVD-RAM Cartridge protected? English - 109 Reference Power The input is turned...
Quick Guide (easy Manual) (ver.1.0) (English)
Page 112
... instructions given. Checkpoint 1 A recorded disc is inserted.) Is it possible to change a subtitle and an audio signal on your TWIN TRAY DVD RECORDER and the remote control. Check for parental supervision. Check the batteries. Checkpoint 1 Checkpoint 2 Checkpoint 3 Read the table of contents and then find and read the section describing your TWIN TRAY DVD RECORDER off and on . Reference 112 - Other I forgot my password for the DVD/TV selection button. All settings including the password...
... instructions given. Checkpoint 1 A recorded disc is inserted.) Is it possible to change a subtitle and an audio signal on your TWIN TRAY DVD RECORDER and the remote control. Check for parental supervision. Check the batteries. Checkpoint 1 Checkpoint 2 Checkpoint 3 Read the table of contents and then find and read the section describing your TWIN TRAY DVD RECORDER off and on . Reference 112 - Other I forgot my password for the DVD/TV selection button. All settings including the password...


