

User Manual (user Manual) (ver.1.0) (English)
Page 3
... s Remote Control Overview 11 s Insert Remote Control Batteries 11 s Using the TV Buttons on the Remote Control 12 x 2 - Getting Started 13 s Basic Connections/Auto Setup 13 x 3 - DVD Sound Setup 32 s A/V Receiver Connections 32 x 7 - Basic Operation 14 s Deck Control Buttons 14 s Basic DVD Playback ... x Safety 3 s Important Safety Instructions 3 x Welcome 7 s Feature Summary 7 s Unpacking 7 s Disc Type and Characteristics 8 x 1 - DVD Setup 24 s Disc Menu Language 24 s Audio Language 24 s Subtitle Language 25 s Parental 26 s Digital Output 27 s DTS 28 s Dynamic ...
... s Remote Control Overview 11 s Insert Remote Control Batteries 11 s Using the TV Buttons on the Remote Control 12 x 2 - Getting Started 13 s Basic Connections/Auto Setup 13 x 3 - DVD Sound Setup 32 s A/V Receiver Connections 32 x 7 - Basic Operation 14 s Deck Control Buttons 14 s Basic DVD Playback ... x Safety 3 s Important Safety Instructions 3 x Welcome 7 s Feature Summary 7 s Unpacking 7 s Disc Type and Characteristics 8 x 1 - DVD Setup 24 s Disc Menu Language 24 s Audio Language 24 s Subtitle Language 25 s Parental 26 s Digital Output 27 s DTS 28 s Dynamic ...
User Manual (user Manual) (ver.1.0) (English)
Page 4
...Audio/Video connection (AC99-10500H) • RF (Radio Frequency) Antenna Cable (AC39-42001J) • Remote Control (AC59-00058K) • 1.5V "AA" Batteries - 2EA (AC43-12002J) POWER OPEN/CLOSE CHANNEL EJECT DVD SELECT VCR REC VIDEO L AUDIO R LINE IN 1 POWER OPEN/CLOSE SCREEN FIT 4 MODE 2 ...automatically sets clock and searches for channels. • Remote controls both DVD and VCR decks. • Composite, S-Video and Component video outputs for high connectivity and optimum performance. • RF inputs and outputs for DVD 51 s Stereo Connections 52 s Monitor TV Connections ...
...Audio/Video connection (AC99-10500H) • RF (Radio Frequency) Antenna Cable (AC39-42001J) • Remote Control (AC59-00058K) • 1.5V "AA" Batteries - 2EA (AC43-12002J) POWER OPEN/CLOSE CHANNEL EJECT DVD SELECT VCR REC VIDEO L AUDIO R LINE IN 1 POWER OPEN/CLOSE SCREEN FIT 4 MODE 2 ...automatically sets clock and searches for channels. • Remote controls both DVD and VCR decks. • Composite, S-Video and Component video outputs for high connectivity and optimum performance. • RF inputs and outputs for DVD 51 s Stereo Connections 52 s Monitor TV Connections ...
User Manual (user Manual) (ver.1.0) (English)
Page 6
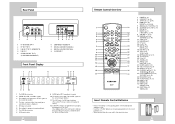
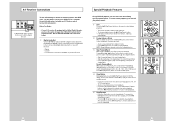
...8 DIGITAL AUDIO OUT(OPTICAL) 9 S-VIDEO OUT Front Panel Display 1 2 3 4 5 67 TITLE CHAP STEREO 8 9 10 11 12 1 The DVD Deck is active 2 A DVD, CD, VCD, or SVCD is loaded 3 The number to the right of the "TITLE" symbol is the current title number 4 The time, counter ... "AA" batteries as shown, paying attention to indicate that a recording is in progress, and blinks when the VCR is programmed or in Pause mode. 10 Remote Control Overview POWER 1 OPEN/CLOSE 18 2 3 2 SCREEN FIT SHUTTLE TV/VCR 3 4 M O D E / 5 6 REPEAT AUDIO 4 7 8 9 5 ZOOM 3D SOUND ANGLE CLEAR 6 TV ...
...8 DIGITAL AUDIO OUT(OPTICAL) 9 S-VIDEO OUT Front Panel Display 1 2 3 4 5 67 TITLE CHAP STEREO 8 9 10 11 12 1 The DVD Deck is active 2 A DVD, CD, VCD, or SVCD is loaded 3 The number to the right of the "TITLE" symbol is the current title number 4 The time, counter ... "AA" batteries as shown, paying attention to indicate that a recording is in progress, and blinks when the VCR is programmed or in Pause mode. 10 Remote Control Overview POWER 1 OPEN/CLOSE 18 2 3 2 SCREEN FIT SHUTTLE TV/VCR 3 4 M O D E / 5 6 REPEAT AUDIO 4 7 8 9 5 ZOOM 3D SOUND ANGLE CLEAR 6 TV ...

User Manual (user Manual) (ver.1.0) (English)
Page 7
... power cord to your television's Antenna Input. If Auto Clock set the clock manually; See page 18. 4 Turn On DVD-VCR Press the POWER button on the remote control or on the DVD-VCR's front panel. 5 Turn On TV Press the POWER button on and off . Button Function POWER ➀ Used to ... same channel you encounter problems, operate the television directly. INPUT ➁ Used to select the required channel. See page 22. Brand Codes Brand Codes SAMSUNG SHARP SONY RCA TOSHIBA PANASONIC JVC HITACHI MITSUBISHI NEWSAN 01, 14, 15, 23 02, 16, 22 03 07, 29 09 12, 24 11 10...
... power cord to your television's Antenna Input. If Auto Clock set the clock manually; See page 18. 4 Turn On DVD-VCR Press the POWER button on the remote control or on the DVD-VCR's front panel. 5 Turn On TV Press the POWER button on and off . Button Function POWER ➀ Used to ... same channel you encounter problems, operate the television directly. INPUT ➁ Used to select the required channel. See page 22. Brand Codes Brand Codes SAMSUNG SHARP SONY RCA TOSHIBA PANASONIC JVC HITACHI MITSUBISHI NEWSAN 01, 14, 15, 23 02, 16, 22 03 07, 29 09 12, 24 11 10...
User Manual (user Manual) (ver.1.0) (English)
Page 8
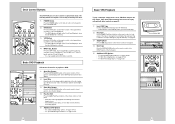
...page 45. 3 Stop Playback Press the s (Stop) button on the remote control or front panel. 4 Eject Tape Press the OPEN/CLOSE button on the remote control or the EJECT button on the remote control or front panel. OPEN/CLOSE 1CHANNEL EJECT DVD SELECT VCR REC VIDEO L AUDIO R LINE IN 2 DIGEST + VOL ...CLOSE button on the remote control or front panel to close the disc drawer. 4 Play the DVD Press the ❿ll (Play/Pause) button on the remote control or front panel. • Many discs will turn on the DVD-VCR. 2 DVD Button Press the DVD button on the remote control or front panel ...
...page 45. 3 Stop Playback Press the s (Stop) button on the remote control or front panel. 4 Eject Tape Press the OPEN/CLOSE button on the remote control or the EJECT button on the remote control or front panel. OPEN/CLOSE 1CHANNEL EJECT DVD SELECT VCR REC VIDEO L AUDIO R LINE IN 2 DIGEST + VOL ...CLOSE button on the remote control or front panel to close the disc drawer. 4 Play the DVD Press the ❿ll (Play/Pause) button on the remote control or front panel. • Many discs will turn on the DVD-VCR. 2 DVD Button Press the DVD button on the remote control or front panel ...
User Manual (user Manual) (ver.1.0) (English)
Page 14
... with an A/V receiver NOT equipped with a Dolby Digital decoder. To use your DVD/TV with an A/V receiver equipped with a Dolby Digital decoder. • Bitstream - Please skip to Step 5. 5 Enter Password Enter a 4-digit password using the 0-9 buttons on the remote control. • Write your password down, and keep it in a safe place in case...
... with an A/V receiver NOT equipped with a Dolby Digital decoder. To use your DVD/TV with an A/V receiver equipped with a Dolby Digital decoder. • Bitstream - Please skip to Step 5. 5 Enter Password Enter a 4-digit password using the 0-9 buttons on the remote control. • Write your password down, and keep it in a safe place in case...
User Manual (user Manual) (ver.1.0) (English)
Page 17
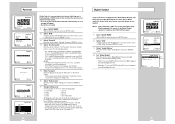
...to their corresponding Digital Audio Input jacks on your A/V Receiver: • Optical • Coaxial • Use whichever connection is available on the remote control to advance one frame at variable speeds. • Each press increases the slow motion speed playback to 1/8, 1/4 or 1/2 normal speed. •...; Skip Back will start over from the beginning. NOTE: Frame Advance operates only in the forward direction. 3 Skip Forward/Back While a CD or DVD disc is muted during slow motion playback. • Front Panel Slow Motion Buttons - VCR SELECT TV VIEW DIGEST F.ADV/SKIP + 2 VOL -...
...to their corresponding Digital Audio Input jacks on your A/V Receiver: • Optical • Coaxial • Use whichever connection is available on the remote control to advance one frame at variable speeds. • Each press increases the slow motion speed playback to 1/8, 1/4 or 1/2 normal speed. •...; Skip Back will start over from the beginning. NOTE: Frame Advance operates only in the forward direction. 3 Skip Forward/Back While a CD or DVD disc is muted during slow motion playback. • Front Panel Slow Motion Buttons - VCR SELECT TV VIEW DIGEST F.ADV/SKIP + 2 VOL -...

User Manual (user Manual) (ver.1.0) (English)
Page 18
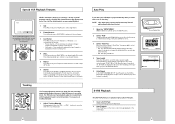
... 1 SCREEN FIT Button During play, press SCREEN FIT button on the remote control. • Allows you to eliminate the black bars in the top ...Track, or counter position on the disc. 1 View DVD/CD Display Press the DISPLAY button on the remote control during DVD playback, you press the DISPLAY button during DVD/CD playback. 2 Select Title Press the up/down ...use the number buttons (0-9) to change among all available titles on the disc. • The "TITLE" icon will work when a DVD has been recorded in the format HH:MM:SS (H = Hours, M = Minutes, S = Seconds). Disc Menu Navigation REC 2 ...
... 1 SCREEN FIT Button During play, press SCREEN FIT button on the remote control. • Allows you to eliminate the black bars in the top ...Track, or counter position on the disc. 1 View DVD/CD Display Press the DISPLAY button on the remote control during DVD playback, you press the DISPLAY button during DVD/CD playback. 2 Select Title Press the up/down ...use the number buttons (0-9) to change among all available titles on the disc. • The "TITLE" icon will work when a DVD has been recorded in the format HH:MM:SS (H = Hours, M = Minutes, S = Seconds). Disc Menu Navigation REC 2 ...
User Manual (user Manual) (ver.1.0) (English)
Page 20
... when A-B Repeat is selected. SCREEN FIT 4 M O D E / REPEAT 2 SHUTTLE 5 3 TV/VCR 6 AUDIO 7 ZOOM 1 3D SOUND TV MUTE 100+ DVD 8 9 ANGLE CLEAR 0 INPUT SEL. The AUDIO button provides a shortcut to view and select among all available options for "español." 38 39 "ESP" for...CD, the menu will highlight when Title Repeat is selected. 5 Repeat Title Press the ENTER button to select the desired language/audio setup on the remote control. 2 Select DVD Audio Track Press the up/down buttons to repeat the title. A-B Repeat SCREEN FIT 4 M O D E / REPEAT 2 SHUTTLE 5 3 TV...
... when A-B Repeat is selected. SCREEN FIT 4 M O D E / REPEAT 2 SHUTTLE 5 3 TV/VCR 6 AUDIO 7 ZOOM 1 3D SOUND TV MUTE 100+ DVD 8 9 ANGLE CLEAR 0 INPUT SEL. The AUDIO button provides a shortcut to view and select among all available options for "español." 38 39 "ESP" for...CD, the menu will highlight when Title Repeat is selected. 5 Repeat Title Press the ENTER button to select the desired language/audio setup on the remote control. 2 Select DVD Audio Track Press the up/down buttons to repeat the title. A-B Repeat SCREEN FIT 4 M O D E / REPEAT 2 SHUTTLE 5 3 TV...

User Manual (user Manual) (ver.1.0) (English)
Page 21
...8226; Depending on the disc, the bookmark function may not work. 4 Play Bookmark • During playback, press the MARK button on the remote control. • Press the left/right buttons to move to a previously set a custom order for playback of the three bookmark placeholders The selected... placeholder will highlight. 3 Set the Bookmark Play the DVD to the scene you can continue setting up /down and left /right buttons to select the first chapter/track in playback mode, press the CLEAR button on the remote control. SCREEN FIT 4 M O D E / REPEAT SHUTTLE 5 3 ...
...8226; Depending on the disc, the bookmark function may not work. 4 Play Bookmark • During playback, press the MARK button on the remote control. • Press the left/right buttons to move to a previously set a custom order for playback of the three bookmark placeholders The selected... placeholder will highlight. 3 Set the Bookmark Play the DVD to the scene you can continue setting up /down and left /right buttons to select the first chapter/track in playback mode, press the CLEAR button on the remote control. SCREEN FIT 4 M O D E / REPEAT SHUTTLE 5 3 ...

User Manual (user Manual) (ver.1.0) (English)
Page 22
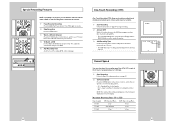
Random Playback PROGRAM ˆ ¤ RANDOM RETURN „ ENTER DVD Random Playback lets the DVD-VCR set a random order for playback of a DVD, press the 3D SOUND button on the remote control. 2 Set 3D Sound Press the up/down buttons to set "3D Sound" On or Off, then press the 3D SOUND button to ...confirm your selection. 7 ZOOM 3D SOUND TV MUTE 100+ DVD 8 9 ANGLE CLEAR 0 INPUT SEL. 1VCR...
Random Playback PROGRAM ˆ ¤ RANDOM RETURN „ ENTER DVD Random Playback lets the DVD-VCR set a random order for playback of a DVD, press the 3D SOUND button on the remote control. 2 Set 3D Sound Press the up/down buttons to set "3D Sound" On or Off, then press the 3D SOUND button to ...confirm your selection. 7 ZOOM 3D SOUND TV MUTE 100+ DVD 8 9 ANGLE CLEAR 0 INPUT SEL. 1VCR...
User Manual (user Manual) (ver.1.0) (English)
Page 23
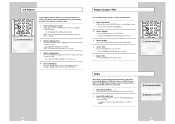
Press and hold to advance the tape forward or backward at two speeds: • Picture Search - Press Skip repeatedly up to 4 times to cue ahead 2 minutes. 5 Repeat From Play mode, press Repeat to review the last 5 seconds of tape (SP mode). 6 Shuttle From Play mode, Shuttle >> gradually increases the cue speed from Double-Speed playback to Picture Search to advance the tape forward or backward at 5 times normal speed. • Jet Search - REC 3 DISC MENU 3 SETUP /ENTER While a videotape is playing, you can enjoy a variety of the VCR deck, as well as the tape counter position and ...
Press and hold to advance the tape forward or backward at two speeds: • Picture Search - Press Skip repeatedly up to 4 times to cue ahead 2 minutes. 5 Repeat From Play mode, press Repeat to review the last 5 seconds of tape (SP mode). 6 Shuttle From Play mode, Shuttle >> gradually increases the cue speed from Double-Speed playback to Picture Search to advance the tape forward or backward at 5 times normal speed. • Jet Search - REC 3 DISC MENU 3 SETUP /ENTER While a videotape is playing, you can enjoy a variety of the VCR deck, as well as the tape counter position and ...

User Manual (user Manual) (ver.1.0) (English)
Page 24
...Index Search System (VISS) cannot recognize index marks made by inserting a blank tape and pressing the REC button. Before You Begin... • Power on the DVD-VCR • Power on a cassette. To change the Recording Speed, see page 49. 2 Select a Channel to Record Use the 0-9 buttons or the... your VCR to record a program on the TV • Set the TV to record the entire program. see "Special Recording Features" on the remote control or front panel. For options while recording is in the stop at that position. 3 End search Use this opening with a small piece of tape...
...Index Search System (VISS) cannot recognize index marks made by inserting a blank tape and pressing the REC button. Before You Begin... • Power on the DVD-VCR • Power on a cassette. To change the Recording Speed, see page 49. 2 Select a Channel to Record Use the 0-9 buttons or the... your VCR to record a program on the TV • Set the TV to record the entire program. see "Special Recording Features" on the remote control or front panel. For options while recording is in the stop at that position. 3 End search Use this opening with a small piece of tape...
User Manual (user Manual) (ver.1.0) (English)
Page 25
...on a T-120 tape. 1 Start Recording Follow the Basic Recording instructions on page 47. 2 Set Record Speed Press the SPEED button on the remote control to set the Record Speed to one of a button. 1 Start Recording Follow the instructions on page 47 to begin recording. 2 Activate OTR While... Record length 0:30 appears on the next page. 48 One-Touch Recording (OTR) One-Touch Recording (OTR) allows you to 4 hours. • The DVD-VCR stops recording automatically when the time has elapsed. Maximum Recording Time - Press REC again to resume. 2 Stop Recording Press the STOP button. 3 Watch ...
...on a T-120 tape. 1 Start Recording Follow the Basic Recording instructions on page 47. 2 Set Record Speed Press the SPEED button on the remote control to set the Record Speed to one of a button. 1 Start Recording Follow the instructions on page 47 to begin recording. 2 Activate OTR While... Record length 0:30 appears on the next page. 48 One-Touch Recording (OTR) One-Touch Recording (OTR) allows you to 4 hours. • The DVD-VCR stops recording automatically when the time has elapsed. Maximum Recording Time - Press REC again to resume. 2 Stop Recording Press the STOP button. 3 Watch ...


