
User Manual (user Manual) (ver.1.0) (English)
Page 2
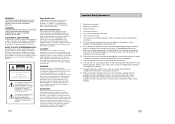
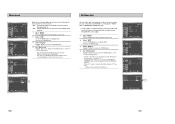
... claims of electric shock, do not use this apparatus near any ventilation openings. Use of cable entry as close to rain or moisture, does not operate normally, or been dropped. 3 CUIDADO: Para prevenir incendio, riesgo de choque, o interferencia enfadosa, use only the recommended accessories. Important Safety Instructions 1. Follow all warnings. 4. Do not install near water. 6. A polarized plug has two...
... claims of electric shock, do not use this apparatus near any ventilation openings. Use of cable entry as close to rain or moisture, does not operate normally, or been dropped. 3 CUIDADO: Para prevenir incendio, riesgo de choque, o interferencia enfadosa, use only the recommended accessories. Important Safety Instructions 1. Follow all warnings. 4. Do not install near water. 6. A polarized plug has two...
User Manual (user Manual) (ver.1.0) (English)
Page 3
... Video Out 33 s Parental 34 x 6 - DVD Operations 36 s Special Playback Features 36 s Disc Menu Navigation 37 s EZ View 37 s Title/Chapter/Time Selection 39 s Angle View 40 s Subtitle 41 s A to B Repeat 42 s Repeat Chapter/Title 43 s Audio 43 s Bookmarks 44 s MP3/WMA Play 45 s Program Play & Random Play 47 s Picture CD Playback 48 s 3D Sound 50 s Function (DVD 51 x 8 - System Overview 9 s Front Panel Overview 9 s Rear Panel 10 s Front Panel Display 10 s Remote Control Overview 11 s Insert Batteries into Remote 11 s Using the TV Buttons on...
... Video Out 33 s Parental 34 x 6 - DVD Operations 36 s Special Playback Features 36 s Disc Menu Navigation 37 s EZ View 37 s Title/Chapter/Time Selection 39 s Angle View 40 s Subtitle 41 s A to B Repeat 42 s Repeat Chapter/Title 43 s Audio 43 s Bookmarks 44 s MP3/WMA Play 45 s Program Play & Random Play 47 s Picture CD Playback 48 s 3D Sound 50 s Function (DVD 51 x 8 - System Overview 9 s Front Panel Overview 9 s Rear Panel 10 s Front Panel Display 10 s Remote Control Overview 11 s Insert Batteries into Remote 11 s Using the TV Buttons on...
User Manual (user Manual) (ver.1.0) (English)
Page 4
Advanced Connections 60 s S-Video/Component Video Connections (for Audio/Video connection EP-2 Plug Converter RF (Radio Frequency) Antenna Cable Remote Control 1.5V "AAA" Batteries- 2EA OPEN/CLOSE POWER 6 7 DVD-VCR User's Guide POWER CHANNEL DVD VCR LINE IN 2 RCA cable for DVD 60 s Stereo Connections 61 s Monitor TV Connections 62 s Connecting Other Video Equipment 63 x Appendix B - Help 64 s Technical Specifications 64 Feature Summary DVD+VCR Features • Perfect compatibility to play back DVDs, audio CDs, MP3 discs or VHS Tapes. • Enjoy a DVD movie...
Advanced Connections 60 s S-Video/Component Video Connections (for Audio/Video connection EP-2 Plug Converter RF (Radio Frequency) Antenna Cable Remote Control 1.5V "AAA" Batteries- 2EA OPEN/CLOSE POWER 6 7 DVD-VCR User's Guide POWER CHANNEL DVD VCR LINE IN 2 RCA cable for DVD 60 s Stereo Connections 61 s Monitor TV Connections 62 s Connecting Other Video Equipment 63 x Appendix B - Help 64 s Technical Specifications 64 Feature Summary DVD+VCR Features • Perfect compatibility to play back DVDs, audio CDs, MP3 discs or VHS Tapes. • Enjoy a DVD movie...
User Manual (user Manual) (ver.1.0) (English)
Page 5
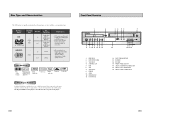
... 7 POWER CHANNEL DVD VCR LINE IN 2 8 9 10 11 12 13 14 15 16 17 18 1 DVD DECK 2 DVD OPEN/CLOSE 3 VCR DECK 4 CHANNEL / 5 DVD 6 VCR 7 VCR EJECT 8 POWER 9 STOP 10 REWIND/REV 11 PLAY/PAUSE 12 FAST-FORWARD/FWD 13 RECORD 14 EZ VIEW 15 FRONT PANEL DISPLAY 16 LINE IN 2 COMPOSITE VIDEO JACK 17 LINE IN 2 LEFT AUDIO JACK 18 LINE IN 2 RIGHT AUDIO JACK 8 9 The Region Number for the disc to Dolby Digital and MPEG-2 system. • Various screen and audio functions...
... 7 POWER CHANNEL DVD VCR LINE IN 2 8 9 10 11 12 13 14 15 16 17 18 1 DVD DECK 2 DVD OPEN/CLOSE 3 VCR DECK 4 CHANNEL / 5 DVD 6 VCR 7 VCR EJECT 8 POWER 9 STOP 10 REWIND/REV 11 PLAY/PAUSE 12 FAST-FORWARD/FWD 13 RECORD 14 EZ VIEW 15 FRONT PANEL DISPLAY 16 LINE IN 2 COMPOSITE VIDEO JACK 17 LINE IN 2 LEFT AUDIO JACK 18 LINE IN 2 RIGHT AUDIO JACK 8 9 The Region Number for the disc to Dolby Digital and MPEG-2 system. • Various screen and audio functions...

User Manual (user Manual) (ver.1.0) (English)
Page 6
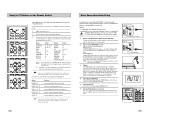
... Front Panel Display 1 2 3 4 5 6 1 When the light is on the remote • Insert two 1.5V "AAA" batteries as shown, making sure of a VHS videotape is playing (The current TV program or video is broadcast in progress. AUDIO 6 VOLUME +/- 7 REWIND SKIP BACK 8 STOP 9 SUBTITLE 10 MENU 11 UP 12 LEFT 13 DOWN 14 SPEED 15 RECORD 16 CLEAR 17 MODE REPEAT 18 OPEN/CLOSE 19 0-9 20 TV/VCR 21 VCR, TV SELECT 22 INPUT SEL. STEREO 7 8 6 A DVD with...
... Front Panel Display 1 2 3 4 5 6 1 When the light is on the remote • Insert two 1.5V "AAA" batteries as shown, making sure of a VHS videotape is playing (The current TV program or video is broadcast in progress. AUDIO 6 VOLUME +/- 7 REWIND SKIP BACK 8 STOP 9 SUBTITLE 10 MENU 11 UP 12 LEFT 13 DOWN 14 SPEED 15 RECORD 16 CLEAR 17 MODE REPEAT 18 OPEN/CLOSE 19 0-9 20 TV/VCR 21 VCR, TV SELECT 22 INPUT SEL. STEREO 7 8 6 A DVD with...
User Manual (user Manual) (ver.1.0) (English)
Page 7
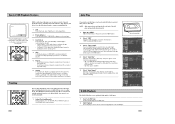
... Connection method, set your DVD-VCR to a TV Choose one that works. ☛ When you change the batteries in the remote control, you must be used. Button Function POWER ➀ Used to a TV and run DVD+VCR setup menu, even if you encounter problems, operate the television directly. 12 Basic Connections/Auto Setup You will need to connect the DVD-VCR to switch the television on and off . If you connect S-Video or Component Video Output for a better picture quality. 1 Connect the RF Antenna Cable to your DVD-VCR Connect...
... Connection method, set your DVD-VCR to a TV Choose one that works. ☛ When you change the batteries in the remote control, you must be used. Button Function POWER ➀ Used to a TV and run DVD+VCR setup menu, even if you encounter problems, operate the television directly. 12 Basic Connections/Auto Setup You will need to connect the DVD-VCR to switch the television on and off . If you connect S-Video or Component Video Output for a better picture quality. 1 Connect the RF Antenna Cable to your DVD-VCR Connect...
User Manual (user Manual) (ver.1.0) (English)
Page 8
.... 4 Eject Tape Press the OPEN/CLOSE button on the remote control or the EJECT button on the front panel of the unit. • Most discs will start to close the disc tray. 4 Play a DVD Press the PLAY/PAUSE button on TV screen. 5 Additional DVD Options • See pages 25 ~ 35 for advanced DVD Setup options. • See pages 36 ~ 51 for Timer Recording features. CHANNEL DVD VCR LINE IN 2 1 3 2 NNEL DVD VCR 4 LINE IN 2 15 Deck Control Buttons POWER 1 2 OPEN/CLOSE 3 4 The DVD-VCR uses one set...
.... 4 Eject Tape Press the OPEN/CLOSE button on the remote control or the EJECT button on the front panel of the unit. • Most discs will start to close the disc tray. 4 Play a DVD Press the PLAY/PAUSE button on TV screen. 5 Additional DVD Options • See pages 25 ~ 35 for advanced DVD Setup options. • See pages 36 ~ 51 for Timer Recording features. CHANNEL DVD VCR LINE IN 2 1 3 2 NNEL DVD VCR 4 LINE IN 2 15 Deck Control Buttons POWER 1 2 OPEN/CLOSE 3 4 The DVD-VCR uses one set...

User Manual (user Manual) (ver.1.0) (English)
Page 9
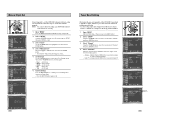
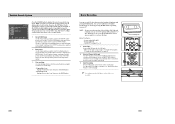
... Stop or Play mode. 2 Select "SETUP" Using the UP/DOWN buttons, move to the previous or the next channel. 3 0-9 Buttons Use these buttons to move the selection bar to "SETUP" then press ENTER to select. 3 Select "Language" Use the UP/DOWN buttons to highlight "Language" then press the ENTER button. 4 Set menu Language Place the selection bar next to enable or disable various functions on your DVD-VCR. Button Press this button to channels 100 and above. On-Screen Menu Navigation Language : English Front Display Auto Power Off : Auto...
... Stop or Play mode. 2 Select "SETUP" Using the UP/DOWN buttons, move to the previous or the next channel. 3 0-9 Buttons Use these buttons to move the selection bar to "SETUP" then press ENTER to select. 3 Select "Language" Use the UP/DOWN buttons to highlight "Language" then press the ENTER button. 4 Set menu Language Place the selection bar next to enable or disable various functions on your DVD-VCR. Button Press this button to channels 100 and above. On-Screen Menu Navigation Language : English Front Display Auto Power Off : Auto...
User Manual (user Manual) (ver.1.0) (English)
Page 10
... on the wrong channel numbers. 1 Open "MENU" With the DVD in Stop or Play mode. 2 Select "SETUP" Using the UP/DOWN buttons, move the selection bar to "Channel", then press ENTER to select. 4 Select "Ant/Cable" Move the selection arrow to "Ant/Cable" then press right to select from the following options, then use the UP/DOWN buttons to set each option: • Hour - Tuner Band Setting This feature allows you to manually set the DVD-VCR's tuner band to...
... on the wrong channel numbers. 1 Open "MENU" With the DVD in Stop or Play mode. 2 Select "SETUP" Using the UP/DOWN buttons, move the selection bar to "Channel", then press ENTER to select. 4 Select "Ant/Cable" Move the selection arrow to "Ant/Cable" then press right to select from the following options, then use the UP/DOWN buttons to set each option: • Hour - Tuner Band Setting This feature allows you to manually set the DVD-VCR's tuner band to...
User Manual (user Manual) (ver.1.0) (English)
Page 16
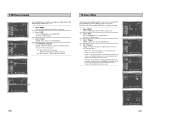
... screen. As a result, black bars will appear at the appropriate size for your television. PCM Down Sampling Language : English Front Display Auto Power Off : Auto : Off If your amplifier is not capable of reproducing a 96kHz signal, PCM downsampling should be outputted. Choose from standard, letterbox, or widescreen format. 1 Open "MENU" Press the MENU button while the DVD is in Stop mode. 2 Select "DVD" Use the UP/DOWN buttons to highlight "DVD " then press the ENTER button. 3 Select "Audio...
... screen. As a result, black bars will appear at the appropriate size for your television. PCM Down Sampling Language : English Front Display Auto Power Off : Auto : Off If your amplifier is not capable of reproducing a 96kHz signal, PCM downsampling should be outputted. Choose from standard, letterbox, or widescreen format. 1 Open "MENU" Press the MENU button while the DVD is in Stop mode. 2 Select "DVD" Use the UP/DOWN buttons to highlight "DVD " then press the ENTER button. 3 Select "Audio...
User Manual (user Manual) (ver.1.0) (English)
Page 17
... connect to a TV. • Component - Black Level Language : English Front Display Auto Power Off : Auto : Off The Black Level feature adjusts the reference level of black in the video signal to one of the following options: • On - Interlace : Interaced Scan mode will enhance the Black Level for the DVD player. Display Setup On On Off Language : English Front Display Auto Power Off : Auto : Off Display Setup On S-Video Interlace 32 33 Enhanced black level, for increased contrast during DVD playback. 1 Open "MENU" Press the MENU button...
... connect to a TV. • Component - Black Level Language : English Front Display Auto Power Off : Auto : Off The Black Level feature adjusts the reference level of black in the video signal to one of the following options: • On - Interlace : Interaced Scan mode will enhance the Black Level for the DVD player. Display Setup On On Off Language : English Front Display Auto Power Off : Auto : Off Display Setup On S-Video Interlace 32 33 Enhanced black level, for increased contrast during DVD playback. 1 Open "MENU" Press the MENU button...
User Manual (user Manual) (ver.1.0) (English)
Page 18
...; Use whichever connection is available on the front panel for 5 seconds. Press the REW and F.F buttons simultaneously on your A/V Receiver. Press the POWER button and the DVD-VCR will change your settings later. 6 Select "Rating Level" Move the selection bar to "Rating Level," then press ENTER to select. 7 Change Rating Level Use the UP/DOWN buttons to select one of an A/V Receiver with no Default Password. 5 Enter Password Use the numeric buttons (0-9) on the remote control...
...; Use whichever connection is available on the front panel for 5 seconds. Press the REW and F.F buttons simultaneously on your A/V Receiver. Press the POWER button and the DVD-VCR will change your settings later. 6 Select "Rating Level" Move the selection bar to "Rating Level," then press ENTER to select. 7 Change Rating Level Use the UP/DOWN buttons to select one of an A/V Receiver with no Default Password. 5 Enter Password Use the numeric buttons (0-9) on the remote control...

User Manual (user Manual) (ver.1.0) (English)
Page 21
... the screen is viewed on a 16:9 TV, black bars will be identified. button during DVD playback. In the Audio example, the soundtrack is generated using a 4:3 TV - For 4:3 aspect ratio discs • Normal Wide Displays the content of the DVD title in the format H:MM:SS (H = Hours, M = Minutes, S = Seconds). Most DVD discs are cut off and the full screen appears. A surround sound effect is played in 16:9 aspect ratio. EZ View - For 4:3 aspect ratio discs • Normal Screen Displays...
... the screen is viewed on a 16:9 TV, black bars will be identified. button during DVD playback. In the Audio example, the soundtrack is generated using a 4:3 TV - For 4:3 aspect ratio discs • Normal Wide Displays the content of the DVD title in the format H:MM:SS (H = Hours, M = Minutes, S = Seconds). Most DVD discs are cut off and the full screen appears. A surround sound effect is played in 16:9 aspect ratio. EZ View - For 4:3 aspect ratio discs • Normal Screen Displays...
User Manual (user Manual) (ver.1.0) (English)
Page 24
... screen. 2 Select Bookmark Placeholder Use the LEFT/RIGHT buttons to move to a previously set up to the scene you want to exit the Bookmark menu. With the MP3 in Stop mode, press the MODE button to your choice. • To change to a number (1, 2 or 3). • You may not work. 4 Play Bookmark • During playback, press the MARK button on the right side of the song file. RETURN PROGRAM...
... screen. 2 Select Bookmark Placeholder Use the LEFT/RIGHT buttons to move to a previously set up to the scene you want to exit the Bookmark menu. With the MP3 in Stop mode, press the MODE button to your choice. • To change to a number (1, 2 or 3). • You may not work. 4 Play Bookmark • During playback, press the MARK button on the right side of the song file. RETURN PROGRAM...
User Manual (user Manual) (ver.1.0) (English)
Page 25
... to prevent illegal copying. Program Play & Random Play Program Play (CD/MP3/WMA) 1. Press the PLAY/PAUSE (❿ ll) button. Press the ENTER button. Getting audio CD quality sound requires an analog/digital sampling rate, that the DVD player will not be played properly. • Do not try recording copyright protected MP3 files. Sound quality with MP3 files basically depends on the disc, the Program and Random Play functions may not work. • To...
... to prevent illegal copying. Program Play & Random Play Program Play (CD/MP3/WMA) 1. Press the PLAY/PAUSE (❿ ll) button. Press the ENTER button. Getting audio CD quality sound requires an analog/digital sampling rate, that the DVD player will not be played properly. • Do not try recording copyright protected MP3 files. Sound quality with MP3 files basically depends on the disc, the Program and Random Play functions may not work. • To...
User Manual (user Manual) (ver.1.0) (English)
Page 28
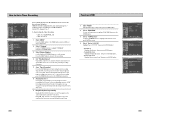
...: • Picture Search - Press Skip repeatedly up to 4 times to cue ahead 2 minutes. 5 Repeat • From Play mode, press Repeat to review the last 5 seconds of tape (SP mode). • From Play mode, press Repeat to review the last 15 seconds of special playback features, including Still, Frame Advance, Skip, Repeat, and more. Special VCR Playback Features PLAY 0:00:00 SP Press the INFO. Press the Play button again to...
...: • Picture Search - Press Skip repeatedly up to 4 times to cue ahead 2 minutes. 5 Repeat • From Play mode, press Repeat to review the last 5 seconds of tape (SP mode). • From Play mode, press Repeat to review the last 15 seconds of special playback features, including Still, Frame Advance, Skip, Repeat, and more. Special VCR Playback Features PLAY 0:00:00 SP Press the INFO. Press the Play button again to...
User Manual (user Manual) (ver.1.0) (English)
Page 29
... record a program on the remote control or front panel. Variable Search System Forward Reverse Press the SEARCH button to display the search screen in the stop at that position. 2 End search Use this feature when you don't know exactly where a program is long enough to record the entire program. The VCR will rewind or fast forward, searching for a blank position, and then automatically stop mode. see page 57. 2 Select a Channel to Record Use...
... record a program on the remote control or front panel. Variable Search System Forward Reverse Press the SEARCH button to display the search screen in the stop at that position. 2 End search Use this feature when you don't know exactly where a program is long enough to record the entire program. The VCR will rewind or fast forward, searching for a blank position, and then automatically stop mode. see page 57. 2 Select a Channel to Record Use...
User Manual (user Manual) (ver.1.0) (English)
Page 31
... the ENTER button. - Date can program up to a month in Stop or Play mode, press the MENU button. 2 Select "FUNCTION" Use the Up/Down buttons to highlight "FUNCTION" then press the ENTER button. 3 Select "VCR Function" Using the UP/DOWN buttons to highlight "VCR Function" then press ENTER to select. 4 Select "Go to ( 0: 00: 00)" Highlight "Go to ( 0:00:00)", then press the ENTER button. - Recording will automatically turn the power off. Language : English Front Display Auto Power Off : Auto : Off Forward Reverse...
... the ENTER button. - Date can program up to a month in Stop or Play mode, press the MENU button. 2 Select "FUNCTION" Use the Up/Down buttons to highlight "FUNCTION" then press the ENTER button. 3 Select "VCR Function" Using the UP/DOWN buttons to highlight "VCR Function" then press ENTER to select. 4 Select "Go to ( 0: 00: 00)" Highlight "Go to ( 0:00:00)", then press the ENTER button. - Recording will automatically turn the power off. Language : English Front Display Auto Power Off : Auto : Off Forward Reverse...
User Manual (user Manual) (ver.1.0) (English)
Page 32
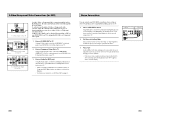
... audio cables, connect the Left/Right Line Out jacks on the back panel of the DVD-VCR to adjust the volume on your connection, see "Alt Video Out" on -screen display. 60 61 Be sure to the Auxiliary Inputs on your alternative (S-Video or Component) video selection, follow the "Alt Video Out" instructions on Your TV Use the S-Video or Component Video connection method only for the DVD player. To activate your stereo receiver or TV. The tuner...
... audio cables, connect the Left/Right Line Out jacks on the back panel of the DVD-VCR to adjust the volume on your connection, see "Alt Video Out" on -screen display. 60 61 Be sure to the Auxiliary Inputs on your alternative (S-Video or Component) video selection, follow the "Alt Video Out" instructions on Your TV Use the S-Video or Component Video connection method only for the DVD player. To activate your stereo receiver or TV. The tuner...
User Manual (user Manual) (ver.1.0) (English)
Page 33
... of audio/video equipment to your DVD-VCR, including: • An additional VCR • Laser Disc Player • DVD Player • Camcorder • Satellite Receiver • Video Game Since all of these devices use essentially the same connections, they receive the audio and video signals directly from LINE1 (rear panel inputs) or LINE2 (front panel inputs) appears on your TV screen. 3 Record Device First, play your monitor television owner's manual for the correct setting. 3 Connection is Complete NOTE: With this connection, the TV/VCR button...
... of audio/video equipment to your DVD-VCR, including: • An additional VCR • Laser Disc Player • DVD Player • Camcorder • Satellite Receiver • Video Game Since all of these devices use essentially the same connections, they receive the audio and video signals directly from LINE1 (rear panel inputs) or LINE2 (front panel inputs) appears on your TV screen. 3 Record Device First, play your monitor television owner's manual for the correct setting. 3 Connection is Complete NOTE: With this connection, the TV/VCR button...


