
User Manual
Page 8
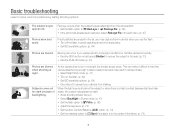
... Night Shot mode. (p. 41) • Turn on the flash. (p. 62) • Set ISO sensitivity options. (p. 64) • Use a tripod to ensure the subject is focused. (p. 33) • Use the DUAL IS mode. (p. 43) Photos are blurred. The subject's eyes appear red. Blurring can make it difficult to hold the camera incorrectly. • Use the OIS function or half-press [Shutter] to prevent your camera from the camera flash. • Set the flash option...
... Night Shot mode. (p. 41) • Turn on the flash. (p. 62) • Set ISO sensitivity options. (p. 64) • Use a tripod to ensure the subject is focused. (p. 33) • Use the DUAL IS mode. (p. 43) Photos are blurred. The subject's eyes appear red. Blurring can make it difficult to hold the camera incorrectly. • Use the OIS function or half-press [Shutter] to prevent your camera from the camera flash. • Set the flash option...
User Manual
Page 9
...; 41 • Night Shot mode 41 • Flash options 62 • ISO sensitivity (to adjust the sensitivity to light) 64 Capturing action photos • Continuous, Motion Capture 77 Adjusting the exposure (brightness) Capturing photos of text, insects, or flowers • Scene mode > Text 41 • Close Up mode 42 • Macro 65 Taking panoramic photos • Live Panorama mode 39 Applying...
...; 41 • Night Shot mode 41 • Flash options 62 • ISO sensitivity (to adjust the sensitivity to light) 64 Capturing action photos • Continuous, Motion Capture 77 Adjusting the exposure (brightness) Capturing photos of text, insects, or flowers • Scene mode > Text 41 • Close Up mode 42 • Macro 65 Taking panoramic photos • Live Panorama mode 39 Applying...
User Manual
Page 10
... Home screen 25 Rearranging icons 27 Setting Wallpaper 27 Using the Help mode 29 Viewing the Application description 29 Viewing the Operation guide 29 Capturing photos 30 Zooming 31 Reducing camera shake (OIS 33 Tips for getting a clearer photo 34 Extended functions 36 Using shooting modes 37 Using the Smart Auto mode 37 Using the 3D Photo mode 38 Using the Live Panorama mode 39 Using the Scene mode 41 Using the Night Shot mode 41 Using the Close Up mode 42 Using the Timer Shot mode 42 Using...
... Home screen 25 Rearranging icons 27 Setting Wallpaper 27 Using the Help mode 29 Viewing the Application description 29 Viewing the Operation guide 29 Capturing photos 30 Zooming 31 Reducing camera shake (OIS 33 Tips for getting a clearer photo 34 Extended functions 36 Using shooting modes 37 Using the Smart Auto mode 37 Using the 3D Photo mode 38 Using the Live Panorama mode 39 Using the Scene mode 41 Using the Night Shot mode 41 Using the Close Up mode 42 Using the Timer Shot mode 42 Using...
User Manual
Page 11
... Adjusting brightness and color 73 Adjusting the exposure manually (EV 73 Compensating for backlighting (ACB 74 Changing the metering option 74 Selecting a light source (White balance 75 Using burst modes 77 Applying effects/Adjusting images 78 Applying Smart Filter effects 78 Adjusting your photos 80 Reducing the sound of the zoom 81 Available shooting options by shooting mode 82 Playback/Editing 84 Viewing photos or videos in Playback mode 85 Starting Playback mode 85 Viewing photos 91 Playing a video 93 Editing a photo 95 Resizing photos...
... Adjusting brightness and color 73 Adjusting the exposure manually (EV 73 Compensating for backlighting (ACB 74 Changing the metering option 74 Selecting a light source (White balance 75 Using burst modes 77 Applying effects/Adjusting images 78 Applying Smart Filter effects 78 Adjusting your photos 80 Reducing the sound of the zoom 81 Available shooting options by shooting mode 82 Playback/Editing 84 Viewing photos or videos in Playback mode 85 Starting Playback mode 85 Viewing photos 91 Playing a video 93 Editing a photo 95 Resizing photos...
User Manual
Page 42
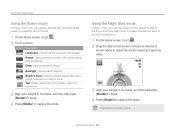
... half-press [Shutter] to focus. 4 Press [Shutter] to extend the time the shutter stays open. Extended functions 41 Using the Night Shot mode In Night mode, you can use a slow shutter speed to capture the photo. Use a tripod to adjust the shutter speed and aperture value. Shutter Speed Aperture 3 Align your subject in the arrow directions shown below to prevent blurry photos. Using shooting modes Using the Scene mode In Scene mode, you can capture a photo with natural-looking reds and yellows. Backlight...
... half-press [Shutter] to focus. 4 Press [Shutter] to extend the time the shutter stays open. Extended functions 41 Using the Night Shot mode In Night mode, you can use a slow shutter speed to capture the photo. Use a tripod to adjust the shutter speed and aperture value. Shutter Speed Aperture 3 Align your subject in the arrow directions shown below to prevent blurry photos. Using shooting modes Using the Scene mode In Scene mode, you can capture a photo with natural-looking reds and yellows. Backlight...
User Manual
Page 47
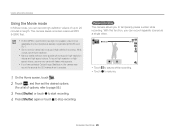
.... • Memory cards with faster write speeds. • If you can record high-definition videos of options, refer to page 58.) 3 Press [Shutter] or touch to start recording. 4 Press [Shutter] again or touch to 20 minutes in length. Using shooting modes Using the Movie mode In Movie mode, you to temporarily pause a video while recording. If this function, you have activated Optical Image Stabilization, the camera may not support high definition recording. Pause recording The camera allows...
.... • Memory cards with faster write speeds. • If you can record high-definition videos of options, refer to page 58.) 3 Press [Shutter] or touch to start recording. 4 Press [Shutter] again or touch to 20 minutes in length. Using shooting modes Using the Movie mode In Movie mode, you to temporarily pause a video while recording. If this function, you have activated Optical Image Stabilization, the camera may not support high definition recording. Pause recording The camera allows...
User Manual
Page 51
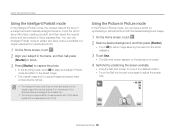
... half-press [Shutter] to focus. 3 Press [Shutter] to capture the photo. • In the shooting mode, touch to apply an Intelligent-Portraitmode-like effect on the background screen. 4 Self-shot by positioning the screen vertically. • Drag the Self-shot screen to move it to a desired location. • Touch the Self-shot screen once again to adjust the screen size. Using the Picture in Picture mode In the Picture in three separate files. Extended functions 50
... half-press [Shutter] to focus. 3 Press [Shutter] to capture the photo. • In the shooting mode, touch to apply an Intelligent-Portraitmode-like effect on the background screen. 4 Self-shot by positioning the screen vertically. • Drag the Self-shot screen to move it to a desired location. • Touch the Self-shot screen once again to adjust the screen size. Using the Picture in Picture mode In the Picture in three separate files. Extended functions 50
User Manual
Page 52
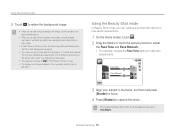
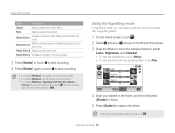
... screen. When using the Beauty Shot mode, the focus distance will be set to capture the photo. Using the Beauty Shot mode In Beauty Shot mode, you change the picture size. • The resolution is fixed at in the Picture in Picture mode. • The background image is saved in the frame, and then half-press [Shutter] to focus. 4 Press [Shutter] to Auto Macro. Face Tone Face Retouch 3 Align your subject in the opposite direction as the self shot...
... screen. When using the Beauty Shot mode, the focus distance will be set to capture the photo. Using the Beauty Shot mode In Beauty Shot mode, you change the picture size. • The resolution is fixed at in the Picture in Picture mode. • The background image is saved in the frame, and then half-press [Shutter] to focus. 4 Press [Shutter] to Auto Macro. Face Tone Face Retouch 3 Align your subject in the opposite direction as the self shot...
User Manual
Page 54
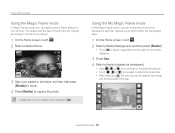
... [Shutter]. • Touch to set an image taken by the user from the list as wallpaper. 3 Touch Use. 4 Select a frame to display as transparent. • Drag , or to move them to the desired locations. • Touch , or once again to adjust the screen size. • When selecting , the user can apply various frame effects to capture the photo. In Magic Frame mode...
... [Shutter]. • Touch to set an image taken by the user from the list as wallpaper. 3 Touch Use. 4 Select a frame to display as transparent. • Drag , or to move them to the desired locations. • Touch , or once again to adjust the screen size. • When selecting , the user can apply various frame effects to capture the photo. In Magic Frame mode...
User Manual
Page 58
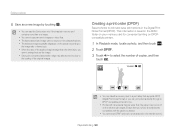
... Apply a black and white effect. Retro Apply a sepia tone effect. Using the Vignetting mode In Vignetting mode, you can capture a photo or record a video with a vignetting effect. 1 On the Home screen, touch . 2 Select (photo) or (movie) on the left side of the video will increase. • If you select Miniature, the camera will not record sound. • If you select Miniature, the speed of the screen. 3 Drag...
... Apply a black and white effect. Retro Apply a sepia tone effect. Using the Vignetting mode In Vignetting mode, you can capture a photo or record a video with a vignetting effect. 1 On the Home screen, touch . 2 Select (photo) or (movie) on the left side of the video will increase. • If you select Miniature, the camera will not record sound. • If you select Miniature, the speed of the screen. 3 Drag...
User Manual
Page 59
... Detecting eye blinking 70 Using Smart Face Recognition 70 Registering faces as your favorites (My Star 71 Adjusting brightness and color 73 Adjusting the exposure manually (EV 73 Compensating for backlighting (ACB 74 Changing the metering option 74 Selecting a light source (White balance) ... ... 75 Using burst modes 77 Applying effects/Adjusting images 78 Applying Smart Filter effects 78 Adjusting your photos 80 Reducing the sound of the zoom 81 Available shooting...
... Detecting eye blinking 70 Using Smart Face Recognition 70 Registering faces as your favorites (My Star 71 Adjusting brightness and color 73 Adjusting the exposure manually (EV 73 Compensating for backlighting (ACB 74 Changing the metering option 74 Selecting a light source (White balance) ... ... 75 Using burst modes 77 Applying effects/Adjusting images 78 Applying Smart Filter effects 78 Adjusting your photos 80 Reducing the sound of the zoom 81 Available shooting...
User Manual
Page 100
Editing a photo 6 Save as a new image by touching . • You can use the Cartoonizer only if the inserted memory card contains more than one image. • You cannot use panoramic images or video files. • The saved storyboard image can print photos directly through a DPOF-compatible printer at home. • Photos with dimensions that are wider than the paper may take the memory card to a print shop that your memory card for photos stored in the Digital Print Order Format (DPOF...
Editing a photo 6 Save as a new image by touching . • You can use the Cartoonizer only if the inserted memory card contains more than one image. • You cannot use panoramic images or video files. • The saved storyboard image can print photos directly through a DPOF-compatible printer at home. • Photos with dimensions that are wider than the paper may take the memory card to a print shop that your memory card for photos stored in the Digital Print Order Format (DPOF...
User Manual
Page 102
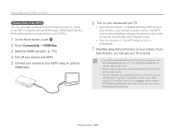
... remote control. • The time it takes for the camera to connect to your HDTV may vary with the type of the card is supported by most HDTVs. 1 On the Home screen, touch . 2 Touch Connectivity → HDMI Size. 3 Select an HDMI resolution. (p. 115) 4 Turn off , the HDTV does not turn on automatically. 7 View files using the touch screen on your camera's Anynet+ function, the HDTV turns on automatically and displays the camera screen...
... remote control. • The time it takes for the camera to connect to your HDTV may vary with the type of the card is supported by most HDTVs. 1 On the Home screen, touch . 2 Touch Connectivity → HDMI Size. 3 Select an HDMI resolution. (p. 115) 4 Turn off , the HDTV does not turn on automatically. 7 View files using the touch screen on your camera's Anynet+ function, the HDTV turns on automatically and displays the camera screen...
User Manual
Page 106
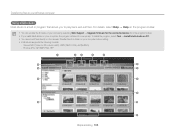
..., select Help → Help on the program toolbar. • You can update the firmware of your camera by selecting Web Support → Upgrade firmware for the connected device from the program toolbar. • If you to play back and edit files. Photos: JPG, GIF, BMP, PNG, TIFF 1 2 3 4 5 15 6 14 7 13 8 9 12 10 11 Playback/Editing 105 Transfer files to a folder on the camera. Transferring files to your Windows computer Using Intelli...
..., select Help → Help on the program toolbar. • You can update the firmware of your camera by selecting Web Support → Upgrade firmware for the connected device from the program toolbar. • If you to play back and edit files. Photos: JPG, GIF, BMP, PNG, TIFF 1 2 3 4 5 15 6 14 7 13 8 9 12 10 11 Playback/Editing 105 Transfer files to a folder on the camera. Transferring files to your Windows computer Using Intelli...
User Manual
Page 116
... Item Language Time Zone Date/Time Set Date Type Description * Default Set a language for your location. Settings menu Item HDMI Size USB PC Software Description * Default Set the resolution of photos when the camera plays back files on the language selected. Select the mode to use when you connect the camera to a computer or printer with a USB cable. • Computer*: Connect your camera to a computer to transfer files. • Printer: Connect your camera to a printer to print files. • Select Mode: Manually select the USB mode when you travel to a device. Set the time...
... Item Language Time Zone Date/Time Set Date Type Description * Default Set a language for your location. Settings menu Item HDMI Size USB PC Software Description * Default Set the resolution of photos when the camera plays back files on the language selected. Select the mode to use when you connect the camera to a computer or printer with a USB cable. • Computer*: Connect your camera to a computer to transfer files. • Printer: Connect your camera to a printer to print files. • Select Mode: Manually select the USB mode when you travel to a device. Set the time...

User Manual
Page 119
Error messages 119 Camera maintenance 120 Cleaning your camera 120 Using or storing the camera 121 About memory cards 122 About the battery 124 Before contacting a service center 128 Camera specifications 131 Glossary 135 FCC notice 140 Index 141 Appendixes Get information about error messages, specifications, and maintenance.
Error messages 119 Camera maintenance 120 Cleaning your camera 120 Using or storing the camera 121 About memory cards 122 About the battery 124 Before contacting a service center 128 Camera specifications 131 Glossary 135 FCC notice 140 Index 141 Appendixes Get information about error messages, specifications, and maintenance.
User Manual
Page 129
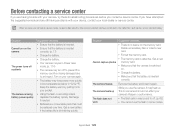
Turn on . • Charge the battery. • Make sure that must be replaced over time. Recharge if needed. • Batteries are consumable parts that the battery is switched on your camera again. • The battery may heat up While you use the flash in low temperatures (below 0 °C/32 ºF). Get a new battery if the battery life is defective. Delete unnecessary files or insert a new card. Cannot capture photos • Format the memory card. •...
Turn on . • Charge the battery. • Make sure that must be replaced over time. Recharge if needed. • Batteries are consumable parts that the battery is switched on your camera again. • The battery may heat up While you use the flash in low temperatures (below 0 °C/32 ºF). Get a new battery if the battery life is defective. Delete unnecessary files or insert a new card. Cannot capture photos • Format the memory card. •...
User Manual
Page 131
... memory card contains photos. • Make sure that the USB cable is connected correctly. • Make sure that your camera is turned on in the settings menu. (p. 115) • Depending on . • Make sure that PC Software is switched on your computer. The file transmission may not play on some video player programs. To play videos Suggested remedies • Make sure that the camera is correctly connected to the TV with your camera, install and use...
... memory card contains photos. • Make sure that the USB cable is connected correctly. • Make sure that your camera is turned on in the settings menu. (p. 115) • Depending on . • Make sure that PC Software is switched on your computer. The file transmission may not play on some video player programs. To play videos Suggested remedies • Make sure that the camera is correctly connected to the TV with your camera, install and use...
User Manual
Page 142
... shot Close up mode 42 macro 65 Connecting to a computer Mac 108 Windows 103 Contrast Playback mode 96 Shooting mode 80 D Date/Time Display 113 Date/Time set 115 Deleting files 90 DIgital Print Order Format (DPOF) 99 Digital zoom 31 Disconnecting the camera 107 Display Brightness 114 Display Resolution 114 DUAL IS mode 43 Appendixes 141 E Editing photos 95 Editing videos capturing 94 trimming 94 Enlarging 91 Error messages 119 F Face detection 68 Flash Auto 62 Fill in 63 Off 62 Red-eye 63 Red-eye fix...
... shot Close up mode 42 macro 65 Connecting to a computer Mac 108 Windows 103 Contrast Playback mode 96 Shooting mode 80 D Date/Time Display 113 Date/Time set 115 Deleting files 90 DIgital Print Order Format (DPOF) 99 Digital zoom 31 Disconnecting the camera 107 Display Brightness 114 Display Resolution 114 DUAL IS mode 43 Appendixes 141 E Editing photos 95 Editing videos capturing 94 trimming 94 Enlarging 91 Error messages 119 F Face detection 68 Flash Auto 62 Fill in 63 Off 62 Red-eye 63 Red-eye fix...
User Manual
Page 144
Index Printing photos 109 Program mode 44 Protecting files 90 Q Quick view 114 R Red-eye Playback mode 97 Shooting mode 62 Reset 117 Resolution Playback mode 95 Shooting mode 59 Retouching faces Playback mode 97 Shooting mode 51 Rotating 95 S Saturation Playback mode 96 Shooting mode 80 Scene mode 41 Self portrait shot 69 Self Shot mode 49 Service center 128 Settings 112 Sharpness 80 Shooting portraits Beauty Shot mode 51 Blink detection 70 Face detection 68 Red-eye 63 Red-eye fix 63 Self portrait 69 Smart Face Recognition 70 Smile shot 69 Shutter button 14, 16...
Index Printing photos 109 Program mode 44 Protecting files 90 Q Quick view 114 R Red-eye Playback mode 97 Shooting mode 62 Reset 117 Resolution Playback mode 95 Shooting mode 59 Retouching faces Playback mode 97 Shooting mode 51 Rotating 95 S Saturation Playback mode 96 Shooting mode 80 Scene mode 41 Self portrait shot 69 Self Shot mode 49 Service center 128 Settings 112 Sharpness 80 Shooting portraits Beauty Shot mode 51 Blink detection 70 Face detection 68 Red-eye 63 Red-eye fix 63 Self portrait 69 Smart Face Recognition 70 Smile shot 69 Shutter button 14, 16...


