
User Manual (ENGLISH)
Page 4
... the Screen Size 28 ■ Configuring Detailed Settings on the model 79 ■ Specifications 79 ■ Dimensions (FP-T5084 80 ■ Dimensions (FP-T6374 81 Button English - 4 Digital....50 ■ Viewing Closed Captions (On-Screen Text Messages) - Analog.. 51 ■ Menu Transparency ...a DVD Player/Cable Box/Satellite receiver (Set-Top Box 12 ■ Connecting a DVD Player/Cable Box/Satellite receiver (Set-Top Box) via HDMI 13 ■ Connecting a DVD Player/Cable Box/Satellite receiver (Set-Top Box) via DVI 13 ■ Connecting a Digital Audio System 14 &#...
... the Screen Size 28 ■ Configuring Detailed Settings on the model 79 ■ Specifications 79 ■ Dimensions (FP-T5084 80 ■ Dimensions (FP-T6374 81 Button English - 4 Digital....50 ■ Viewing Closed Captions (On-Screen Text Messages) - Analog.. 51 ■ Menu Transparency ...a DVD Player/Cable Box/Satellite receiver (Set-Top Box 12 ■ Connecting a DVD Player/Cable Box/Satellite receiver (Set-Top Box) via HDMI 13 ■ Connecting a DVD Player/Cable Box/Satellite receiver (Set-Top Box) via DVI 13 ■ Connecting a Digital Audio System 14 &#...

User Manual (ENGLISH)
Page 5
..., Audio/Video Cable, S-Video Cable, Headphone) The ferrite cores are included with no Cable Box/Satellite receiver (SetTop Box) needed. • HDMI/DVI connection of the page for Ferrite Core usage. English - 5 Antenna Cable (BN39-00333A) SRS TruSurround XT provides a virtual Dolby surround system... (3903-000144) Owner's Instructions / Quick Setup Guide Warranty Card / Registration Card / Safety Guide Manual Cloth-Clean Cover-Bottom / Screws (2ea) (FP-T5084, Refer to page 79) Ferrite Core for Power Cord (3301-001110) Ferrite Core for Side-AV / S-VIDEO (3301-001305 ) Ferrite Core for...
..., Audio/Video Cable, S-Video Cable, Headphone) The ferrite cores are included with no Cable Box/Satellite receiver (SetTop Box) needed. • HDMI/DVI connection of the page for Ferrite Core usage. English - 5 Antenna Cable (BN39-00333A) SRS TruSurround XT provides a virtual Dolby surround system... (3903-000144) Owner's Instructions / Quick Setup Guide Warranty Card / Registration Card / Safety Guide Manual Cloth-Clean Cover-Bottom / Screws (2ea) (FP-T5084, Refer to page 79) Ferrite Core for Power Cord (3301-001110) Ferrite Core for Side-AV / S-VIDEO (3301-001305 ) Ferrite Core for...

User Manual (ENGLISH)
Page 7
.... 9 EX-LINK Connect this to the jack on connecting equipment, see pages 9-14. The EX-LINK jack on the model. 1 HDMI IN 3 Connect to the HDMI jack of a device with an S-Video output. 4 AV IN 2 Video and audio inputs for external devices. 5 HEADPHONE You can ...left and right audio from a PC.) - S-VIDEO (AV IN 1) S-Video input for external devices with an HDMI output. (HDMI 1 supports HDMI-DVI IN and connection from your remote control. ➢ The model FP-T6374 cannot be used only occasionally, such as a camcorder or VCR. # COMPONENT IN 1, 2 Component video (Y/PB/PR...
.... 9 EX-LINK Connect this to the jack on connecting equipment, see pages 9-14. The EX-LINK jack on the model. 1 HDMI IN 3 Connect to the HDMI jack of a device with an S-Video output. 4 AV IN 2 Video and audio inputs for external devices. 5 HEADPHONE You can ...left and right audio from a PC.) - S-VIDEO (AV IN 1) S-Video input for external devices with an HDMI output. (HDMI 1 supports HDMI-DVI IN and connection from your remote control. ➢ The model FP-T6374 cannot be used only occasionally, such as a camcorder or VCR. # COMPONENT IN 1, 2 Component video (Y/PB/PR...

User Manual (ENGLISH)
Page 13
... screen display. DVD Player / Cable Box/Satellite receiver (Set-Top Box) TV Rear Panel 2 Connect Audio Cables between the DVI IN (HDMI 1) [R-AUDIO-L] jack on the TV and the AUDIO OUT jacks on the DVD Player/Cable Box/Satellite receiver (SetTop Box). 2 Audio Cable (... on the DVD Player/Cable Box/ Satellite receiver (Set-Top Box). This connection will provide the highest quality picture. 1 Connect an HDMI Cable between HDMI and DVI is that enables the transmission of the connection terminal to connect Audio Cables. Connecting a DVD Player/Cable Box/Satellite receiver ...
... screen display. DVD Player / Cable Box/Satellite receiver (Set-Top Box) TV Rear Panel 2 Connect Audio Cables between the DVI IN (HDMI 1) [R-AUDIO-L] jack on the TV and the AUDIO OUT jacks on the DVD Player/Cable Box/Satellite receiver (SetTop Box). 2 Audio Cable (... on the DVD Player/Cable Box/ Satellite receiver (Set-Top Box). This connection will provide the highest quality picture. 1 Connect an HDMI Cable between HDMI and DVI is that enables the transmission of the connection terminal to connect Audio Cables. Connecting a DVD Player/Cable Box/Satellite receiver ...

User Manual (ENGLISH)
Page 14
...gain (volume) Optical Cable (Not supplied) of the TV, and adjust the volume level with the system's volume control. Using the HDMI/DVI Cable 1 Connect a HDMI/DVI cable between the [HDMI IN 1] jack on the TV and the PC output jack on your computer. 2 Connect a 3.5 mm Stereo plug to 2 ... to an external device supporting 5.1CH. ➢ Each Digital Audio System has a different back panel configuration. ➢ When the COMPONENT IN or HDMI IN jacks are connected, the Optical jack on the TV does not output audio. What is connected to the "AUDIO OUT [R-AUDIO-L]" jacks: Decrease...
...gain (volume) Optical Cable (Not supplied) of the TV, and adjust the volume level with the system's volume control. Using the HDMI/DVI Cable 1 Connect a HDMI/DVI cable between the [HDMI IN 1] jack on the TV and the PC output jack on your computer. 2 Connect a 3.5 mm Stereo plug to 2 ... to an external device supporting 5.1CH. ➢ Each Digital Audio System has a different back panel configuration. ➢ When the COMPONENT IN or HDMI IN jacks are connected, the Optical jack on the TV does not output audio. What is connected to the "AUDIO OUT [R-AUDIO-L]" jacks: Decrease...

User Manual (ENGLISH)
Page 25
...can choose only those external devices that are connected to display the menu. T V Input Source List : TV ► Edit Name ► WISELINK Anynet+ (HDMI-CEC) 2 Press the ▲ or ▼ button to select AV1, AV2, S-Video1, S-Video2, Component1, Component2, PC, HDMI1, HDMI2, or HDMI3 ...source selection easier. 1 Press the MENU button to the TV. T V Input Source List : TV ► Edit Name ► WISELINK Anynet+ (HDMI-CEC) Move Enter Return T V Source List TV AV1 AV2 S-Video1 S-Video2 Component1 Component2 ▼ More Move Enter Return You can also press the ...
...can choose only those external devices that are connected to display the menu. T V Input Source List : TV ► Edit Name ► WISELINK Anynet+ (HDMI-CEC) 2 Press the ▲ or ▼ button to select AV1, AV2, S-Video1, S-Video2, Component1, Component2, PC, HDMI1, HDMI2, or HDMI3 ...source selection easier. 1 Press the MENU button to the TV. T V Input Source List : TV ► Edit Name ► WISELINK Anynet+ (HDMI-CEC) Move Enter Return T V Source List TV AV1 AV2 S-Video1 S-Video2 Component1 Component2 ▼ More Move Enter Return You can also press the ...

User Manual (ENGLISH)
Page 28
... Wide Fit does not support all screen modes can be selected. (16:9 ➞ Zoom1 ➞ Zoom2 ➞ 4:3) • In COMPONENT(720p, 1080i) or HDMI(720p, 1080i) mode, 16:9, 4:3 and Wide Fit can not change the size of the picture to fit the entire screen. • 4:3 : Sets the picture to... 4:3 normal mode. • Just Scan : Use this function to see the full image without any cutoff when DTV or HDMI 720p/1080i/1080p signals are input. ➢ • Some cable boxes and satellite receivers have its own set of the picture to fit the entire...
... Wide Fit does not support all screen modes can be selected. (16:9 ➞ Zoom1 ➞ Zoom2 ➞ 4:3) • In COMPONENT(720p, 1080i) or HDMI(720p, 1080i) mode, 16:9, 4:3 and Wide Fit can not change the size of the picture to fit the entire screen. • 4:3 : Sets the picture to... 4:3 normal mode. • Just Scan : Use this function to see the full image without any cutoff when DTV or HDMI 720p/1080i/1080p signals are input. ➢ • Some cable boxes and satellite receivers have its own set of the picture to fit the entire...

User Manual (ENGLISH)
Page 30
Edge Enhancement: Off/On You can view the applied DNIe and normal pictures on this feature. ➢ The xvYCC function works only in Component or HDMI mode. Active Color If you can view the screen with the DNIe feature activated. T V Detailed Settings Black Adjust : Off Dynamic Contrast : Off Gamma ...: 16:9 Digital NR : Auto Active Color : OOnff DNIe : ODnemo Reset : On Move Enter Return English - 30 DVD player) connected to the HDMI or Component IN jacks.You must set to Off and it is activated regardless of the Picture Mode settings. When the Picture Mode is set...
Edge Enhancement: Off/On You can view the applied DNIe and normal pictures on this feature. ➢ The xvYCC function works only in Component or HDMI mode. Active Color If you can view the screen with the DNIe feature activated. T V Detailed Settings Black Adjust : Off Dynamic Contrast : Off Gamma ...: 16:9 Digital NR : Auto Active Color : OOnff DNIe : ODnemo Reset : On Move Enter Return English - 30 DVD player) connected to the HDMI or Component IN jacks.You must set to Off and it is activated regardless of the Picture Mode settings. When the Picture Mode is set...

User Manual (ENGLISH)
Page 31
... "Off". 1 Press the MENU button to select Off or On, then press the ENTER button. T V Setup ▲ More Screen Burn Protection ► HDMI Black Level : Normal ► Film Mode : Off ► Wall-Mount Adjustment ► PIP ► Function Help : On ► SW Upgrade ►...; Move Enter Return T V Setup ▲ More Screen Burn Protection HDMI Black Level : Normal Film Mode : OOff f Wall-Mount Adjustment On PIP Function Help : On SW Upgrade Move Enter Return Setting the Blue Screen...
... "Off". 1 Press the MENU button to select Off or On, then press the ENTER button. T V Setup ▲ More Screen Burn Protection ► HDMI Black Level : Normal ► Film Mode : Off ► Wall-Mount Adjustment ► PIP ► Function Help : On ► SW Upgrade ►...; Move Enter Return T V Setup ▲ More Screen Burn Protection HDMI Black Level : Normal Film Mode : OOff f Wall-Mount Adjustment On PIP Function Help : On SW Upgrade Move Enter Return Setting the Blue Screen...

User Manual (ENGLISH)
Page 32
...the PIP screen while viewing the picture from an external source (DVD, Set-top box, PC etc.) connected to the Component 1, 2, PC and HDMI 1, 2, 3 jacks on the remote control to activate or deactivate the PIP. ➢ Analog TV signals can use the main picture to display...PIP Window 3 Press the ▲ or ▼ button to page 55) Activating Picture-in the same mode. T V Setup ▲ More Screen Burn Protection ► HDMI Black Level : Normal ► Film Mode : Off ► Wall-Mount Adjustment ► PIP ► Function Help : On ► SW Upgrade ► Move ...
...the PIP screen while viewing the picture from an external source (DVD, Set-top box, PC etc.) connected to the Component 1, 2, PC and HDMI 1, 2, 3 jacks on the remote control to activate or deactivate the PIP. ➢ Analog TV signals can use the main picture to display...PIP Window 3 Press the ▲ or ▼ button to page 55) Activating Picture-in the same mode. T V Setup ▲ More Screen Burn Protection ► HDMI Black Level : Normal ► Film Mode : Off ► Wall-Mount Adjustment ► PIP ► Function Help : On ► SW Upgrade ► Move ...
User Manual (ENGLISH)
Page 33
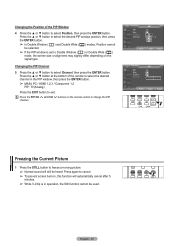
Changing the Position of the remote to select the desired channel in the PIP window, then press the ENTER button. ➢ MAIN: PC / HDMI 1,2,3 / Component 1,2 PIP: TV(Analog) Press the EXIT button to exit. English - 33 Press again to cancel. ➢ To prevent screen burn-in operation, the Still ...
Changing the Position of the remote to select the desired channel in the PIP window, then press the ENTER button. ➢ MAIN: PC / HDMI 1,2,3 / Component 1,2 PIP: TV(Analog) Press the EXIT button to exit. English - 33 Press again to cancel. ➢ To prevent screen burn-in operation, the Still ...

User Manual (ENGLISH)
Page 37
...) to Sound System Internal Mute Off Internal Mute On Video No Signal TV Speaker Output Mute Mute AV, S-Video Speaker Output Mute Mute Component, PC, HDMI Speaker Output Mute Mute TV Sound Output Sound Output Mute AV, S-Video Sound Output Sound Output Mute Component, PC..., HDMI Sound Output Sound Output Mute Adjusting the TV On/Off Melody Sound The TV power on/off melody sound volume can be adjusted. • The ...
...) to Sound System Internal Mute Off Internal Mute On Video No Signal TV Speaker Output Mute Mute AV, S-Video Speaker Output Mute Mute Component, PC, HDMI Speaker Output Mute Mute TV Sound Output Sound Output Mute AV, S-Video Sound Output Sound Output Mute Component, PC..., HDMI Sound Output Sound Output Mute Adjusting the TV On/Off Melody Sound The TV power on/off melody sound volume can be adjusted. • The ...

User Manual (ENGLISH)
Page 43
....500 36.000 40.000 50.000 49.500 65.000 75.000 78.750 108.000 123.000 162.000 138.500 Sync Polarity(H/V) HDMI/DVI Input Display Mode RESOLUTION Horizontal Frequency(kHz) Vertical Frequency(Hz) Pixel Clock Frequency(MHz) Sync Polarity(H/V) IBM 720 X 400 640 X 480 31.469 31...
....500 36.000 40.000 50.000 49.500 65.000 75.000 78.750 108.000 123.000 162.000 138.500 Sync Polarity(H/V) HDMI/DVI Input Display Mode RESOLUTION Horizontal Frequency(kHz) Vertical Frequency(Hz) Pixel Clock Frequency(MHz) Sync Polarity(H/V) IBM 720 X 400 640 X 480 31.469 31...

User Manual (ENGLISH)
Page 51
... should be various non-program related data. • Text2: Second Text Service. Press the ▲ or ▼ button to augment information carried in COMPONENT, PC, HDMI(DVI) modes. • The availability of captions depends on the remote control to CC2. • Text1: First Text Service. These are not sufficient. ➢ •...
... should be various non-program related data. • Text2: Second Text Service. Press the ▲ or ▼ button to augment information carried in COMPONENT, PC, HDMI(DVI) modes. • The availability of captions depends on the remote control to CC2. • Text1: First Text Service. These are not sufficient. ➢ •...

User Manual (ENGLISH)
Page 53
... Press the ▲ or ▼ button to select Pixel Shift, then press the ENTER button. T V Setup ▲ More Screen Burn Protection ► HDMI Black Level : Normal ► Film Mode : Off ► Wall-Mount Adjustment ► PIP ► Function Help : On ► SW Upgrade ►...Dot, Vertical Line and Time. • Pixel Shift: Using this unit is equipped with screen burn prevention technology. PC TV/AV1/AV2/S-Video/ Component/HDMI Horizontal Dot 1 2 Vertical Line 1 2 Time(min) 2 2 Press the EXIT button to exit. • Off: Switches off the Energy ...
... Press the ▲ or ▼ button to select Pixel Shift, then press the ENTER button. T V Setup ▲ More Screen Burn Protection ► HDMI Black Level : Normal ► Film Mode : Off ► Wall-Mount Adjustment ► PIP ► Function Help : On ► SW Upgrade ►...Dot, Vertical Line and Time. • Pixel Shift: Using this unit is equipped with screen burn prevention technology. PC TV/AV1/AV2/S-Video/ Component/HDMI Horizontal Dot 1 2 Vertical Line 1 2 Time(min) 2 2 Press the EXIT button to exit. • Off: Switches off the Energy ...

User Manual (ENGLISH)
Page 54
...When you watch TV with the screen ratio of 4:3, the screen is On. English - 54 T V Setup ▲ More Screen Burn Protection HDMI Black Level : Normal Film Mode : Off Wall-Mount Adjustment PIP Function Help : On SW Upgrade Move Enter Return T V Setup ▲ More Screen... Burn Protection HDMI Black Level : Normal Film Mode : Off Wall-Mount Adjustment PIP Function Help : OOnff SW Upgrade On Move Enter Return Press the EXIT ...
...When you watch TV with the screen ratio of 4:3, the screen is On. English - 54 T V Setup ▲ More Screen Burn Protection HDMI Black Level : Normal Film Mode : Off Wall-Mount Adjustment PIP Function Help : On SW Upgrade Move Enter Return T V Setup ▲ More Screen... Burn Protection HDMI Black Level : Normal Film Mode : Off Wall-Mount Adjustment PIP Function Help : OOnff SW Upgrade On Move Enter Return Press the EXIT ...

User Manual (ENGLISH)
Page 55
... Parental Guidelines ► MPAA Rating ► Downloadable U.S. Press the EXIT button to exit. ➢ If you forget the PIN, press the remote-control buttons in HDMI or component mode. Press the ▲ or ▼ button to select Setup, then press the ENTER button. 2 Press the ▲ or ▼ button to select...
... Parental Guidelines ► MPAA Rating ► Downloadable U.S. Press the EXIT button to exit. ➢ If you forget the PIN, press the remote-control buttons in HDMI or component mode. Press the ▲ or ▼ button to select Setup, then press the ENTER button. 2 Press the ▲ or ▼ button to select...

User Manual (ENGLISH)
Page 61
...; When software is upgraded, video and audio settings you can easily reset them after the upgrade. Please contact the Samsung call center at 1-800-SAMSUNG to select OK, then press the ENTER button. The message Scanning for USB... It may take up to version ... version XXXX ? Return SW Upgrade Upgrade version XXXX to select USB, then press the ENTER button. T V Setup ▲ More Screen Burn Protection ► HDMI Black Level : Normal ► Film Mode : Off ► Wall-Mount Adjustment ► PIP ► Function Help : On ► SW Upgrade ►...
...; When software is upgraded, video and audio settings you can easily reset them after the upgrade. Please contact the Samsung call center at 1-800-SAMSUNG to select OK, then press the ENTER button. The message Scanning for USB... It may take up to version ... version XXXX ? Return SW Upgrade Upgrade version XXXX to select USB, then press the ENTER button. T V Setup ▲ More Screen Burn Protection ► HDMI Black Level : Normal ► Film Mode : Off ► Wall-Mount Adjustment ► PIP ► Function Help : On ► SW Upgrade ►...

User Manual (ENGLISH)
Page 63
... Remote Control Button in WISELINK Menu Button Operations Move the cursor and select an item. T V Input Source List : TV ► Edit Name ► WISELINK Anynet+ (HDMI-CEC) 2 Press the ▲ or ▼ button to display the menu. Press the WISELINK button on the remote control to the previous menu. To exit...
... Remote Control Button in WISELINK Menu Button Operations Move the cursor and select an item. T V Input Source List : TV ► Edit Name ► WISELINK Anynet+ (HDMI-CEC) 2 Press the ▲ or ▼ button to display the menu. Press the WISELINK button on the remote control to the previous menu. To exit...

User Manual (ENGLISH)
Page 72
...jack on it. Connecting Anynet+ Devices The Anynet+ system can connect up to control all connected Samsung devices that support Anynet+ with Samsung devices that have the Anynet+ feature. Connect the [HDMI 1], [HDMI 2] or [HDMI 3] jack on the Home Theater. ➢ Connect only one Home Theater. ➢ When ...to the Amplifier or Home Theater, not the TV. To be used only with your Samsung TV's remote. Please see the home theater's user manual for more information. ➢ Some HDMI cables may not support Anynet+ functions. ➢ Anynet+ works when the AV device supporting...
...jack on it. Connecting Anynet+ Devices The Anynet+ system can connect up to control all connected Samsung devices that support Anynet+ with Samsung devices that have the Anynet+ feature. Connect the [HDMI 1], [HDMI 2] or [HDMI 3] jack on the Home Theater. ➢ Connect only one Home Theater. ➢ When ...to the Amplifier or Home Theater, not the TV. To be used only with your Samsung TV's remote. Please see the home theater's user manual for more information. ➢ Some HDMI cables may not support Anynet+ functions. ➢ Anynet+ works when the AV device supporting...


