
Owners Manual
Page 2
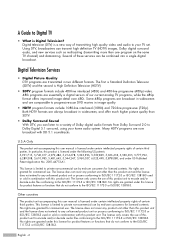
... for commercial use by end-user consumers for product features or functions that do not conform to progressive-scan DVD movies in widescreen, and offer much higher picture quality than SDTV. • Dolby Surround Sound With DTV, you can transmit high definition TV (HDTV) images, Dolby digital surround audio, and new services such as multicasting (transmitting more than one program on the same TV channel) and...
... for commercial use by end-user consumers for product features or functions that do not conform to progressive-scan DVD movies in widescreen, and offer much higher picture quality than SDTV. • Dolby Surround Sound With DTV, you can transmit high definition TV (HDTV) images, Dolby digital surround audio, and new services such as multicasting (transmitting more than one program on the same TV channel) and...
Owners Manual
Page 3
... threshold at the receiver, the digital video and audio data is decoded at the same quality it to my cable TV service? Can I connect my DTV set-top receiver to receive DTV signals indoors? However, DTV broadcast channel assignments are no noise, ghosting, static, or scratchy audio. 3. You can find out whether your area by the OTARD rules and will still need a different antenna. It is possible...
... threshold at the receiver, the digital video and audio data is decoded at the same quality it to my cable TV service? Can I connect my DTV set-top receiver to receive DTV signals indoors? However, DTV broadcast channel assignments are no noise, ghosting, static, or scratchy audio. 3. You can find out whether your area by the OTARD rules and will still need a different antenna. It is possible...
Owners Manual
Page 4
... Video Jacks 21 Connecting a DTV Set-Top Box 22 Connecting to Y, PB, PR 22 Connecting to HDMI (High Definition Multimedia Interface 22 Connecting to DVI (Digital Visual Interface 23 Connecting a Digital Audio System 23 Connecting to an Analog Amplifier 24 Operation 26 Turning the TV On and Off 26 Plug & Play Feature 26 Viewing the Menus and On-Screen Displays 29 Selecting a Menu Language 30 Memorizing the Channels 31 Changing Channels 33 Customizing Your Remote Control 34 Remote Control Codes...
... Video Jacks 21 Connecting a DTV Set-Top Box 22 Connecting to Y, PB, PR 22 Connecting to HDMI (High Definition Multimedia Interface 22 Connecting to DVI (Digital Visual Interface 23 Connecting a Digital Audio System 23 Connecting to an Analog Amplifier 24 Operation 26 Turning the TV On and Off 26 Plug & Play Feature 26 Viewing the Menus and On-Screen Displays 29 Selecting a Menu Language 30 Memorizing the Channels 31 Changing Channels 33 Customizing Your Remote Control 34 Remote Control Codes...
Owners Manual
Page 5
...) Display (How to Connect Your PC to the TV) .........104 Adjusting the Picture Quality 107 Changing the Picture Position 108 Adjusting the Picture Quality and Position Automatically 109 Changing the Picture Size (PC Mode 110 Viewing the Current Resolution 111 Initializing the Picture Settings 112 WISELINK 114 Using the WISELINK Function 114 Using the WISELINK Menu 115 Using the PHOTO (JPEG) List 116 Using the MP3 List 123 Using the Setup Menu 125 Appendix 128 Replacing the Lamp 128 Troubleshooting...
...) Display (How to Connect Your PC to the TV) .........104 Adjusting the Picture Quality 107 Changing the Picture Position 108 Adjusting the Picture Quality and Position Automatically 109 Changing the Picture Size (PC Mode 110 Viewing the Current Resolution 111 Initializing the Picture Settings 112 WISELINK 114 Using the WISELINK Function 114 Using the WISELINK Menu 115 Using the PHOTO (JPEG) List 116 Using the MP3 List 123 Using the Setup Menu 125 Appendix 128 Replacing the Lamp 128 Troubleshooting...
Owners Manual
Page 9
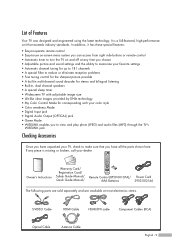
...-operate remote control • Easy-to-use on-screen menu system you can access from right side buttons or remote control • Automatic timer to turn the TV on and off at most electronics stores. It is missing or broken, call your TV, check to view and play photo (JPEG) and audio files (MP3) through the TV's WISELINK jack. S-VIDEO Cable HDMI Cable HDMI/DVI cable Component Cables (RCA) Optical Cable Antenna Cable English - 9 If any time you choose • Adjustable picture and sound settings...
...-operate remote control • Easy-to-use on-screen menu system you can access from right side buttons or remote control • Automatic timer to turn the TV on and off at most electronics stores. It is missing or broken, call your TV, check to view and play photo (JPEG) and audio files (MP3) through the TV's WISELINK jack. S-VIDEO Cable HDMI Cable HDMI/DVI cable Component Cables (RCA) Optical Cable Antenna Cable English - 9 If any time you choose • Adjustable picture and sound settings...
Owners Manual
Page 11
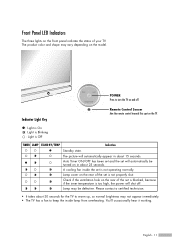
... rear of your TV. The product color and shape may be turned on the front panel indicate the status of the set is blocked, because if the inner temperature is not properly shut. POWER Press to keep the inside the set is Off TIMER LAMP STAND BY/TEMP Indication Standby state. Indicator Light Key Remote Control Sensor Aim the remote control towards this spot on the TV. : Light is On : Light is Blinking : Light is not operating...
... rear of your TV. The product color and shape may be turned on the front panel indicate the status of the set is blocked, because if the inner temperature is not properly shut. POWER Press to keep the inside the set is Off TIMER LAMP STAND BY/TEMP Indication Standby state. Indicator Light Key Remote Control Sensor Aim the remote control towards this spot on the TV. : Light is On : Light is Blinking : Light is not operating...
Owners Manual
Page 12
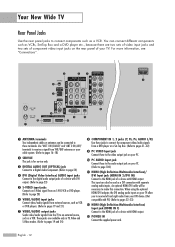
... a DVI connection with HDMI output. Ò POWER IN Connect the supplied power cord. This input can connect different components such as a VCR. English - 12 Use "ANT 1 IN (CABLE)" and "ANT 2 IN (AIR)" terminals to receive a signal from VHF/UHF antennas or your cable system. (Refer to pages 16~18) ´ SERVICE This jack is for service only. ˇ DIGITAL AUDIO OUT (OPTICAL) jack Connect to a Digital Audio Component. (Refer to page 24) ¨ DVI (Digital Video Interface) AUDIO input jacks Connect...
... a DVI connection with HDMI output. Ò POWER IN Connect the supplied power cord. This input can connect different components such as a VCR. English - 12 Use "ANT 1 IN (CABLE)" and "ANT 2 IN (AIR)" terminals to receive a signal from VHF/UHF antennas or your cable system. (Refer to pages 16~18) ´ SERVICE This jack is for service only. ˇ DIGITAL AUDIO OUT (OPTICAL) jack Connect to a Digital Audio Component. (Refer to page 24) ¨ DVI (Digital Video Interface) AUDIO input jacks Connect...
Owners Manual
Page 13
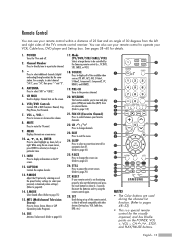
... menu. 24. SET Used during the channel list function. (Refer to page 81) NOTES • The Color buttons are used during set up , down, left and right sides of this remote control, so that it will work compatibly with other devices (Set-top box, VCR, Cable box, DVD, etc.) 16. CH / Press to select highlight up of the TV's remote control receiver. POWER Turns the TV on -screen menu. 10 ENTER Press to change ) a particular item. 11. MENU Displays...
... menu. 24. SET Used during the channel list function. (Refer to page 81) NOTES • The Color buttons are used during set up , down, left and right sides of this remote control, so that it will work compatibly with other devices (Set-top box, VCR, Cable box, DVD, etc.) 16. CH / Press to select highlight up of the TV's remote control receiver. POWER Turns the TV on -screen menu. 10 ENTER Press to change ) a particular item. 11. MENU Displays...
Owners Manual
Page 21
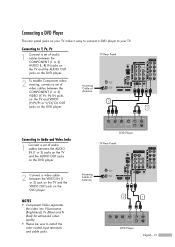
NOTES • Component Video separates the video into Y(Luminance (Brightness)), PB (Blue) and PR (Red) for enhanced video quality. • Please be sure to your TV. Incoming Cable or Antenna 2 1 DVD Player English - 21 Connecting to Audio and Video Jacks 1 Connect a set of audio cables between the VIDEO IN (1 or 2) jack on the TV and the VIDEO OUT jack on the DVD player. TV Rear Panel 2 To enable Component video viewing, connect a set of video cables between the COMPONENT (1 or 2) Incoming Cable or Antenna VIDEO (Y, PB...
NOTES • Component Video separates the video into Y(Luminance (Brightness)), PB (Blue) and PR (Red) for enhanced video quality. • Please be sure to your TV. Incoming Cable or Antenna 2 1 DVD Player English - 21 Connecting to Audio and Video Jacks 1 Connect a set of audio cables between the VIDEO IN (1 or 2) jack on the TV and the VIDEO OUT jack on the DVD player. TV Rear Panel 2 To enable Component video viewing, connect a set of video cables between the COMPONENT (1 or 2) Incoming Cable or Antenna VIDEO (Y, PB...
Owners Manual
Page 23
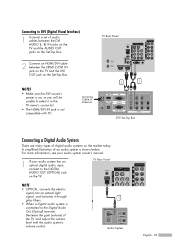
... adjust the volume level with PC. TV Rear Panel NOTE • OPTICAL: converts the electric signal into an optical light signal, and transmits it in the TV menu's source list. • The HDMI/DVI IN jack is not compatible with the audio system's volume control. 1 Audio System English - 23 For more information, see your audio system owner's manual. 1 If your audio system has an optical digital audio input, connect to the DIGITAL AUDIO OUT (OPTICAL) jack on the Set-Top Box. Connecting to DVI (Digital Visual Interface) 1 Connect a set...
... adjust the volume level with PC. TV Rear Panel NOTE • OPTICAL: converts the electric signal into an optical light signal, and transmits it in the TV menu's source list. • The HDMI/DVI IN jack is not compatible with the audio system's volume control. 1 Audio System English - 23 For more information, see your audio system owner's manual. 1 If your audio system has an optical digital audio input, connect to the DIGITAL AUDIO OUT (OPTICAL) jack on the Set-Top Box. Connecting to DVI (Digital Visual Interface) 1 Connect a set...
Owners Manual
Page 24
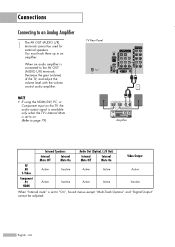
... Active Active Active Active Video Output Active Inactive When "Internal mute" is connected to the AV OUT (AUDIO L/R) terminals: Decrease the gain (volume) of the TV, and adjust the volume level with the volume control audio amplifier. English - 24 You must hook them up to "On", Sound menus except "Multi-Track Options" and "Digital Output" cannot be used for external speakers. When an audio amplifier is set to an amplifier.
... Active Active Active Active Video Output Active Inactive When "Internal mute" is connected to the AV OUT (AUDIO L/R) terminals: Decrease the gain (volume) of the TV, and adjust the volume level with the volume control audio amplifier. English - 24 You must hook them up to "On", Sound menus except "Multi-Track Options" and "Digital Output" cannot be used for external speakers. When an audio amplifier is set to an amplifier.
Owners Manual
Page 26
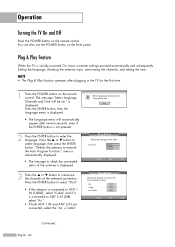
... after plugging in the TV for the first time. 1 Press the POWER button on the remote control. or † button to execute the Auto Program Function." English - 26 Press the ... menu is automatically displayed. • The message to check the connected status of the antenna is not pressed. 2 Press the ENTER button to enter the language. i Menu language, Channels and Time will be set ." Air Cable Air+Cable Start Start Start...
... after plugging in the TV for the first time. 1 Press the POWER button on the remote control. or † button to execute the Auto Program Function." English - 26 Press the ... menu is automatically displayed. • The message to check the connected status of the antenna is not pressed. 2 Press the ENTER button to enter the language. i Menu language, Channels and Time will be set ." Air Cable Air+Cable Start Start Start...
Owners Manual
Page 29
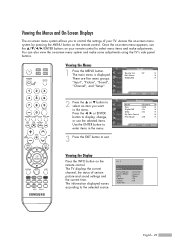
... ENTER button to display, change, or use the ENTER buttons on your TV. Access the on-screen menu system by pressing the MENU button on the remote control. Viewing the Menus 1 Press the MENU button. Air 3 Mono Picture Mode Sound Mode MTS Caption V-Chip 12:00 am : Dynamic : Custom : Mono : Off : Off English - 29 The main menu is displayed. Input Source List : TV √ Edit Name √ WISELINK √ Move Enter Exit Picture Mode : Dynamic √ Size : 16:9 √ Digital NR...
... ENTER button to display, change, or use the ENTER buttons on your TV. Access the on-screen menu system by pressing the MENU button on the remote control. Viewing the Menus 1 Press the MENU button. Air 3 Mono Picture Mode Sound Mode MTS Caption V-Chip 12:00 am : Dynamic : Custom : Mono : Off : Off English - 29 The main menu is displayed. Input Source List : TV √ Edit Name √ WISELINK √ Move Enter Exit Picture Mode : Dynamic √ Size : 16:9 √ Digital NR...
Owners Manual
Page 32
... ENTER button at any time to start the auto program. Even if a particular channel is set to start the auto program. Stop Cable 26 37% Enter Return English - 32 STD HRC IRC Start Move Enter Return • STD, HRC and IRC identify various types of cable TV systems. Contact your particular area. Auto Program Selects a cable signal type for your location. or † button to select the Antenna connection...
... ENTER button at any time to start the auto program. Even if a particular channel is set to start the auto program. Stop Cable 26 37% Enter Return English - 32 STD HRC IRC Start Move Enter Return • STD, HRC and IRC identify various types of cable TV systems. Contact your particular area. Auto Program Selects a cable signal type for your location. or † button to select the Antenna connection...
Owners Manual
Page 66
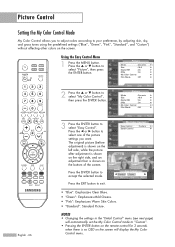
... the picture settings you to adjust colors according to select "My Color Control", then press the ENTER button. Move Enter Return Picture Mode : Dynamic √ Size : 16:9 √ Digital NR : On √ DNIe : On √ My Color Control √ Film Mode : Off √ 3 Press the ENTER button to select "Picture", then press the ENTER button. NOTES • Changing the settings in the "Detail Control" menu (see next page) will display the My Color Control menu...
... the picture settings you to adjust colors according to select "My Color Control", then press the ENTER button. Move Enter Return Picture Mode : Dynamic √ Size : 16:9 √ Digital NR : On √ DNIe : On √ My Color Control √ Film Mode : Off √ 3 Press the ENTER button to select "Picture", then press the ENTER button. NOTES • Changing the settings in the "Detail Control" menu (see next page) will display the My Color Control menu...
Owners Manual
Page 86
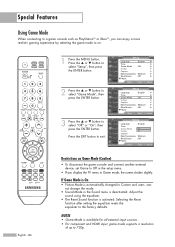
... Mode", then press the ENTER button. 3 Press the ... If Game Mode is On • Picture Mode is available for all external input sources. • For component and HDMI input, game mode supports a resolution of up to exit. Adjust the sound using the equalizer. • The Reset Sound function is deactivated. Selecting the Reset function after setting the equalizer resets the equalizer to Custom and users cannot change the mode. • Sound Mode in Game mode, the screen...
... Mode", then press the ENTER button. 3 Press the ... If Game Mode is On • Picture Mode is available for all external input sources. • For component and HDMI input, game mode supports a resolution of up to exit. Adjust the sound using the equalizer. • The Reset Sound function is deactivated. Selecting the Reset function after setting the equalizer resets the equalizer to Custom and users cannot change the mode. • Sound Mode in Game mode, the screen...
Owners Manual
Page 87
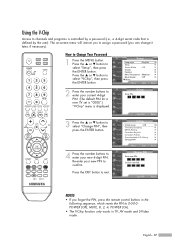
... you forget the PIN, press the remote control buttons in TV, AV mode and S-Video mode. Press the ... How to 0-0-0-0: POWER (Off), MUTE, 8, 2, 4, POWER (On). • The V-Chip function only works in the following sequence, which resets the PIN to Change Your Password 1 Press the MENU button. English - 87 Using the V-Chip Access to channels and programs is controlled by the user). The on-screen menu will instruct you can change it later, if necessary). Press the...
... you forget the PIN, press the remote control buttons in TV, AV mode and S-Video mode. Press the ... How to 0-0-0-0: POWER (Off), MUTE, 8, 2, 4, POWER (On). • The V-Chip function only works in the following sequence, which resets the PIN to Change Your Password 1 Press the MENU button. English - 87 Using the V-Chip Access to channels and programs is controlled by the user). The on-screen menu will instruct you can change it later, if necessary). Press the...
Owners Manual
Page 108
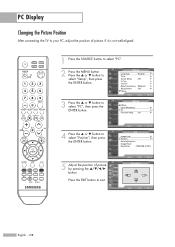
... ... Input Picture Sound Channel Setup Listings ▼ Move Enter Return Position ▲ ▼ ▼ Move Enter Return English - 108 Setup Language : English √ Time √ Game Mode : Off √ V-Chip √ Caption √ Menu Transparency : Medium √ Blue Screen : Off √ † More Move Enter Return Setup ... or † button to select "PC", then press the ENTER button. PC Display Changing the Picture Position After connecting the TV to your PC, adjust the...
... ... Input Picture Sound Channel Setup Listings ▼ Move Enter Return Position ▲ ▼ ▼ Move Enter Return English - 108 Setup Language : English √ Time √ Game Mode : Off √ V-Chip √ Caption √ Menu Transparency : Medium √ Blue Screen : Off √ † More Move Enter Return Setup ... or † button to select "PC", then press the ENTER button. PC Display Changing the Picture Position After connecting the TV to your PC, adjust the...
Owners Manual
Page 130
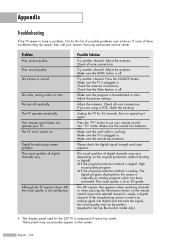
... check the digital signal strength and input antenna. If the broadcasting station converts an analog signal into "TV" mode. These pixels may not be perfect. (Applied to have a problem, first try operating it again. Make sure the TV is plugged in. Adjust the antenna. Appendix Troubleshooting If the TV seems to Set Top Box built-in model only.) • The display panel used for 30 seconds, then try this list of possible problems and...
... check the digital signal strength and input antenna. If the broadcasting station converts an analog signal into "TV" mode. These pixels may not be perfect. (Applied to have a problem, first try operating it again. Make sure the TV is plugged in. Adjust the antenna. Appendix Troubleshooting If the TV seems to Set Top Box built-in model only.) • The display panel used for 30 seconds, then try this list of possible problems and...
Owners Manual
Page 131
... TV channel frequencies. Liquids • Do not handle liquids near appliances with electric motors that may not work properly with another system due to a foreign country, please be aware of the cabinet. • This DLP TV projects the image onto a large screen by applying an optical system. Cabinet • Never open the cabinet or touch the parts inside. • Wipe your TV...
... TV channel frequencies. Liquids • Do not handle liquids near appliances with electric motors that may not work properly with another system due to a foreign country, please be aware of the cabinet. • This DLP TV projects the image onto a large screen by applying an optical system. Cabinet • Never open the cabinet or touch the parts inside. • Wipe your TV...


