
Owner Instructions
Page 6
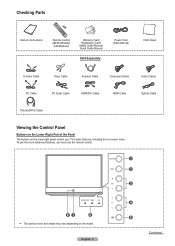
... and shape may vary depending on -screen menu. Checking Parts Owner's Instructions Remote Control (BP59-00126A)/ AAA Batteries Warranty Card/ Registration Card/ Safety Guide Manual/ Quick Guide Manual Sold Separately Power Cord (3903-000144) Cloth-Clean S-Video Cable Video Cable Antenna Cable Component Cables Audio Cables PC Cable PC Audio Cable HDMI...
... and shape may vary depending on -screen menu. Checking Parts Owner's Instructions Remote Control (BP59-00126A)/ AAA Batteries Warranty Card/ Registration Card/ Safety Guide Manual/ Quick Guide Manual Sold Separately Power Cord (3903-000144) Cloth-Clean S-Video Cable Video Cable Antenna Cable Component Cables Audio Cables PC Cable PC Audio Cable HDMI...

Owner Instructions
Page 18
...by pressing the number buttons on the map of the United States). If clock is displayed. Plug & Play Set the Clock Mode. Clock Mode : AAuuttoo Manual Move Enter Skip Plug & Play Set current date and time Month Day - - - - Adjust Enter Skip Plug & Play Set to select... displayed, then go to step 9. 7 Press the ◄ or ► button to move the highlight to highlight the time zone for setting the current time manually, then press the ENTER button. Press the ▲ or ▼ button to Month, Day, Year, Hour, Minute, or am /pm - - DST : OOffff On Move ...
...by pressing the number buttons on the map of the United States). If clock is displayed. Plug & Play Set the Clock Mode. Clock Mode : AAuuttoo Manual Move Enter Skip Plug & Play Set current date and time Month Day - - - - Adjust Enter Skip Plug & Play Set to select... displayed, then go to step 9. 7 Press the ◄ or ► button to move the highlight to highlight the time zone for setting the current time manually, then press the ENTER button. Press the ▲ or ▼ button to Month, Day, Year, Hour, Minute, or am /pm - - DST : OOffff On Move ...
Owner Instructions
Page 21
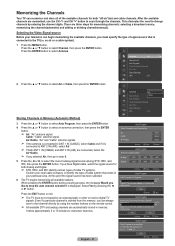
...; The TV must specify the type of the available channels for memorizing channels: selecting a broadcast source, memorizing the channels(automatic) and adding or deleting channels(manual). Stop Enter Skip Auto Program Would you selected Air, then go to step 6. 5 Press the ◄ or ► to that exists in memory. There are...
...; The TV must specify the type of the available channels for memorizing channels: selecting a broadcast source, memorizing the channels(automatic) and adding or deleting channels(manual). Stop Enter Skip Auto Program Would you selected Air, then go to step 6. 5 Press the ◄ or ► to that exists in memory. There are...

Owner Instructions
Page 22
... POWER button on the remote control. Your cable box should turn on after set-up correctly. Pressing the corresponding button on page 25 of this manual for your brand of VCR. Setting Up the Remote to switch among these modes, and control whichever piece of equipment you choose. ➢ The remote... control can operate in CABLE mode, the volume buttons still control your TV's volume. If your VCR does not turn on page 24 of this manual for your brand of cable box. Setting Up Your Remote Control After your remote control has been properly set up , repeat steps 2, 3 and 4, but try...
... POWER button on the remote control. Your cable box should turn on after set-up correctly. Pressing the corresponding button on page 25 of this manual for your brand of VCR. Setting Up the Remote to switch among these modes, and control whichever piece of equipment you choose. ➢ The remote... control can operate in CABLE mode, the volume buttons still control your TV's volume. If your VCR does not turn on page 24 of this manual for your brand of cable box. Setting Up Your Remote Control After your remote control has been properly set up , repeat steps 2, 3 and 4, but try...

Owner Instructions
Page 23
... code, even if the first digit is a "0". (If more than one code is in DVD mode, the volume buttons still control your brand of this manual for your TV's volume. Setting Up the Remote to Operate Your Set Top Box 1 Turn off your DVD. 2 Press the DVD button on your TV... your TV's remote control. 4 Using the number buttons on your remote control, enter three digits of the DVD code listed on page 26 of this manual for your brand of DVD. Setting Up the Remote to Operate Your DVD 1 Turn off your STB. 2 Press the STB button on your TV's remote...
... code, even if the first digit is a "0". (If more than one code is in DVD mode, the volume buttons still control your brand of this manual for your TV's volume. Setting Up the Remote to Operate Your Set Top Box 1 Turn off your DVD. 2 Press the DVD button on your TV... your TV's remote control. 4 Using the number buttons on your remote control, enter three digits of the DVD code listed on page 26 of this manual for your brand of DVD. Setting Up the Remote to Operate Your DVD 1 Turn off your STB. 2 Press the STB button on your TV's remote...
Owner Instructions
Page 46
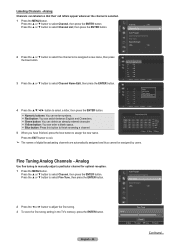
... to assign the new name. Analog Use fine tuning to select Fine Tune, then press the ENTER button. Press the ▲ or ▼ button to manually adjust a particular channel for optimal reception. 1 Press the MENU button. Channel Name Edit 6 _ A V Number Character Delete Blank Done Move Enter Return Press the EXIT button...
... to assign the new name. Analog Use fine tuning to select Fine Tune, then press the ENTER button. Press the ▲ or ▼ button to manually adjust a particular channel for optimal reception. 1 Press the MENU button. Channel Name Edit 6 _ A V Number Character Delete Blank Done Move Enter Return Press the EXIT button...
Owner Instructions
Page 48
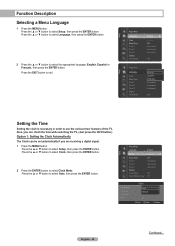
... Timer 1 : Inactivated Timer 2 : Inactivated Timer 3 : Inactivated Caption Game Mode : Off DLP® 3D/Dual-View : Off Clock Mode Clock Set Time zone DST Clock : AAuutoto Manual : Off Move Enter Return English - 48 Continued... Press the ▲ or ▼ button to select Setup, then press the ENTER button. Function Description Selecting a Menu...
... Timer 1 : Inactivated Timer 2 : Inactivated Timer 3 : Inactivated Caption Game Mode : Off DLP® 3D/Dual-View : Off Clock Mode Clock Set Time zone DST Clock : AAuutoto Manual : Off Move Enter Return English - 48 Continued... Press the ▲ or ▼ button to select Setup, then press the ENTER button. Function Description Selecting a Menu...

Owner Instructions
Page 49
... : OOfnf correctly. Move Enter Return ➢ Antenna or Cable must be set the time automatically. Press the ▲ or ▼ button to select Manual, then press the ENTER button. 3 Press the ▲ or ▼ button to select Clock Set, then press the ENTER button. 4 Press the ...or am Adjust Enter Return English - 49 Continued... Set the date and time you press the INFO button. ➢ You can set the time manually. Time Zone Newfoundland Atlantic Eastern Central Mountain Pacific Move Enter Return 4 Press the ▲ or ▼ button to select Setup, ...
... : OOfnf correctly. Move Enter Return ➢ Antenna or Cable must be set the time automatically. Press the ▲ or ▼ button to select Manual, then press the ENTER button. 3 Press the ▲ or ▼ button to select Clock Set, then press the ENTER button. 4 Press the ...or am Adjust Enter Return English - 49 Continued... Set the date and time you press the INFO button. ➢ You can set the time manually. Time Zone Newfoundland Atlantic Eastern Central Mountain Pacific Move Enter Return 4 Press the ▲ or ▼ button to select Setup, ...

Owner Instructions
Page 68
For more information on Bluetooth, refer to the user manual of the range or there is on. ➢ To not use Bluetooth communication, select Off. Communication failure may occur due to interference from the following ...
For more information on Bluetooth, refer to the user manual of the range or there is on. ➢ To not use Bluetooth communication, select Off. Communication failure may occur due to interference from the following ...
Owner Instructions
Page 69
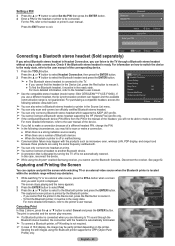
...the PIN Enter your PIN Return Clear 0~9 Number Enter Return Connecting a Bluetooth stereo headset (Sold separately) If you select Bluetooth stereo headset in the manual of the corresponding device. 1 Press the TOOLS button. Press the ▲ or ▼ button to select Headset Connection, then press the ENTER... to the TV. ● If you wish to the user manual of the headset, you can listen to the printer's user manual. For information on the printer. Sending the still images using the Anynet+ enabled Samsung receiver, you are listening to be in the Device List, press...
...the PIN Enter your PIN Return Clear 0~9 Number Enter Return Connecting a Bluetooth stereo headset (Sold separately) If you select Bluetooth stereo headset in the manual of the corresponding device. 1 Press the TOOLS button. Press the ▲ or ▼ button to select Headset Connection, then press the ENTER... to the TV. ● If you wish to the user manual of the headset, you can listen to the printer's user manual. For information on the printer. Sending the still images using the Anynet+ enabled Samsung receiver, you are listening to be in the Device List, press...

Owner Instructions
Page 81
...enables you to control all connected Samsung AV devices with your Samsung TV's remote. HDMI 1.3 Cable HDMI 1.3 Cable Home Theater Anynet+ Device 3 Optical Cable HDMI 1.3 Cable HDMI 1.3 Cable ➢ Connect the Optical cable between [Digital Audio Out (Optical)] on your Samsung AV device has this feature,... check if there is an AV network system that have the Anynet+ feature. Please see the manual for the home theater. ➢ You can listen to 5.1 channel sound through...
...enables you to control all connected Samsung AV devices with your Samsung TV's remote. HDMI 1.3 Cable HDMI 1.3 Cable Home Theater Anynet+ Device 3 Optical Cable HDMI 1.3 Cable HDMI 1.3 Cable ➢ Connect the Optical cable between [Digital Audio Out (Optical)] on your Samsung AV device has this feature,... check if there is an AV network system that have the Anynet+ feature. Please see the manual for the home theater. ➢ You can listen to 5.1 channel sound through...
Owner Instructions
Page 83
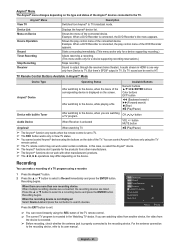
... to search devices. When a DVD Recorder is recorded in Tuner After switching to TV. English - 83 When the recording device is set to its user manual. For the antenna connection to the recording device, refer to TV. ➢ The REC button works only in TV. button MUTE button Anyview2 When watching...
... to search devices. When a DVD Recorder is recorded in Tuner After switching to TV. English - 83 When the recording device is set to its user manual. For the antenna connection to the recording device, refer to TV. ➢ The REC button works only in TV. button MUTE button Anyview2 When watching...


