

Owner Instructions
Page 4
...■ Viewing the Menus 20 ■ Using the TOOLS Button 20 ■ Memorizing the Channels 21 ■ Setting Up Your Remote Control 22 ■ To Select the Source 27 ■ To Edit the Input Source Name 27 Picture Control ■ Using Automatic ...List of Features 5 ■ Checking Parts 6 ■ Viewing the Control Panel 6 ■ Viewing the Connection Panel 8 ■ Remote Control 9 ■ Installing Batteries in the Remote Control 10 ■ Clearing Scrambled Channels - Digital 40 ■ Managing Channels 41 ■ Fine Tuning Analog Channels - Analog 38 ■...
...■ Viewing the Menus 20 ■ Using the TOOLS Button 20 ■ Memorizing the Channels 21 ■ Setting Up Your Remote Control 22 ■ To Select the Source 27 ■ To Edit the Input Source Name 27 Picture Control ■ Using Automatic ...List of Features 5 ■ Checking Parts 6 ■ Viewing the Control Panel 6 ■ Viewing the Connection Panel 8 ■ Remote Control 9 ■ Installing Batteries in the Remote Control 10 ■ Clearing Scrambled Channels - Digital 40 ■ Managing Channels 41 ■ Fine Tuning Analog Channels - Analog 38 ■...
Owner Instructions
Page 5
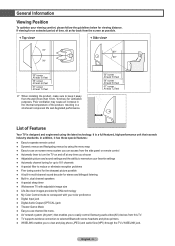
... : At least 7.2 feet ➢ When installing the product, make sure to keep it has these special features: ● Easy-to-operate remote control ● Dynamic menus and Navigating menus by DNle technology ● My Color Control mode to correspond with your color preference ● Digital ...733; screen : At least 7.2 feet List of Features Your TV is a full-featured, high-performance unit that enables you to easily control Samsung audio-video(AV) devices from this TV. ● TV supports wireless connection to selected Bluetooth stereo headsets and photo printers. ● WISELINK ...
... : At least 7.2 feet ➢ When installing the product, make sure to keep it has these special features: ● Easy-to-operate remote control ● Dynamic menus and Navigating menus by DNle technology ● My Color Control mode to correspond with your color preference ● Digital ...733; screen : At least 7.2 feet List of Features Your TV is a full-featured, high-performance unit that enables you to easily control Samsung audio-video(AV) devices from this TV. ● TV supports wireless connection to selected Bluetooth stereo headsets and photo printers. ● WISELINK ...
Owner Instructions
Page 6
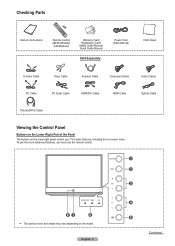
English - 6 Continued... Checking Parts Owner's Instructions Remote Control (BP59-00126A)/ AAA Batteries Warranty Card/ Registration Card/ Safety Guide Manual/ Quick Guide Manual Sold Separately Power Cord (3903-000144) Cloth-Clean S-Video Cable ... on the lower-right panel control your TV's basic features, including the on the model. To use the more advanced features, you must use the remote control. ➢ The product color and shape may vary depending on -screen menu.
English - 6 Continued... Checking Parts Owner's Instructions Remote Control (BP59-00126A)/ AAA Batteries Warranty Card/ Registration Card/ Safety Guide Manual/ Quick Guide Manual Sold Separately Power Cord (3903-000144) Cloth-Clean S-Video Cable ... on the lower-right panel control your TV's basic features, including the on the model. To use the more advanced features, you must use the remote control. ➢ The product color and shape may vary depending on -screen menu.

Owner Instructions
Page 7
...Indicator Light Key ( : On, : Blinking, : Off) STAND BY/TEMP TIMER LED Standby state. Press to turn the TV on and off. 7 Remote Control Sensor Aim the remote control towards this spot on the TV. 8 Indicator Lights Blinks and turns off . Indication The picture will shut off when the power is...in about 15 seconds. English - 7 In the on-screen menu, use the CH buttons as you would use the ▲ and ▼ buttons on the remote control. 5 (ENTER) Press to confirm a selection. 6 POWER Press to increase or decrease the volume. You'll occasionally hear it , you can use the +...
...Indicator Light Key ( : On, : Blinking, : Off) STAND BY/TEMP TIMER LED Standby state. Press to turn the TV on and off. 7 Remote Control Sensor Aim the remote control towards this spot on the TV. 8 Indicator Lights Blinks and turns off . Indication The picture will shut off when the power is...in about 15 seconds. English - 7 In the on-screen menu, use the CH buttons as you would use the ▲ and ▼ buttons on the remote control. 5 (ENTER) Press to confirm a selection. 6 POWER Press to increase or decrease the volume. You'll occasionally hear it , you can use the +...
Owner Instructions
Page 9
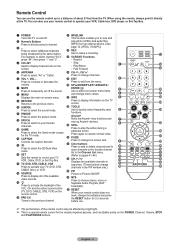
... l CH / Displays the available channels in sequence. (These buttons change the batteries and press the RESET button for 2-3 seconds before use the remote control up Anynet+ devices. Press to increase or decrease the volume. 7 MUTE Press to temporarily cut off . 2 Numeric Buttons Press to activate...the Channel List menu. (Refer to choose stereo, mono or Separate Audio Program (SAP broadcast). Press again to change the screen size. When using the remote, always point it directly at the TV. Fast Forward d CH , CH Press to resume normal video. i STILL Press to make a recording. ...
... l CH / Displays the available channels in sequence. (These buttons change the batteries and press the RESET button for 2-3 seconds before use the remote control up Anynet+ devices. Press to increase or decrease the volume. 7 MUTE Press to temporarily cut off . 2 Numeric Buttons Press to activate...the Channel List menu. (Refer to choose stereo, mono or Separate Audio Program (SAP broadcast). Press again to change the screen size. When using the remote, always point it directly at the TV. Fast Forward d CH , CH Press to resume normal video. i STILL Press to make a recording. ...
Owner Instructions
Page 10
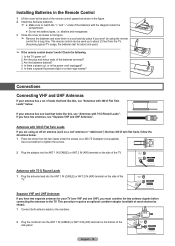
... that has 300 Ω twin flat leads, follow the directions below . This procedure requires an optional combiner-adaptor (available at the back of the remote control upward as shown in a cool and dry place if you won't be used up to tighten the screws. 2 Plug the adaptor into the... like this , see "Separate VHF and UHF Antennas". Connections Connecting VHF and UHF Antennas If your TV (one VHF and one year.) ➢ If the remote control doesn't work! alkaline and manganese. 3 Close the cover as a roof antenna or "rabbit ears") that looks like this , see "Antennas with 75 &#...
... that has 300 Ω twin flat leads, follow the directions below . This procedure requires an optional combiner-adaptor (available at the back of the remote control upward as shown in a cool and dry place if you won't be used up to tighten the screws. 2 Plug the adaptor into the... like this , see "Separate VHF and UHF Antennas". Connections Connecting VHF and UHF Antennas If your TV (one VHF and one year.) ➢ If the remote control doesn't work! alkaline and manganese. 3 Close the cover as a roof antenna or "rabbit ears") that looks like this , see "Antennas with 75 &#...
Owner Instructions
Page 16
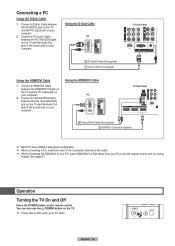
...] jack on the TV and the Audio Out jack of the sound card on your computer. You can also use the POWER button on the remote control. Using the HDMI/DVI Cable PC TV Side Panel 2 1Streo/2RCA Cable (Not supplied) 1 HDMI/DVI Cable (Not supplied) ➢ Each PC has a different...
...] jack on the TV and the Audio Out jack of the sound card on your computer. You can also use the POWER button on the remote control. Using the HDMI/DVI Cable PC TV Side Panel 2 1Streo/2RCA Cable (Not supplied) 1 HDMI/DVI Cable (Not supplied) ➢ Each PC has a different...
Owner Instructions
Page 17
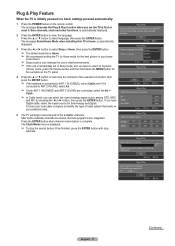
... Air + Cable. ➢ In Cable mode, you set to Shop mode, and you have Digital cable, select the signal source for five seconds on the remote control. Plug & Play Feature When the TV is initially powered on, basic settings proceed automatically: 1 Press the POWER button on the TV panel. 4 Press the...
... Air + Cable. ➢ In Cable mode, you set to Shop mode, and you have Digital cable, select the signal source for five seconds on the remote control. Plug & Play Feature When the TV is initially powered on, basic settings proceed automatically: 1 Press the POWER button on the TV panel. 4 Press the...

Owner Instructions
Page 18
... and time. is displayed, then go to step 9. 7 Press the ◄ or ► button to move the highlight to the appropriate time zone on the remote control. 8 The message Enjoy your watching. Plug & Play Set the Clock Mode. is displayed. 10 Press the ▲ or ▼ button to set the month...
... and time. is displayed, then go to step 9. 7 Press the ◄ or ► button to move the highlight to the appropriate time zone on the remote control. 8 The message Enjoy your watching. Plug & Play Set the Clock Mode. is displayed. 10 Press the ▲ or ▼ button to set the month...
Owner Instructions
Page 20
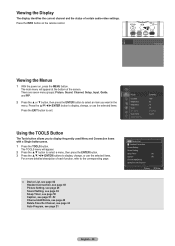
Air 3 No Time Information Viewing the Menus 1 With the power on the remote control. There are seven menu groups: Picture, Sound, Channel, Setup, Input, Guide, and PIP. 2 Press the ▲ or ▼ button, then press the ENTER button ...
Air 3 No Time Information Viewing the Menus 1 With the power on the remote control. There are seven menu groups: Picture, Sound, Channel, Setup, Input, Guide, and PIP. 2 Press the ▲ or ▼ button, then press the ENTER button ...
Owner Instructions
Page 21
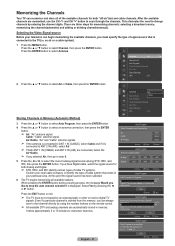
... select Auto Program, then press the ENTER button. 4 Press the ▲ or ▼ button to select Antenna. Air 10 3% Digital Channels are added on the remote control. ➢ All available DTV and analog channels are connected, select the Air+Cable. ➢ If you like to exit. ➢ The TV must specify...
... select Auto Program, then press the ENTER button. 4 Press the ▲ or ▼ button to select Antenna. Air 10 3% Digital Channels are added on the remote control. ➢ All available DTV and analog channels are connected, select the Air+Cable. ➢ If you like to exit. ➢ The TV must specify...

Owner Instructions
Page 22
... the first digit is a "0". (If more than one code is in CABLE mode, the volume buttons still control your brand of VCR. Note on Using Remote Control Modes: Cable Box When your remote control is listed, try the first one of the other codes listed for your TV's volume. Setting Up the... the cable box code listed on if your brand of VCR. If your VCR does not turn on page 25 of this manual for your remote is listed, try the first one code is set up correctly. If no other codes are listed, try one of the code, even if the...
... the first digit is a "0". (If more than one code is in CABLE mode, the volume buttons still control your brand of VCR. Note on Using Remote Control Modes: Cable Box When your remote control is listed, try the first one of the other codes listed for your TV's volume. Setting Up the... the cable box code listed on if your brand of VCR. If your VCR does not turn on page 25 of this manual for your remote is listed, try the first one code is set up correctly. If no other codes are listed, try one of the code, even if the...

Owner Instructions
Page 23
... in STB mode, the volume buttons still control your brand of STB. English - 23 Continued... Your STB should turn on Using Remote Control Modes: STB When your remote control is in DVD mode, the volume buttons still control your DVD does not turn on after set up , repeat steps 2, 3 and ...listed for your TV's volume. If no other codes are listed, try the first one.) 5 Press the POWER button on the remote control. Your DVD should turn on if your remote is listed, try each code, 000 through 074. If your STB does not turn on after set up , repeat steps 2,...
... in STB mode, the volume buttons still control your brand of STB. English - 23 Continued... Your STB should turn on Using Remote Control Modes: STB When your remote control is in DVD mode, the volume buttons still control your DVD does not turn on after set up , repeat steps 2, 3 and ...listed for your TV's volume. If no other codes are listed, try the first one.) 5 Press the POWER button on the remote control. Your DVD should turn on if your remote is listed, try each code, 000 through 074. If your STB does not turn on after set up , repeat steps 2,...
Owner Instructions
Page 27
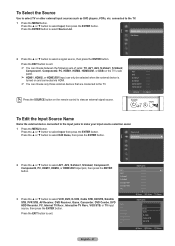
...; Refresh Option Press the SOURCE button on and connected via HDMI. ➢ You can only be selected when the external device is turned on the remote control to view an external signal source. connected to select VCR, DVD, D-VHS, Cable STB, HD STB, Satellite STB, PVR STB, AV Receiver, DVD Receiver...
...; Refresh Option Press the SOURCE button on and connected via HDMI. ➢ You can only be selected when the external device is turned on the remote control to view an external signal source. connected to select VCR, DVD, D-VHS, Cable STB, HD STB, Satellite STB, PVR STB, AV Receiver, DVD Receiver...
Owner Instructions
Page 28
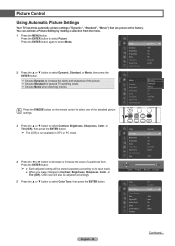
... Contrast Brightness Sharpness Color Tint (G/R) Color Tone Detail Settings : DDyynnaammicic : 1S00tandard : 4M5 ovie : 75 : 55 : G50/R50 : Cool1 Press the P.MODE button on the remote control to select one of a particular item. Picture Control Using Automatic Picture Settings Your TV has three automatic picture settings ("Dynamic", "Standard", "Movie") that are...
... Contrast Brightness Sharpness Color Tint (G/R) Color Tone Detail Settings : DDyynnaammicic : 1S00tandard : 4M5 ovie : 75 : 55 : G50/R50 : Cool1 Press the P.MODE button on the remote control to select one of a particular item. Picture Control Using Automatic Picture Settings Your TV has three automatic picture settings ("Dynamic", "Standard", "Movie") that are...
Owner Instructions
Page 30
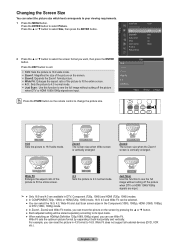
... (1080i, 1080p), HDMI (1080i, 1080p), or DTV (1080i, 1080p) mode. ● In Zoom1, Zoom2 and Wide Fit modes, you can move the picture on the remote control to change the picture size. 16:9 Sets the picture to its input mode. ● When watching an HD(High Definition 720p,1080i,1080p) signal...
... (1080i, 1080p), HDMI (1080i, 1080p), or DTV (1080i, 1080p) mode. ● In Zoom1, Zoom2 and Wide Fit modes, you can move the picture on the remote control to change the picture size. 16:9 Sets the picture to its input mode. ● When watching an HD(High Definition 720p,1080i,1080p) signal...
Owner Instructions
Page 34
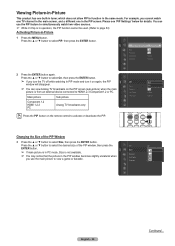
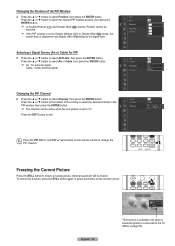
You can view Analog TV broadcasts on the remote control to activate or deactivate the PIP. PIP PIP Size Position Air/Cable Channel : OOffff : On : : Cable : Cable 3 Changing the Size of the PIP ...
You can view Analog TV broadcasts on the remote control to activate or deactivate the PIP. PIP PIP Size Position Air/Cable Channel : OOffff : On : : Cable : Cable 3 Changing the Size of the PIP ...
Owner Instructions
Page 35
..., then press the ENTER button. PIP Position Air/Cable Channel : : Cable : CableC3able 3 Press the PIP CH and CH and buttons on the remote control. English - 35 Still Print Cancel This function is available only when a bluetooth printer is connected to the TV. (Refer to change the PIP channel.... Changing the Position of the remote to select the desired channel in the PIP window, then press the ENTER button. ➢ The channel can be active when the sub picture ...
..., then press the ENTER button. PIP Position Air/Cable Channel : : Cable : CableC3able 3 Press the PIP CH and CH and buttons on the remote control. English - 35 Still Print Cancel This function is available only when a bluetooth printer is connected to the TV. (Refer to change the PIP channel.... Changing the Position of the remote to select the desired channel in the PIP window, then press the ENTER button. ➢ The channel can be active when the sub picture ...
Owner Instructions
Page 36
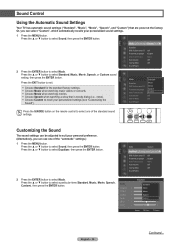
... TruSurround XT Preferred Language Multi-Track Sound Music : OMffovie : ESnpgelisehch : MCounsotom Auto Volume : Off Internal Mute : Off Sound Reset Press the S.MODE button on the remote control to select one of the standard sound settings. Sound Control Using the Automatic Sound Settings Your TV has automatic sound settings ("Standard", "Music", "Movie...
... TruSurround XT Preferred Language Multi-Track Sound Music : OMffovie : ESnpgelisehch : MCounsotom Auto Volume : Off Internal Mute : Off Sound Reset Press the S.MODE button on the remote control to select one of the standard sound settings. Sound Control Using the Automatic Sound Settings Your TV has automatic sound settings ("Standard", "Music", "Movie...
Owner Instructions
Page 38
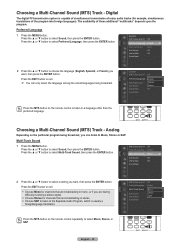
...Language : EEnngglliisshh Multi-Track Sound Auto Volume : MSopnaonish : OFffrench Internal Mute : Off Sound Reset Press the MTS button on the remote control to select Multi-Track Sound, then press the ENTER button. Multi-Track Sound 1 Press the MENU button. Preferred Language 1 Press the ...MENU button. Analog Depending on the remote control repeatedly to Mono, Stereo or SAP. Press the ▲ or ▼ button to listen in a language other than the preferred...
...Language : EEnngglliisshh Multi-Track Sound Auto Volume : MSopnaonish : OFffrench Internal Mute : Off Sound Reset Press the MTS button on the remote control to select Multi-Track Sound, then press the ENTER button. Multi-Track Sound 1 Press the MENU button. Preferred Language 1 Press the ...MENU button. Analog Depending on the remote control repeatedly to Mono, Stereo or SAP. Press the ▲ or ▼ button to listen in a language other than the preferred...


