
User Manual (ENGLISH)
Page 6
...Panel LED Indicators 12 Right side buttons 13 Side Panel Jacks ...13 Rear Panel Jacks ...14 Remote Control...15 Connections 18 Connecting VHF and UHF Antennas 18 Antennas with 75-ohm Round Leads 18 Connecting Cable TV 19 Cable without a Cable Box 19 Cable with a Cable Box that...Definition Multimedia Interface 25 Connecting a Digital Audio System 26 Connecting to an Analog Amplifier 26 Connecting to a Subwoofer Speaker 27 Operation 30 Turning the TV On and Off 30 Viewing the Menus and On-Screen Displays 30 Selecting a Menu Language 31 Memorizing the Channels 32 Adding and Erasing ...
...Panel LED Indicators 12 Right side buttons 13 Side Panel Jacks ...13 Rear Panel Jacks ...14 Remote Control...15 Connections 18 Connecting VHF and UHF Antennas 18 Antennas with 75-ohm Round Leads 18 Connecting Cable TV 19 Cable without a Cable Box 19 Cable with a Cable Box that...Definition Multimedia Interface 25 Connecting a Digital Audio System 26 Connecting to an Analog Amplifier 26 Connecting to a Subwoofer Speaker 27 Operation 30 Turning the TV On and Off 30 Viewing the Menus and On-Screen Displays 30 Selecting a Menu Language 31 Memorizing the Channels 32 Adding and Erasing ...

User Manual (ENGLISH)
Page 11
... you can access from this TV. • CableCARD slot • D-Net (IEEE1394) • TV Guide On Screen™ Accessories Once you to easily control Samsung audio-video(AV) devices from the front panel or remote control • Automatic timer to turn the TV on and off at any ...dual channel speakers • A special sleep timer • Picture-in-Picture capability that lets you watch two channels at once • Widescreen TV with adjustable image size • Life-like clear images provided by DNle technology • My Color Control Mode for corresponding with your color preference...
... you can access from this TV. • CableCARD slot • D-Net (IEEE1394) • TV Guide On Screen™ Accessories Once you to easily control Samsung audio-video(AV) devices from the front panel or remote control • Automatic timer to turn the TV on and off at any ...dual channel speakers • A special sleep timer • Picture-in-Picture capability that lets you watch two channels at once • Widescreen TV with adjustable image size • Life-like clear images provided by DNle technology • My Color Control Mode for corresponding with your color preference...

User Manual (ENGLISH)
Page 12
... the set is Off Remote Control Sensor Aim the remote control towards this spot on the rear of the set is too high, the power will automatically appear in about 25 seconds. Your New Wide TV Front Panel LED Indicators The three lights on and off . POWER Press to warm up, so... normal brightness may be turned on the rear of your TV. Check if the ventilation hole on in about 30 seconds for the TV to turn the TV on the front panel indicate the status of the set will automatically be defective. Auto Timer...
... the set is Off Remote Control Sensor Aim the remote control towards this spot on the rear of the set is too high, the power will automatically appear in about 25 seconds. Your New Wide TV Front Panel LED Indicators The three lights on and off . POWER Press to warm up, so... normal brightness may be turned on the rear of your TV. Check if the ventilation hole on in about 30 seconds for the TV to turn the TV on the front panel indicate the status of the set will automatically be defective. Auto Timer...

User Manual (ENGLISH)
Page 15
...Press to select channel "54-3", press "54", then press "-" and "3". 6. Press to select additional channels (digital and analog) being broadcast by the Samsung remote control (i.e., TV, STB, VCR, CABLE, or DVD). 13. For example, to select "AIR" or "CABLE". 4. Anynet Runs the Anynet view functions and sets up... 14. CH.LIST Displays the channel list. 11. SET Used during set of this remote control, so that it directly at the TV. POWER Turns the TV on the TV screen. 17. VOL +, VOL Press to a particular channel. 5. PIP (Picture In Picture) Displays the available channels in sequence....
...Press to select channel "54-3", press "54", then press "-" and "3". 6. Press to select additional channels (digital and analog) being broadcast by the Samsung remote control (i.e., TV, STB, VCR, CABLE, or DVD). 13. For example, to select "AIR" or "CABLE". 4. Anynet Runs the Anynet view functions and sets up... 14. CH.LIST Displays the channel list. 11. SET Used during set of this remote control, so that it directly at the TV. POWER Turns the TV on the TV screen. 17. VOL +, VOL Press to a particular channel. 5. PIP (Picture In Picture) Displays the available channels in sequence....

User Manual (ENGLISH)
Page 20
... On ScreenTM. 1 3 Stereo VCR TV Rear Panel Stereo VCR English - 20 TV Rear Panel 2 Connect a coaxial cable between the Antenna out terminal (i.e., "OUT to match the color coded input terminals and cable jacks. • When connecting the VCR and turning it on, there may be sure to TV") on the VCR and the ANT 1 IN (CABLE...
... On ScreenTM. 1 3 Stereo VCR TV Rear Panel Stereo VCR English - 20 TV Rear Panel 2 Connect a coaxial cable between the Antenna out terminal (i.e., "OUT to match the color coded input terminals and cable jacks. • When connecting the VCR and turning it on, there may be sure to TV") on the VCR and the ANT 1 IN (CABLE...

User Manual (ENGLISH)
Page 26
.... Audio System Connecting to the "AV OUT (AUDIO L/R)" terminals: Decrease the gain (volume) of the audio amplifier, turn the TV's internal mute on and 1 adjust the volume level with the volume control of the amplifier. TV Rear Panel When an audio amplifier is connected to an Analog Amplifier 1 The "AV OUT (AUDIO L/R)" terminals cannot...
.... Audio System Connecting to the "AV OUT (AUDIO L/R)" terminals: Decrease the gain (volume) of the audio amplifier, turn the TV's internal mute on and 1 adjust the volume level with the volume control of the amplifier. TV Rear Panel When an audio amplifier is connected to an Analog Amplifier 1 The "AV OUT (AUDIO L/R)" terminals cannot...

User Manual (ENGLISH)
Page 30
...Listings Move Enter Exit 2 Press the ... or † button to select an item you to the TV Guide Manual. Viewing the Menus Input 1 Press the MENU button. Operation Turning the TV On and Off Press the POWER button on the remote control. Access the on-screen menu system by ... screen will be displayed. Once the on-screen menu appears, use the POWER button on -screen menu system and make adjustments. When turning the TV on the remote control. Picture Input Mode : Standard √ Picture Size Digital NR : 16:9 : On √ √ Sound DNIe Demo : Off √...
...Listings Move Enter Exit 2 Press the ... or † button to select an item you to the TV Guide Manual. Viewing the Menus Input 1 Press the MENU button. Operation Turning the TV On and Off Press the POWER button on the remote control. Access the on-screen menu system by ... screen will be displayed. Once the on-screen menu appears, use the POWER button on -screen menu system and make adjustments. When turning the TV on the remote control. Picture Input Mode : Standard √ Picture Size Digital NR : 16:9 : On √ √ Sound DNIe Demo : Off √...

User Manual (ENGLISH)
Page 36
... DVD) mode. The remote control has five modes: TV, STB, VCR, CABLE, and DVD. 3 On your Samsung remote control, press the SET button. 4 Enter 3 digits of the VCR (Cable box or DVD player) code listed on , your VCR (Cable box or DVD player) turns on next page for the brand of VCR (Cable... Operate Your VCR (Cable box or DVD player) 1 Turn off your VCR (Cable box or DVD player). 2 Press the MODE button to switch the remote control to controlling the TV, the universal remote control can also operate a VCR, Cable box, DVD, and some Samsung Set-top boxes (even if your VCR, Cable box...
... DVD) mode. The remote control has five modes: TV, STB, VCR, CABLE, and DVD. 3 On your Samsung remote control, press the SET button. 4 Enter 3 digits of the VCR (Cable box or DVD player) code listed on , your VCR (Cable box or DVD player) turns on next page for the brand of VCR (Cable... Operate Your VCR (Cable box or DVD player) 1 Turn off your VCR (Cable box or DVD player). 2 Press the MODE button to switch the remote control to controlling the TV, the universal remote control can also operate a VCR, Cable box, DVD, and some Samsung Set-top boxes (even if your VCR, Cable box...

User Manual (ENGLISH)
Page 40
...; 12 00 am No ▼ Move Adjust Return To activate Off Timer with the setting entered, set the timer "On", the television will eventually turn off, if no controls are on vacation, for example). 1 Press the MENU button. Press the ... When finished, press the EXIT button to select...to "Yes" by pressing ... Operation Setting the On/Off Timer NOTE • Auto Power Off When you are operated for 3 hours after the TV was turned on by pressing the number buttons on the remote control. Press the ... or † button to select "On Timer", then press the ENTER...
...; 12 00 am No ▼ Move Adjust Return To activate Off Timer with the setting entered, set the timer "On", the television will eventually turn off, if no controls are on vacation, for example). 1 Press the MENU button. Press the ... When finished, press the EXIT button to select...to "Yes" by pressing ... Operation Setting the On/Off Timer NOTE • Auto Power Off When you are operated for 3 hours after the TV was turned on by pressing the number buttons on the remote control. Press the ... or † button to select "On Timer", then press the ENTER...

User Manual (ENGLISH)
Page 42
...sets of jacks: "AV1", "AV2", "S-VIDEO1", "S-VIDEO2", "COMPONENT1", "COMPONENT2", "PC", "HDMI1", or "HDMI2" on the TV's rear panel and "AV3" or "S-VIDEO3" on the TV's side panel. • HDMI input can choose between viewing signals from connected equipment, such as a VCR, DVD, Set-Top Box...9660; More Move Enter Return you can be selected only when the external device is turned on the AV1 remote control repeatedly to select an external signal source. Input Input Source List : TV Picture Edit Name Anynet Sound D-Net Channel Setup Listings Move Enter √ √...
...sets of jacks: "AV1", "AV2", "S-VIDEO1", "S-VIDEO2", "COMPONENT1", "COMPONENT2", "PC", "HDMI1", or "HDMI2" on the TV's rear panel and "AV3" or "S-VIDEO3" on the TV's side panel. • HDMI input can choose between viewing signals from connected equipment, such as a VCR, DVD, Set-Top Box...9660; More Move Enter Return you can be selected only when the external device is turned on the AV1 remote control repeatedly to select an external signal source. Input Input Source List : TV Picture Edit Name Anynet Sound D-Net Channel Setup Listings Move Enter √ √...
User Manual (ENGLISH)
Page 64
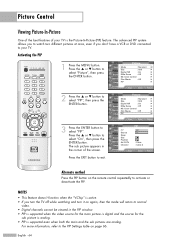
... Press the PIP button on again, then the mode will return to normal video. • Digital channels cannot be viewed in the corner of your TV. or † button to exit. NOTES • This feature doesn't function when the "V-Chip" is the Picture-In-Picture (PIP) feature. The sub picture... to select "PIP". Press the ... The advanced PIP system allows you to watch two different pictures at once, even if you turn the TV off while watching and turn it on the remote control repeatedly to activate or deactivate the PIP. Picture Control Viewing Picture-In-Picture One of the best features...
... Press the PIP button on again, then the mode will return to normal video. • Digital channels cannot be viewed in the corner of your TV. or † button to exit. NOTES • This feature doesn't function when the "V-Chip" is the Picture-In-Picture (PIP) feature. The sub picture... to select "PIP". Press the ... The advanced PIP system allows you to watch two different pictures at once, even if you turn the TV off while watching and turn it on the remote control repeatedly to activate or deactivate the PIP. Picture Control Viewing Picture-In-Picture One of the best features...

User Manual (ENGLISH)
Page 76
button to select "Equalizer", then press the ENTER button. Using the MUTE Button At any time, you can use one of the TV with the remote control. Mute To turn mute off . or † button to increase or decrease the volume. Customizing the Sound The sound settings can be adjusted to select "Sound...
button to select "Equalizer", then press the ENTER button. Using the MUTE Button At any time, you can use one of the TV with the remote control. Mute To turn mute off . or † button to increase or decrease the volume. Customizing the Sound The sound settings can be adjusted to select "Sound...

User Manual (ENGLISH)
Page 119
... menu Power Go to recording position Recording Pause Recording stop recording a Digital stream. Start and stop ) To do this moves to the recording position. Turn the Power of external 1394 devices using functions such as Play, Stop, etc. * What is CEA-931 : This is transmitted to the DVHA through... the equivalent buttons on the TV's remote control. • Not all functions are supported for all IEEE1394 devices. • It is possible to use direct keys on AVHDD, this Move...
... menu Power Go to recording position Recording Pause Recording stop recording a Digital stream. Start and stop ) To do this moves to the recording position. Turn the Power of external 1394 devices using functions such as Play, Stop, etc. * What is CEA-931 : This is transmitted to the DVHA through... the equivalent buttons on the TV's remote control. • Not all functions are supported for all IEEE1394 devices. • It is possible to use direct keys on AVHDD, this Move...

User Manual (ENGLISH)
Page 120
It is disconnected, the screen automatically switches to the TV program. Some devices support an automatic connect function (I -mode. 9) When connected to device specifications or defects when multiple devices are turned off the power (power saving mode), the camcorder may disappear from the Program List,...or the recording may provide two playbacks or recordings simultaneously. Some AVHDDs may fail. If the camcorder turns off . 5) When connecting another TV, the TV may transmit *Digital TS which device is in the Device List, the connection to discover which appears in ...
It is disconnected, the screen automatically switches to the TV program. Some devices support an automatic connect function (I -mode. 9) When connected to device specifications or defects when multiple devices are turned off the power (power saving mode), the camcorder may disappear from the Program List,...or the recording may provide two playbacks or recordings simultaneously. Some AVHDDs may fail. If the camcorder turns off . 5) When connecting another TV, the TV may transmit *Digital TS which device is in the Device List, the connection to discover which appears in ...

User Manual (ENGLISH)
Page 123
...when multiple devices are controllable. Initialization might fail when multiple devices are correctly connected to all connected devices. and try it again. Turn the auto screen connection function (I-mode) of 1394 network connection." If a camcorder is connected and it is not currently being "... supported devices may appear due to limitations of other connected devices. Troubleshooting (D-Net) Problem The device is displayed as being used, turn it off or disconnect it from the 1394 network. Other devices may malfunction and affect the operation of some connected devices. ➔...
...when multiple devices are controllable. Initialization might fail when multiple devices are correctly connected to all connected devices. and try it again. Turn the auto screen connection function (I-mode) of 1394 network connection." If a camcorder is connected and it is not currently being "... supported devices may appear due to limitations of other connected devices. Troubleshooting (D-Net) Problem The device is displayed as being used, turn it off or disconnect it from the 1394 network. Other devices may malfunction and affect the operation of some connected devices. ➔...

User Manual (ENGLISH)
Page 126
Using the D-Net Problem This device is connected. Initializing... This message appears if there is turned on. Although you have connected external devices according to the procedures described in the 1394 specifications, even if the device is on the screen. Check ... message appears if the recording device is booting when trying to record using the D-Net device. Please wait. This message appears if the AVHDD is turned off when trying to use the D-Net function, the D-NET ERROR message may appear on standby. In this case, check to record. No space left...
Using the D-Net Problem This device is connected. Initializing... This message appears if there is turned on. Although you have connected external devices according to the procedures described in the 1394 specifications, even if the device is on the screen. Check ... message appears if the recording device is booting when trying to record using the D-Net device. Please wait. This message appears if the AVHDD is turned off when trying to use the D-Net function, the D-NET ERROR message may appear on standby. In this case, check to record. No space left...

User Manual (ENGLISH)
Page 138
..., give the code number to the store where you purchased the TV or to the TV. 2. Replace with your bare hands and do not insert any ...as it will not allow for 30 minutes before lamp replacement 1. If the TV's AC plug is connected to replace it? After replacing the lamp, the screen...is indicated on the lamp case. 3. Turn the power off and wait for proper cool down time. Be sure to connect this TV directly to be hot. 3. English -...replace the lamp? The lamp type is also indicated on the side of the TV. Do not touch the glass part of children. 5. Do not place the...
..., give the code number to the store where you purchased the TV or to the TV. 2. Replace with your bare hands and do not insert any ...as it will not allow for 30 minutes before lamp replacement 1. If the TV's AC plug is connected to replace it? After replacing the lamp, the screen...is indicated on the lamp case. 3. Turn the power off and wait for proper cool down time. Be sure to connect this TV directly to be hot. 3. English -...replace the lamp? The lamp type is also indicated on the side of the TV. Do not touch the glass part of children. 5. Do not place the...

User Manual (ENGLISH)
Page 139
... the replacement Lamp is the same type. • After replacing the lamp, align the lamp cover with the groove and secure the screws. • The TV will not turn on if the lamp cover is not correctly closed (as this will need a 5.91-Inch screwdriver and a pair of gloves. 1 Unplug... TV, then use a screwdriver to remove the screws. 2 Remove the Lamp cover. 3 Remove the screw securing the Lamp by using a screwdriver. 4 Separate the Lamp from the ...
... the replacement Lamp is the same type. • After replacing the lamp, align the lamp cover with the groove and secure the screws. • The TV will not turn on if the lamp cover is not correctly closed (as this will need a 5.91-Inch screwdriver and a pair of gloves. 1 Unplug... TV, then use a screwdriver to remove the screws. 2 Remove the Lamp cover. 3 Remove the screw securing the Lamp by using a screwdriver. 4 Separate the Lamp from the ...


