

User Manual
Page 3
... camcorder using the internal software of important recorded data. Play back your camcorder fail to operate correctly, refer to Troubleshooting. ¬pages 108~120 This User Manual covers HMX-Q20, HMX-Q200, and HMXQF20 models. • Illustrations of model HMX-Q20 are subject to the software installation and USB connection guide. • Copyrights: Please note that this Samsung Camcorder. Refer to change without permission of the owner of very small objects. Data recorded on the LCD screen. • Designs and specifications of HMX...
... camcorder using the internal software of important recorded data. Play back your camcorder fail to operate correctly, refer to Troubleshooting. ¬pages 108~120 This User Manual covers HMX-Q20, HMX-Q200, and HMXQF20 models. • Illustrations of model HMX-Q20 are subject to the software installation and USB connection guide. • Copyrights: Please note that this Samsung Camcorder. Refer to change without permission of the owner of very small objects. Data recorded on the LCD screen. • Designs and specifications of HMX...

User Manual
Page 9
... battery and memory card 15 Inserting/ejecting the battery 15 Inserting/ejecting a memory card (not supplied 16 Charging the battery 20 Checking the battery state 21 Turning your camcorder on/off 24 Using the touch screen 25 Performing the initial setup 28 Selecting the language 29 Learning icons 30 Using the Home screen 34 Accessing the Home screen 34 Icons on the Home screen 34 Using the grip belt 35 Basic functions 36 Recording videos 37 Recording videos in playback mode...
... battery and memory card 15 Inserting/ejecting the battery 15 Inserting/ejecting a memory card (not supplied 16 Charging the battery 20 Checking the battery state 21 Turning your camcorder on/off 24 Using the touch screen 25 Performing the initial setup 28 Selecting the language 29 Learning icons 30 Using the Home screen 34 Accessing the Home screen 34 Icons on the Home screen 34 Using the grip belt 35 Basic functions 36 Recording videos 37 Recording videos in playback mode...

User Manual
Page 12
... is missing from your box, call Samsung's Customer Care Centre. Unpacking Your new camcorder comes with your local Samsung dealer. Checking your accessories Battery (BP125A) AC power adaptor (AA-MA9) USB cable Model name HMX-Q20BP HMX-Q200BP HMX-Q20TP HMX-Q200TP HMX-Q20RP HMX-Q200RP HMX-QF20BP Colour Internal memory Lens Black Titan No X20 (Optical) X40 (Digital) Wine Red Black WiFi module No Yes User manual CD Quick start guide. Getting Started 12 • The exact...
... is missing from your box, call Samsung's Customer Care Centre. Unpacking Your new camcorder comes with your local Samsung dealer. Checking your accessories Battery (BP125A) AC power adaptor (AA-MA9) USB cable Model name HMX-Q20BP HMX-Q200BP HMX-Q20TP HMX-Q200TP HMX-Q20RP HMX-Q200RP HMX-QF20BP Colour Internal memory Lens Black Titan No X20 (Optical) X40 (Digital) Wine Red Black WiFi module No Yes User manual CD Quick start guide. Getting Started 12 • The exact...
User Manual
Page 19
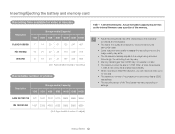
... and resolution, the more memory the camcorder uses. • Lower resolution and quality increases the recording time, but the image quality may vary depending on settings. Inserting/Ejecting the battery and memory card Recording time available for video in Web/HD resolution, you can record a video up to the image being recorded. When a video file exceeds 1.8GB, a new video file is created automatically. • When recording in minutes Resolution Storage media (Capacity) 1GB 2GB...
... and resolution, the more memory the camcorder uses. • Lower resolution and quality increases the recording time, but the image quality may vary depending on settings. Inserting/Ejecting the battery and memory card Recording time available for video in Web/HD resolution, you can record a video up to the image being recorded. When a video file exceeds 1.8GB, a new video file is created automatically. • When recording in minutes Resolution Storage media (Capacity) 1GB 2GB...

User Manual
Page 30
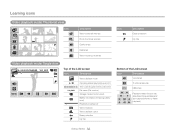
... of the LCD screen Icon / / / / Description Smart Auto mode/Manual mode/ Art Film mode/Art Time Lapse mode/ Vertical HD Recording mode Video/Photo recording mode tab Zoom tab Playback tab Centre of the LCD screen Icon STBY / z/ 00:00:00 Description Operating status (standby/recording/ pause) Time counter (video recording time) [253Min] Remaining recordable time My Clip 01/JAN/2012 00:00 Time Zone (Visit) Date/Time Right of the LCD screen Icon Description Storage media (Memory card) Battery information (remaining charge level) Optical zoom/Digital zoom bar Video resolution Tele...
... of the LCD screen Icon / / / / Description Smart Auto mode/Manual mode/ Art Film mode/Art Time Lapse mode/ Vertical HD Recording mode Video/Photo recording mode tab Zoom tab Playback tab Centre of the LCD screen Icon STBY / z/ 00:00:00 Description Operating status (standby/recording/ pause) Time counter (video recording time) [253Min] Remaining recordable time My Clip 01/JAN/2012 00:00 Time Zone (Visit) Date/Time Right of the LCD screen Icon Description Storage media (Memory card) Battery information (remaining charge level) Optical zoom/Digital zoom bar Video resolution Tele...
User Manual
Page 32
...Video playback mode: Thumbnail view Icon Description Video thumbnail view tab Photo thumbnail view tab Combine tab Delete tab Video recording mode tab Icon Description Erase protection My Clip Video playback mode: Single view 00:00:20/00:01:03 100_0001 Top of the LCD screen Icon Description Video playback mode X / Operating status (playback/pause etc.) 00:00:20/00:01:03 Time code (elapsed time/recorded time) 100_0001 File name (File number) Storage media (memory card) Battery information (remaining battery level) Playback progress bar Video resolution Video playback option Erase...
...Video playback mode: Thumbnail view Icon Description Video thumbnail view tab Photo thumbnail view tab Combine tab Delete tab Video recording mode tab Icon Description Erase protection My Clip Video playback mode: Single view 00:00:20/00:01:03 100_0001 Top of the LCD screen Icon Description Video playback mode X / Operating status (playback/pause etc.) 00:00:20/00:01:03 Time code (elapsed time/recorded time) 100_0001 File name (File number) Storage media (memory card) Battery information (remaining battery level) Playback progress bar Video resolution Video playback option Erase...

User Manual
Page 38
... prevent unnecessary battery power consumption. • For the on-screen information display, see page 30. • For approximate recording time, see pages 45~54. • If the power cable/battery is disconnected or recording is disabled during recording, the system is switched to the data recovery mode. The increasing microphone sensitivity can be recovered. • Do not turn off the camcorder or remove the memory card while accessing the storage media. Recording videos • If...
... prevent unnecessary battery power consumption. • For the on-screen information display, see page 30. • For approximate recording time, see pages 45~54. • If the power cable/battery is disconnected or recording is disabled during recording, the system is switched to the data recovery mode. The increasing microphone sensitivity can be recovered. • Do not turn off the camcorder or remove the memory card while accessing the storage media. Recording videos • If...

User Manual
Page 41
... the image being recorded. ¬page 101 • For on-screen display information, see page 31. • For various functions available during recording, see pages 45~52. • Photo files conform to adjust the size of the subject. ¬page 43 Do not turn off the camcorder or remove the memory card when taking photos as it may damage the storage media or data. • The recordable number of photos varies...
... the image being recorded. ¬page 101 • For on-screen display information, see page 31. • For various functions available during recording, see pages 45~52. • Photo files conform to adjust the size of the subject. ¬page 43 Do not turn off the camcorder or remove the memory card when taking photos as it may damage the storage media or data. • The recordable number of photos varies...

User Manual
Page 42
... brightness of landscapes with the best performance. 1 Press the [Home ( )] button Š touch Smart Auto. Appears when recording at night. (Night) Appears when recording images of faces. To set or adjust functions on your own, select Manual on the Home screen. • The camcorder may not select the correct scene depending on shooting conditions, such as camcorder shake, lighting, and distance to recognise the...
... brightness of landscapes with the best performance. 1 Press the [Home ( )] button Š touch Smart Auto. Appears when recording at night. (Night) Appears when recording images of faces. To set or adjust functions on your own, select Manual on the Home screen. • The camcorder may not select the correct scene depending on shooting conditions, such as camcorder shake, lighting, and distance to recognise the...

User Manual
Page 78
... supports the Wake on LAN (WOL) feature, you are connecting to the same access point again. • If you turn off the camcorder or remove the battery while sending files, the file transfer will be interrupted. • While you can connect only one camcorder to the PC at a time for backing up files to a PC 1 Press the [Home ( )] button p touch Auto Backup. Using Auto Backup to send videos or photos Installing...
... supports the Wake on LAN (WOL) feature, you are connecting to the same access point again. • If you turn off the camcorder or remove the battery while sending files, the file transfer will be interrupted. • While you can connect only one camcorder to the PC at a time for backing up files to a PC 1 Press the [Home ( )] button p touch Auto Backup. Using Auto Backup to send videos or photos Installing...
User Manual
Page 85
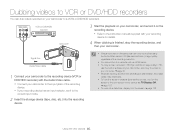
... Audio/Video cable 1 Connect your camcorder to the recording device (VCR or DVD/HDD recorder) with the Audio/Video cable. • Connect your camcorder to the input jacks of the recording device. • If your recording device has an input selector, set it to the correct input mode. 2 Insert the storage device (tape, disc, etc.) into the recording device. • Videos recorded on this camcorder can dub videos recorded on the screen. ¬page 102 Using with your recording device for details. 4 When dubbing is performed via analogue data transfer, the image...
... Audio/Video cable 1 Connect your camcorder to the recording device (VCR or DVD/HDD recorder) with the Audio/Video cable. • Connect your camcorder to the input jacks of the recording device. • If your recording device has an input selector, set it to the correct input mode. 2 Insert the storage device (tape, disc, etc.) into the recording device. • Videos recorded on this camcorder can dub videos recorded on the screen. ¬page 102 Using with your recording device for details. 4 When dubbing is performed via analogue data transfer, the image...

User Manual
Page 87
... to power the camcorder during printing, it might damage data on the storage media. • You cannot print video images. • You cannot print photos recorded on the printer. The date/time imprint option cannot be supported by Canon, Fuji, HP, Olympus, Seiko Epson, and Sony. • Use the AC power adaptor to the printer's user manual for Pictbridge printers 1 In the printer mode, touch the MENU...
... to power the camcorder during printing, it might damage data on the storage media. • You cannot print video images. • You cannot print photos recorded on the printer. The date/time imprint option cannot be supported by Canon, Fuji, HP, Olympus, Seiko Epson, and Sony. • Use the AC power adaptor to the printer's user manual for Pictbridge printers 1 In the printer mode, touch the MENU...

User Manual
Page 93
... a memory card. ¬page 16 4 Connect the camcorder to the PC with other devices 93 • If the Removable Disk window does not appear, confirm the connection (¬page 89) or perform steps 1 to 4 again. Photos Videos Setting folder System folder 6 Copy and paste or drag and drop the files from the storage media to your computer may be created. Please update your anti-virus software to...
... a memory card. ¬page 16 4 Connect the camcorder to the PC with other devices 93 • If the Removable Disk window does not appear, confirm the connection (¬page 89) or perform steps 1 to 4 again. Photos Videos Setting folder System folder 6 Copy and paste or drag and drop the files from the storage media to your computer may be created. Please update your anti-virus software to...

User Manual
Page 102
... menu screen, thumbnail display, and demo screens are output in the same format as well. Use this setting only when connecting to an HDTV. • 576p: The recorded file is in operation. When the internal rechargeable battery is depleted. • The date and time displayed by dimming the LCD screen. • When the Auto LCD Off function is On, you can press any button on the camcorder's display. • Off*: Does not display the current date/time information. • Date: Displays...
... menu screen, thumbnail display, and demo screens are output in the same format as well. Use this setting only when connecting to an HDTV. • 576p: The recorded file is in operation. When the internal rechargeable battery is depleted. • The date and time displayed by dimming the LCD screen. • When the Auto LCD Off function is On, you can press any button on the camcorder's display. • Off*: Does not display the current date/time information. • Date: Displays...

User Manual
Page 103
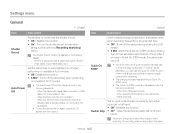
... use when connecting the camcorder to a PC or printer with a USB cable. • Mass Storage*: Connect to a PC to transfer videos or photos. ¬page 93 • PictBridge: Connect to a PictBridge printer to print photos directly (when using the PictBridge function). ¬page 86 * : Default Item Description TV Connect Guide View the instructions before connecting the camcorder to your TV set USB Connect to the user manual of the camcorder with a TV remote control when connecting the camcorder to a Samsung's Anynet+ supported...
... use when connecting the camcorder to a PC or printer with a USB cable. • Mass Storage*: Connect to a PC to transfer videos or photos. ¬page 93 • PictBridge: Connect to a PictBridge printer to print photos directly (when using the PictBridge function). ¬page 86 * : Default Item Description TV Connect Guide View the instructions before connecting the camcorder to your TV set USB Connect to the user manual of the camcorder with a TV remote control when connecting the camcorder to a Samsung's Anynet+ supported...
User Manual
Page 105
... shutter sound to hear when taking a photo with both your right or left hand. • Off : Disables the function. • On* : Uses the camcorder easily with the [Recording start/stop] button. When the camcorder has a cable connection. (Audio/ Video cable, micro HDMI cable, etc.) Set the camcorder to automatically turn the camcorder on the camcorder. - While recording. When operating the buttons on again, close the LCD screen and then open . - When the camcorder has a cable connection. (USB cable, AC power adaptor, etc.) - When the LCD screen...
... shutter sound to hear when taking a photo with both your right or left hand. • Off : Disables the function. • On* : Uses the camcorder easily with the [Recording start/stop] button. When the camcorder has a cable connection. (Audio/ Video cable, micro HDMI cable, etc.) Set the camcorder to automatically turn the camcorder on the camcorder. - While recording. When operating the buttons on again, close the LCD screen and then open . - When the camcorder has a cable connection. (USB cable, AC power adaptor, etc.) - When the LCD screen...

User Manual
Page 106
... operation. * : Default Item Description Default Set Language Demo Reset all files completely of correct problems on the menu. • Formatting completely deletes all the settings returned to the defaults. • Do not turn off the power while using the battery to power the camcorder, the Auto Power Off function turns the camcorder off the power) during formatting. • If the storage media becomes corrupted, format it is touched. - If the LCD screen is idle for the camcorder. • Off: Disables...
... operation. * : Default Item Description Default Set Language Demo Reset all files completely of correct problems on the menu. • Formatting completely deletes all the settings returned to the defaults. • Do not turn off the power while using the battery to power the camcorder, the Auto Power Off function turns the camcorder off the power) during formatting. • If the storage media becomes corrupted, format it is touched. - If the LCD screen is idle for the camcorder. • Off: Disables...
User Manual
Page 111
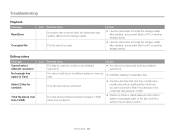
... files that ... - Note that ... Action • Use the camcorder to format the storage media after backing up important files to a PC or another storage device. • Use the camcorder to insufficient space on memory card. You cannot edit due to format the storage media after deleting unnecessary files. • Combine two files first, and then combine the resulting file with an additional file. This file cannot be read. Troubleshooting Playback Message Read Error Corrupted file...
... files that ... - Note that ... Action • Use the camcorder to format the storage media after backing up important files to a PC or another storage device. • Use the camcorder to insufficient space on memory card. You cannot edit due to format the storage media after deleting unnecessary files. • Combine two files first, and then combine the resulting file with an additional file. This file cannot be read. Troubleshooting Playback Message Read Error Corrupted file...

User Manual
Page 115
... use a memory card with low writing speed, the camcorder automatically stops recording videos and a corresponding message appears on the LCD screen. The image on the screen. Adjust the brightness and angle of the storage media deteriorates. Back up important files on the storage media. Recording Symptom Pressing the [Recording start/stop] button does not start recording. If this occurs, format the storage media again. • If you disconnect the AC power adaptor or remove the battery before turning the power...
... use a memory card with low writing speed, the camcorder automatically stops recording videos and a corresponding message appears on the LCD screen. The image on the screen. Adjust the brightness and angle of the storage media deteriorates. Back up important files on the storage media. Recording Symptom Pressing the [Recording start/stop] button does not start recording. If this occurs, format the storage media again. • If you disconnect the AC power adaptor or remove the battery before turning the power...
User Manual
Page 125
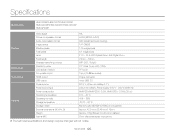
Specifications Model name HMX-Q20BP/HMX-Q20TP/HMX-Q20RP HMX-Q200BP/HMX-Q200TP/HMX-Q200RP HMX-QF20BP System LCD screen Connectors General Video signal Picture compression format Audio compression format Image device Effective pixels Total pixels Lens Focal length Wireless networking protocol Size/dot number LCD screen method Composite output HDMI output USB output Power source Power source type Power consumption Operating temperature Operating humidity Storage temperature Storage media External dimensions (W x H x D) Weight Internal MIC PAL H.264 (MPEG-4.AVC) AAC (Advanced Audio Coding) ...
Specifications Model name HMX-Q20BP/HMX-Q20TP/HMX-Q20RP HMX-Q200BP/HMX-Q200TP/HMX-Q200RP HMX-QF20BP System LCD screen Connectors General Video signal Picture compression format Audio compression format Image device Effective pixels Total pixels Lens Focal length Wireless networking protocol Size/dot number LCD screen method Composite output HDMI output USB output Power source Power source type Power consumption Operating temperature Operating humidity Storage temperature Storage media External dimensions (W x H x D) Weight Internal MIC PAL H.264 (MPEG-4.AVC) AAC (Advanced Audio Coding) ...


