

User Manual (ENGLISH)
Page 4
Analog 70 Using the Auto Volume 71 Setting the On/Off Melody 72 Selecting the Internal Mute 73 Sound Reset 74 Operation Turning the TV On and Off 32 Viewing the Menus and Displays 36 Memorizing the Channels 37 Setting Up Your Remote Control 41 Viewing an ... Strength 85 LNA (Low Noise Amplifier 86 4 Digital 69 Choosing a Multi-Channel Sound (MTS) track - Table of Contents General Information Your New Plasma Display Panel 8 Remote Control Buttons 11 Wall Installation Instructions 13 How to assemble the Stand-Base 17 Connections Connecting VHF and UHF Antennas 20 Connecting...
Analog 70 Using the Auto Volume 71 Setting the On/Off Melody 72 Selecting the Internal Mute 73 Sound Reset 74 Operation Turning the TV On and Off 32 Viewing the Menus and Displays 36 Memorizing the Channels 37 Setting Up Your Remote Control 41 Viewing an ... Strength 85 LNA (Low Noise Amplifier 86 4 Digital 69 Choosing a Multi-Channel Sound (MTS) track - Table of Contents General Information Your New Plasma Display Panel 8 Remote Control Buttons 11 Wall Installation Instructions 13 How to assemble the Stand-Base 17 Connections Connecting VHF and UHF Antennas 20 Connecting...

User Manual (ENGLISH)
Page 5
... Operation Connecting a PC 88 Changing the Position of the TV's software and the regional conditions. 5 Analog 109 Viewing ...Chip (for Canada 124 Appendix Troubleshooting 134 Care and Maintenance 135 Specifications 136 Dimensions (HP-S4253 137 Dimensions (HP-S5053 139 Note • The information contained in these Owner's Instructions is subject ...to change without prior notice for improvement, and may vary depending on the version of the Image 92 Picture Quality Adjustment 93 Image Reset...
... Operation Connecting a PC 88 Changing the Position of the TV's software and the regional conditions. 5 Analog 109 Viewing ...Chip (for Canada 124 Appendix Troubleshooting 134 Care and Maintenance 135 Specifications 136 Dimensions (HP-S4253 137 Dimensions (HP-S5053 139 Note • The information contained in these Owner's Instructions is subject ...to change without prior notice for improvement, and may vary depending on the version of the Image 92 Picture Quality Adjustment 93 Image Reset...

User Manual (ENGLISH)
Page 12
...). ≠ SRS button Activates TruSurround. (Refer to match the "+" and "-" ends of this Samsung remote control, so that it will work compatibly with the diagram inside the compartment. •Do not...cover as shown in the PIP window only.) µ CAPTION button Controls the caption decoder. ¥ RESET button If your remote control is a special remote control for about 2~3 seconds. button Press to display... and Volume buttons. Make sure to page 68) - ˛ P.MODE button Adjust the TV picture by selecting one of the preset factory settings (or select your remote control within a ...
...). ≠ SRS button Activates TruSurround. (Refer to match the "+" and "-" ends of this Samsung remote control, so that it will work compatibly with the diagram inside the compartment. •Do not...cover as shown in the PIP window only.) µ CAPTION button Controls the caption decoder. ¥ RESET button If your remote control is a special remote control for about 2~3 seconds. button Press to display... and Volume buttons. Make sure to page 68) - ˛ P.MODE button Adjust the TV picture by selecting one of the preset factory settings (or select your remote control within a ...

User Manual (ENGLISH)
Page 35
Note • Plug and Play can only be set. To reset this feature... 1 Press the MENU button. Start 3 For further details on setting up options, refer to select "Plug & Play". TV Plug & Play Language Time Game Mode V-Chip Caption † More Setup √ : English √ √ : Off √ √ √ Move Enter Return i Menu language, Channels and Time will be accessed in the TV mode. 35 Press the ▲ or ▼ button to select "Setup", then press the ENTER button. 2 Press the ENTER button to the previous page.
Note • Plug and Play can only be set. To reset this feature... 1 Press the MENU button. Start 3 For further details on setting up options, refer to select "Plug & Play". TV Plug & Play Language Time Game Mode V-Chip Caption † More Setup √ : English √ √ : Off √ √ √ Move Enter Return i Menu language, Channels and Time will be accessed in the TV mode. 35 Press the ▲ or ▼ button to select "Setup", then press the ENTER button. 2 Press the ENTER button to the previous page.

User Manual (ENGLISH)
Page 52
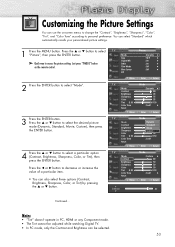
...; Quick way to select the desired picture mode (Dynamic, Standard, Movie, Custom), then press the ENTER button. TV Mode Mode Contrast Brightness Sharpness Color Tint G 50 Color Tone Reset : DDyynnaammiicc Standa1rd00 Movie 45 Custom75 55 R 50 : Cool1 Move Enter Return 4 Press the EXIT button to exit... when viewing the movie. • Choose Custom if you want to adjust the settings according to select "Mode". TV Mode Mode Contrast Brightness Sharpness Color Tint G 50 Color Tone Reset : Dynamic √ 100 45 75 55 R 50 : Cool1 √ Move Enter Return 3 Press the ENTER...
...; Quick way to select the desired picture mode (Dynamic, Standard, Movie, Custom), then press the ENTER button. TV Mode Mode Contrast Brightness Sharpness Color Tint G 50 Color Tone Reset : DDyynnaammiicc Standa1rd00 Movie 45 Custom75 55 R 50 : Cool1 Move Enter Return 4 Press the EXIT button to exit... when viewing the movie. • Choose Custom if you want to adjust the settings according to select "Mode". TV Mode Mode Contrast Brightness Sharpness Color Tint G 50 Color Tone Reset : Dynamic √ 100 45 75 55 R 50 : Cool1 √ Move Enter Return 3 Press the ENTER...
User Manual (ENGLISH)
Page 53
...; : On √ : Off √ : Off √ Move Enter Return TV Mode Mode Contrast Brightness Sharpness Color Tint G 50 Color Tone Reset : Dynamic √ 100 45 75 55 R 50 : Cool1 √ Move Enter Return TV Mode Mode Contrast Brightness Sharpness Color Tint G 50 Color Tone Reset : DDyynnaammiicc Standa1rd00 Movie 45 Custom75 55 R 50 : Cool1 Move...
...; : On √ : Off √ : Off √ Move Enter Return TV Mode Mode Contrast Brightness Sharpness Color Tint G 50 Color Tone Reset : Dynamic √ 100 45 75 55 R 50 : Cool1 √ Move Enter Return TV Mode Mode Contrast Brightness Sharpness Color Tint G 50 Color Tone Reset : DDyynnaammiicc Standa1rd00 Movie 45 Custom75 55 R 50 : Cool1 Move...
User Manual (ENGLISH)
Page 54
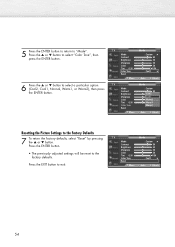
Press the ENTER button. • The previously adjusted settings will be reset to "Mode". TV Mode Mode Contrast Brightness Sharpness Color Tint G 50 Color Tone Reset : Custom √ 80 50 50 50 R 50 : Cool1 √ Move Enter Return 54 5 Press the ENTER button to return to ...or Warm2), then press the ENTER button. TV Mode Mode Contrast Brightness Sharpness Color Tint G 50 Color Tone Reset : Custom √ 80 50 50 50 R 50 : Cool1 √ Move Enter Return TV Mode Mode Contrast Brightness Sharpness Color Tint G 50 Color Tone Reset : Custom 80 Cool2 50 Cool1 50 Normal50 ...
Press the ENTER button. • The previously adjusted settings will be reset to "Mode". TV Mode Mode Contrast Brightness Sharpness Color Tint G 50 Color Tone Reset : Custom √ 80 50 50 50 R 50 : Cool1 √ Move Enter Return 54 5 Press the ENTER button to return to ...or Warm2), then press the ENTER button. TV Mode Mode Contrast Brightness Sharpness Color Tint G 50 Color Tone Reset : Custom √ 80 50 50 50 R 50 : Cool1 √ Move Enter Return TV Mode Mode Contrast Brightness Sharpness Color Tint G 50 Color Tone Reset : Custom 80 Cool2 50 Cool1 50 Normal50 ...

User Manual (ENGLISH)
Page 64
Move Enter Return 4 Press the EXIT button to select "Main" or "Sub", then press the ENTER button. More Melody Sound Select Reset : On : MMaainin Sub 3 Press the ▲ or ▼ button to exit. 64 Selecting the Sound Source You can use this feature to ...", then press the ENTER button. 2 Press the ▲ or ▼ button to hear sound from the main or sub (PIP) picture. 1 Press the MENU button. TV Sound Mode : Custom √ Equalizer √ SRS TruSurround XT : Off √ Multi-Track Options √ Auto Volume : Off √ Internal Mute : Off √...
Move Enter Return 4 Press the EXIT button to select "Main" or "Sub", then press the ENTER button. More Melody Sound Select Reset : On : MMaainin Sub 3 Press the ▲ or ▼ button to exit. 64 Selecting the Sound Source You can use this feature to ...", then press the ENTER button. 2 Press the ▲ or ▼ button to hear sound from the main or sub (PIP) picture. 1 Press the MENU button. TV Sound Mode : Custom √ Equalizer √ SRS TruSurround XT : Off √ Multi-Track Options √ Auto Volume : Off √ Internal Mute : Off √...

User Manual (ENGLISH)
Page 65
Digital 69 Choosing a Multi-Channel Sound (MTS) track - Analog 70 Using the Auto Volume 71 Setting the On/Off Melody 72 Selecting the Internal Mute 73 Sound Reset 74 PLASMA DISPLAY PANEL Sound Control Customizing the Sound 66 Using Automatic Sound Settings 67 Setting the TruSurround XT 68 Choosing a Multi-Channel Sound (MTS) track -
Digital 69 Choosing a Multi-Channel Sound (MTS) track - Analog 70 Using the Auto Volume 71 Setting the On/Off Melody 72 Selecting the Internal Mute 73 Sound Reset 74 PLASMA DISPLAY PANEL Sound Control Customizing the Sound 66 Using Automatic Sound Settings 67 Setting the TruSurround XT 68 Choosing a Multi-Channel Sound (MTS) track -

User Manual (ENGLISH)
Page 72
...Select Reset : OOnff : MOanin 3 Press the EXIT button to select "On" or "Off", then press the ENTER button. TV Sound Mode : Custom √ Equalizer √ SRS TruSurround XT : Off √ Multi-Track Options √ Auto Volume : Off √ Internal Mute : Off √ † More Move Enter Return TV Sound...or ▼ button to select "Sound", then press the ENTER button. 2 Press the ▲ or ▼ button to come on when the TV is powered On or Off. 1 Press the MENU button. Setting the On/Off Melody A melody sound can be set to select "Melody", then ...
...Select Reset : OOnff : MOanin 3 Press the EXIT button to select "On" or "Off", then press the ENTER button. TV Sound Mode : Custom √ Equalizer √ SRS TruSurround XT : Off √ Multi-Track Options √ Auto Volume : Off √ Internal Mute : Off √ † More Move Enter Return TV Sound...or ▼ button to select "Sound", then press the ENTER button. 2 Press the ▲ or ▼ button to come on when the TV is powered On or Off. 1 Press the MENU button. Setting the On/Off Melody A melody sound can be set to select "Melody", then ...

User Manual (ENGLISH)
Page 74
... the EXIT button to select "Sound", then press the ENTER button. Sound Reset If Game Mode is On (Refer to page 108), the Reset Sound function is On > 2 Press the ▲ or ▼ button to select "Reset", then press the ENTER button. TV Sound Mode : Custom √ Equalizer √ SRS TruSurround XT : Off √... < If Game Mode is activated. Move Enter Return 74 Press the ▲ or ▼ button to exit. More Sound Melody : On √ • The equalizer resets the equalizer setting to the factory defaults. 1 Press the MENU button. Selecting the...
... the EXIT button to select "Sound", then press the ENTER button. Sound Reset If Game Mode is On (Refer to page 108), the Reset Sound function is On > 2 Press the ▲ or ▼ button to select "Reset", then press the ENTER button. TV Sound Mode : Custom √ Equalizer √ SRS TruSurround XT : Off √... < If Game Mode is activated. Move Enter Return 74 Press the ▲ or ▼ button to exit. More Sound Melody : On √ • The equalizer resets the equalizer setting to the factory defaults. 1 Press the MENU button. Selecting the...

User Manual (ENGLISH)
Page 84
Air 4 Fine Tune 0 Adjust Reset Save Return 3 Press the œ or √ button to manually adjust a particular channel for optimal reception. 1 Press the MENU button. To store the fine tuning setting in the TV's memory, press the ENTER button. Fine Tuning Analog Channels Use fine tuning to adjust the fine tuning. Notes •...
Air 4 Fine Tune 0 Adjust Reset Save Return 3 Press the œ or √ button to manually adjust a particular channel for optimal reception. 1 Press the MENU button. To store the fine tuning setting in the TV's memory, press the ENTER button. Fine Tuning Analog Channels Use fine tuning to adjust the fine tuning. Notes •...

User Manual (ENGLISH)
Page 87
PLASMA DISPLAY PANEL Connecting a PC and Operation Connecting a PC 88 Changing the Position of the Image 92 Picture Quality Adjustment 93 Image Reset 95
PLASMA DISPLAY PANEL Connecting a PC and Operation Connecting a PC 88 Changing the Position of the Image 92 Picture Quality Adjustment 93 Image Reset 95
User Manual (ENGLISH)
Page 92
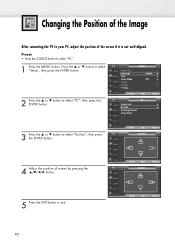
...select "Position", then press the ENTER button. TV PC Image Lock √ Position √ Auto Adjustment Image Reset 3 Press the ▲ or ▼ button to select "Setup", then press the ENTER button. Adjust Enter Return 92 TV Move Enter Position Return 4 Adjust the position... of screen by pressing the button. TV Plug & Play Language Time Game ...
...select "Position", then press the ENTER button. TV PC Image Lock √ Position √ Auto Adjustment Image Reset 3 Press the ▲ or ▼ button to select "Setup", then press the ENTER button. Adjust Enter Return 92 TV Move Enter Position Return 4 Adjust the position... of screen by pressing the button. TV Plug & Play Language Time Game ...

User Manual (ENGLISH)
Page 93
... the ▲ or ▼ button to select "Auto Adjustment", then press the ENTER button. Please wait." TV PC Image Lock √ Position √ Auto Adjustment Image Reset 3 Press the ▲ or ▼ button to select "Setup", then press the ENTER button. The message... Quality Adjustment Picture Automatic Adjustment Preset: • Press the SOURCE button to exit. appears on the screen and the picture adjustments are automatically activated. TV Plug & Play Language Time Game Mode V-Chip Caption † More Setup √ : English √ √ : Off √ √...
... the ▲ or ▼ button to select "Auto Adjustment", then press the ENTER button. Please wait." TV PC Image Lock √ Position √ Auto Adjustment Image Reset 3 Press the ▲ or ▼ button to select "Setup", then press the ENTER button. The message... Quality Adjustment Picture Automatic Adjustment Preset: • Press the SOURCE button to exit. appears on the screen and the picture adjustments are automatically activated. TV Plug & Play Language Time Game Mode V-Chip Caption † More Setup √ : English √ √ : Off √ √...

User Manual (ENGLISH)
Page 94
...▲ or ▼ button to exit. Coarse Fine Move Enter Return 50 0 5 Press the EXIT button to select "Setup", then press the ENTER button. TV Plug & Play Language Time Game Mode V-Chip Caption † More Setup √ : English √ √ : Off √ √ √ ... may change the width of screen. Preset: • Press the SOURCE button to remove the picture noise. TV PC Image Lock √ Position √ Auto Adjustment Image Reset 3 Press the ENTER button to select "Coarse" or "Fine", then press the ENTER button. Move Enter Return...
...▲ or ▼ button to exit. Coarse Fine Move Enter Return 50 0 5 Press the EXIT button to select "Setup", then press the ENTER button. TV Plug & Play Language Time Game Mode V-Chip Caption † More Setup √ : English √ √ : Off √ √ √ ... may change the width of screen. Preset: • Press the SOURCE button to remove the picture noise. TV PC Image Lock √ Position √ Auto Adjustment Image Reset 3 Press the ENTER button to select "Coarse" or "Fine", then press the ENTER button. Move Enter Return...
User Manual (ENGLISH)
Page 95
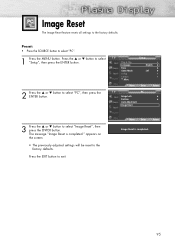
...8730; Move Enter Return 2 Press the ▲ or ▼ button to select "PC". 1 Press the MENU button. TV PC Image Lock √ Position √ Auto Adjustment Image Reset 3 Press the ▲ or ▼ button to the factory defaults. appears on the screen. • The previously ...adjusted settings will be reset to select "Image Reset", then press the ENTER button. Press the ▲ or ▼ button to the factory defaults. Image Reset The Image Reset feature resets all settings to select "Setup", then press the ENTER ...
...8730; Move Enter Return 2 Press the ▲ or ▼ button to select "PC". 1 Press the MENU button. TV PC Image Lock √ Position √ Auto Adjustment Image Reset 3 Press the ▲ or ▼ button to the factory defaults. appears on the screen. • The previously ...adjusted settings will be reset to select "Image Reset", then press the ENTER button. Press the ▲ or ▼ button to the factory defaults. Image Reset The Image Reset feature resets all settings to select "Setup", then press the ENTER ...

User Manual (ENGLISH)
Page 108
... Mode is automatically changed to Custom and users cannot change the mode. • Sound Mode in the Sound menu is activated. Selecting the Reset function after setting the equalizer resets the equalizer setting to Off and connect external devices. 108 Adjust the sound using the equalizer. • The... the screen which means that Game Mode is On. Using Game Mode When connecting to a game console such as PlayStationTM or XboxTM, you display the TV menu in Game mode, the screen shakes slightly. • The mark ( ) appears on with the selected source. Notes • Game Mode is ...
... Mode is automatically changed to Custom and users cannot change the mode. • Sound Mode in the Sound menu is activated. Selecting the Reset function after setting the equalizer resets the equalizer setting to Off and connect external devices. 108 Adjust the sound using the equalizer. • The... the screen which means that Game Mode is On. Using Game Mode When connecting to a game console such as PlayStationTM or XboxTM, you display the TV menu in Game mode, the screen shakes slightly. • The mark ( ) appears on with the selected source. Notes • Game Mode is ...
User Manual (ENGLISH)
Page 118
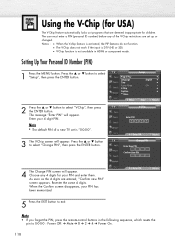
... PIN and enter them. TV V-Chip The message "Enter PIN" will appear. Enter your 4 digit PIN. Re-enter the same 4 digits. Enter PIN **** Note • The default PIN of the V-Chip restrictions are set is not available in the following sequence, which resets the pin to 0-0-0-0 :...) before any 4 digits for your PIN has been memorized. 0~9 Enter PIN Return 5 Press the EXIT button to select "V-Chip", then press the ENTER button. TV Plug & Play Language Time Game Mode V-Chip Caption † More Setup √ : English √ √ : Off √ √ √ Move...
... PIN and enter them. TV V-Chip The message "Enter PIN" will appear. Enter your 4 digit PIN. Re-enter the same 4 digits. Enter PIN **** Note • The default PIN of the V-Chip restrictions are set is not available in the following sequence, which resets the pin to 0-0-0-0 :...) before any 4 digits for your PIN has been memorized. 0~9 Enter PIN Return 5 Press the EXIT button to select "V-Chip", then press the ENTER button. TV Plug & Play Language Time Game Mode V-Chip Caption † More Setup √ : English √ √ : Off √ √ √ Move...

User Manual (ENGLISH)
Page 123
The screen will go blank and the following sequence, which resets the pin to 0-0-0-0 : Power Off. ➔ Mute ➔ 8 ➔ 2 ➔ 4 ➔ Power On. 123 Channel Is Locked by TV-PG[ S ] Use the NUMBER buttons to enter your PIN then press the ENTER, and press the ▲ or &#... button. To resume normal viewing, tune to clear PIN. Press EXIT to a different channel using CH or CH button. How to Reset the TV after the V-Chip Blocks a Channel ("Emergency Escape") If the TV is tuned to a restricted channel, the V-Chip will appear: 1 Enter your PIN. Channel Is Locked by...
The screen will go blank and the following sequence, which resets the pin to 0-0-0-0 : Power Off. ➔ Mute ➔ 8 ➔ 2 ➔ 4 ➔ Power On. 123 Channel Is Locked by TV-PG[ S ] Use the NUMBER buttons to enter your PIN then press the ENTER, and press the ▲ or &#... button. To resume normal viewing, tune to clear PIN. Press EXIT to a different channel using CH or CH button. How to Reset the TV after the V-Chip Blocks a Channel ("Emergency Escape") If the TV is tuned to a restricted channel, the V-Chip will appear: 1 Enter your PIN. Channel Is Locked by...


