
User Manual (user Manual) (ver.1.0) (English)
Page 3
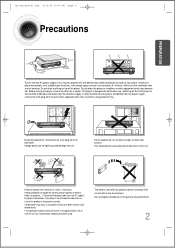
... outlet, especially when left unused for industrial use. vases) , and excess heat(e.g.fireplace) or equipment creating strong magnetic or electric fields (i.e.speakers...). Your player is empty. Use of the player. Do not place the player on a suitable base (furniture), with enough space around ...use . In order to overheating and malfunction of time. Disconnect the power cable from moisture(i.e. This could damage the unit. 1p~42p(DS690)-SEA 9/15/04 5:00 PM Page 5 Precautions PREPARATION Ensure that are not covered. If transporting the player during the winter, wait ...
... outlet, especially when left unused for industrial use. vases) , and excess heat(e.g.fireplace) or equipment creating strong magnetic or electric fields (i.e.speakers...). Your player is empty. Use of the player. Do not place the player on a suitable base (furniture), with enough space around ...use . In order to overheating and malfunction of time. Disconnect the power cable from moisture(i.e. This could damage the unit. 1p~42p(DS690)-SEA 9/15/04 5:00 PM Page 5 Precautions PREPARATION Ensure that are not covered. If transporting the player during the winter, wait ...
User Manual (user Manual) (ver.1.0) (English)
Page 6
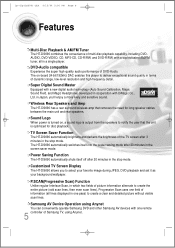
...Speakers and Amp The HT-DS690 has a rear surround wireless amp that the unit is optimized for long speaker cables between the main unit and rear speakers. Sound Logo When power is output from the speakers to select your favorite image during JPEG, DVD playback and set it as your background wallpaper. 1p~42p(DS690...tuner, all lines displayed in a single player. Samsung AV Device Operation using Anynet You can conveniently operate Samsung DVD and other Samsung AV devices with one pass) to deliver exceptional sound quality in terms of Samsung TV, using Anynet. in the stop mode. The...
...Speakers and Amp The HT-DS690 has a rear surround wireless amp that the unit is optimized for long speaker cables between the main unit and rear speakers. Sound Logo When power is output from the speakers to select your favorite image during JPEG, DVD playback and set it as your background wallpaper. 1p~42p(DS690...tuner, all lines displayed in a single player. Samsung AV Device Operation using Anynet You can conveniently operate Samsung DVD and other Samsung AV devices with one pass) to deliver exceptional sound quality in terms of Samsung TV, using Anynet. in the stop mode. The...

User Manual (user Manual) (ver.1.0) (English)
Page 7
1p~42p(DS690)-SEA 9/15/04 5:00 PM Page 9 Contents PREPARATION PREPARATION Safety Warnings...1 Precautions ...2 Safety Instructions ...3 Features...5 Notes on Discs...7 Description ...9 CONNECTIONS Connecting the Speakers...13 Connecting the Video Out to TV ...17 P.SCAN(Progressive Scan) Function ...18 Connecting External Components ...19...(Rating Level)...47 Setting the Password ...49 Setting the Wallpaper...51 DVD Playback Mode...53 AV SYNC Setup...54 Setting the Speaker Mode ...55 Setting the Test Tone...56 Setting the Delay Time...57 Setting the Audio Quality ...59 Setting the DRC (Dynamic...
1p~42p(DS690)-SEA 9/15/04 5:00 PM Page 9 Contents PREPARATION PREPARATION Safety Warnings...1 Precautions ...2 Safety Instructions ...3 Features...5 Notes on Discs...7 Description ...9 CONNECTIONS Connecting the Speakers...13 Connecting the Video Out to TV ...17 P.SCAN(Progressive Scan) Function ...18 Connecting External Components ...19...(Rating Level)...47 Setting the Password ...49 Setting the Wallpaper...51 DVD Playback Mode...53 AV SYNC Setup...54 Setting the Speaker Mode ...55 Setting the Test Tone...56 Setting the Delay Time...57 Setting the Audio Quality ...59 Setting the DRC (Dynamic...
User Manual (user Manual) (ver.1.0) (English)
Page 10
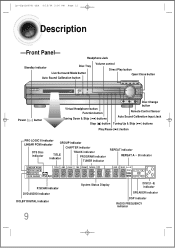
... indicator TRACK indicator PROGRAM indicator TUNER indicator REPEAT indicator REPEAT A↔ B indicator P.SCAN indicator DVD AUDIO indicator DOLBY DIGITAL indicator 9 System Status Display DISC(1~5) indicator SPEAKER indicator DSP indicator RADIO FREQUENCY indicator 1p~42p(DS690)-SEA 9/15/04 5:00 PM Page 12 Description -Front Panel-
... indicator TRACK indicator PROGRAM indicator TUNER indicator REPEAT indicator REPEAT A↔ B indicator P.SCAN indicator DVD AUDIO indicator DOLBY DIGITAL indicator 9 System Status Display DISC(1~5) indicator SPEAKER indicator DSP indicator RADIO FREQUENCY indicator 1p~42p(DS690)-SEA 9/15/04 5:00 PM Page 12 Description -Front Panel-
User Manual (user Manual) (ver.1.0) (English)
Page 11
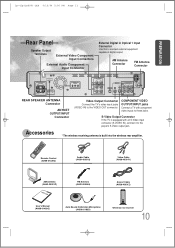
...S-Video Output Connector If the TV is built into the wireless rear amplifier. AM Antenna Connector FM Antenna Connector REAR SPEAKER ANTENNA REAR SPEAKER ANTENNA Connector ANYNET OUTPUT/INPUT Connector Video Output Connector Connect the TV's video input jacks (VIDEO IN) to connect ...external equipment capable of digital output. 1p~42p(DS690)-SEA 9/15/04 5:00 PM Page 13 PREPARATION -Rear Panel- Speaker Output Terminals External Video Component Input Connectors External Audio Component Input Connector External Digital in Optical 1...
...S-Video Output Connector If the TV is built into the wireless rear amplifier. AM Antenna Connector FM Antenna Connector REAR SPEAKER ANTENNA REAR SPEAKER ANTENNA Connector ANYNET OUTPUT/INPUT Connector Video Output Connector Connect the TV's video input jacks (VIDEO IN) to connect ...external equipment capable of digital output. 1p~42p(DS690)-SEA 9/15/04 5:00 PM Page 13 PREPARATION -Rear Panel- Speaker Output Terminals External Video Component Input Connectors External Audio Component Input Connector External Digital in Optical 1...
User Manual (user Manual) (ver.1.0) (English)
Page 14
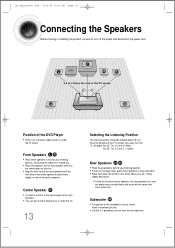
... (2 to 3feet) above your ear. • Align the front face of the front speakers with the front face of the center speaker or place them all the time. 1p~42p(DS690)-SEA 9/15/04 5:00 PM Page 16 Connecting the Speakers Before moving or installing the product, be at the same height as the... front speakers. • You can also install it at the same height as your ear...
... (2 to 3feet) above your ear. • Align the front face of the front speakers with the front face of the center speaker or place them all the time. 1p~42p(DS690)-SEA 9/15/04 5:00 PM Page 16 Connecting the Speakers Before moving or installing the product, be at the same height as the... front speakers. • You can also install it at the same height as your ear...
User Manual (user Manual) (ver.1.0) (English)
Page 15
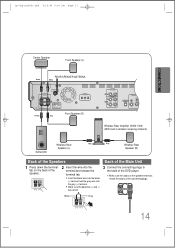
...DS690)-SEA 9/15/04 5:00 PM Page 17 CONNECTIONS Center Speaker Front Speaker (L) REAR SPEAKER ANTENNA Green White Purple Red Front Speaker (R) Wireless Rear Amplifier (SWA-1000) (With built-in wireless receiving antenna) Subwoofer Wireless Rear Speaker (L) Blue Gray Wireless Rear Speaker (R) Back of the Speakers... Back of the Main Unit 1 Press down the terminal tab on the back of the speaker. 2 Insert the wire into the terminal and release...
...DS690)-SEA 9/15/04 5:00 PM Page 17 CONNECTIONS Center Speaker Front Speaker (L) REAR SPEAKER ANTENNA Green White Purple Red Front Speaker (R) Wireless Rear Amplifier (SWA-1000) (With built-in wireless receiving antenna) Subwoofer Wireless Rear Speaker (L) Blue Gray Wireless Rear Speaker (R) Back of the Speakers... Back of the Main Unit 1 Press down the terminal tab on the back of the speaker. 2 Insert the wire into the terminal and release...
User Manual (user Manual) (ver.1.0) (English)
Page 16
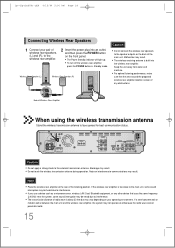
...the wireless transmission antenna Stand the wireless transmission antenna to face upward for best communication status. 1p~42p(DS690)-SEA 9/15/04 5:00 PM Page 18 Connecting Wireless Rear Speakers 1 Connect your operating environment. Keep the unit away from water and moisture. • For optimal listening... interference to the wireless transmission antenna. Breakage may not operate at the rear of the main unit. Back of wireless rear speakers, (L) and (R), to the speaker outputs on the front panel. • The Power Standby indicator will light up. • To turn off the wireless ...
...the wireless transmission antenna Stand the wireless transmission antenna to face upward for best communication status. 1p~42p(DS690)-SEA 9/15/04 5:00 PM Page 18 Connecting Wireless Rear Speakers 1 Connect your operating environment. Keep the unit away from water and moisture. • For optimal listening... interference to the wireless transmission antenna. Breakage may not operate at the rear of the main unit. Back of wireless rear speakers, (L) and (R), to the speaker outputs on the front panel. • The Power Standby indicator will light up. • To turn off the wireless ...
User Manual (user Manual) (ver.1.0) (English)
Page 17
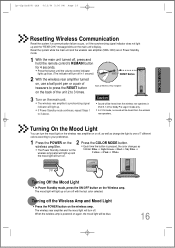
... unit 2 to 3 times. 3 Turn on the main unit. • The wireless rear amplifier's synchronizing signal indicator will be heard from the wireless rear speakers. Turning Off the Mood Light • In Power Standby mode, press the ON/OFF button on again, the mood light will light up. • If... light on the wireless rear amplifier on the Press the COLOR MODE button. Turning On the Mood Light You can turn off . 1p~42p(DS690)-SEA 9/15/04 5:00 PM Page 19 CONNECTIONS Resetting Wireless Communication Reset the system if a communication failure occurs, or if the synchronizing signal ...
... unit 2 to 3 times. 3 Turn on the main unit. • The wireless rear amplifier's synchronizing signal indicator will be heard from the wireless rear speakers. Turning Off the Mood Light • In Power Standby mode, press the ON/OFF button on again, the mood light will light up. • If... light on the wireless rear amplifier on the Press the COLOR MODE button. Turning On the Mood Light You can turn off . 1p~42p(DS690)-SEA 9/15/04 5:00 PM Page 19 CONNECTIONS Resetting Wireless Communication Reset the system if a communication failure occurs, or if the synchronizing signal ...
User Manual (user Manual) (ver.1.0) (English)
Page 56
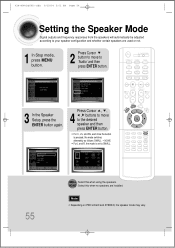
... move to SMALL. 55 SMALL : Select this when no speakers are installed. 43P~80P(DS690)-SEA 9/15/04 5:01 PM Page 54 Setting the Speaker Mode Signal outputs and frequency responses from the speakers will automatically be adjusted according to your speaker configuration and whether certain speakers are used or not. 1 In Stop mode, press MENU...
... move to SMALL. 55 SMALL : Select this when no speakers are installed. 43P~80P(DS690)-SEA 9/15/04 5:01 PM Page 54 Setting the Speaker Mode Signal outputs and frequency responses from the speakers will automatically be adjusted according to your speaker configuration and whether certain speakers are used or not. 1 In Stop mode, press MENU...
User Manual (user Manual) (ver.1.0) (English)
Page 57
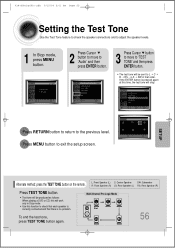
Press MENU button to the previous level. 43P~80P(DS690)-SEA 9/15/04 5:01 PM Page 55 Setting the Test Tone Use the Test Tone feature to check the speaker connections and to adjust the speaker levels. 1 In Stop mode, press MENU button. 2 Press Cursor button to move ... tone, press TEST TONE button again. SETUP Press RETURN button to return to exit the setup screen. L: Front Speaker (L) C: Center Speaker SW: Subwoofer R: Front Speaker (R) LS: Rear Speaker (L) RS: Rear Speaker (R) Press TEST TONE button. • Test tone will stop. Alternate method: press the TEST TONE button on the...
Press MENU button to the previous level. 43P~80P(DS690)-SEA 9/15/04 5:01 PM Page 55 Setting the Test Tone Use the Test Tone feature to check the speaker connections and to adjust the speaker levels. 1 In Stop mode, press MENU button. 2 Press Cursor button to move ... tone, press TEST TONE button again. SETUP Press RETURN button to return to exit the setup screen. L: Front Speaker (L) C: Center Speaker SW: Subwoofer R: Front Speaker (R) LS: Rear Speaker (L) RS: Rear Speaker (R) Press TEST TONE button. • Test tone will stop. Alternate method: press the TEST TONE button on the...
User Manual (user Manual) (ver.1.0) (English)
Page 58
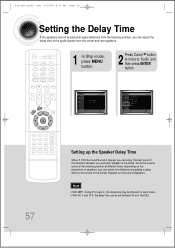
... difference by adding a delay effect to the sound of speakers, you can enjoy the best sound if the distance between 00 and 15mSEC. Note • With (Dolby Pro Logic II), the delay time may be different for each speaker is the same. 43P~80P(DS690)-SEA 9/15/04 5:01 PM Page 56 Setting... the Delay Time If the speakers cannot be set between you and each mode. • With AC-3 and DTS, the delay time...
... difference by adding a delay effect to the sound of speakers, you can enjoy the best sound if the distance between 00 and 15mSEC. Note • With (Dolby Pro Logic II), the delay time may be different for each speaker is the same. 43P~80P(DS690)-SEA 9/15/04 5:01 PM Page 56 Setting... the Delay Time If the speakers cannot be set between you and each mode. • With AC-3 and DTS, the delay time...
User Manual (user Manual) (ver.1.0) (English)
Page 59
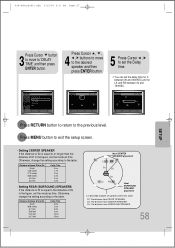
..., change the setting according to place all speakers within this circle. Press RETURN button to return to 'DELAY TIME' and then press ENTER button. 43P~80P(DS690)-SEA 9/15/04 5:01 PM Page 57... SETUP 3 Press Cursor button to move to the desired speaker and then press ENTER button. 5 Press Cursor , to...Dc is desirable to the table. Press MENU button to exit the setup screen. • Setting CENTER SPEAKER If the distance of Df in the figure, set the mode as 0ms. Otherwise, change the setting ...
..., change the setting according to place all speakers within this circle. Press RETURN button to return to 'DELAY TIME' and then press ENTER button. 43P~80P(DS690)-SEA 9/15/04 5:01 PM Page 57... SETUP 3 Press Cursor button to move to the desired speaker and then press ENTER button. 5 Press Cursor , to...Dc is desirable to the table. Press MENU button to exit the setup screen. • Setting CENTER SPEAKER If the distance of Df in the figure, set the mode as 0ms. Otherwise, change the setting ...
User Manual (user Manual) (ver.1.0) (English)
Page 60
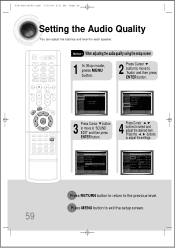
Press the , buttons to adjust the settings. 59 Press RETURN button to return to select and adjust the desired item. 43P~80P(DS690)-SEA 9/15/04 5:01 PM Page 58 Setting the Audio Quality You can adjust the balance and level for each speaker. Method 1 When adjusting the audio quality using the setup screen 1 In Stop mode, press MENU button. 2 Press Cursor button to move to 'Audio' and then press ENTER button. 3 Press Cursor button to move to 'SOUND EDIT' and then press ENTER button. 4 Press Cursor , buttons to the previous level. Press MENU button to exit the setup screen.
Press the , buttons to adjust the settings. 59 Press RETURN button to return to select and adjust the desired item. 43P~80P(DS690)-SEA 9/15/04 5:01 PM Page 58 Setting the Audio Quality You can adjust the balance and level for each speaker. Method 1 When adjusting the audio quality using the setup screen 1 In Stop mode, press MENU button. 2 Press Cursor button to move to 'Audio' and then press ENTER button. 3 Press Cursor button to move to 'SOUND EDIT' and then press ENTER button. 4 Press Cursor , buttons to the previous level. Press MENU button to exit the setup screen.
User Manual (user Manual) (ver.1.0) (English)
Page 61
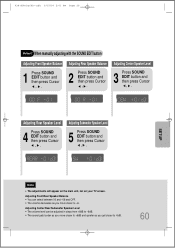
... RDS RT ST TUNED kHz MHz Note • The adjustments will appear on the main unit, not on your TV screen. Adjusting Center/Rear/Subwoofer Speaker Level • The volume level can select between 00 and -06 and OFF. • The volume decreases as you move closer to +6dB and ... TUNED kHz MHz TITLE CHAP PRGM RDS RT ST TUNED kHz MHz Adjusting Rear Speaker Level 4 Press SOUND EDIT button and then press Cursor , . Adjusting Rear Speaker Balance 2 Press SOUND EDIT button and then press Cursor , . 43P~80P(DS690)-SEA 9/15/04 5:01 PM Page 59 SETUP Method 2 When manually adjusting with the...
... RDS RT ST TUNED kHz MHz Note • The adjustments will appear on the main unit, not on your TV screen. Adjusting Center/Rear/Subwoofer Speaker Level • The volume level can select between 00 and -06 and OFF. • The volume decreases as you move closer to +6dB and ... TUNED kHz MHz TITLE CHAP PRGM RDS RT ST TUNED kHz MHz Adjusting Rear Speaker Level 4 Press SOUND EDIT button and then press Cursor , . Adjusting Rear Speaker Balance 2 Press SOUND EDIT button and then press Cursor , . 43P~80P(DS690)-SEA 9/15/04 5:01 PM Page 59 SETUP Method 2 When manually adjusting with the...

User Manual (user Manual) (ver.1.0) (English)
Page 64
... images are for illustrative purposes only and may differ from the actual product. Auto Sound Calibration Microphone L: Front Speaker (L) C: Center Speaker LS: Rear Speaker (L) R: Front Speaker (R) SW: Subwoofer RS: Rear Speaker (R) Note • If you purchased the unit for the first time or initialized it, pressing the Auto ... • Because the volume level of the tone is fixed during the auto sound calibration setup, you turn on . 43P~80P(DS690)-SEA 9/15/04 5:01 PM Page 62 Auto Sound Calibration Setup * This function is pressed, the selection alternates between channels, and ...
... images are for illustrative purposes only and may differ from the actual product. Auto Sound Calibration Microphone L: Front Speaker (L) C: Center Speaker LS: Rear Speaker (L) R: Front Speaker (R) SW: Subwoofer RS: Rear Speaker (R) Note • If you purchased the unit for the first time or initialized it, pressing the Auto ... • Because the volume level of the tone is fixed during the auto sound calibration setup, you turn on . 43P~80P(DS690)-SEA 9/15/04 5:01 PM Page 62 Auto Sound Calibration Setup * This function is pressed, the selection alternates between channels, and ...
User Manual (user Manual) (ver.1.0) (English)
Page 65
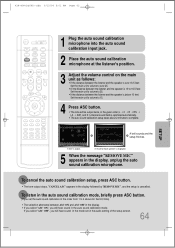
...you set in the audio setting of the setup screen. 64 A result for the first time) • The selection alternates between the listener and the speaker is below 10 feet: Set the main unit's volume to 15. 4 Press ASC button. • The tone will be output twice, in the ...the setup is optimized automatically. • The auto sound calibration setup takes about 2 minutes to complete. A bell sounds and the setup finishes. 43P~80P(DS690)-SEA 9/15/04 5:01 PM Page 63 SETUP 1 Plug the auto sound calibration microphone into the auto sound calibration input jack. 2 Place the auto sound...
...you set in the audio setting of the setup screen. 64 A result for the first time) • The selection alternates between the listener and the speaker is below 10 feet: Set the main unit's volume to 15. 4 Press ASC button. • The tone will be output twice, in the ...the setup is optimized automatically. • The auto sound calibration setup takes about 2 minutes to complete. A bell sounds and the setup finishes. 43P~80P(DS690)-SEA 9/15/04 5:01 PM Page 63 SETUP 1 Plug the auto sound calibration microphone into the auto sound calibration input jack. 2 Place the auto sound...
User Manual (user Manual) (ver.1.0) (English)
Page 68
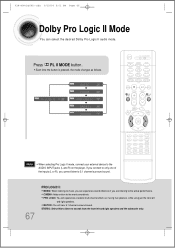
...mode, connect your external device to sounds from the front left and right speakers. • MATRIX: You will experience a realistic multi-channel effect, as if using five speakers, while using just the front left and right speakers and the subwoofer only. STEREO: Select this to listen to the AUDIO INPUT... jacks (L and R) on the player. 43P~80P(DS690)-SEA 9/15/04 5:01 PM Page 66 Dolby Pro Logic...
...mode, connect your external device to sounds from the front left and right speakers. • MATRIX: You will experience a realistic multi-channel effect, as if using five speakers, while using just the front left and right speakers and the subwoofer only. STEREO: Select this to listen to the AUDIO INPUT... jacks (L and R) on the player. 43P~80P(DS690)-SEA 9/15/04 5:01 PM Page 66 Dolby Pro Logic...
User Manual (user Manual) (ver.1.0) (English)
Page 69
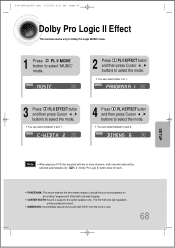
... be selected automatically and (Dolby Pro Logic II) button does not work. • PANORAMA: This mode extends the front stereo image to include the surround speakers for an exciting "wraparound" effect with side wall imaging. • CENTER WIDTH: Sound is output to select the mode. • You can select between... 0 and 6. 43P~80P(DS690)-SEA 9/15/04 5:01 PM Page 67 Dolby Pro Logic II Effect This function works only in Dolby Pro Logic MUSIC mode. 1 Press PL II...
... be selected automatically and (Dolby Pro Logic II) button does not work. • PANORAMA: This mode extends the front stereo image to include the surround speakers for an exciting "wraparound" effect with side wall imaging. • CENTER WIDTH: Sound is output to select the mode. • You can select between... 0 and 6. 43P~80P(DS690)-SEA 9/15/04 5:01 PM Page 67 Dolby Pro Logic II Effect This function works only in Dolby Pro Logic MUSIC mode. 1 Press PL II...

User Manual (user Manual) (ver.1.0) (English)
Page 76
... sound is heard during fast playback, slow playback, and step motion playback. • Are the speakers connected properly? Playback does not start . Sound can use all six. When condensation forms inside the... code of the setup screen, no sound is heard from a cold place to a warm one? 43P~80P(DS690)-SEA 9/15/04 5:01 PM Page 74 Before Calling for 1 or 2 hours with 5.1 channel sound. &#... Turn off the unit, disconnect the power cord, and contact the nearest authorized dealer or Samsung Electronics Service Center. Picture does not appear, sound is output to use the player again ...
... sound is heard during fast playback, slow playback, and step motion playback. • Are the speakers connected properly? Playback does not start . Sound can use all six. When condensation forms inside the... code of the setup screen, no sound is heard from a cold place to a warm one? 43P~80P(DS690)-SEA 9/15/04 5:01 PM Page 74 Before Calling for 1 or 2 hours with 5.1 channel sound. &#... Turn off the unit, disconnect the power cord, and contact the nearest authorized dealer or Samsung Electronics Service Center. Picture does not appear, sound is output to use the player again ...


