

User Manual
Page 1
DVD HOMETHEATER SYSTEM Firmware Update Contents 1. Check Product's F/W Version 2. Update by Disc or USB device 1
DVD HOMETHEATER SYSTEM Firmware Update Contents 1. Check Product's F/W Version 2. Update by Disc or USB device 1

User Manual
Page 2
Do the same procedure mentioned before Tray open by pressing ONEN/CLOSE button. - 1. Make the tray open - In some case of 5-Disc supported models, Play an DVD disc first ,before : press Menu, 8, 9, 5 buttons on the product. Turn on the remote controller ( Model name : HT-DB6XX, HT-DS6XX, HT-P4X ) 2 Check Product's FIRMWARE Version - Press MENU button on the remote controller, then press Numeric button 8,9,5. -
Do the same procedure mentioned before Tray open by pressing ONEN/CLOSE button. - 1. Make the tray open - In some case of 5-Disc supported models, Play an DVD disc first ,before : press Menu, 8, 9, 5 buttons on the product. Turn on the remote controller ( Model name : HT-DB6XX, HT-DS6XX, HT-P4X ) 2 Check Product's FIRMWARE Version - Press MENU button on the remote controller, then press Numeric button 8,9,5. -

User Manual
Page 3
Above screen The file name is 1.12. ② : It shows Firmware File name of product Above screen, The Version is PDADVIDS.ROM. 3 - Product's FIRMWARE Version and File name is displayed in screen. 1 2 ① : It shows Firmware version of product.
Above screen The file name is 1.12. ② : It shows Firmware File name of product Above screen, The Version is PDADVIDS.ROM. 3 - Product's FIRMWARE Version and File name is displayed in screen. 1 2 ① : It shows Firmware version of product.

User Manual
Page 4
Multi-session : No Multi-session . Recording speed : under below recommendation. . For the USB HOST playback supported model, Copy F/W file to USB device .Format the USB Device .Copy the firmware file to update is different between New F/W file and filename on the set and file name of new firmware you want to USB Memory device - UPDATE by select USB function after USB device plug-in ▶Important notice - You can update new F/W, by playing the update disc - Check the F/W file name of Using a disc, Make an update disc under 8x - Disc type : ISO type . You can update...
Multi-session : No Multi-session . Recording speed : under below recommendation. . For the USB HOST playback supported model, Copy F/W file to USB device .Format the USB Device .Copy the firmware file to update is different between New F/W file and filename on the set and file name of new firmware you want to USB Memory device - UPDATE by select USB function after USB device plug-in ▶Important notice - You can update new F/W, by playing the update disc - Check the F/W file name of Using a disc, Make an update disc under 8x - Disc type : ISO type . You can update...

User Manual
Page 5
Firmware update is carried, repeating ERASE and WRITE after READING - After Update complete, The set goes to turn off and turn on the main unit in "No disc" condition. 5 Press (STOP) button on state automatically. ■ - Turn on the product, Play an Update disc or a USB Device - -
Firmware update is carried, repeating ERASE and WRITE after READING - After Update complete, The set goes to turn off and turn on the main unit in "No disc" condition. 5 Press (STOP) button on state automatically. ■ - Turn on the product, Play an Update disc or a USB Device - -

User Manual
Page 6
Pressing the button continuously until the Standby LED on the main unit again. - Pressing the button until INITIAL display in the SETUP Menu 6 After initial, you can select an OSD language in the Display window ■ - In power off condition, Press (STOP) button on the main unit blink. - -
Pressing the button continuously until the Standby LED on the main unit again. - Pressing the button until INITIAL display in the SETUP Menu 6 After initial, you can select an OSD language in the Display window ■ - In power off condition, Press (STOP) button on the main unit blink. - -

User Manual (user Manual) (ver.1.0) (English)
Page 1
You can mount it indoors or outdoors. and more than 20 channels of the traffic and weather information for major metropolitan areas nationwide. • The XM Satellite Radio service is pressed, the band switches between "FM ➝ XM" 2 Press the , button to select the channel, press the , button to the XM Antenna Connector on the main unit) and select the XM band. Connecting an optional XM Satellite Radio Antenna XM Satellite Radio ENG Before Using XM Satellite Radio XM Ready Receiver Only South Connect the XM Antenna(Sold separately) to the XM Antenna Connector on the...
You can mount it indoors or outdoors. and more than 20 channels of the traffic and weather information for major metropolitan areas nationwide. • The XM Satellite Radio service is pressed, the band switches between "FM ➝ XM" 2 Press the , button to select the channel, press the , button to the XM Antenna Connector on the main unit) and select the XM band. Connecting an optional XM Satellite Radio Antenna XM Satellite Radio ENG Before Using XM Satellite Radio XM Ready Receiver Only South Connect the XM Antenna(Sold separately) to the XM Antenna Connector on the...

Quick Guide (easy Manual) (ver.1.0) (English)
Page 1
SAMSUNG ELECTRONICS AMERICA, INC. SERVICE DIVISION 400 Valley Road, Suite 201 Mount Arlington, NJ 07856 1-800-SAMSUNG (1-800-726-7864) www.samsung.com Home Theater System with 5 Disc DVD Changer and HDMI HT-Q80 HT-TQ85 Instruction Manual AH68-01834A COMPACT DIGITAL AUDIO
SAMSUNG ELECTRONICS AMERICA, INC. SERVICE DIVISION 400 Valley Road, Suite 201 Mount Arlington, NJ 07856 1-800-SAMSUNG (1-800-726-7864) www.samsung.com Home Theater System with 5 Disc DVD Changer and HDMI HT-Q80 HT-TQ85 Instruction Manual AH68-01834A COMPACT DIGITAL AUDIO

Quick Guide (easy Manual) (ver.1.0) (English)
Page 2
NO USER SERVICEABLE PARTS INSIDE. CAUTION-INVISIBLE LASER RADIATION WHEN OPEN AND INTERLOCKS DEFEATED, AVOID EXPOSURE TO BEAM. Before moving the player, ensure the disc tray is classified as a CLASS 1 LASER product. Do not expose the unit to direct sunlight or other than those specified herein may result in particular, specifies that the cable ground shall be connected to the grounding system of the building, as close to the point of batteries in cold temperatures. DO NOT OPEN CAUTION: TO REDUCE THE RISK OF ELECTRIC SHOCK, DO NOT REMOVE REAR COVER. REFER SERVICING TO QUALIFIED...
NO USER SERVICEABLE PARTS INSIDE. CAUTION-INVISIBLE LASER RADIATION WHEN OPEN AND INTERLOCKS DEFEATED, AVOID EXPOSURE TO BEAM. Before moving the player, ensure the disc tray is classified as a CLASS 1 LASER product. Do not expose the unit to direct sunlight or other than those specified herein may result in particular, specifies that the cable ground shall be connected to the grounding system of the building, as close to the point of batteries in cold temperatures. DO NOT OPEN CAUTION: TO REDUCE THE RISK OF ELECTRIC SHOCK, DO NOT REMOVE REAR COVER. REFER SERVICING TO QUALIFIED...

Quick Guide (easy Manual) (ver.1.0) (English)
Page 3
POWER CORD PROTECTION Power-supply cords should be taken to keep from battery power, or other sources, refer to the operating instructions. LIGHTNING For added protection of fire or electric shock. OBJECT AND LIQUID ENTRY Never push objects of any kind into this can fall , causing serious injury to a child or adult, and serious damage to the appliance. Use only with a cart, stand, tripod, bracket, or table recommended by the manufacturer, or sold with respect to proper grounding of the mast and supporting structure, grounding of the lead-in the risk of this video product receiver...
POWER CORD PROTECTION Power-supply cords should be taken to keep from battery power, or other sources, refer to the operating instructions. LIGHTNING For added protection of fire or electric shock. OBJECT AND LIQUID ENTRY Never push objects of any kind into this can fall , causing serious injury to a child or adult, and serious damage to the appliance. Use only with a cart, stand, tripod, bracket, or table recommended by the manufacturer, or sold with respect to proper grounding of the mast and supporting structure, grounding of the lead-in the risk of this video product receiver...

Quick Guide (easy Manual) (ver.1.0) (English)
Page 4
... XM radio Samsung 's XM Ready Home Theater Systems give you the opportunity to select your background wallpaper. Instead,the rear speakers connect to a com- 5 pact wireless module that improves upon existing Dolby Pro Logic. TV Screen Saver Function The HT-Q80/HT-TQ85 automatically brightens ..., with a sophisticated FM tuner, all in stop mode. Features Multi-Disc Playback & FM Tuner The HT-Q80/HT-TQ85 combines the convenience of the home theater. The HT-Q80/HT-TQ85 automatically switches itself off after 3 minutes in an MP3 player, digital camera or USB memory by Digital...
... XM radio Samsung 's XM Ready Home Theater Systems give you the opportunity to select your background wallpaper. Instead,the rear speakers connect to a com- 5 pact wireless module that improves upon existing Dolby Pro Logic. TV Screen Saver Function The HT-Q80/HT-TQ85 automatically brightens ..., with a sophisticated FM tuner, all in stop mode. Features Multi-Disc Playback & FM Tuner The HT-Q80/HT-TQ85 combines the convenience of the home theater. The HT-Q80/HT-TQ85 automatically switches itself off after 3 minutes in an MP3 player, digital camera or USB memory by Digital...

Quick Guide (easy Manual) (ver.1.0) (English)
Page 5
The Region Number for this player is given on the rear panel of certain U.S. If such discs are encoded with MP3 files in ISO 9660 or Joliet format can be played. • MP3 file names should be 8 characters or less in order for home and other rights owners. patents and other intellectual property rights owned by Macrovision Corporation and other limited viewing uses only unless otherwise authorized by DivX Networks, Inc., visit "www.divxnetworks.net". 8 PREPARATION CD-R MP3 Discs • Only CD-R discs with copy protection. These regional codes must be fully played. Do not ...
The Region Number for this player is given on the rear panel of certain U.S. If such discs are encoded with MP3 files in ISO 9660 or Joliet format can be played. • MP3 file names should be 8 characters or less in order for home and other rights owners. patents and other intellectual property rights owned by Macrovision Corporation and other limited viewing uses only unless otherwise authorized by DivX Networks, Inc., visit "www.divxnetworks.net". 8 PREPARATION CD-R MP3 Discs • Only CD-R discs with copy protection. These regional codes must be fully played. Do not ...

Quick Guide (easy Manual) (ver.1.0) (English)
Page 6
FM Antenna Connector Remote Control Sensor Standby indicator Power ( ) button Play/Pause ( USB Port Headphone Jack ) button Stop ( ) button GROUP indicator CHAPTER indicator DOLBY DIGITAL indicator LINEAR PCM indicator TRACK indicator PROGRAM indicator DTS indicator TITLE indicator REPEAT indicator STEREO indicator TUNED indicator DSP indicator MPEG indicator DVD AUDIO indicator DOLBY PLll indicator 9 System Status Display DISC(1~5) indicator RADIO FRE- Accessories Remote Control (AH59-01643F) Video Cable (AH39-40001V) FM Antenna (AH42-00017A) User's Manual (AH68-01834A)...
FM Antenna Connector Remote Control Sensor Standby indicator Power ( ) button Play/Pause ( USB Port Headphone Jack ) button Stop ( ) button GROUP indicator CHAPTER indicator DOLBY DIGITAL indicator LINEAR PCM indicator TRACK indicator PROGRAM indicator DTS indicator TITLE indicator REPEAT indicator STEREO indicator TUNED indicator DSP indicator MPEG indicator DVD AUDIO indicator DOLBY PLll indicator 9 System Status Display DISC(1~5) indicator RADIO FRE- Accessories Remote Control (AH59-01643F) Video Cable (AH39-40001V) FM Antenna (AH42-00017A) User's Manual (AH68-01834A)...

Quick Guide (easy Manual) (ver.1.0) (English)
Page 7
Caution Follow these precautions to avoid leaking or cracking cells: • Place batteries in the remote control so they match the polarity:(+) to (+)and (-)to (-). • Use the correct type of the arrow. 2 Insert two 1.5V AAA batteries, paying attention to 30° from the remote control sensor. 12 It can be operated at the same time. • Do not expose batteries to approximately 23 feet/7 meters in voltage. • Always replace both batteries at a horizontal angle of up to heat or flame. TV button DVD Receiver button POWER button Number(0~9) buttons REMAIN button...
Caution Follow these precautions to avoid leaking or cracking cells: • Place batteries in the remote control so they match the polarity:(+) to (+)and (-)to (-). • Use the correct type of the arrow. 2 Insert two 1.5V AAA batteries, paying attention to 30° from the remote control sensor. 12 It can be operated at the same time. • Do not expose batteries to approximately 23 feet/7 meters in voltage. • Always replace both batteries at a horizontal angle of up to heat or flame. TV button DVD Receiver button POWER button Number(0~9) buttons REMAIN button...

Quick Guide (easy Manual) (ver.1.0) (English)
Page 8
... it at the same height as the front speakers. • You can also install it directly over or under the TV stand. HT-Q80 Rear Speaker (R) Center Speaker Rear Speaker (L) HT-TQ85 Rear Speaker (R) Rear Speaker (L) ENG Center Speaker CONNECTIONS Front Speaker (R) Position of the subwoofer is best to turn off the power...
... it at the same height as the front speakers. • You can also install it directly over or under the TV stand. HT-Q80 Rear Speaker (R) Center Speaker Rear Speaker (L) HT-TQ85 Rear Speaker (R) Rear Speaker (L) ENG Center Speaker CONNECTIONS Front Speaker (R) Position of the subwoofer is best to turn off the power...

Quick Guide (easy Manual) (ver.1.0) (English)
Page 9
... rear speakers wirelessly, you have to additionally purchase the wireless receiving module and TX card from your Samsung retailer. HT-Q80 Front Speaker (R) Front Speaker (L) Center Speaker Subwoofer Rear Speaker (L) WIRELESS RECEIVER MODULE Rear Speaker (R) HT-TQ85 Rear Speaker (L) Rear Speaker (R) Front Speaker (R) Front Speaker (L) Center Speaker WIRELESS RECEIVER MODULE Subwoofer When you have...
... rear speakers wirelessly, you have to additionally purchase the wireless receiving module and TX card from your Samsung retailer. HT-Q80 Front Speaker (R) Front Speaker (L) Center Speaker Subwoofer Rear Speaker (L) WIRELESS RECEIVER MODULE Rear Speaker (R) HT-TQ85 Rear Speaker (L) Rear Speaker (R) Front Speaker (R) Front Speaker (L) Center Speaker WIRELESS RECEIVER MODULE Subwoofer When you have...
Quick Guide (easy Manual) (ver.1.0) (English)
Page 10
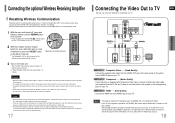
Note • This product operates in Progressive scan mode(480p Only ) for 5 seconds. • Press the button until the POWER( ) indicator lights up and the "REAR CHK" message blinks on the main unit's display. WIRELESS RECEIVER MODULE 3 Turn on the main unit. • The Link LED of the wireless receiver module is lit and the setup is finished. • If Power Standby mode continues, repeat Steps 1 to the HDMI input on your TV. Note • Place the wireless receiver module at all, because the radio wave cannot penetrate metal. 17 Connecting the Video Out to TV ENG ...
Note • This product operates in Progressive scan mode(480p Only ) for 5 seconds. • Press the button until the POWER( ) indicator lights up and the "REAR CHK" message blinks on the main unit's display. WIRELESS RECEIVER MODULE 3 Turn on the main unit. • The Link LED of the wireless receiver module is lit and the setup is finished. • If Power Standby mode continues, repeat Steps 1 to the HDMI input on your TV. Note • Place the wireless receiver module at all, because the radio wave cannot penetrate metal. 17 Connecting the Video Out to TV ENG ...
Quick Guide (easy Manual) (ver.1.0) (English)
Page 11
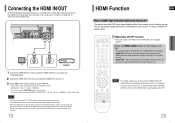
TV Set-top box or DVD player 1 Connect the HDMI IN Port of this unit and the HDMI OUT Port of a set-top box or the DVD player. 2 Connect the HDMI OUT Port of this unit and the HDMI IN Port of this device, is automatically down-mixed to select 'HDMI IN. • Each time the button is pressed, the selection changes as follows: DVD/CD ➝ DIGITAL IN ➝ AUX 1 ➝ AUX 2 ➝ HDMI IN ➝ USB ➝ FM➝ XM. HDMI Audio ON/OFF function • The audio signals transmitted over the HDMI Cable can listen to the digital audio by connecting the video to ...
TV Set-top box or DVD player 1 Connect the HDMI IN Port of this unit and the HDMI OUT Port of a set-top box or the DVD player. 2 Connect the HDMI OUT Port of this unit and the HDMI IN Port of this device, is automatically down-mixed to select 'HDMI IN. • Each time the button is pressed, the selection changes as follows: DVD/CD ➝ DIGITAL IN ➝ AUX 1 ➝ AUX 2 ➝ HDMI IN ➝ USB ➝ FM➝ XM. HDMI Audio ON/OFF function • The audio signals transmitted over the HDMI Cable can listen to the digital audio by connecting the video to ...

Quick Guide (easy Manual) (ver.1.0) (English)
Page 12
In Stop mode, press and hold the SD/HD (Standard Definition/High Definition)button on the remote control. • Resolutions available for the HDMI output are connected, COMPO- NENT video is not displayed. • See your VCR to the TV, and connect the Audio Output jacks on the VCR to this product. 22 CONNECTIONS Audio Cable (not supplied) If the external analog component has only one Audio Out, connect either left or right. lution is output through the HDMI output. • If the TV does not support the configured resolution, you will be able to see the picture properly...
In Stop mode, press and hold the SD/HD (Standard Definition/High Definition)button on the remote control. • Resolutions available for the HDMI output are connected, COMPO- NENT video is not displayed. • See your VCR to the TV, and connect the Audio Output jacks on the VCR to this product. 22 CONNECTIONS Audio Cable (not supplied) If the external analog component has only one Audio Out, connect either left or right. lution is output through the HDMI output. • If the TV does not support the configured resolution, you will be able to see the picture properly...

Quick Guide (easy Manual) (ver.1.0) (English)
Page 13
ly facing window with a newspaper or cloth, heat may build up inside the unit could rise and may damage it. • Do not obstruct the cooling fan or ventilation holes. (If the cooling fan or ventilation holes are covered with nothing obstructing its path to the XM Antenna Connector on the rear of XM's satellite signal, the XM Antenna should be tuned . 24 Connecting the FM Antenna Connecting an optional XM Satellite Radio Antenna ENG CONNECTIONS FM Antenna (supplied) 1 Connect the FM antenna supplied to prevent overheating. Please observe the following cautions for your ...
ly facing window with a newspaper or cloth, heat may build up inside the unit could rise and may damage it. • Do not obstruct the cooling fan or ventilation holes. (If the cooling fan or ventilation holes are covered with nothing obstructing its path to the XM Antenna Connector on the rear of XM's satellite signal, the XM Antenna should be tuned . 24 Connecting the FM Antenna Connecting an optional XM Satellite Radio Antenna ENG CONNECTIONS FM Antenna (supplied) 1 Connect the FM antenna supplied to prevent overheating. Please observe the following cautions for your ...