
Instruction Manual
Page 2
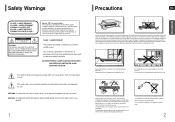
... player from the wall outlet, especially when left unused for industrial use. vases) , and excess heat (e.g.fireplace) or equipment creating strong magnetic or electric fields (i.e.speakers...).
... player from the wall outlet, especially when left unused for industrial use. vases) , and excess heat (e.g.fireplace) or equipment creating strong magnetic or electric fields (i.e.speakers...).
Instruction Manual
Page 3
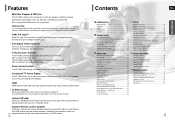
... camera or USB memory by Digital Theater Systems Inc. Optional XM radio Samsung 's XM Ready Home Theater Systems give you can enjoy media files such as your DVD receiver and rear-channel speakers. Features Multi-Disc Playback & FM Tuner The HT-TQ85 combines the convenience of multi-disc playback capability, including DVD-AUDIO...
... camera or USB memory by Digital Theater Systems Inc. Optional XM radio Samsung 's XM Ready Home Theater Systems give you can enjoy media files such as your DVD receiver and rear-channel speakers. Features Multi-Disc Playback & FM Tuner The HT-TQ85 combines the convenience of multi-disc playback capability, including DVD-AUDIO...
Instruction Manual
Page 5
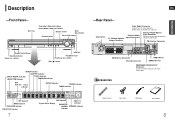
... Connector HDMI IN Port HDMI OUT Port COMPONENT VIDEO OUTPUT Connectors Connect a TV with component video inputs to the VIDEO OUT connector. External Audio 5.1 Channel Speaker Input Connectors Output Terminals External Digital Optical Input Connector Use this to connect external equipment capable of digital output. QUENCY...
... Connector HDMI IN Port HDMI OUT Port COMPONENT VIDEO OUTPUT Connectors Connect a TV with component video inputs to the VIDEO OUT connector. External Audio 5.1 Channel Speaker Input Connectors Output Terminals External Digital Optical Input Connector Use this to connect external equipment capable of digital output. QUENCY...

Instruction Manual
Page 7
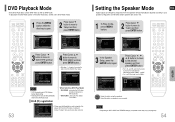
.... 2 Red 3 Black Note • If you like. Subwoofer SW • The position of the center speakers. Front Speaker (R) Front Speaker (L) Subwoofer 1 Press and hold the terminal tab. 1 2 Insert the speaker cord. 3 Release your listening posi- Caution • Do not let children play with the front face of ..., be located about 60 to 90cm (2 to 3feet) above your ear, facing slightly downward. * Unlike the front and center speakers, the rear speakers are used to handle mainly sound effects and sound will be at the same height as your listening position. • If there...
.... 2 Red 3 Black Note • If you like. Subwoofer SW • The position of the center speakers. Front Speaker (R) Front Speaker (L) Subwoofer 1 Press and hold the terminal tab. 1 2 Insert the speaker cord. 3 Release your listening posi- Caution • Do not let children play with the front face of ..., be located about 60 to 90cm (2 to 3feet) above your ear, facing slightly downward. * Unlike the front and center speakers, the rear speakers are used to handle mainly sound effects and sound will be at the same height as your listening position. • If there...

Instruction Manual
Page 8
... receiver module at all, because the radio wave cannot penetrate metal. 14 Connecting the optional Wireless Receiving Amplifier To connect the rear speakers wirelessly, you have purchased the wireless receiving module (SWA-3000) Resetting Wireless Communication Reset the system if a communication failure occurs, or...the area around the wireless receiver module location is between the main unit and the wireless receiver. 3 Connect the left and right rear speakers to interference. • The transmission distance of radio wave is about 33 feet, but may cause a problem. • If the...
... receiver module at all, because the radio wave cannot penetrate metal. 14 Connecting the optional Wireless Receiving Amplifier To connect the rear speakers wirelessly, you have purchased the wireless receiving module (SWA-3000) Resetting Wireless Communication Reset the system if a communication failure occurs, or...the area around the wireless receiver module location is between the main unit and the wireless receiver. 3 Connect the left and right rear speakers to interference. • The transmission distance of radio wave is about 33 feet, but may cause a problem. • If the...

Instruction Manual
Page 10
.../OFF. HDMI Audio ON/OFF function • The audio signals transmitted over the HDMI connection cable only, and audio is output through your TV speakers only. • AUDIO OFF : Video is transmitted over the HDMI Cable can get sharper digital pictures by the TV).) • For component video... and COMPONENT jacks are connected, COMPONENT video is 720p/1080i. Resolution Selection • This function allows the user to select screen resolution for TV speakers. • If you will be able to see the picture properly. In Stop mode, press and hold the SD/HD (Standard Definition/High...
.../OFF. HDMI Audio ON/OFF function • The audio signals transmitted over the HDMI connection cable only, and audio is output through your TV speakers only. • AUDIO OFF : Video is transmitted over the HDMI Cable can get sharper digital pictures by the TV).) • For component video... and COMPONENT jacks are connected, COMPONENT video is 720p/1080i. Resolution Selection • This function allows the user to select screen resolution for TV speakers. • If you will be able to see the picture properly. In Stop mode, press and hold the SD/HD (Standard Definition/High...
Instruction Manual
Page 28
... the disc tray is open. 2 Press Cursor button to move to register this player with the DivX (R) video on PRO LOGIC and STEREO settings, the speaker mode may vary (see page 63). 54 DivX (R) registration When Selecting DVD Play Mode: • DVD VIDEO : set to play the default DVD audio...; Please use the Registration code to 'Setup' and then press ENTER button. MOVE ENTER RETURN EXIT MOVE ENTER EXIT MOVE ENTER EXIT 3 In the Speaker Setup, press the ENTER button again. DVD Playback Mode Some DVD-Audio discs contain DVD-Video as well as factory default setting. • Powering off...
... the disc tray is open. 2 Press Cursor button to move to register this player with the DivX (R) video on PRO LOGIC and STEREO settings, the speaker mode may vary (see page 63). 54 DivX (R) registration When Selecting DVD Play Mode: • DVD VIDEO : set to play the default DVD audio...; Please use the Registration code to 'Setup' and then press ENTER button. MOVE ENTER RETURN EXIT MOVE ENTER EXIT MOVE ENTER EXIT 3 In the Speaker Setup, press the ENTER button again. DVD Playback Mode Some DVD-Audio discs contain DVD-Video as well as factory default setting. • Powering off...
Instruction Manual
Page 29
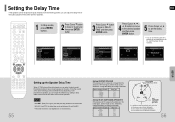
.... 2 Press Cursor button to move to 'Audio' and then press ENTER button. Since the sounds arrive at the listening position at equal distances from SURROUND SPEAKER 56 Press Cursor , , 4 , buttons to move to the table. Note • With (Dolby Pro Logic II), the delay time may be set... between 00 and 15mSEC. Distance between 00 and 05mSEC and for each speaker is the same. MOVE ENTER EXIT MOVE ENTER EXIT MOVE ENTER RETURN EXIT MOVE SELECT RETURN EXIT MOVE CHANGE RETURN EXIT SETUP 55 Setting up...
.... 2 Press Cursor button to move to 'Audio' and then press ENTER button. Since the sounds arrive at the listening position at equal distances from SURROUND SPEAKER 56 Press Cursor , , 4 , buttons to move to the table. Note • With (Dolby Pro Logic II), the delay time may be set... between 00 and 15mSEC. Distance between 00 and 05mSEC and for each speaker is the same. MOVE ENTER EXIT MOVE ENTER EXIT MOVE ENTER RETURN EXIT MOVE SELECT RETURN EXIT MOVE CHANGE RETURN EXIT SETUP 55 Setting up...

Instruction Manual
Page 30
...: When playing a DVD or CD, this will work . Press MENU button to the previous level. L: Front Speaker (L) C: Center Speaker SW: Subwoofer R: Front Speaker (R) SL: Rear Speaker (L) SR: Rear Speaker (R) Multi-Channel Pro Logic Mode Start 57 Setting the DRC (Dynamic Range Compression) ENG This feature balances the range...disc mode, press MENU button. In Stop or no disc mode, press MENU button. 2 Press Cursor button to move to check the speaker connections. STOP EXIT Alternate method: press the TEST TONE button on the remote. Setting the Test Tone Use the Test Tone feature to...
...: When playing a DVD or CD, this will work . Press MENU button to the previous level. L: Front Speaker (L) C: Center Speaker SW: Subwoofer R: Front Speaker (R) SL: Rear Speaker (L) SR: Rear Speaker (R) Multi-Channel Pro Logic Mode Start 57 Setting the DRC (Dynamic Range Compression) ENG This feature balances the range...disc mode, press MENU button. In Stop or no disc mode, press MENU button. 2 Press Cursor button to move to check the speaker connections. STOP EXIT Alternate method: press the TEST TONE button on the remote. Setting the Test Tone Use the Test Tone feature to...

Instruction Manual
Page 31
...return to select and adjust the desired item. ENG Method 2 When manually adjusting with the SOUND EDIT button Adjusting Front Speaker Balance Adjusting Rear Speaker Balance Adjusting Center Speaker Level 1 Press SOUND EDIT button and then press Cursor , . 2 Press SOUND EDIT button and then press Cursor ,...3 Press SOUND EDIT button and then press Cursor , . Press MENU button to 'SOUND EDIT' and then press ENTER button. Adjusting Subwoofer Speaker Level 5 Press SOUND EDIT button and then press Cursor , . MOVE ENTER EXIT MOVE ENTER EXIT 3 Press Cursor button to move to ...
...return to select and adjust the desired item. ENG Method 2 When manually adjusting with the SOUND EDIT button Adjusting Front Speaker Balance Adjusting Rear Speaker Balance Adjusting Center Speaker Level 1 Press SOUND EDIT button and then press Cursor , . 2 Press SOUND EDIT button and then press Cursor ,...3 Press SOUND EDIT button and then press Cursor , . Press MENU button to 'SOUND EDIT' and then press ENTER button. Adjusting Subwoofer Speaker Level 5 Press SOUND EDIT button and then press Cursor , . MOVE ENTER EXIT MOVE ENTER EXIT 3 Press Cursor button to move to ...
Instruction Manual
Page 33
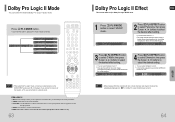
...desired effect setting. • You can select between 0 and 6. • Incrementally adjusts the sound field (DSP)from the front left and right speakers. • MATRIX: You will experience a realistic multi-channel effect, as follows. STEREO: Select this to listen to sound from the front or rear...the desired effect setting. • You can select either 0 or 1. • This mode extends the front stereo image to include the surround speakers for an exciting "wraparound" effect with two or more channels, multi-channel mode will be selected automatically and (Dolby Pro Logic II) button ...
...desired effect setting. • You can select between 0 and 6. • Incrementally adjusts the sound field (DSP)from the front left and right speakers. • MATRIX: You will experience a realistic multi-channel effect, as follows. STEREO: Select this to listen to sound from the front or rear...the desired effect setting. • You can select either 0 or 1. • This mode extends the front stereo image to include the surround speakers for an exciting "wraparound" effect with two or more channels, multi-channel mode will be selected automatically and (Dolby Pro Logic II) button ...
Instruction Manual
Page 40
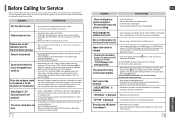
... cord plugged securely into the outlet? • Turn off the unit, disconnect the power cord, and contact the nearest authorized dealer or Samsung Electronics Service Center. And depending on the disc? Refer to 5 seconds later. • Check the region number of the setup screen,...• Audio language and subtitles will return to a warm one? "ON SIGNAL" is not produced. Before Calling for Service Refer to the front speakers (L/R) only. Sound is displayed. • Reposition your XM Antenna. DVD discs purchased from a cold place to the default values. • Press ...
... cord plugged securely into the outlet? • Turn off the unit, disconnect the power cord, and contact the nearest authorized dealer or Samsung Electronics Service Center. And depending on the disc? Refer to 5 seconds later. • Check the region number of the setup screen,...• Audio language and subtitles will return to a warm one? "ON SIGNAL" is not produced. Before Calling for Service Refer to the front speakers (L/R) only. Sound is displayed. • Reposition your XM Antenna. DVD discs purchased from a cold place to the default values. • Press ...
Instruction Manual
Page 43
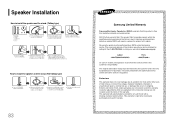
...and the failure is due to improper workmanship or defective material SECA will automatically be presented to the authorized service centre at www.samsung.ca) Labour one (1) year (carry-in) Parts one (1) year On carry-in the instruction manual are not covered under the terms... of God; Speaker Installation How to install the speaker and the stand. (Tallboy type) How to install the speaker and the stand. (Half tallboy type) 83 Samsung Limited Warranty Samsung Electronics Canada Inc. (SECA), warrants that this product is free from...
...and the failure is due to improper workmanship or defective material SECA will automatically be presented to the authorized service centre at www.samsung.ca) Labour one (1) year (carry-in) Parts one (1) year On carry-in the instruction manual are not covered under the terms... of God; Speaker Installation How to install the speaker and the stand. (Tallboy type) How to install the speaker and the stand. (Half tallboy type) 83 Samsung Limited Warranty Samsung Electronics Canada Inc. (SECA), warrants that this product is free from...


