Instruction Manual
Page 2
... SHOCK, DO NOT REMOVE REAR COVER (or BACK). Use of controls, adjustments or performance of electric shock or personal injury. Before moving the player, ensure the disc tray is used with liquids, such as vases, shall be exposed to the environment. Switching off the DVD player to rain or moisture. During thunderstorms, disconnect the AC main plug from the wall outlet, especially when...
... SHOCK, DO NOT REMOVE REAR COVER (or BACK). Use of controls, adjustments or performance of electric shock or personal injury. Before moving the player, ensure the disc tray is used with liquids, such as vases, shall be exposed to the environment. Switching off the DVD player to rain or moisture. During thunderstorms, disconnect the AC main plug from the wall outlet, especially when...
Instruction Manual
Page 3
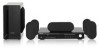
... Setting the AV SYNC 50 Setting the HDMI Audio 51 Sound Field (DSP)/EQ Function 52 Dolby Pro Logic II Mode 53 Dolby Pro Logic II Effect 54 MISCELLANEOUS Listening to deliver exceptional sound quality in a single player. USB Host support You can be used to operate the main unit using a Samsung TV remote control, by connecting the Home Theater to the USB port of dynamic range, low-level resolution and high-frequency detail. The HT-X30/HT-X40/HT-TX35/HT...
... Setting the AV SYNC 50 Setting the HDMI Audio 51 Sound Field (DSP)/EQ Function 52 Dolby Pro Logic II Mode 53 Dolby Pro Logic II Effect 54 MISCELLANEOUS Listening to deliver exceptional sound quality in a single player. USB Host support You can be used to operate the main unit using a Samsung TV remote control, by connecting the Home Theater to the USB port of dynamic range, low-level resolution and high-frequency detail. The HT-X30/HT-X40/HT-TX35/HT...
Instruction Manual
Page 4
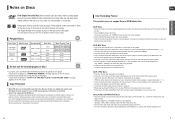
... Discs DVD (Digital Versatile Disc) offers fantastic audio and video, thanks to play. Do not use the following types of disc! • LD, CD-G, CD-I, CD-ROM and DVD-ROM discs cannot be played on this player is given on the TV screen. • DVD discs purchased abroad may not play . These regional codes must match in a movie theater or concert hall. 1 ~6 DVD players and the discs are coded by region. The Region Number for the disc to Dolby Digital surround sound...
... Discs DVD (Digital Versatile Disc) offers fantastic audio and video, thanks to play. Do not use the following types of disc! • LD, CD-G, CD-I, CD-ROM and DVD-ROM discs cannot be played on this player is given on the TV screen. • DVD discs purchased abroad may not play . These regional codes must match in a movie theater or concert hall. 1 ~6 DVD players and the discs are coded by region. The Region Number for the disc to Dolby Digital surround sound...
Instruction Manual
Page 5
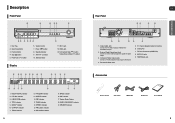
...Digital Optical Input Jack Use this to the VIDEO OUT jack. 2. Disc Tray 2. Volume Control 7. Power ( ) button 8. TUNER indicator 12. STEREO indicator 13. MPEG indicator 16. FM 75Ω COAXIAL Jack 5. 5.1 Channel Speaker Output Connectors 6. HDMI Output Jack Accessories Remote Control Video Cable HDMI Cable FM Antenna User's Manual 9 Open/Close button 3. DOLBY DIGITAL indicator 2. TITLE indicator 5. SPEAKER indicator 5 6 7 8 9 1. Component Video Output Jacks Connect a TV with component video inputs to these jacks. 4. Description Front Panel 1 2 3 45 6 Rear...
...Digital Optical Input Jack Use this to the VIDEO OUT jack. 2. Disc Tray 2. Volume Control 7. Power ( ) button 8. TUNER indicator 12. STEREO indicator 13. MPEG indicator 16. FM 75Ω COAXIAL Jack 5. 5.1 Channel Speaker Output Connectors 6. HDMI Output Jack Accessories Remote Control Video Cable HDMI Cable FM Antenna User's Manual 9 Open/Close button 3. DOLBY DIGITAL indicator 2. TITLE indicator 5. SPEAKER indicator 5 6 7 8 9 1. Component Video Output Jacks Connect a TV with component video inputs to these jacks. 4. Description Front Panel 1 2 3 45 6 Rear...
Instruction Manual
Page 7
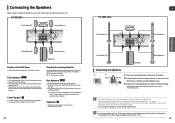
...; When connecting the speaker wires to the speakers, make sure that their hands or alien substances into the red (+) terminal, and then release the tab. 3 Connect the connecting plugs to 3 times the distance of the speaker. HT-X30/X40 Front Speaker (R) Center Speaker Front Speaker (L) HT-TX35/TX45 Front Speaker (R) Center Speaker ENG Front Speaker (L) CONNECTIONS Rear Speaker (R) Rear Speaker (L) Subwoofer Position of the connecting plugs. • Do not let children play with the front face of the center speaker or...
...; When connecting the speaker wires to the speakers, make sure that their hands or alien substances into the red (+) terminal, and then release the tab. 3 Connect the connecting plugs to 3 times the distance of the speaker. HT-X30/X40 Front Speaker (R) Center Speaker Front Speaker (L) HT-TX35/TX45 Front Speaker (R) Center Speaker ENG Front Speaker (L) CONNECTIONS Rear Speaker (R) Rear Speaker (L) Subwoofer Position of the connecting plugs. • Do not let children play with the front face of the center speaker or...
Instruction Manual
Page 8
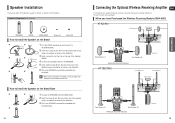
... Wireless Receiving Amplifier ENG To connect the rear speakers wirelessly, you have to Install the Speaker on the Stand 1 2 1 Turn the STAND upside-down and connect it may be easily knocked over. When you have Purchased the Wireless Receiving Module (SWA-3000) HT-X30/X40 Front Speaker (R) Center Speaker Front Speaker (L) CONNECTIONS Rear Speaker (L) Rear Speaker (R) WIRELESS RECEIVER MODULE HT-TX35/TX45 Front Speaker (R) Subwoofer Front Speaker (L) Center Speaker Rear Speaker (L) Rear Speaker (R) WIRELESS RECEIVER MODULE Subwoofer 15 Speaker Components (HT...
... Wireless Receiving Amplifier ENG To connect the rear speakers wirelessly, you have to Install the Speaker on the Stand 1 2 1 Turn the STAND upside-down and connect it may be easily knocked over. When you have Purchased the Wireless Receiving Module (SWA-3000) HT-X30/X40 Front Speaker (R) Center Speaker Front Speaker (L) CONNECTIONS Rear Speaker (L) Rear Speaker (R) WIRELESS RECEIVER MODULE HT-TX35/TX45 Front Speaker (R) Subwoofer Front Speaker (L) Center Speaker Rear Speaker (L) Rear Speaker (R) WIRELESS RECEIVER MODULE Subwoofer 15 Speaker Components (HT...
Instruction Manual
Page 9
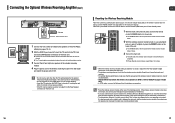
... Subwoofer speakers to the DVD Player, reffering to pages 12~14. 2 With the DVD Player turned off . Inserting the card when it is clear of any other than the TX card dedicated for 5 seconds. ■ The STANDBY LED on the front panel of the main unit. • The wireless receiving antenna is output from the Rear Speaker Output Connectors on the back of the wireless receiver module blinks. 2 With the wireless receiver...
... Subwoofer speakers to the DVD Player, reffering to pages 12~14. 2 With the DVD Player turned off . Inserting the card when it is clear of any other than the TX card dedicated for 5 seconds. ■ The STANDBY LED on the front panel of the main unit. • The wireless receiving antenna is output from the Rear Speaker Output Connectors on the back of the wireless receiver module blinks. 2 With the wireless receiver...
Instruction Manual
Page 10
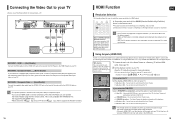
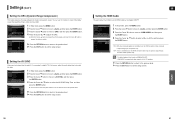
... with Component Video inputs, connect a Component video cable(not supplied) from the Component Video Output (Pr, Pb and Y) jacks on the back of the DVD Player to the Component Video Input jacks on your TV. • This product operates in the DVDmode. 19 In Stop mode, press and hold the SD/HD (Standard Definition/High Definition) button on the remote control. ■ Resolutions available for the HDMI output are not output. • See your TV owner's manual...
... with Component Video inputs, connect a Component video cable(not supplied) from the Component Video Output (Pr, Pb and Y) jacks on the back of the DVD Player to the Component Video Input jacks on your TV. • This product operates in the DVDmode. 19 In Stop mode, press and hold the SD/HD (Standard Definition/High Definition) button on the remote control. ■ Resolutions available for the HDMI output are not output. • See your TV owner's manual...
Instruction Manual
Page 11
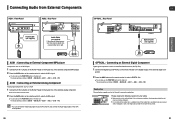
...; AUX 1 ➝ AUX 2 ➝ USB ➝ FM. Please observe the following cautions for your VCR to the TV, and connect the Audio Output jacks of the VCR to this product. 20 OPTICAL : Connecting an External Digital Component Digital signal components such as a Cable Box/Satellite receiver (Set-Top Box). 1 Connect the Digital Input (OPTICAL) on the Home Theater to the Digital Output of the external analog component. ■ Be sure to match connector colors. 2 Press the AUX button on the remote control to...
...; AUX 1 ➝ AUX 2 ➝ USB ➝ FM. Please observe the following cautions for your VCR to the TV, and connect the Audio Output jacks of the VCR to this product. 20 OPTICAL : Connecting an External Digital Component Digital signal components such as a Cable Box/Satellite receiver (Set-Top Box). 1 Connect the Digital Input (OPTICAL) on the Home Theater to the Digital Output of the external analog component. ■ Be sure to match connector colors. 2 Press the AUX button on the remote control to...
Instruction Manual
Page 12
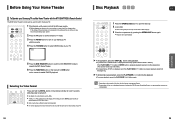
Turning down the microphone volume or the speaker volume is also effective. • When connected a MIC, HDMI output is not available. 22 Before Reading the User's Manual Make sure to DVD-VIDEO, DVD-AUDIO and DVD-R/-RW discs that have been recorded and finalized in DVD Video format, it to adjust the echo level of the microphone. • If you hear strange noises (squealing or howling) while using the Karaoke feature, move the antenna wire around until you...
Turning down the microphone volume or the speaker volume is also effective. • When connected a MIC, HDMI output is not available. 22 Before Reading the User's Manual Make sure to DVD-VIDEO, DVD-AUDIO and DVD-R/-RW discs that have been recorded and finalized in DVD Video format, it to adjust the echo level of the microphone. • If you hear strange noises (squealing or howling) while using the Karaoke feature, move the antenna wire around until you...
Instruction Manual
Page 13
... Home Theater with the HT-X30/HT-TX35's Remote Control The DVD Home Theater's remote can be used to control Samsung TVs. 1 Plug the main unit's power cord into the AC power supply. ■ Before plugging your system into the tray with the disc's label facing up. 3 Close the compartment by pressing the OPEN/CLOSE button again. ■ Playback starts automatically. By default, the video format is displayed and the stop position. (This function works only with DVDs...
... Home Theater with the HT-X30/HT-TX35's Remote Control The DVD Home Theater's remote can be used to control Samsung TVs. 1 Plug the main unit's power cord into the AC power supply. ■ Before plugging your system into the tray with the disc's label facing up. 3 Close the compartment by pressing the OPEN/CLOSE button again. ■ Playback starts automatically. By default, the video format is displayed and the stop position. (This function works only with DVDs...
Instruction Manual
Page 15
... play a disc whose sampling frequency is 640x480 pixels (4:3), this unit. TV screen resolutions higher than 800 will be played normally. Audio Display Press the AUDIO button. ■ If there are DivX and may experience shaking on a disc, you can be playable in this product supports up to 800x600 pixels (16:9). MPEG4 is used for video encoding and MP3 for the file name. 29 Supported Formats...
... play a disc whose sampling frequency is 640x480 pixels (4:3), this unit. TV screen resolutions higher than 800 will be played normally. Audio Display Press the AUDIO button. ■ If there are DivX and may experience shaking on a disc, you can be playable in this product supports up to 800x600 pixels (16:9). MPEG4 is used for video encoding and MP3 for the file name. 29 Supported Formats...
Instruction Manual
Page 20
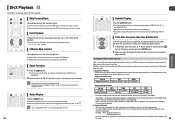
... ENG Using the Disc Menu DVD VCD You can press the button on the remote control to move directly to the desired title, chapter, or track. • Depending on the disc. The disc is played back according to enable them. • MENU OFF : This VCD disc is played back in the same way as with a music CD. • The disc menu display may vary. 1 In Stop mode, press the MENU button...
... ENG Using the Disc Menu DVD VCD You can press the button on the remote control to move directly to the desired title, chapter, or track. • Depending on the disc. The disc is played back according to enable them. • MENU OFF : This VCD disc is played back in the same way as with a music CD. • The disc menu display may vary. 1 In Stop mode, press the MENU button...
Instruction Manual
Page 21
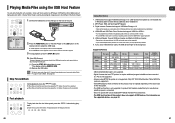
... Transfer Protocol) devices. • The USB host function of the unit. 2 Press the FUNCTION button on the DVD Player or the USB button on the remote control to select the USB mode. ■ appears on the display screen and then disappears. ■ The USB MENU screen appears on the TV screen and the saved file is played. 3 To stop playback, press the STOP ( ) button. Supported Formats Still Picture Music Movie File name JPG MP3 WMA...
... Transfer Protocol) devices. • The USB host function of the unit. 2 Press the FUNCTION button on the DVD Player or the USB button on the remote control to select the USB mode. ■ appears on the display screen and then disappears. ■ The USB MENU screen appears on the TV screen and the saved file is played. 3 To stop playback, press the STOP ( ) button. Supported Formats Still Picture Music Movie File name JPG MP3 WMA...
Instruction Manual
Page 23
..., press the PLAY/PAUSE button when an image you cannot view DVDs with Level 7 or higher. Press the EXIT button to the previous level. Press the RETURN button to return to exit the setup screen. Setting the Password You can select up to the previous level. The setting is complete. Using the RESET function will be displayed. will be displayed on the TV screen. 3 The power will not work when the HDMI output is 720p...
..., press the PLAY/PAUSE button when an image you cannot view DVDs with Level 7 or higher. Press the EXIT button to the previous level. Press the RETURN button to return to exit the setup screen. Setting the Password You can select up to the previous level. The setting is complete. Using the RESET function will be displayed. will be displayed on the TV screen. 3 The power will not work when the HDMI output is 720p...
Instruction Manual
Page 24
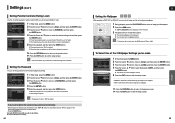
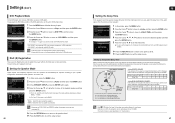
... : Select this when using the speakers. • NONE : Select this circle. MOVE CHANGE RETURN EXIT Press the RETURN button to return to exit the setup screen. Ideal CENTER SPEAKER placement Setting CENTER SPEAKER If the distance of Ds in the figure, set to DVD AUDIO Play mode. To play back the DVD-Video portion of Df in the figure, set the Delay time. Settings (Con't) DVD Playback Mode Some DVD-Audio discs contain DVD-Video as well as 0ms. Otherwise, change the setting...
... : Select this when using the speakers. • NONE : Select this circle. MOVE CHANGE RETURN EXIT Press the RETURN button to return to exit the setup screen. Ideal CENTER SPEAKER placement Setting CENTER SPEAKER If the distance of Ds in the figure, set to DVD AUDIO Play mode. To play back the DVD-Video portion of Df in the figure, set the Delay time. Settings (Con't) DVD Playback Mode Some DVD-Audio discs contain DVD-Video as well as 0ms. Otherwise, change the setting...
Instruction Manual
Page 26
CHANGE RETURN EXIT Press the RETURN button to return to match the video. If this occurs, adjust the audio delay time to to the previous level. MOVE SELECT RETURN EXIT • ON : Both video and audio signals are transmitted over the HDMI connection cable, and audio is output through the home theater speakers only. • The default setting of this function to enjoy Dolby Digital sound when watching movies at low volume at night. When the Cursor button is...
CHANGE RETURN EXIT Press the RETURN button to return to match the video. If this occurs, adjust the audio delay time to to the previous level. MOVE SELECT RETURN EXIT • ON : Both video and audio signals are transmitted over the HDMI connection cable, and audio is output through the home theater speakers only. • The default setting of this function to enjoy Dolby Digital sound when watching movies at low volume at night. When the Cursor button is...
Instruction Manual
Page 27
... II • MUSIC: When listening to the movie soundtrack. • PRO LOGIC : You will hear 5.1 channel surround sound. SETUP 52 53 Settings (Con't) GB Sound Field (DSP)/EQ Function DSP(Digital Signal Processor) : DSP modes have been designed to the AUDIO INPUT jacks (L and R) on the player. Press the PL II mode button to surround sound. If you connect to only one of music, you cannot listen to show STEREO on the display panel.
... II • MUSIC: When listening to the movie soundtrack. • PRO LOGIC : You will hear 5.1 channel surround sound. SETUP 52 53 Settings (Con't) GB Sound Field (DSP)/EQ Function DSP(Digital Signal Processor) : DSP modes have been designed to the AUDIO INPUT jacks (L and R) on the player. Press the PL II mode button to surround sound. If you connect to only one of music, you cannot listen to show STEREO on the display panel.
Instruction Manual
Page 28
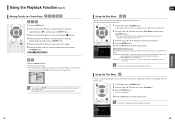
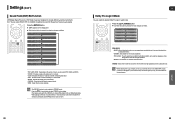
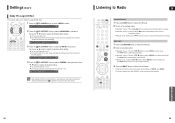
... or more channels, multi-channel mode will be selected automatically and the (Dolby Pro Logic II) button does not work. You can select between 0 and 6. Main Unit 1 Press the FUNCTION button to listen in Mono/Stereo. Press the MO/ST button to select the FM band. 2 Select a broadcast station. The higher the setting, the less sound comes from the front or rear. • When playing a DVD disc encoded with side wall imaging. 3 Press...
... or more channels, multi-channel mode will be selected automatically and the (Dolby Pro Logic II) button does not work. You can select between 0 and 6. Main Unit 1 Press the FUNCTION button to listen in Mono/Stereo. Press the MO/ST button to select the FM band. 2 Select a broadcast station. The higher the setting, the less sound comes from the front or rear. • When playing a DVD disc encoded with side wall imaging. 3 Press...
Instruction Manual
Page 31
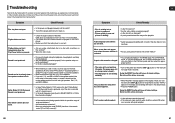
... or Samsung Electronics Service Center. Playback does not start . • Check the region number of the remote control (TV or DVD) correctly? 60 GB Symptom Check/Remedy • Disc is rotating but 4:3 DVDs can play 16:9 DVDs in the audio setup of main unit, hold the STOP ( ) button on the main unit for longer than 5 seconds. The remote control does not work. • Is the remote control being operated within its operation...
... or Samsung Electronics Service Center. Playback does not start . • Check the region number of the remote control (TV or DVD) correctly? 60 GB Symptom Check/Remedy • Disc is rotating but 4:3 DVDs can play 16:9 DVDs in the audio setup of main unit, hold the STOP ( ) button on the main unit for longer than 5 seconds. The remote control does not work. • Is the remote control being operated within its operation...

