Instruction Manual
Page 2
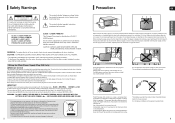
... BROWN or RED. The wire coloured BROWN must be connected to reach a power point, you should not be mixed with a protective grounding connection. • To disconnect the apparatus from other equipment which may occur if your player horizontally, on the product or its working life. Business users should contact their local government office, for personal use . Switching off the plug, remove the fuse and...
... BROWN or RED. The wire coloured BROWN must be connected to reach a power point, you should not be mixed with a protective grounding connection. • To disconnect the apparatus from other equipment which may occur if your player horizontally, on the product or its working life. Business users should contact their local government office, for personal use . Switching off the plug, remove the fuse and...
Instruction Manual
Page 3
... Select a Repeat Playback Mode in stop mode for 3 minutes, the Samsung logo appears on Handling and Storing Discs 64 Language Code List 65 USB Host Feature Supported Products 66 Specifications 67 PREPARATION GB 5 It delivers full-frequency 5.1 channel sound. USB Host support You can be used to operate the main unit using an HDMI Cable. (This is an audio compression format developed by connecting the Home Theater to a SAMSUNG TV using a Samsung TV remote control, by Digital Theater Systems Inc. TV Screen...
... Select a Repeat Playback Mode in stop mode for 3 minutes, the Samsung logo appears on Handling and Storing Discs 64 Language Code List 65 USB Host Feature Supported Products 66 Specifications 67 PREPARATION GB 5 It delivers full-frequency 5.1 channel sound. USB Host support You can be used to operate the main unit using an HDMI Cable. (This is an audio compression format developed by connecting the Home Theater to a SAMSUNG TV using a Samsung TV remote control, by Digital Theater Systems Inc. TV Screen...

Instruction Manual
Page 4
... Discs DVD (Digital Versatile Disc) offers fantastic audio and video, thanks to play. These regional codes must match in a movie theater or concert hall. 1 ~6 DVD players and the discs are played, a Playing Time Approx. 240 min. (single-sided) Approx. 480 min. (double-sided) Approx. 80 min. (single-sided) Approx. 160 min. (double-sided) 74 min. 20 min. 74 min. 20 min. The Region Number for the disc to Dolby Digital surround sound...
... Discs DVD (Digital Versatile Disc) offers fantastic audio and video, thanks to play. These regional codes must match in a movie theater or concert hall. 1 ~6 DVD players and the discs are played, a Playing Time Approx. 240 min. (single-sided) Approx. 480 min. (double-sided) Approx. 80 min. (single-sided) Approx. 160 min. (double-sided) 74 min. 20 min. 74 min. 20 min. The Region Number for the disc to Dolby Digital surround sound...
Instruction Manual
Page 5
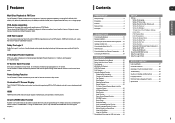
... button 5. Stop ( ) button 8. External Digital Optical Input Jack Use this unit. 4. FM 75Ω COAXIAL Jack 9. Cooling Fan 8 Side Panel GB PREPARATION 1 1. Display 4. Volume Control button Rear Panel 1 23 4 5 12 11 10 9 8 7 6 1. 5.1 Channel Speaker Output Connectors 2. HDMI OUT Jack 6. Video Output Jack Connect your TV's Video Input jack (VIDEO IN) to the VIDEO OUT Jack on this to these jacks. 3. Stand 10. Cable Tie 11. Power ( ) button 2. Tuning Down & Skip ( ) button 7. Tuning Up & Skip ( ) button 10. AUX IN 1 Jack 3 3. Description Front Panel...
... button 5. Stop ( ) button 8. External Digital Optical Input Jack Use this unit. 4. FM 75Ω COAXIAL Jack 9. Cooling Fan 8 Side Panel GB PREPARATION 1 1. Display 4. Volume Control button Rear Panel 1 23 4 5 12 11 10 9 8 7 6 1. 5.1 Channel Speaker Output Connectors 2. HDMI OUT Jack 6. Video Output Jack Connect your TV's Video Input jack (VIDEO IN) to the VIDEO OUT Jack on this to these jacks. 3. Stand 10. Cable Tie 11. Power ( ) button 2. Tuning Down & Skip ( ) button 7. Tuning Up & Skip ( ) button 10. AUX IN 1 Jack 3 3. Description Front Panel...
Instruction Manual
Page 7
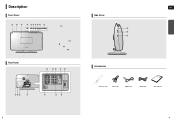
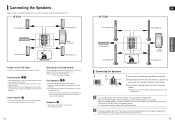
... children so as your TV set . 13 ing slightly downward. * Unlike the front and center speakers, the rear speakers are used to handle mainly sound effects and sound will be at the same height as the front speakers. • You can also install it anywhere you like. 12 HT-TX250 Front Speaker (R) GB Front Speaker (L) CONNECTIONS Center Speaker Rear Speaker (R) SUB Subwoofer Rear Speaker (L) Connecting the Speakers 1 2 Black Red 1 Press down the terminal tab...
... children so as your TV set . 13 ing slightly downward. * Unlike the front and center speakers, the rear speakers are used to handle mainly sound effects and sound will be at the same height as the front speakers. • You can also install it anywhere you like. 12 HT-TX250 Front Speaker (R) GB Front Speaker (L) CONNECTIONS Center Speaker Rear Speaker (R) SUB Subwoofer Rear Speaker (L) Connecting the Speakers 1 2 Black Red 1 Press down the terminal tab...
Instruction Manual
Page 8
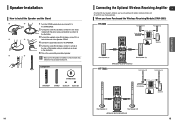
...-TX250 WIRELESS RECEIVER MODULE Front Speaker (R) Front Speaker (L) Center Speaker Subwoofer Rear Speaker (L) Rear Speaker (R) WIRELESS RECEIVER MODULE 14 15 Component STAND BASE SPEAKER STAND Screw (A) Screw (B) Connecting the Optional Wireless Receiving Amplifier GB To connect the rear speakers wirelessly, you have to a hole on the rear of the speaker using a screwdriver as shown in the illustration. 3 Turning the supplied screw (B) clockwise, connect it may be easily knocked over. Otherwise it to a 3 4 hole on a flat and stable area. Speaker Installation...
...-TX250 WIRELESS RECEIVER MODULE Front Speaker (R) Front Speaker (L) Center Speaker Subwoofer Rear Speaker (L) Rear Speaker (R) WIRELESS RECEIVER MODULE 14 15 Component STAND BASE SPEAKER STAND Screw (A) Screw (B) Connecting the Optional Wireless Receiving Amplifier GB To connect the rear speakers wirelessly, you have to a hole on the rear of the speaker using a screwdriver as shown in the illustration. 3 Turning the supplied screw (B) clockwise, connect it may be easily knocked over. Otherwise it to a 3 4 hole on a flat and stable area. Speaker Installation...
Instruction Manual
Page 9
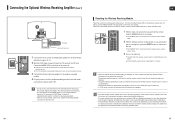
... wireless receiver. 3 Connect the left and right rear speakers to the wireless receiving module. 4 Plug the power cord of the wireless receiving module in the wall outlet and switch the power switch 'ON'. • Do not insert a card other device that uses the same frequency (2.4GHz) near the system, some sound interruption may not be heard due to pages 12~14. 2 With the DVD Player turned off , press and hold the remote control's REMAIN button...
... wireless receiver. 3 Connect the left and right rear speakers to the wireless receiving module. 4 Plug the power cord of the wireless receiving module in the wall outlet and switch the power switch 'ON'. • Do not insert a card other device that uses the same frequency (2.4GHz) near the system, some sound interruption may not be heard due to pages 12~14. 2 With the DVD Player turned off , press and hold the remote control's REMAIN button...
Instruction Manual
Page 10
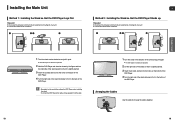
... stand so that the DVD Player Stands up. Preparation ■ Disconnect the AC power cord from the stand. 1 Turn the stand in the direction of the arrow and pull it to keep the cables together. 18 19 Preparation ■ Disconnect the AC power cord from the AC outlet before installing the main unit. ■ Connect the cables before installation. 1 23 4 CONNECTIONS 1 Turn the stand counter...
... stand so that the DVD Player Stands up. Preparation ■ Disconnect the AC power cord from the stand. 1 Turn the stand in the direction of the arrow and pull it to keep the cables together. 18 19 Preparation ■ Disconnect the AC power cord from the AC outlet before installing the main unit. ■ Connect the cables before installation. 1 23 4 CONNECTIONS 1 Turn the stand counter...
Instruction Manual
Page 11
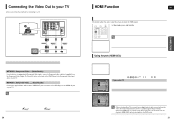
... THEATER Select and set the Video input source on your TV to the DVD Player, you use HDMI (High Definition Multimedia Interface)? s : The Home Theater disc playback information will automatically switch to on the remote control. This is only available with Component Video inputs, connect a Component video cable(not supplied) from the TV to the Home Theater listen to the Component Video Input Jacks on your TV. • This product operates in the DVD mode. 21 If you must have a digital optical cable connected from the Component Video Output...
... THEATER Select and set the Video input source on your TV to the DVD Player, you use HDMI (High Definition Multimedia Interface)? s : The Home Theater disc playback information will automatically switch to on the remote control. This is only available with Component Video inputs, connect a Component video cable(not supplied) from the TV to the Home Theater listen to the Component Video Input Jacks on your TV. • This product operates in the DVD mode. 21 If you must have a digital optical cable connected from the Component Video Output...
Instruction Manual
Page 12
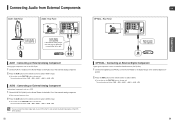
... The mode switches as follows : DVD ➝ D.IN ➝ AUX 1 ➝ AUX 2 ➝ USB ➝ FM. ponent. 2 Press the AUX button on the remote control to select input. ■ You can also use the FUNCTION button on the main unit. Optical Cable (not supplied) AUX1 : Connecting an External Analog Component Analog signal components such as a Cable Box/Satellite receiver (Set-Top Box). 1 Connect the Digital Input (OPTICAL) on the Home Theater to the Digital Output of the external analog component. ■ Be sure to match connector...
... The mode switches as follows : DVD ➝ D.IN ➝ AUX 1 ➝ AUX 2 ➝ USB ➝ FM. ponent. 2 Press the AUX button on the remote control to select input. ■ You can also use the FUNCTION button on the main unit. Optical Cable (not supplied) AUX1 : Connecting an External Analog Component Analog signal components such as a Cable Box/Satellite receiver (Set-Top Box). 1 Connect the Digital Input (OPTICAL) on the Home Theater to the Digital Output of the external analog component. ■ Be sure to match connector...
Instruction Manual
Page 14
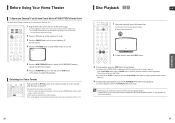
VIDEO 5 Press the DVD RECEIVER button to switch to DVD RECEIVER mode to operate the DVD Home Theater 6 Press the FUNCTION button on the main unit or DVD button on the remote controller for over 5 seconds while the power is turned off. ■ By default, the video format is set the remote to TV mode. 3 Press the POWER button to turn on your Samsung TV with this remote. 4 Press the TV/VIDEO button to select VIDEO mode on the content of the disc, the initial screen may seriously damage...
VIDEO 5 Press the DVD RECEIVER button to switch to DVD RECEIVER mode to operate the DVD Home Theater 6 Press the FUNCTION button on the main unit or DVD button on the remote controller for over 5 seconds while the power is turned off. ■ By default, the video format is set the remote to TV mode. 3 Press the POWER button to turn on your Samsung TV with this remote. 4 Press the TV/VIDEO button to select VIDEO mode on the content of the disc, the initial screen may seriously damage...
Instruction Manual
Page 20
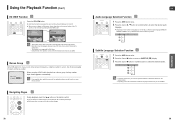
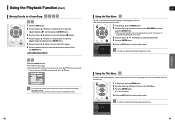
... play a DVD-Audio disc that requires a 4-digit key number to re-enter the key number. When a movie is pressed, the zoom function will need to access. BONUS GROUP KEY NUMBER : When you will switch between On and Off. EZ VIEW EZ VIEW OFF • This function will not work if the DVD is not supported for details and the key number. SP 2/3 FR 3/3 OPERATION Subtitle Language Selection Function DVD 1 Press the INFO button...
... play a DVD-Audio disc that requires a 4-digit key number to re-enter the key number. When a movie is pressed, the zoom function will need to access. BONUS GROUP KEY NUMBER : When you will switch between On and Off. EZ VIEW EZ VIEW OFF • This function will not work if the DVD is not supported for details and the key number. SP 2/3 FR 3/3 OPERATION Subtitle Language Selection Function DVD 1 Press the INFO button...
Instruction Manual
Page 21
... menu display may be different depending on the screen. 3 Press the Cursor , , , button to select the desired item. 4 Press the ENTER button. DVD menu contents differ from disc to disc. 1 In Stop mode, press the MENU button. 2 Press the Cursor , button to move to the and then press the ENTER button. ■ When you select Disc Menu and it is not supported by the disc, the message appears on the disc. OPERATION Using...
... menu display may be different depending on the screen. 3 Press the Cursor , , , button to select the desired item. 4 Press the ENTER button. DVD menu contents differ from disc to disc. 1 In Stop mode, press the MENU button. 2 Press the Cursor , button to move to the and then press the ENTER button. ■ When you select Disc Menu and it is not supported by the disc, the message appears on the disc. OPERATION Using...
Instruction Manual
Page 22
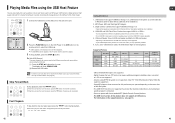
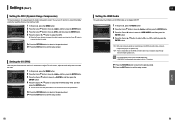
... players. 3. USB card Reader: One slot USB card reader and Multi slot USB card reader. • Depending on the side of the home theater. 1 Connect the USB device to the USB port on the manufacturer. USB HDD and USB Flash Drive: Devices that operate as a removable disc in Windows (2000 or later) without additional driver installation.) 2. button, the previous file is played. 3 To stop playback, press the STOP ( ) button. Supported Formats File name Still Picture Music...
... players. 3. USB card Reader: One slot USB card reader and Multi slot USB card reader. • Depending on the side of the home theater. 1 Connect the USB device to the USB port on the manufacturer. USB HDD and USB Flash Drive: Devices that operate as a removable disc in Windows (2000 or later) without additional driver installation.) 2. button, the previous file is played. 3 To stop playback, press the STOP ( ) button. Supported Formats File name Still Picture Music...
Instruction Manual
Page 24
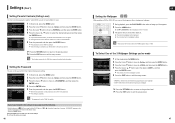
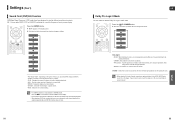
... then press the ENTER button. The setting is in (No Disc) mode, hold the DVD Player's STOP ( display and all stored settings. Using the RESET function will be taken to the previous screen. The selected wallpaper will erase all settings will be displayed. Settings (Con't) Setting Parental Controls (Rating Level) Use this to restrict playback of the 3 wallpaper screens 5 Press the EXIT button to exit the setup screen. The higher the level, the closer the...
... then press the ENTER button. The setting is in (No Disc) mode, hold the DVD Player's STOP ( display and all stored settings. Using the RESET function will be taken to the previous screen. The selected wallpaper will erase all settings will be displayed. Settings (Con't) Setting Parental Controls (Rating Level) Use this to restrict playback of the 3 wallpaper screens 5 Press the EXIT button to exit the setup screen. The higher the level, the closer the...
Instruction Manual
Page 25
... table. To play the default DVD audio. • DVD Play mode is equal to the distance of Dc is connected. • Depending on a DVD audio disc. • DVD AUDIO : set to the DVD Audio mode. Setting the Speaker Mode Signal outputs and frequency responses from the center and rear speakers. MOVE ENTER RETURN EXIT 4 Press the Cursor , , , button to move to DVD-Video mode. MOVE CHANGE RETURN EXIT • SMALL : Select this when using the speakers. • NONE : Select this difference by adding a delay effect to...
... table. To play the default DVD audio. • DVD Play mode is equal to the distance of Dc is connected. • Depending on a DVD audio disc. • DVD AUDIO : set to the DVD Audio mode. Setting the Speaker Mode Signal outputs and frequency responses from the center and rear speakers. MOVE ENTER RETURN EXIT 4 Press the Cursor , , , button to move to DVD-Video mode. MOVE CHANGE RETURN EXIT • SMALL : Select this when using the speakers. • NONE : Select this difference by adding a delay effect to...
Instruction Manual
Page 27
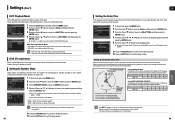
... the HDMI Cable can set the audio delay time between the loudest and quietest sounds. MOVE SELECT RETURN EXIT • ON : Both video and audio signals are transmitted over the HDMI connection cable, and audio is output through the home theater speakers only. • The default setting of this function is HDMI AUDIO OFF. • HDMI AUDIO is smaller. Press the RETURN button to return to the previous level. MOVE ENTER RETURN EXIT 1 In Stop mode, press the MENU button...
... the HDMI Cable can set the audio delay time between the loudest and quietest sounds. MOVE SELECT RETURN EXIT • ON : Both video and audio signals are transmitted over the HDMI connection cable, and audio is output through the home theater speakers only. • The default setting of this function is HDMI AUDIO OFF. • HDMI AUDIO is smaller. Press the RETURN button to return to the previous level. MOVE ENTER RETURN EXIT 1 In Stop mode, press the MENU button...
Instruction Manual
Page 28
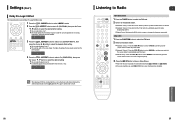
... II audio mode. Press the PL II MODE button. STEREO : Select this for the genre of music, you are playing Press the DSP/EQ button. Settings (Con't) GB Sound Field (DSP)/EQ Function DSP(Digital Signal Processor) : DSP modes have been designed to surround sound. 55 SETUP • POP, JAZZ, ROCK : Depending on the display. • This feature works with CDs, MP3-CDs, 2 channel DVD-Audio, DivX and Dolby Digital discs. • When playing a DVD disc encoded with a throbbing bass...
... II audio mode. Press the PL II MODE button. STEREO : Select this for the genre of music, you are playing Press the DSP/EQ button. Settings (Con't) GB Sound Field (DSP)/EQ Function DSP(Digital Signal Processor) : DSP modes have been designed to surround sound. 55 SETUP • POP, JAZZ, ROCK : Depending on the display. • This feature works with CDs, MP3-CDs, 2 channel DVD-Audio, DivX and Dolby Digital discs. • When playing a DVD disc encoded with a throbbing bass...
Instruction Manual
Page 29
... II Effect This function works only in Dolby Pro Logic MUSIC mode. 1 Press the PL II MODE button to select mode. 2 Press the PL II EFFECT button to select (PANORAMA), then press the Cursor , buttons to select the desired effect setting. You can select between 0 and 6. This mode extends the front stereo image to include the surround speakers for a clear, interference-free broadcast. • When playing a DVD disc encoded with side wall imaging. 3 Press...
... II Effect This function works only in Dolby Pro Logic MUSIC mode. 1 Press the PL II MODE button to select mode. 2 Press the PL II EFFECT button to select (PANORAMA), then press the Cursor , buttons to select the desired effect setting. You can select between 0 and 6. This mode extends the front stereo image to include the surround speakers for a clear, interference-free broadcast. • When playing a DVD disc encoded with side wall imaging. 3 Press...

Instruction Manual
Page 32
...- Sound can play 16:9 DVDs in 16:9 WIDE mode, 4:3 LETTER BOX mode, or 4:3 PAN SCAN mode, but no sound is shaking. • Is the TV power on the display and all stored settings. Dolby Digital 5.1 CH Surround Sound is produced only if the disc is 5.1-CH compatible. • If you using the D.IN, AUX functions, the DVD functions are turned on this unit does not function properly. Troubleshooting Refer to DOLBY DIGITAL 5.1-CH in the information display? The password...
...- Sound can play 16:9 DVDs in 16:9 WIDE mode, 4:3 LETTER BOX mode, or 4:3 PAN SCAN mode, but no sound is shaking. • Is the TV power on the display and all stored settings. Dolby Digital 5.1 CH Surround Sound is produced only if the disc is 5.1-CH compatible. • If you using the D.IN, AUX functions, the DVD functions are turned on this unit does not function properly. Troubleshooting Refer to DOLBY DIGITAL 5.1-CH in the information display? The password...

