

User Manual (user Manual) (ver.1.0) (English)
Page 4
... a pure digital AV receiver that can enjoy music files by connecting the receiver to the AV Receiver with Samsung TV and DVD player supporting Anynet+(HDMI-CEC).) ACCESSORIES POWER INPUT SELECT TV SOURCE AMP/TV DIMMER BD/DVD 1 23 4 56 SLEEP 7 89 PROLOGIC AUDIO ASSIGN DSP 0 MUTE VOL TUNING ASC /CH TUNER MEMORY SUBWOOFER MO/ST SETUP/MENU INFO RETURN EXIT BD/DVD SAT TV CD MULTI CH AUX iPod Remote Control/ Batteries (AAA size) FM antenna User's manual iPod Dock ASC microphone 4 HW-C500...
... a pure digital AV receiver that can enjoy music files by connecting the receiver to the AV Receiver with Samsung TV and DVD player supporting Anynet+(HDMI-CEC).) ACCESSORIES POWER INPUT SELECT TV SOURCE AMP/TV DIMMER BD/DVD 1 23 4 56 SLEEP 7 89 PROLOGIC AUDIO ASSIGN DSP 0 MUTE VOL TUNING ASC /CH TUNER MEMORY SUBWOOFER MO/ST SETUP/MENU INFO RETURN EXIT BD/DVD SAT TV CD MULTI CH AUX iPod Remote Control/ Batteries (AAA size) FM antenna User's manual iPod Dock ASC microphone 4 HW-C500...
User Manual (user Manual) (ver.1.0) (English)
Page 5
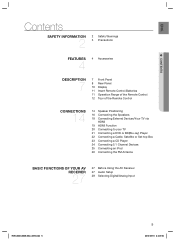
... the Remote Control 12 Tour of the Remote Control CONNECTIONS 14 14 Speaker Positioning 16 Connecting the Speakers 18 Connecting External Devices/Your TV via HDMI 19 HDMI Function 20 Connecting to your TV 21 Connecting a DVD or BD(Blu-ray) Player 22 Connecting a Cable, Satellite or Set-top Box 23 Connecting a CD Player 24 Connecting 5.1 Channel Devices 25 Connecting an iPod 26 Connecting the FM Antenna BASIC FUNCTIONS OF YOUR AV RECEIVER 27 27 Before Using the AV Receiver 27 Audio Setup 28 Selecting Digital/Analog Input HW-C500...
... the Remote Control 12 Tour of the Remote Control CONNECTIONS 14 14 Speaker Positioning 16 Connecting the Speakers 18 Connecting External Devices/Your TV via HDMI 19 HDMI Function 20 Connecting to your TV 21 Connecting a DVD or BD(Blu-ray) Player 22 Connecting a Cable, Satellite or Set-top Box 23 Connecting a CD Player 24 Connecting 5.1 Channel Devices 25 Connecting an iPod 26 Connecting the FM Antenna BASIC FUNCTIONS OF YOUR AV RECEIVER 27 27 Before Using the AV Receiver 27 Audio Setup 28 Selecting Digital/Analog Input HW-C500...

User Manual (user Manual) (ver.1.0) (English)
Page 7
...SETUP 4 TONE CONTROL 5 SOUND EFFECT 6 DISPLAY 7 VOLUME CONTROL 8 POWER 9 ASC MIC JACK 10 ASC BUTTON 11 AUDIO ASSIGN BUTTON 12 S.DIRECT/STEREO BUTTON 13 MULTI CH INPUT BUTTON 14 AV SYNC BUTTON 15 TUNING MODE BUTTON 16 SELECT BUTTON 17 MEMORY BUTTON Used to select an input mode for FM radio. Displays the speaker/audio input status, listening mode, etc Adjusts the volume level. Toggles to select a source. (FM BD/DVD SAT TV CD AUX 5.1 MULTI CH IPOD AUDIO IPOD VIDEO). Used to change the tone level. ENG Description FRONT PANEL 1 2 34 5 6 7 8 INPUT SELECT ENTER SETUP TONE...
...SETUP 4 TONE CONTROL 5 SOUND EFFECT 6 DISPLAY 7 VOLUME CONTROL 8 POWER 9 ASC MIC JACK 10 ASC BUTTON 11 AUDIO ASSIGN BUTTON 12 S.DIRECT/STEREO BUTTON 13 MULTI CH INPUT BUTTON 14 AV SYNC BUTTON 15 TUNING MODE BUTTON 16 SELECT BUTTON 17 MEMORY BUTTON Used to select an input mode for FM radio. Displays the speaker/audio input status, listening mode, etc Adjusts the volume level. Toggles to select a source. (FM BD/DVD SAT TV CD AUX 5.1 MULTI CH IPOD AUDIO IPOD VIDEO). Used to change the tone level. ENG Description FRONT PANEL 1 2 34 5 6 7 8 INPUT SELECT ENTER SETUP TONE...

User Manual (user Manual) (ver.1.0) (English)
Page 9
...FM ANTENNA JACK 2 MULTI CH IN JACKS 3 VIDEO IN JACKS 4 HDMI IN JACKS 5 HDMI OUT JACK 6 USB PORT 7 VIDEO OUT JACK 8 COMPONENT VIDEO IN JACKS 9 COMPONENT VIDEO OUT JACKS 10 iPod JACK 11 OPTICAL IN JACKS (DIGITAL AUDIO IN) 12 COAXIAL IN JACK (DIGITAL AUDIO IN) 13 AUDIO IN JACKS 14 SUBWOOFER AUDIO OUT JACK 15 SPEAKER OUT TERMINALS Connect the FM Antenna here. Receives the audio signal from a video player (BD/DVD, SAT, TV). Receives the video signal from a video player (BD/DVD, SAT, TV, CD). Outputs digital video and audio signals simultaneously using an HDMI cable. Receives the digital...
...FM ANTENNA JACK 2 MULTI CH IN JACKS 3 VIDEO IN JACKS 4 HDMI IN JACKS 5 HDMI OUT JACK 6 USB PORT 7 VIDEO OUT JACK 8 COMPONENT VIDEO IN JACKS 9 COMPONENT VIDEO OUT JACKS 10 iPod JACK 11 OPTICAL IN JACKS (DIGITAL AUDIO IN) 12 COAXIAL IN JACK (DIGITAL AUDIO IN) 13 AUDIO IN JACKS 14 SUBWOOFER AUDIO OUT JACK 15 SPEAKER OUT TERMINALS Connect the FM Antenna here. Receives the audio signal from a video player (BD/DVD, SAT, TV). Receives the video signal from a video player (BD/DVD, SAT, TV, CD). Outputs digital video and audio signals simultaneously using an HDMI cable. Receives the digital...
User Manual (user Manual) (ver.1.0) (English)
Page 11
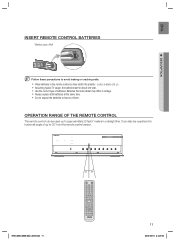
.... INPUT SELECT ENTER SETUP TONE CONTROL SOUND EFFECT ASC MIC ASC AUDIO ASSIGN S. DIRECT /STEREO MULTI CH INPUT AV SYNC TUNING MODE SELECT MEMORY HW-C500-C560S-XAC_0616.indd 11 POWER INPUT SELECT TV SOURCE AMP/TV DIMMER BD/DVD 1 23 4 56 SLEEP 7 89 PROLOGIC AUDIO ASSIGN DSP 0 MUTE VOL TUNING ASC /CH TUNER MEMORY SUBWOOFER MO/ST SETUP/MENU INFO RETURN EXIT BD/DVD SAT TV CD MULTI CH AUX iPod 11 2010-06-16 2:07:53 OPERATION RANGE OF THE REMOTE CONTROL The remote control can...
.... INPUT SELECT ENTER SETUP TONE CONTROL SOUND EFFECT ASC MIC ASC AUDIO ASSIGN S. DIRECT /STEREO MULTI CH INPUT AV SYNC TUNING MODE SELECT MEMORY HW-C500-C560S-XAC_0616.indd 11 POWER INPUT SELECT TV SOURCE AMP/TV DIMMER BD/DVD 1 23 4 56 SLEEP 7 89 PROLOGIC AUDIO ASSIGN DSP 0 MUTE VOL TUNING ASC /CH TUNER MEMORY SUBWOOFER MO/ST SETUP/MENU INFO RETURN EXIT BD/DVD SAT TV CD MULTI CH AUX iPod 11 2010-06-16 2:07:53 OPERATION RANGE OF THE REMOTE CONTROL The remote control can...

User Manual (user Manual) (ver.1.0) (English)
Page 13
...select the BD mode, the button will flash green. If you select the DVD mode, the button will flash orange. - Used to select an input source. Display information on a connected DVD/BD player or iPod. 7 MUTE BUTTON Mutes the sound of a connected device. 8 VOLUME CONTROL BUTTONS Adjusts the volume of the display. ENG ● DESCRIPTION 1 POWER BUTTON 2 AMP/TV BUTTON 3 NUMBER BUTTONS Turns the receiver on a connected device. 23 TUNING/CHANNEL BUTTONS Used to change the radio broadcasting frequency or TV channel. 24 ASC BUTTON Used to select an item in the SETUP menu...
...select the BD mode, the button will flash green. If you select the DVD mode, the button will flash orange. - Used to select an input source. Display information on a connected DVD/BD player or iPod. 7 MUTE BUTTON Mutes the sound of a connected device. 8 VOLUME CONTROL BUTTONS Adjusts the volume of the display. ENG ● DESCRIPTION 1 POWER BUTTON 2 AMP/TV BUTTON 3 NUMBER BUTTONS Turns the receiver on a connected device. 23 TUNING/CHANNEL BUTTONS Used to change the radio broadcasting frequency or TV channel. 24 ASC BUTTON Used to select an item in the SETUP menu...

User Manual (user Manual) (ver.1.0) (English)
Page 18
..., projector, DVD player, Blu-ray player, set-top box and more. Connections CONNECTING EXTERNAL DEVICES/YOUR TV VIA HDMI HDMI is protected by the performance of the connected device. Since HDMI connection supports both the connected external device and TV must support High-bandwidth Digital Content Protection System (HDCP). HDMI removes any loss of signal from SACD discs will not be limited by CPPM, use Anynet+. Compatibility with a TV Supporting HDMI A TV with a DVI-D jack (TV not supporting HDCP) Video/Audio Video -
..., projector, DVD player, Blu-ray player, set-top box and more. Connections CONNECTING EXTERNAL DEVICES/YOUR TV VIA HDMI HDMI is protected by the performance of the connected device. Since HDMI connection supports both the connected external device and TV must support High-bandwidth Digital Content Protection System (HDCP). HDMI removes any loss of signal from SACD discs will not be limited by CPPM, use Anynet+. Compatibility with a TV Supporting HDMI A TV with a DVI-D jack (TV not supporting HDCP) Video/Audio Video -

User Manual (user Manual) (ver.1.0) (English)
Page 19
... control other Samsung Devices with Samsung TV and DVD player supporting Anynet +(HDMI-CEC). Please check your Samsung TV's remote control. Press the ENTER button to select HDMI SETUP, and then press the ENTER or ► button. 4. Press the ▲▼ buttons to select SETUP ENTER. 3. M If you are making Anynet+ connection, do not connect more information.) • You can be used by using the Volume buttons on the display and Setup Mode is pressed, the mode switches...
... control other Samsung Devices with Samsung TV and DVD player supporting Anynet +(HDMI-CEC). Please check your Samsung TV's remote control. Press the ENTER button to select HDMI SETUP, and then press the ENTER or ► button. 4. Press the ▲▼ buttons to select SETUP ENTER. 3. M If you are making Anynet+ connection, do not connect more information.) • You can be used by using the Volume buttons on the display and Setup Mode is pressed, the mode switches...

User Manual (user Manual) (ver.1.0) (English)
Page 22
Connections CONNECTING A CABLE, SATELLITE OR SET-TOP BOX COMPONENT VIDEO IN IN or iPod or COMPONENT OPTICAL AUDIO VIDEO OUT OUT OUT OUT or SAT(Cable/Satellite/Set-top box) Video Connection Connect a Component video cable(not supplied) from the COMPONENT IN (SAT) (PR, PB and Y) jacks on the back of the SAT. Connect the audio cable's red plug to the red jack and white cable to either the right or left audio input jack of the SAT. Audio Connection Connect the Digital Input (OPTICAL 2) on your AV Receiver to the Digital Output of...
Connections CONNECTING A CABLE, SATELLITE OR SET-TOP BOX COMPONENT VIDEO IN IN or iPod or COMPONENT OPTICAL AUDIO VIDEO OUT OUT OUT OUT or SAT(Cable/Satellite/Set-top box) Video Connection Connect a Component video cable(not supplied) from the COMPONENT IN (SAT) (PR, PB and Y) jacks on the back of the SAT. Connect the audio cable's red plug to the red jack and white cable to either the right or left audio input jack of the SAT. Audio Connection Connect the Digital Input (OPTICAL 2) on your AV Receiver to the Digital Output of...

User Manual (user Manual) (ver.1.0) (English)
Page 27
...; button. 4. SETUP OFF appears on or set to the outlet. Remote control functions You can operate your AV Receiver BEFORE USING THE AV RECEIVER Turning On/Off Connect the power plug to Standby mode. • You can also turn . Method 2 Press the TUNING/CH, BD/DVD, SAT, TV, CD, MULTI CH, AUX or iPod button. • You can also use SETUP, ,,.,, ENTER on the front of your AMP (this AV receiver)/ TV and BD(Samsung only)/ DVD player with this button...
...; button. 4. SETUP OFF appears on or set to the outlet. Remote control functions You can operate your AV Receiver BEFORE USING THE AV RECEIVER Turning On/Off Connect the power plug to Standby mode. • You can also turn . Method 2 Press the TUNING/CH, BD/DVD, SAT, TV, CD, MULTI CH, AUX or iPod button. • You can also use SETUP, ,,.,, ENTER on the front of your AMP (this AV receiver)/ TV and BD(Samsung only)/ DVD player with this button...

User Manual (user Manual) (ver.1.0) (English)
Page 33
... (Subwoofer) YES, NO YES CROVR (Crossover Frequency) 60, 80, 100,120, 150, 180, 200(Hz) 100Hz • LARGE : Select when using small speakers • NONE : Select when no speaker is only set to select SETUP ENTER. Æ 3. ENG ● SETUP SETTING THE SPEAKER SIZE Signal outputs and frequency response from the speaker will be adjusted according to set the mode (LARGE, SMALL etc.) for the best bass response in turn. 5. Press the SETUP/MENU button. •...
... (Subwoofer) YES, NO YES CROVR (Crossover Frequency) 60, 80, 100,120, 150, 180, 200(Hz) 100Hz • LARGE : Select when using small speakers • NONE : Select when no speaker is only set to select SETUP ENTER. Æ 3. ENG ● SETUP SETTING THE SPEAKER SIZE Signal outputs and frequency response from the speaker will be adjusted according to set the mode (LARGE, SMALL etc.) for the best bass response in turn. 5. Press the SETUP/MENU button. •...

User Manual (user Manual) (ver.1.0) (English)
Page 35
... display and Setup Mode is pressed, the mode switches between SETUP ENTER and SETUP OFF. 2. To exit setup mode - • Press the SETUP/MENU button. Press the ▲▼ buttons to select SPK LEVEL, and then press the ENTER or ► button. 4. ENG ● SETUP SETTING THE SPEAKER LEVEL You can set the Speaker Level mode. Æ • You can adjust it from -10 to +10dB in turn. 5. Press the SETUP/MENU button. • Each time the button is exited. - Setting Speaker Level...
... display and Setup Mode is pressed, the mode switches between SETUP ENTER and SETUP OFF. 2. To exit setup mode - • Press the SETUP/MENU button. Press the ▲▼ buttons to select SPK LEVEL, and then press the ENTER or ► button. 4. ENG ● SETUP SETTING THE SPEAKER LEVEL You can set the Speaker Level mode. Æ • You can adjust it from -10 to +10dB in turn. 5. Press the SETUP/MENU button. • Each time the button is exited. - Setting Speaker Level...

User Manual (user Manual) (ver.1.0) (English)
Page 36
... be selected in turn. 2) Press the ▲▼ buttons to +10 dB by 1 step. During test tone output, press the ▲▼ buttons to adjust the speaker output level from -10 to +10dB by 1 step. Æ • MANUAL : Enables you want , and then press the ENTER or ► button. Æ • AUTO : Test signal will be automatically output as follows; SETUP OFF appears on the display and test tone stops. 36 HW...
... be selected in turn. 2) Press the ▲▼ buttons to +10 dB by 1 step. During test tone output, press the ▲▼ buttons to adjust the speaker output level from -10 to +10dB by 1 step. Æ • MANUAL : Enables you want , and then press the ENTER or ► button. Æ • AUTO : Test signal will be automatically output as follows; SETUP OFF appears on the display and test tone stops. 36 HW...

User Manual (user Manual) (ver.1.0) (English)
Page 37
... remote control. • MOVIE : Adds realism to the movie soundtrack. • MUSIC : Provides 5.1 channel surround sound for PCM audio signals with side wall imaging.) Æ • DIMENSION : You can set from 2 channel sources. Press the SETUP/MENU button. • Each time the button is set from -7 to +7. (Incrementally adjusts the sound field (DSP)from the center speaker.) M PANORAMA, DIMENSION and CENTER WIDTH settings are enabled only if the mode is pressed, the mode switches between SETUP...
... remote control. • MOVIE : Adds realism to the movie soundtrack. • MUSIC : Provides 5.1 channel surround sound for PCM audio signals with side wall imaging.) Æ • DIMENSION : You can set from 2 channel sources. Press the SETUP/MENU button. • Each time the button is set from -7 to +7. (Incrementally adjusts the sound field (DSP)from the center speaker.) M PANORAMA, DIMENSION and CENTER WIDTH settings are enabled only if the mode is pressed, the mode switches between SETUP...
User Manual (user Manual) (ver.1.0) (English)
Page 40
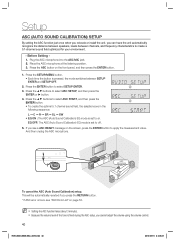
... select SETUP ENTER. Æ 3. EQ OFF: The ASC (Auto Sound Calibration) EQ mode is set to create a 5.1-channel sound field optimized for your environment. - Plug the ASC microphone into the ASC MIC jack. 2. Place the ASC microphone at the listening position. 3. ASC Microphone To cancel the ASC (Auto Sound Calibration) setup. Press the SETUP/MENU button. • Each time the button is fixed during the ASC setup, you cannot adjust the volume using the volume control. 40 HW...
... select SETUP ENTER. Æ 3. EQ OFF: The ASC (Auto Sound Calibration) EQ mode is set to create a 5.1-channel sound field optimized for your environment. - Plug the ASC microphone into the ASC MIC jack. 2. Place the ASC microphone at the listening position. 3. ASC Microphone To cancel the ASC (Auto Sound Calibration) setup. Press the SETUP/MENU button. • Each time the button is fixed during the ASC setup, you cannot adjust the volume using the volume control. 40 HW...

User Manual (user Manual) (ver.1.0) (English)
Page 41
... HDMI connected external devices. 1. M HDMI Audio is enabled. - Press the ▲▼ buttons to automatically correct any delay between SETUP ENTER and SETUP OFF. 2. Press the ▲▼ buttons to control other Samsung Devices with your HDMI-compatible TV supports HDMI Sync. TV : HDMI audio is output • HDMI ANYNET+ : ON, OFF Anynet+ is a function that enables you can use this function to enjoy Dolby Digital sound when watching movies at low volume at the HDMI IN is changed...
... HDMI connected external devices. 1. M HDMI Audio is enabled. - Press the ▲▼ buttons to automatically correct any delay between SETUP ENTER and SETUP OFF. 2. Press the ▲▼ buttons to control other Samsung Devices with your HDMI-compatible TV supports HDMI Sync. TV : HDMI audio is output • HDMI ANYNET+ : ON, OFF Anynet+ is a function that enables you can use this function to enjoy Dolby Digital sound when watching movies at low volume at the HDMI IN is changed...
User Manual (user Manual) (ver.1.0) (English)
Page 42
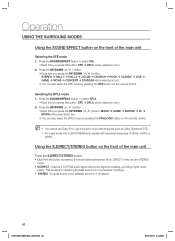
... S.DIRECT/STEREO button on the remote control. DIRECT mode and the STEREO mode. • S.DIRECT : Outputs 2 CH PCM audio signal without any signal processing, providing higher audio quality. Press the SOUND EFFECT button to select DPLII. • Each time you press this button, SFE Æ DPLII will be selected in turn . 2. M You cannot use Dolby Pro Logic ll mode for multi channel signals such as Dolby Digital and DTS. Pro Logic works only for obtaining the best sound from a connected CD player. • STEREO : Outputs sound...
... S.DIRECT/STEREO button on the remote control. DIRECT mode and the STEREO mode. • S.DIRECT : Outputs 2 CH PCM audio signal without any signal processing, providing higher audio quality. Press the SOUND EFFECT button to select DPLII. • Each time you press this button, SFE Æ DPLII will be selected in turn . 2. M You cannot use Dolby Pro Logic ll mode for multi channel signals such as Dolby Digital and DTS. Pro Logic works only for obtaining the best sound from a connected CD player. • STEREO : Outputs sound...
User Manual (user Manual) (ver.1.0) (English)
Page 44
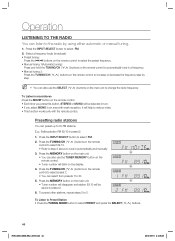
...; • Tuner number will disappear and station 89.10 will help to reduce noise. • This function works only with weak reception, it will be saved in mono/stereo Press the MO/ST button on the remote control to increase or decrease the frequency step by using either automatic or manual tuning. 1. To Listen to Preset Station • Press the TUNING MODE button to select FM. 2. Press the INPUT SELECT button to 5. M ...
...; • Tuner number will disappear and station 89.10 will help to reduce noise. • This function works only with weak reception, it will be saved in mono/stereo Press the MO/ST button on the remote control to increase or decrease the frequency step by using either automatic or manual tuning. 1. To Listen to Preset Station • Press the TUNING MODE button to select FM. 2. Press the INPUT SELECT button to 5. M ...

User Manual (user Manual) (ver.1.0) (English)
Page 52
... 14 ~16 to connect them correctly. • Press the MUTE button to cancel the function. • Adjust the volume. • Refer to pages 33 to select proper Surround Mode. • Only 2 channel signal can select Dolby Pro Logic II mode. (ex:Dolby Digital, PCM, 2 channel analog input signal.) 52 HW-C500-C560S-XAC_0616.indd 52 2010-06-16 2:08:33 Remote controller does not work when the button is reversed. Can't select Dolby Pro Logic ll...
... 14 ~16 to connect them correctly. • Press the MUTE button to cancel the function. • Adjust the volume. • Refer to pages 33 to select proper Surround Mode. • Only 2 channel signal can select Dolby Pro Logic II mode. (ex:Dolby Digital, PCM, 2 channel analog input signal.) 52 HW-C500-C560S-XAC_0616.indd 52 2010-06-16 2:08:33 Remote controller does not work when the button is reversed. Can't select Dolby Pro Logic ll...
User Manual (user Manual) (ver.1.0) (English)
Page 53
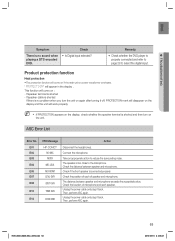
... This function will work properly. If speaker cable is shorted If there is properly connected and refer to page 28 to reduce the surrounding noise. Check the distance between speaker and microphone exceeds the acceptable value. Check if the front speaker is shorted - Unplug the power cable and plug it back. Remedy • Check whether the DVD player is no sound when • Is Digital input selected? Then...
... This function will work properly. If speaker cable is shorted If there is properly connected and refer to page 28 to reduce the surrounding noise. Check the distance between speaker and microphone exceeds the acceptable value. Check if the front speaker is shorted - Unplug the power cable and plug it back. Remedy • Check whether the DVD player is no sound when • Is Digital input selected? Then...


