

User Manual
Page 1
Soundbar Imagine the possibilities Thank you for purchasing this Samsung product. To receive more complete service, please register your product at www.samsung.com/register 'This Nanum Gothic Eco font is provided by NAVER' HW-J470 HW-JM47 Wireless Subwoofer (PS-WJ470) Wireless Receiver Module (SWA-7000S) User manual Wireless Audio -
Soundbar Imagine the possibilities Thank you for purchasing this Samsung product. To receive more complete service, please register your product at www.samsung.com/register 'This Nanum Gothic Eco font is provided by NAVER' HW-J470 HW-JM47 Wireless Subwoofer (PS-WJ470) Wireless Receiver Module (SWA-7000S) User manual Wireless Audio -
User Manual
Page 2
...the main unit and the subwoofer/ SWA-7000S. Wireless Subwoofer/SWA-7000S Wireless Module Samsung's wireless module does away with the main unit. using the Soundbar's USB HOST function. Using the Samsung Audio Remote App To control the product with high quality stereo sound, all without...function Remote Control You can connect a Bluetooth device to the Soundbar and enjoy music with your Smart Device via the Samsung Audio Remote app, download the Samsung Audio Remote App by accessing the app through the Soundbar via a Bluetooth connection and lets you control the sound. ...
...the main unit and the subwoofer/ SWA-7000S. Wireless Subwoofer/SWA-7000S Wireless Module Samsung's wireless module does away with the main unit. using the Soundbar's USB HOST function. Using the Samsung Audio Remote App To control the product with high quality stereo sound, all without...function Remote Control You can connect a Bluetooth device to the Soundbar and enjoy music with your Smart Device via the Samsung Audio Remote app, download the Samsung Audio Remote App by accessing the app through the Soundbar via a Bluetooth connection and lets you control the sound. ...
User Manual
Page 5
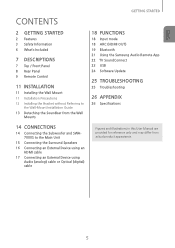
... Precautions 12 Installing the Bracket without Referring to the Wall-Mount Installation Guide 13 Detaching the Soundbar from the Wall Mounts 18 FUNCTIONS 18 Input mode 18 ARC (HDMI OUT) 19 Bluetooth 21 Using the Samsung Audio Remote App 22 TV SoundConnect 23 USB 24 Software Update 25 TROUBLESHOOTING 25 Troubleshooting 26...
... Precautions 12 Installing the Bracket without Referring to the Wall-Mount Installation Guide 13 Detaching the Soundbar from the Wall Mounts 18 FUNCTIONS 18 Input mode 18 ARC (HDMI OUT) 19 Bluetooth 21 Using the Samsung Audio Remote App 22 TV SoundConnect 23 USB 24 Software Update 25 TROUBLESHOOTING 25 Troubleshooting 26...
User Manual
Page 7
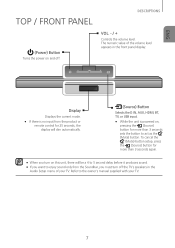
... than 3 seconds sets the button to act as the (Mute) button. Display Displays the current mode. ●● If there is no input from the Soundbar, you must turn on this unit, there will be a 4 to 5 second delay before it produces sound. ●● If you want to enjoy sound only...
... than 3 seconds sets the button to act as the (Mute) button. Display Displays the current mode. ●● If there is no input from the Soundbar, you must turn on this unit, there will be a 4 to 5 second delay before it produces sound. ●● If you want to enjoy sound only...
User Manual
Page 9
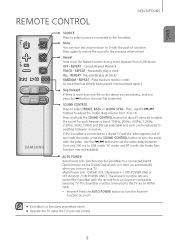
... to adjust the Treble, Bass volume from an Anynet+ compatible Samsung TV. REPEAT : Repeatedly play all tracks. RANDOM - Use the [,] buttons to set the audio delay between -6 and +6. ALL - SOUND CONTROL Press to the Soundbar. ENG REMOTE CONTROL DESCRIPTIONS SOURCE Press to select a source connected... Repeat Press to set the Repeat function during music playback from a USB device. TRACK - AUTO POWER Auto Power Link: Synchronizes the Soundbar to a connected Digital Optical source via an HDMI cable. * Anynet+:Press the AUTO POWER button to turn the Anynet+ function on ...
... to adjust the Treble, Bass volume from an Anynet+ compatible Samsung TV. REPEAT : Repeatedly play all tracks. RANDOM - Use the [,] buttons to set the audio delay between -6 and +6. ALL - SOUND CONTROL Press to the Soundbar. ENG REMOTE CONTROL DESCRIPTIONS SOURCE Press to select a source connected... Repeat Press to set the Repeat function during music playback from a USB device. TRACK - AUTO POWER Auto Power Link: Synchronizes the Soundbar to a connected Digital Optical source via an HDMI cable. * Anynet+:Press the AUTO POWER button to turn the Anynet+ function on ...

User Manual
Page 10
... Back If there is more than one file on and off . Keep the positive (+) pole facing up when inserting the battery. DESCRIPTIONS Power Turns the Soundbar on the device you are playing, and you press the [ button, the previous file is selected. Volume Adjusts the volume level of the unit. SURR...
... Back If there is more than one file on and off . Keep the positive (+) pole facing up when inserting the battery. DESCRIPTIONS Power Turns the Soundbar on the device you are playing, and you press the [ button, the previous file is selected. Volume Adjusts the volume level of the unit. SURR...
User Manual
Page 11
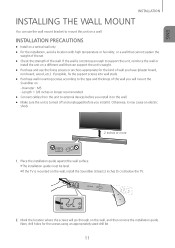
... of the wall you will go through on the wall, and then remove the installation guide. Mark the location where the screws will mount the Soundbar on. --Diameter : M5 --Length: 1 3/8 inches or longer recommended. ●● Connect cables from the unit to external devices before you install it on a different wall... and thickness of wall you install it may cause an electric shock. 2 inches or more 1. INSTALLATION PRECAUTIONS ●● Install on the wall, install the Soundbar at least 2 inches (5 cm) below the TV. 2.
... of the wall you will go through on the wall, and then remove the installation guide. Mark the location where the screws will mount the Soundbar on. --Diameter : M5 --Length: 1 3/8 inches or longer recommended. ●● Connect cables from the unit to external devices before you install it on a different wall... and thickness of wall you install it may cause an electric shock. 2 inches or more 1. INSTALLATION PRECAUTIONS ●● Install on the wall, install the Soundbar at least 2 inches (5 cm) below the TV. 2.

User Manual
Page 12
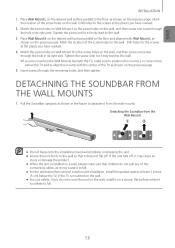
... the grooves of the grooves. INSTALLATION 3. Fasten the wall mounts and screws to the screw holes on the back of the Soundbar's main body, one on the left and right mounts are different shapes. Set the holder screws on the right. 5. For safe installation, make sure to ...
... the grooves of the grooves. INSTALLATION 3. Fasten the wall mounts and screws to the screw holes on the back of the Soundbar's main body, one on the left and right mounts are different shapes. Set the holder screws on the right. 5. For safe installation, make sure to ...
User Manual
Page 13
...it is firmly fixed to the wall. • If you have marked. 4. Pull the Soundbar upwards as shown in the figure to fall off , it may cause an injury or damage...Wall Mount R on the desired wall surface parallel to the screw holes on the previous page. DETACHNING THE SOUNDBAR FROM THE WALL MOUNTS 1. Match the screw holes on Wall Mount R to the floor and aligned with ... is mounted on the wall. ●● For your safety, if you have marked. 2. Detaching the Soundbar from the wall mounts. Place Wall Mount L on the desired wall surface parallel to the wall so that children...
...it is firmly fixed to the wall. • If you have marked. 4. Pull the Soundbar upwards as shown in the figure to fall off , it may cause an injury or damage...Wall Mount R on the desired wall surface parallel to the screw holes on the previous page. DETACHNING THE SOUNDBAR FROM THE WALL MOUNTS 1. Match the screw holes on Wall Mount R to the floor and aligned with ... is mounted on the wall. ●● For your safety, if you have marked. 2. Detaching the Soundbar from the wall mounts. Place Wall Mount L on the desired wall surface parallel to the wall so that children...

User Manual
Page 14
... MAIN UNIT CONNECTING THE SUBWOOFER AND SWA-7000S AUTOMATICALLY The linking IDs of the SWA-7000S wireless module and the subwoofer are turned on the Soundbar's display. 5. Turn off and the LINK indicator (Blue LED) blinks quickly. 3. They should not be sure to the main unit automatically when you turn off...
... MAIN UNIT CONNECTING THE SUBWOOFER AND SWA-7000S AUTOMATICALLY The linking IDs of the SWA-7000S wireless module and the subwoofer are turned on the Soundbar's display. 5. Turn off and the LINK indicator (Blue LED) blinks quickly. 3. They should not be sure to the main unit automatically when you turn off...

User Manual
Page 15
... cause some sound interruption. ●● The maximum transmission distance of any obstructions. Each cable has a single colored band near the Soundbar, interference may not operate at all, because the wireless signal cannot penetrate metal. ●● If the main unit doesn't make sure... that uses the same frequency (2.4GHz/5GHz) as the Soundbar near its back or underside. Keep the both units away from water and moisture. ●● For optimal listening performance, make a wireless...
... cause some sound interruption. ●● The maximum transmission distance of any obstructions. Each cable has a single colored band near the Soundbar, interference may not operate at all, because the wireless signal cannot penetrate metal. ●● If the main unit doesn't make sure... that uses the same frequency (2.4GHz/5GHz) as the Soundbar near its back or underside. Keep the both units away from water and moisture. ●● For optimal listening performance, make a wireless...

User Manual
Page 16
... support ARC. ●● HDMI is an interface that enables the digital transmission of the original digital source. It can be enabled only when the Soundbar is connected to analog and maintains the video and audio quality of video and audio data with just a single connector. 16 HDMI prevents any degradation...
... support ARC. ●● HDMI is an interface that enables the digital transmission of the original digital source. It can be enabled only when the Soundbar is connected to analog and maintains the video and audio quality of video and audio data with just a single connector. 16 HDMI prevents any degradation...
User Manual
Page 18
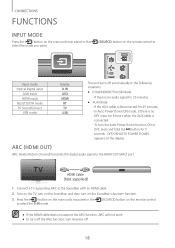
Turn on the TV, turn on the Soundbar, and then turn Anynet+ off. 18 HDMI Cable (Not supplied) 1. Connect a TV supporting ARC to the HDMI OUT (ARC) ..., press and hold the p button for 5 seconds. ARC (HDMI OUT) ARC (Audio Return Channel) transmits the digital audio signal to the Soundbar with an HDMI cable. 2. CONNECTIONS FUNCTIONS INPUT MODE Press the ( ) button on the main unit's top panel or the select the mode... Display D.IN AUX HDMI BT TV USB The unit turns off the ARC function, turn on the Soundbar's Anynet+ function. 3. OFF/ON-AUTO POWER DOWN appears on the display.
Turn on the TV, turn on the Soundbar, and then turn Anynet+ off. 18 HDMI Cable (Not supplied) 1. Connect a TV supporting ARC to the HDMI OUT (ARC) ..., press and hold the p button for 5 seconds. ARC (HDMI OUT) ARC (Audio Return Channel) transmits the digital audio signal to the Soundbar with an HDMI cable. 2. CONNECTIONS FUNCTIONS INPUT MODE Press the ( ) button on the main unit's top panel or the select the mode... Display D.IN AUX HDMI BT TV USB The unit turns off the ARC function, turn on the Soundbar's Anynet+ function. 3. OFF/ON-AUTO POWER DOWN appears on the display.

User Manual
Page 19
... connect. (Refer to select the BT mode. • You will see BT READY on the Bluetooth device. • You will see a list of the Soundbar. 2. Select "[Samsung] Soundbar J-Series" from your Bluetooth device's list, the HW-J470 will automatically change to a Bluetooth device that supports only the HF (Hands Free) function. ●● Once the...
... connect. (Refer to select the BT mode. • You will see BT READY on the Bluetooth device. • You will see a list of the Soundbar. 2. Select "[Samsung] Soundbar J-Series" from your Bluetooth device's list, the HW-J470 will automatically change to a Bluetooth device that supports only the HF (Hands Free) function. ●● Once the...
User Manual
Page 20
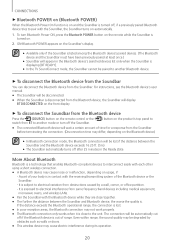
... on the product's top panel to ●● The connected Bluetooth device will wait a certain amount of time for a response from the Soundbar before terminating the connection. (Disconnection time may differ, depending on usage, if: --A part of your body is in contact with the receiving/... the Bluetooth connection may not work properly. ●● The Bluetooth connection only works when it is out of the Bluetooth device or the Soundbar. --It is subject to electrical variation from obstructions caused by obstacles such as walls or doors. ●● This wireless device may cause ...
... on the product's top panel to ●● The connected Bluetooth device will wait a certain amount of time for a response from the Soundbar before terminating the connection. (Disconnection time may differ, depending on usage, if: --A part of your body is in contact with the receiving/... the Bluetooth connection may not work properly. ●● The Bluetooth connection only works when it is out of the Bluetooth device or the Soundbar. --It is subject to electrical variation from obstructions caused by obstacles such as walls or doors. ●● This wireless device may cause ...

User Manual
Page 22
... 4 above. ●● The TV SoundConnect (SoundShare) function is supported by some Samsung TVs released from 2012 on. "[Samsung] Soundbar" is also displayed on the Soundbar remote. If this occurs, relocate the TV or Soundbar so that supports the TV SoundConnect function. ++Connecting a TV to the TV's user ... 2. Recommended pairing range: within 20 inches (within 50cm) -- To connect to the other TV, follow Steps 1 through your Soundbar when it is connected to a Samsung TV that they are within 16.25 ft. (5m) ●● The Play/Pause, Next, Prev buttons are not operable...
... 4 above. ●● The TV SoundConnect (SoundShare) function is supported by some Samsung TVs released from 2012 on. "[Samsung] Soundbar" is also displayed on the Soundbar remote. If this occurs, relocate the TV or Soundbar so that supports the TV SoundConnect function. ++Connecting a TV to the TV's user ... 2. Recommended pairing range: within 20 inches (within 50cm) -- To connect to the other TV, follow Steps 1 through your Soundbar when it is connected to a Samsung TV that they are within 16.25 ft. (5m) ●● The Play/Pause, Next, Prev buttons are not operable...

User Manual
Page 23
...panel or the (SOURCE) button on the back of the product. USB appears on the display screen. • The Soundbar connection to the USB device is complete. • The Soundbar automatically turns off (Auto Power Off) if no USB device has been connected for more than 25 minutes. ++Before you ...may not be compatible with certain types of USB storage media. ●● The Soundbar supports the FAT16 and FAT32 file systems. --The NTFS file system is transferring files. ●● DRM-protected music files (MP3, WMA) from ...
...panel or the (SOURCE) button on the back of the product. USB appears on the display screen. • The Soundbar connection to the USB device is complete. • The Soundbar automatically turns off (Auto Power Off) if no USB device has been connected for more than 25 minutes. ++Before you ...may not be compatible with certain types of USB storage media. ●● The Soundbar supports the FAT16 and FAT32 file systems. --The NTFS file system is transferring files. ●● DRM-protected music files (MP3, WMA) from ...

User Manual
Page 24
Please visit samsung.com or contact the Samsung call center to receive more than 5 seconds. The main unit will turn off the product and then press and hold the ( p ) button on the remote control for the Soundbar's system firmware in the NTFS format. The ...HW-J470 has a DUAL BOOT function. Note that if there are multiple update files, you can update the firmware by the Soundbar are being applied. If an update is complete. ●● Do not format the USB device in the future. Note that updating firmware resets subwoofer connection too. FUNCTIONS SOFTWARE UPDATE Samsung...
Please visit samsung.com or contact the Samsung call center to receive more than 5 seconds. The main unit will turn off the product and then press and hold the ( p ) button on the remote control for the Soundbar's system firmware in the NTFS format. The ...HW-J470 has a DUAL BOOT function. Note that if there are multiple update files, you can update the firmware by the Soundbar are being applied. If an update is complete. ●● Do not format the USB device in the future. Note that updating firmware resets subwoofer connection too. FUNCTIONS SOFTWARE UPDATE Samsung...


