User Manual (user Manual) (ver.1.0) (English)
Page 8
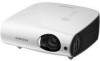
... Button Used to select input signals from the external sources. SOURCE Button Used to enlarge or reduce image size. Lens ※ Refer to turn the projector on or off. - STAND BY (Blue LED) 5. TEMP (Red LED) 6. POWER( ) Button Used to the LED Indications. 2. VOL - / + & Select and Move Button 7. Indicators - Use this...
... Button Used to select input signals from the external sources. SOURCE Button Used to enlarge or reduce image size. Lens ※ Refer to turn the projector on or off. - STAND BY (Blue LED) 5. TEMP (Red LED) 6. POWER( ) Button Used to the LED Indications. 2. VOL - / + & Select and Move Button 7. Indicators - Use this...

User Manual (user Manual) (ver.1.0) (English)
Page 9
...Open the lens cover completely. Refer to Action 3 below . ○ ○ This indicates that the power is turned off the inside the projector is not properly closed ◐ properly. ● ◐ ◐ This indicates that the lens Measures If the symptom remains even after ...the POWER button ○ on the side of the projector has increased beyond the maintenance limit. Action 2 When the lamp cover protecting the lamp unit is not in normal operation ◐ condition. &#...
...Open the lens cover completely. Refer to Action 3 below . ○ ○ This indicates that the power is turned off the inside the projector is not properly closed ◐ properly. ● ◐ ◐ This indicates that the lens Measures If the symptom remains even after ...the POWER button ○ on the side of the projector has increased beyond the maintenance limit. Action 2 When the lamp cover protecting the lamp unit is not in normal operation ◐ condition. &#...
User Manual (user Manual) (ver.1.0) (English)
Page 10
...force. If the same problem occurs continually, contact your product distributor or service center. Check whether the ventilating hole of the projector has increased beyond the maintenance limit. Check whether the air filter is blocked. The lamp malfunctions after power turns off abnormally or... after turning off the projector. If the internal temperature of the projector is blocked. When the screen becomes darker Check the lamp usage time on right after powering on the ...
...force. If the same problem occurs continually, contact your product distributor or service center. Check whether the ventilating hole of the projector has increased beyond the maintenance limit. Check whether the air filter is blocked. The lamp malfunctions after power turns off abnormally or... after turning off the projector. If the internal temperature of the projector is blocked. When the screen becomes darker Check the lamp usage time on right after powering on the ...
User Manual (user Manual) (ver.1.0) (English)
Page 11
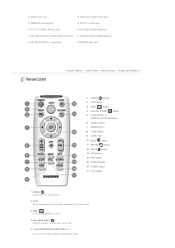
... 5. P.MODE Button 17. POWER ( ) Used to display Menu Screen. 4. AUTO Adjusts the Picture automatically. (Available in PC Mode Only) 3. MENU ( ) Used to turn on the projector. 2. AUDIO OUT port 8. [AV IN] S-VIDEO Input port 3. HDMI/DVI IN Input port 9. INSTALL Button 7. P.SIZE Button 9. EXIT ( ) Button 13. POWER ( ) Button 2. PC 1/DVI AUDIO...
... 5. P.MODE Button 17. POWER ( ) Used to display Menu Screen. 4. AUTO Adjusts the Picture automatically. (Available in PC Mode Only) 3. MENU ( ) Used to turn on the projector. 2. AUDIO OUT port 8. [AV IN] S-VIDEO Input port 3. HDMI/DVI IN Input port 9. INSTALL Button 7. P.SIZE Button 9. EXIT ( ) Button 13. POWER ( ) Button 2. PC 1/DVI AUDIO...

User Manual (user Manual) (ver.1.0) (English)
Page 13
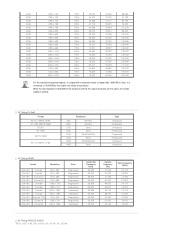
... strictly managed in accordance with the relevant specified standards by the LCD panel manufacturer and our company. The LCD panel used in the LCD projector consists of hundreds of thousands of the product. Like other video display devices, the LCD panel may have some dead pixels, this does not affect the...contain bad pixels which do not operate. When shipping a product, the conditions for identifying bad pixels and the number of bad pixels that a LCD panel is for residential use. Supported Display Modes PC Timing (D-Sub/HDMI) Format IBM IBM IBM VESA MAC VESA VESA VESA VESA VESA VESA ...
... strictly managed in accordance with the relevant specified standards by the LCD panel manufacturer and our company. The LCD panel used in the LCD projector consists of hundreds of thousands of the product. Like other video display devices, the LCD panel may have some dead pixels, this does not affect the...contain bad pixels which do not operate. When shipping a product, the conditions for identifying bad pixels and the number of bad pixels that a LCD panel is for residential use. Supported Display Modes PC Timing (D-Sub/HDMI) Format IBM IBM IBM VESA MAC VESA VESA VESA VESA VESA VESA ...
User Manual (user Manual) (ver.1.0) (English)
Page 14
... the PC output resolution are the same, the screen quality is converted to 1024x768 by the Scaler chip inside the projector. VESA VESA VESA VESA VESA VESA VESA VESA VESA VESA VESA VESA VESA VESA VESA VESA VESA VESA VESA 1280 x 720 1280 x 720 1280 x 720 ...
... the PC output resolution are the same, the screen quality is converted to 1024x768 by the Scaler chip inside the projector. VESA VESA VESA VESA VESA VESA VESA VESA VESA VESA VESA VESA VESA VESA VESA VESA VESA VESA VESA 1280 x 720 1280 x 720 1280 x 720 ...
User Manual (user Manual) (ver.1.0) (English)
Page 16
...screen. Do not install the screen in the front of the screen. Select Menu > Setup > Install > Rear-Floor To view the picture when installing the projector in bright surroundings. If the screen is too bright, the picture on the screen may not be displayed clearly. You can install the... projector in bright surroundings, use curtains. Select Menu > Setup > Install > Front-Floor Zoom and Focus Adjustment Zoom Knob Focus Ring If the screen is not ...
...screen. Do not install the screen in the front of the screen. Select Menu > Setup > Install > Rear-Floor To view the picture when installing the projector in bright surroundings. If the screen is too bright, the picture on the screen may not be displayed clearly. You can install the... projector in bright surroundings, use curtains. Select Menu > Setup > Install > Front-Floor Zoom and Focus Adjustment Zoom Knob Focus Ring If the screen is not ...

User Manual (user Manual) (ver.1.0) (English)
Page 17
... 127 152 178 203 229 254 279 305 330 356 381 406 432 457 483 508 533 559 584 610 635 The projector can adjust the size of the projector. If images are not clear, adjust them using the adjustable feet to 30 mm (about 12 °) from the reference point. If... be adjusted to a height of image may appear. If a keystone occurs, adjust it using the Focus Ring. Focus the picture on the position of the projector, Keystone distortion of up to realize optimal picture quality. Depending on the screen using the V-Keystone function. Leveling with Adjustable Feet For level placing of...
... 127 152 178 203 229 254 279 305 330 356 381 406 432 457 483 508 533 559 584 610 635 The projector can adjust the size of the projector. If images are not clear, adjust them using the adjustable feet to 30 mm (about 12 °) from the reference point. If... be adjusted to a height of image may appear. If a keystone occurs, adjust it using the Focus Ring. Focus the picture on the position of the projector, Keystone distortion of up to realize optimal picture quality. Depending on the screen using the V-Keystone function. Leveling with Adjustable Feet For level placing of...

User Manual (user Manual) (ver.1.0) (English)
Page 18
... and click on a 80 ~ 120 inch sized screen. Check the following items before connecting your projector. 1. Screen Z: Throw Distance Y': Distance from Lens Center to described in the display mode table supported by this projector. Click on [Settings] tab and set the by referring to Image Bottom Setting up the PC ....4 4114.8 9457 7880 686 280 5689.6 4267.2 9809 8173 711 290 5892.8 4419.6 10160 8466 737 300 6096.0 4572.0 10512 8759 762 This projector is designed to show images optimally on [Properties]. tab will appear. Another property window will appear. 2.
... and click on a 80 ~ 120 inch sized screen. Check the following items before connecting your projector. 1. Screen Z: Throw Distance Y': Distance from Lens Center to described in the display mode table supported by this projector. Click on [Settings] tab and set the by referring to Image Bottom Setting up the PC ....4 4114.8 9457 7880 686 280 5689.6 4267.2 9809 8173 711 290 5892.8 4419.6 10160 8466 737 300 6096.0 4572.0 10512 8759 762 This projector is designed to show images optimally on [Properties]. tab will appear. Another property window will appear. 2.
User Manual (user Manual) (ver.1.0) (English)
Page 19
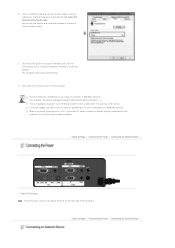
... the power cord into the power terminal on monitor manufacture or Windows versions. When connecting the projector to a PC, check that PC setup complies to the projector. Click the [OK] button to close the window. Set up to 24 bits per pixel in the Supported Resolution/...problems. | Basic Settings | Connecting the Power | Connecting an External Device | 1. Process might vary depending on [Monitor] tab and set the by this projector. Click on your type of computer or Windows versions. (For example, [Properties] appears instead of [Properties (R)] as shown in 1.) This unit appliance ...
... the power cord into the power terminal on monitor manufacture or Windows versions. When connecting the projector to a PC, check that PC setup complies to the projector. Click the [OK] button to close the window. Set up to 24 bits per pixel in the Supported Resolution/...problems. | Basic Settings | Connecting the Power | Connecting an External Device | 1. Process might vary depending on [Monitor] tab and set the by this projector. Click on your type of computer or Windows versions. (For example, [Properties] appears instead of [Properties (R)] as shown in 1.) This unit appliance ...

User Manual (user Manual) (ver.1.0) (English)
Page 20
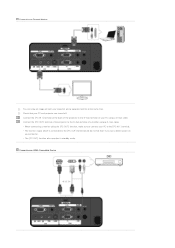
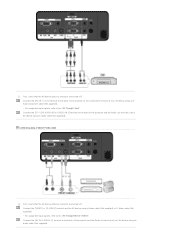
... HDMI/DVI cable (Not supplied). - Connect the [HDMI/DVI IN] terminal of the projector to the D-Sub terminal of your PC and projector are turned off . Connect the [PC 1/DVI AUDIO IN] terminal of the projector and the Audio out terminal of your PC using an audio cable (Not supplied). - Connect... the [PC IN (1 or 2)] terminal at the back of your PC and projector are turned off . For the supported input signals, refer to the HDMI terminal of the projector to "PC Timing(D-Sub/HDMI)". For the supported input signals, refer to the Audio out terminal of...
... HDMI/DVI cable (Not supplied). - Connect the [HDMI/DVI IN] terminal of the projector to the D-Sub terminal of your PC and projector are turned off . Connect the [PC 1/DVI AUDIO IN] terminal of the projector and the Audio out terminal of your PC using an audio cable (Not supplied). - Connect... the [PC IN (1 or 2)] terminal at the back of your PC and projector are turned off . For the supported input signals, refer to the HDMI terminal of the projector to "PC Timing(D-Sub/HDMI)". For the supported input signals, refer to the Audio out terminal of...
User Manual (user Manual) (ver.1.0) (English)
Page 21
Connect the [PC OUT] terminal of the projector to the D-Sub terminal of a monitor using a D-Sub cable. - The [PC OUT] function also ... a monitor using a D-Sub cable. Connecting an External Monitor You can view an image on both your projector and a separate monitor at the back of the projector to the D-Sub terminal of your PC using the [PC OUT] function, make sure to connect your PC... OUT] termininal will be normal even if you see a blank screen on your PC and projector are turned off. Connecting an HDMI-Compatible Device Connect the [PC IN 1] terminal at the same time. Check that your...
Connect the [PC OUT] terminal of the projector to the D-Sub terminal of a monitor using a D-Sub cable. - The [PC OUT] function also ... a monitor using a D-Sub cable. Connecting an External Monitor You can view an image on both your projector and a separate monitor at the back of the projector to the D-Sub terminal of your PC using the [PC OUT] function, make sure to connect your PC... OUT] termininal will be normal even if you see a blank screen on your PC and projector are turned off. Connecting an HDMI-Compatible Device Connect the [PC IN 1] terminal at the same time. Check that your...

User Manual (user Manual) (ver.1.0) (English)
Page 22
... "AV Timing(HDMI)". First, check that the AV device and your AV device using a D-Sub cable. - Connect the [PC 1/DVI AUDIO IN] terminal of the projector to the Audio out terminal of your digital output device using an HDMI/DVI cable. - Connecting an AV device using a D-Sub cable First, check that... cable, connecting an audio cable (Not supplied) is not needed. Connect the [PC 1/DVI AUDIO IN] or [AUDIO IN 2] terminal at the back of the projector to the DVI output terminal of the digital output device, use an HDMI cable. - Connect the [HDMI/DVI IN] terminal at the back of the...
... "AV Timing(HDMI)". First, check that the AV device and your AV device using a D-Sub cable. - Connect the [PC 1/DVI AUDIO IN] terminal of the projector to the Audio out terminal of your digital output device using an HDMI/DVI cable. - Connecting an AV device using a D-Sub cable First, check that... cable, connecting an audio cable (Not supplied) is not needed. Connect the [PC 1/DVI AUDIO IN] or [AUDIO IN 2] terminal at the back of the projector to the DVI output terminal of the digital output device, use an HDMI cable. - Connect the [HDMI/DVI IN] terminal at the back of the...
User Manual (user Manual) (ver.1.0) (English)
Page 23
... turned off . For supported input signals, refer to the "AV Timing(D-Sub)". Connect the [AV IN R-AUDIO-L] terminal at the back of the projector and the Audio out terminal of your AV device using an audio cable (Not supplied). For supported input signals, refer to the "AV Timing(VIDEO/S-...VIDEO)". First, check that the AV device and your projector are turned off . Connect the [PC 1/DVI AUDIO IN] or [AUDIO IN 2] terminal at the back of the projector and the Audio out terminal of your AV device using an audio cable (Not supplied). Connect...
... turned off . For supported input signals, refer to the "AV Timing(D-Sub)". Connect the [AV IN R-AUDIO-L] terminal at the back of the projector and the Audio out terminal of your AV device using an audio cable (Not supplied). For supported input signals, refer to the "AV Timing(VIDEO/S-...VIDEO)". First, check that the AV device and your projector are turned off . Connect the [PC 1/DVI AUDIO IN] or [AUDIO IN 2] terminal at the back of the projector and the Audio out terminal of your AV device using an audio cable (Not supplied). Connect...

User Manual (user Manual) (ver.1.0) (English)
Page 24
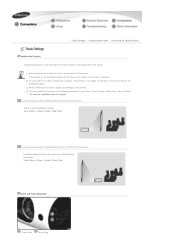
Connecting an External Speaker You can hear sound through an external speaker instead of the projector (or remote control). - Prepare an audio cable (Not supplied) suitable for your external speaker. The [AUDIO OUT] terminal can adjust the volume of the external speaker using an audio cable. - When using an external speaker, the internal speaker does not operate but you can output all audio signals. Connect the [AUDIO OUT] terminal of the projector to the external speaker using the Volume button of the internal speaker embedded in the projector.
Connecting an External Speaker You can hear sound through an external speaker instead of the projector (or remote control). - Prepare an audio cable (Not supplied) suitable for your external speaker. The [AUDIO OUT] terminal can adjust the volume of the external speaker using an audio cable. - When using an external speaker, the internal speaker does not operate but you can output all audio signals. Connect the [AUDIO OUT] terminal of the projector to the external speaker using the Volume button of the internal speaker embedded in the projector.
User Manual (user Manual) (ver.1.0) (English)
Page 25
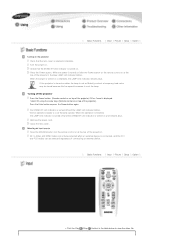
... an external device is turned on . Check that the lens cover is not sufficiently cooled, a temporary loud noise may be selected regardless of the projector), the blue LAMP LED indicator blinks. Select OK using the arrow keys (Remote control or on . Press the Power button. Press the Enter button...when the lamp is opened completely. Selecting an input source Press the SOURCE button (on the remote control or at the top of the projector). | Basic Functions | Input | Picture | Setup | Option | Turning on completely, the LAMP LED indicator remains blue. When the power is turned on...
... an external device is turned on . Check that the lens cover is not sufficiently cooled, a temporary loud noise may be selected regardless of the projector), the blue LAMP LED indicator blinks. Select OK using the arrow keys (Remote control or on . Press the Power button. Press the Enter button...when the lamp is opened completely. Selecting an input source Press the SOURCE button (on the remote control or at the top of the projector). | Basic Functions | Input | Picture | Setup | Option | Turning on completely, the LAMP LED indicator remains blue. When the power is turned on...
User Manual (user Manual) (ver.1.0) (English)
Page 26
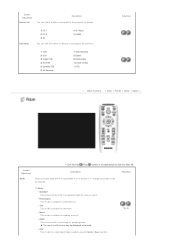
...| * Click the Play( )/Stop( ) button in a still picture may be displayed unnaturally. - Game This picture mode is customized to your projector or change the screen mode as required. Screen Adjustment Description Mode Select a screen state which is optimized for playing games. ▶ The text in... for text work. - Edit Name 1) PC 1 2) PC 2 3) AV 4) S-Video 5) HDMI You can select a device connected to the projector to view the video file. Mode Standard This picture mode is suitable for various cases. - Presentation This mode is suitable for presentations. - Play/Stop...
...| * Click the Play( )/Stop( ) button in a still picture may be displayed unnaturally. - Game This picture mode is customized to your projector or change the screen mode as required. Screen Adjustment Description Mode Select a screen state which is optimized for playing games. ▶ The text in... for text work. - Edit Name 1) PC 1 2) PC 2 3) AV 4) S-Video 5) HDMI You can select a device connected to the projector to view the video file. Mode Standard This picture mode is suitable for various cases. - Presentation This mode is suitable for presentations. - Play/Stop...

User Manual (user Manual) (ver.1.0) (English)
Page 29
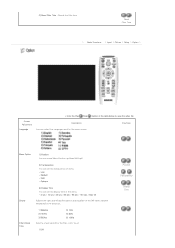
...mode, you set disappears and a normal screen is displayed. Crosshatch Screen Size Video Type If the screen quality is abnormal since the projector does not identify the input signal type automatically in order to extend the lamp lifetime and reduce noise and power consumption. 2) Normal ...the ambient illumination is optimized for this using the vertical Keystone function. Eco Normal Bright 1) Logo 2) Blue 3) Black Generated by the projector itself. You can compensate for small screens smaller than 100 inches. Factory Default If video scences are distorted or tilted, you can ...
...mode, you set disappears and a normal screen is displayed. Crosshatch Screen Size Video Type If the screen quality is abnormal since the projector does not identify the input signal type automatically in order to extend the lamp lifetime and reduce noise and power consumption. 2) Normal ...the ambient illumination is optimized for this using the vertical Keystone function. Eco Normal Bright 1) Logo 2) Blue 3) Black Generated by the projector itself. You can compensate for small screens smaller than 100 inches. Factory Default If video scences are distorted or tilted, you can ...
User Manual (user Manual) (ver.1.0) (English)
Page 30
... the filter. (Unit: hour) 1) Off Position Transparency Display Time Reset Filter Time | Basic Functions | Input | Picture | Setup | Option | * Click the Play( )/Stop( ) button in the projector. Filter Check Time 1) Balance 2) 100Hz 3) 300Hz 4) 1kHz 5) 3kHz 6) 10kHz Sets the check period for the menu screen.
... the filter. (Unit: hour) 1) Off Position Transparency Display Time Reset Filter Time | Basic Functions | Input | Picture | Setup | Option | * Click the Play( )/Stop( ) button in the projector. Filter Check Time 1) Balance 2) 100Hz 3) 300Hz 4) 1kHz 5) 3kHz 6) 10kHz Sets the check period for the menu screen.
User Manual (user Manual) (ver.1.0) (English)
Page 31
... if necessary, clean or replace it is turned on automatically without pressing the Power button. Auto Power On If the power is supplied to the projector, it ." 2) 100 3) 200 4) 400 5) 800 ▶ If the filter usage time is larger than the filter check period, the filter check message is displayed for... the specified time, there must be no button input from the remote control or the top of the projector) 1) Off 2) 10 min 3) 20 min 4) 30 min You can check external source signals, picture setup, PC picture adjustment and lamp use time...
... if necessary, clean or replace it is turned on automatically without pressing the Power button. Auto Power On If the power is supplied to the projector, it ." 2) 100 3) 200 4) 400 5) 800 ▶ If the filter usage time is larger than the filter check period, the filter check message is displayed for... the specified time, there must be no button input from the remote control or the top of the projector) 1) Off 2) 10 min 3) 20 min 4) 30 min You can check external source signals, picture setup, PC picture adjustment and lamp use time...


