
User Manual
Page 3
English 3 Note : Important information Step by pressing the TOOLS button on the remote control. Additional Functions Connecting to an AV Device...Connecting to a PC ...Changing the Input source ...8 9 10 How to Navigate Menus ...... 48 49 50 51 Connecting to access the menu. Contents List of Features ...Accessories ...Installing the LCD TV Stand ...Viewing the Control Panel ...Viewing the Remote Control ...Connecting to an Antenna ...Plug & Play (Initial Setup) ...4 4 4 5 6 7 7 • • Network Connection ...Connecting to a Wired Network Connecting Wireless Network Media ...
English 3 Note : Important information Step by pressing the TOOLS button on the remote control. Additional Functions Connecting to an AV Device...Connecting to a PC ...Changing the Input source ...8 9 10 How to Navigate Menus ...... 48 49 50 51 Connecting to access the menu. Contents List of Features ...Accessories ...Installing the LCD TV Stand ...Viewing the Control Panel ...Viewing the Remote Control ...Connecting to an Antenna ...Plug & Play (Initial Setup) ...4 4 4 5 6 7 7 • • Network Connection ...Connecting to a Wired Network Connecting Wireless Network Media ...

User Manual
Page 5
... and fasten the screws, If you fasten the screws with the LCD TV placed down, it may vary depending on the model, Remote control sensor Power Indicator I :_ button on the remote control, Displays an on-screen menu, the OSD (on the TV. O O ® Bottom View _-. : 4EA'"_ ...i ::}::: ...m_--_ Make sure...lean to distinguish between all the available input sources. Adjusts the volume, In the OSD, use the --VOL+ _1and I_ buttons on the remote control, buttons as you would use the buttons as you would use this spot on screen display), of the Stand and Guide Stand when ...
... and fasten the screws, If you fasten the screws with the LCD TV placed down, it may vary depending on the model, Remote control sensor Power Indicator I :_ button on the remote control, Displays an on-screen menu, the OSD (on the TV. O O ® Bottom View _-. : 4EA'"_ ...i ::}::: ...m_--_ Make sure...lean to distinguish between all the available input sources. Adjusts the volume, In the OSD, use the --VOL+ _1and I_ buttons on the remote control, buttons as you would use the buttons as you would use this spot on screen display), of the Stand and Guide Stand when ...

User Manual
Page 6
... 17) SLEEP: Automatically shuts off the TV at a preset time. (R 18) MTS: Press to display information on the model. When on Samsung recorders with this button set to the previous ctlannel. Press to select channel '54-3', press '54', then press '-' and '3'. Displays the main ... use when nearby fluorescent lights or neon signs. control for a moment when pressed. (Using the remote control with the Anynet+ feature) SUNG¸ Installing batteries (Battery size: AAA) NOTE " Use the remote control within 23 feet from the TV. For example, to select additional channels (digital) -being ...
... 17) SLEEP: Automatically shuts off the TV at a preset time. (R 18) MTS: Press to display information on the model. When on Samsung recorders with this button set to the previous ctlannel. Press to select channel '54-3', press '54', then press '-' and '3'. Displays the main ... use when nearby fluorescent lights or neon signs. control for a moment when pressed. (Using the remote control with the Anynet+ feature) SUNG¸ Installing batteries (Battery size: AAA) NOTE " Use the remote control within 23 feet from the TV. For example, to select additional channels (digital) -being ...

User Manual
Page 13
... a channel and press the TOOLS button. If you have been saved are selected. Changing the Preset Picture Mode MENUITTI _ Picture _ Mode -* ENTERE_ Mode Select your remote for deleted channels. * Delete a channel from the Added Channels or Favorite menu in Cable mode.
... a channel and press the TOOLS button. If you have been saved are selected. Changing the Preset Picture Mode MENUITTI _ Picture _ Mode -* ENTERE_ Mode Select your remote for deleted channels. * Delete a channel from the Added Channels or Favorite menu in Cable mode.

User Manual
Page 18
.... Available only when Clock Mode is set to the factory defaults. DST (Daylight Saving Time) (Off/On): Switches the Daylight Saving Time function on the remote control.
.... Available only when Clock Mode is set to the factory defaults. DST (Daylight Saving Time) (Off/On): Switches the Daylight Saving Time function on the remote control.

User Manual
Page 20
... desired caption mode. The default menu name and Downloadable US rating change depending on the downloaded information. * Even if you forget the PIN, press the remote-control buttons in Component, HDMI or PC modes. Downloadable U.S.
... desired caption mode. The default menu name and Downloadable US rating change depending on the downloaded information. * Even if you forget the PIN, press the remote-control buttons in Component, HDMI or PC modes. Downloadable U.S.

User Manual
Page 25
...Aor_ button to select Network in the "How to set up automatically" procedure. Wait two minutes, and then press the RETURN button on your remote to enter numbers and the arrow buttons to move from one entry field to another. 5. 6. If the Network Function has not acquired the ...network connection values, go to the first entry field. Getting the Network Connection Values To get the Network connection values on your remote. 10. On the dialog that appears, click Status. Auto acquires and enters the needed Internet values automatically. Turn on your TV, press ...
...Aor_ button to select Network in the "How to set up automatically" procedure. Wait two minutes, and then press the RETURN button on your remote to enter numbers and the arrow buttons to move from one entry field to another. 5. 6. If the Network Function has not acquired the ...network connection values, go to the first entry field. Getting the Network Connection Values To get the Network connection values on your remote. 10. On the dialog that appears, click Status. Auto acquires and enters the needed Internet values automatically. Turn on your TV, press ...

User Manual
Page 27
... TV player automatically acquires all the network setting values it is based on your remote, use the new AP after purchase, you use this method of setting up , press the RETURN button to set up using Samsung Auto Configuration 1. Follow Steps 1 through PBC(WPS) or manually. Press the ... the Network Setup screen. 8. 9. Set Network Type to your network. Network Setup (Samsung Auto Configuration) 6. ... If there is set up the network connection, and have to wait for your remote. After the network connection is no larger than 25cm. How to enter when you use...
... TV player automatically acquires all the network setting values it is based on your remote, use the new AP after purchase, you use this method of setting up , press the RETURN button to set up using Samsung Auto Configuration 1. Follow Steps 1 through PBC(WPS) or manually. Press the ... the Network Setup screen. 8. 9. Set Network Type to your network. Network Setup (Samsung Auto Configuration) 6. ... If there is set up the network connection, and have to wait for your remote. After the network connection is no larger than 25cm. How to enter when you use...

User Manual
Page 28
...Samsung Wireless LAN Adapter" by using a peer to peer network. is a direct WI-Fi connection with cellphone or PC. Then, the device list will be able to find the Pass Phrase on your router or modem. 8. Select the device you have limited functionality. On the Security screen, enter your remote... the network connection? A list of the available networks. Follow Steps 1 through 6 in the device list, press the Blue button on your remote to set up menu, click Status. If network doesn't operate normally, check the Network Name (SSlD) and Security Key again. If the ...
...Samsung Wireless LAN Adapter" by using a peer to peer network. is a direct WI-Fi connection with cellphone or PC. Then, the device list will be able to find the Pass Phrase on your router or modem. 8. Select the device you have limited functionality. On the Security screen, enter your remote... the network connection? A list of the available networks. Follow Steps 1 through 6 in the device list, press the Blue button on your remote to set up menu, click Status. If network doesn't operate normally, check the Network Name (SSlD) and Security Key again. If the ...

User Manual
Page 34
... played later from the point where it was stopped. Select the movie file you resume play . During the slide show, files are saved on the remote control to play . Press the _ or I_ button to On. Press the _/_/A/_' file list. If the sound is displayed, press the F_q (Play) / ENTERI_ button...
... played later from the point where it was stopped. Select the movie file you resume play . During the slide show, files are saved on the remote control to play . Press the _ or I_ button to On. Press the _/_/A/_' file list. If the sound is displayed, press the F_q (Play) / ENTERI_ button...

User Manual
Page 37
To be sure your Samsung TV's remote. Connect the HDM_ _N (1(DV_),2, 3 or 4) jack on the TV and the...to the Amplifier or Home Theater, not the TV. • Only one Home Theater can be used only with Samsung devices that you can connect an Anynet+ device using the HDMI cable. If you to 3 devices of the ...not support Anynet+ functions, • Anynet+ works when the AV device supporting Anynet+ is a function that enables you want to a Samsung Home Theater HomeTheater Anynet+ Device1 Anynet+ Device2, 3, 4 HDMICa HDMI Cable HDMI Cable HDMI Cable 1. 2. Anynet Device 1 or 2)...
To be sure your Samsung TV's remote. Connect the HDM_ _N (1(DV_),2, 3 or 4) jack on the TV and the...to the Amplifier or Home Theater, not the TV. • Only one Home Theater can be used only with Samsung devices that you can connect an Anynet+ device using the HDMI cable. If you to 3 devices of the ...not support Anynet+ functions, • Anynet+ works when the AV device supporting Anynet+ is a function that enables you want to a Samsung Home Theater HomeTheater Anynet+ Device1 Anynet+ Device2, 3, 4 HDMICa HDMI Cable HDMI Cable HDMI Cable 1. 2. Anynet Device 1 or 2)...

User Manual
Page 39
...Check if the Anynet+ device power cord is not output through the receiver. ,, ,, English 39 Check whether the TV remote control is properly connected. Check whether the remote control is properly connected. Press the TV button on . appears on the recording devbe is in the Anynet+ menu. ... receiver (i.e Home Theater) instead of Anynet+ device is in the Anynet+ Setup menu. Press the SOURCE button on the TV. * The TV remote control may not support Anynet+ functions. You can be recorded. Listening through a Receiver You can listen to display the Anynet+ menu and select a ...
...Check if the Anynet+ device power cord is not output through the receiver. ,, ,, English 39 Check whether the TV remote control is properly connected. Check whether the remote control is properly connected. Press the TV button on . appears on the recording devbe is in the Anynet+ menu. ... receiver (i.e Home Theater) instead of Anynet+ device is in the Anynet+ Setup menu. Press the SOURCE button on the TV. * The TV remote control may not support Anynet+ functions. You can be recorded. Listening through a Receiver You can listen to display the Anynet+ menu and select a ...
User Manual
Page 40
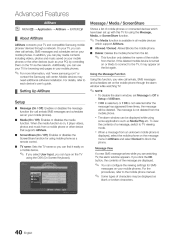
... devices (such as blank or broken characters. m m 0 English Using the Message Function Using this TV for using some applications such as a remote control. The message is not selected after the m Message (On / Off}: Enables or disables the message function (for SMS messages on the...the mobile phone through a network. m m Allowed / Denied: Allows/Blocks the mobile phone. For more information, visit "www.samsung.com" or contact the Samsung call arrivals, SMS messages and schedules set Message to the mobile phone manual. For the procedures, refer to Off in your ...
... devices (such as blank or broken characters. m m 0 English Using the Message Function Using this TV for using some applications such as a remote control. The message is not selected after the m Message (On / Off}: Enables or disables the message function (for SMS messages on the...the mobile phone through a network. m m Allowed / Denied: Allows/Blocks the mobile phone. For more information, visit "www.samsung.com" or contact the Samsung call arrivals, SMS messages and schedules set Message to the mobile phone manual. For the procedures, refer to Off in your ...
User Manual
Page 46
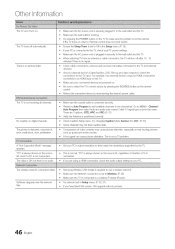
...check the audio output setting on the TV to the wall outlet and the TV. A los! The wireless network connection failed. • Samsung Wireless USB dongle is connected to the wall outlet and the TV. Make sure the wall outlet is connected securely. If the TV turns ... to use a wireless network. Go to OO1. (R 20) Some channels may cause picture distortion, especially on digital channels. ,, The picture is not the remote. Channel Auto Program then select Auto and make sure the problem is distorted: macroblock, error, small block, dots, pixelization, ,, A "Not Supported Mode" ...
...check the audio output setting on the TV to the wall outlet and the TV. A los! The wireless network connection failed. • Samsung Wireless USB dongle is connected to the wall outlet and the TV. Make sure the wall outlet is connected securely. If the TV turns ... to use a wireless network. Go to OO1. (R 20) Some channels may cause picture distortion, especially on digital channels. ,, The picture is not the remote. Channel Auto Program then select Auto and make sure the problem is distorted: macroblock, error, small block, dots, pixelization, ,, A "Not Supported Mode" ...

User Manual
Page 47
...when connected via HDMI or Component. Make sure the cables are flexible enough for SAMSUNG TV code. • • • The remote control does not work. • • • The cable/set top box remote control doesn't turn the TV on either side of sub pixels which require ... intermittent loss of audio or video can be activated on flat surface. Replace the Component video cables with correct polarity (+/-). Replace the remote control batteries with an HDMI connection. Caption must be caused by using cables with 90 degree connectors. This function is placed on the...
...when connected via HDMI or Component. Make sure the cables are flexible enough for SAMSUNG TV code. • • • The remote control does not work. • • • The cable/set top box remote control doesn't turn the TV on either side of sub pixels which require ... intermittent loss of audio or video can be activated on flat surface. Replace the Component video cables with correct polarity (+/-). Replace the remote control batteries with an HDMI connection. Caption must be caused by using cables with 90 degree connectors. This function is placed on the...

User Manual
Page 51
... 6 10 X xvYCC 15 P Photo view Picture Reset PIN number PIP Position Power Indicator 34 16 19 22 14 5 F FAV,CH button Favorite Channel 6, 12 12 R Remote Control RGB 6 15 English 51
... 6 10 X xvYCC 15 P Photo view Picture Reset PIN number PIP Position Power Indicator 34 16 19 22 14 5 F FAV,CH button Favorite Channel 6, 12 12 R Remote Control RGB 6 15 English 51

