
User Manual (ENGLISH)
Page 3
... to contact an authorized Service Center when installing your monitor. Install the monitor base in a location with a dusty plug or connector may cause damage to do so may cause electric shock or fire. Do not use the power cord when the connector or plug is dusty. • If the connector or plug of the power cord is dusty, clean it with a dry cloth. • Using the power cord with heavy dust...
... to contact an authorized Service Center when installing your monitor. Install the monitor base in a location with a dusty plug or connector may cause damage to do so may cause electric shock or fire. Do not use the power cord when the connector or plug is dusty. • If the connector or plug of the power cord is dusty, clean it with a dry cloth. • Using the power cord with heavy dust...

User Manual (ENGLISH)
Page 5
.... If the connector between the plug and the pin is damaged, turn the monitor off and unplug the power cord. Do not remove the cover (or back). • This may cause electric shock or fire. If the monitor is dropped or the casing is dusty or dirty, clean it properly using a soft, dry cloth. • Do not use any unusual sound or smell...
.... If the connector between the plug and the pin is damaged, turn the monitor off and unplug the power cord. Do not remove the cover (or back). • This may cause electric shock or fire. If the monitor is dropped or the casing is dusty or dirty, clean it properly using a soft, dry cloth. • Do not use any unusual sound or smell...

User Manual (ENGLISH)
Page 6
... paper or matches into the monitor openings. • This may cause an explosion or fire. Adjusts the resolution and frequency to the level appropriate for an extended period of time, residual image or blurriness may appear. • Change the mode to energy saving mode or set a screensaver to a changing picture when away from the monitor for the model. • An inappropriate resolution may cause a breakdown, electric...
... paper or matches into the monitor openings. • This may cause an explosion or fire. Adjusts the resolution and frequency to the level appropriate for an extended period of time, residual image or blurriness may appear. • Change the mode to energy saving mode or set a screensaver to a changing picture when away from the monitor for the model. • An inappropriate resolution may cause a breakdown, electric...

User Manual (ENGLISH)
Page 9
Introduction Package Contents Note Please make sure the following items are missing, contact your monitor. If any items are included with your dealer. Contact a local dealer to buy optional items. Unpacking Without stand With stand Monitor Manuals Monitor & Sliding stand Quick Setup Guide Cables Warranty Card (Not available in all locations) User's Guide D-Sub Cable Sold separately Power Cord DVI Cable HDMI Cable 8 Headphones
Introduction Package Contents Note Please make sure the following items are missing, contact your monitor. If any items are included with your dealer. Contact a local dealer to buy optional items. Unpacking Without stand With stand Monitor Manuals Monitor & Sliding stand Quick Setup Guide Cables Warranty Card (Not available in all locations) User's Guide D-Sub Cable Sold separately Power Cord DVI Cable HDMI Cable 8 Headphones

User Manual (ENGLISH)
Page 20
... their specifications. • Do not use Wall Mount according to mount the monitor at least 10 cm away from the LCD monitor. 4. Remove four screws and then remove the stand from the wall surface. • Contact the nearest Samsung Service Center for product damage or personal injury when a non-VESA or non-specified wall mount is used or the consumer fails to follow the product installation instructions. • To mount the monitor on a wall...
... their specifications. • Do not use Wall Mount according to mount the monitor at least 10 cm away from the LCD monitor. 4. Remove four screws and then remove the stand from the wall surface. • Contact the nearest Samsung Service Center for product damage or personal injury when a non-VESA or non-specified wall mount is used or the consumer fails to follow the product installation instructions. • To mount the monitor on a wall...

User Manual (ENGLISH)
Page 21
... disk and download the driver program file at the Internet web site shown here. Then click "OK" button (Microsoft® Windows® XP/2000 Operating System). 20 Insert CD into the CD-ROM drive. 2. Driver installation is slightly different from one operating system to another. Internet web site : http://www.samsung.com/ Installing the Monitor Driver (Automatic) 1. Using the Software Monitor Driver Note When...
... disk and download the driver program file at the Internet web site shown here. Then click "OK" button (Microsoft® Windows® XP/2000 Operating System). 20 Insert CD into the CD-ROM drive. 2. Driver installation is slightly different from one operating system to another. Internet web site : http://www.samsung.com/ Installing the Monitor Driver (Automatic) 1. Using the Software Monitor Driver Note When...

User Manual (ENGLISH)
Page 22
... installation doesn't damage your CD-ROM drive. 2. The monitor can be posted on "Appearance and Personalization". 3. Click "Properties" in the figure below, click "Continue". 21 is displayed, as is. Using the Software Note This monitor driver is completed. Click (Start) and "Control Panel". Click "Personalization" and then "Display Settings". 4. The certified driver will be used as shown in the "Monitor" tab. Then, double-click on Samsung Monitor...
... installation doesn't damage your CD-ROM drive. 2. The monitor can be posted on "Appearance and Personalization". 3. Click "Properties" in the figure below, click "Continue". 21 is displayed, as is. Using the Software Note This monitor driver is completed. Click (Start) and "Control Panel". Click "Personalization" and then "Display Settings". 4. The certified driver will be used as shown in the "Monitor" tab. Then, double-click on Samsung Monitor...

User Manual (ENGLISH)
Page 23
Click "Update Driver..." Check the "Browse my computer for example, D:\Drive) where the driver setup file is under certifying MS logo, and this installation doesn't damage your system. and select the folder (for driver software" checkbox and click "Let me pick from a list of device drivers on Samsung Monitor homepage. 6. in the "Driver" tab. 7. Click "Have Disk..." The certified driver will be posted on my computer". 8. Using the Software Note This monitor driver is located, and click "OK". 22
Click "Update Driver..." Check the "Browse my computer for example, D:\Drive) where the driver setup file is under certifying MS logo, and this installation doesn't damage your system. and select the folder (for driver software" checkbox and click "Let me pick from a list of device drivers on Samsung Monitor homepage. 6. in the "Driver" tab. 7. Click "Have Disk..." The certified driver will be posted on my computer". 8. Using the Software Note This monitor driver is located, and click "OK". 22

User Manual (ENGLISH)
Page 25
Click "Display" icon and choose the "Settings" tab then click "Advanced...". 4. Click the "Properties" button on the "Monitor" tab and select "Driver" tab. 5. then click "Next" button. 6. then click "Next" and then click "Have disk". 24 Using the Software 1. Click "Update Driver..." Select "Don't search, I will..." and select "Install from a list or..." Insert CD into the CD-ROM drive. 2. Click "Start" → "Control Panel" then click the "Appearance and Themes" icon. 3.
Click "Display" icon and choose the "Settings" tab then click "Advanced...". 4. Click the "Properties" button on the "Monitor" tab and select "Driver" tab. 5. then click "Next" button. 6. then click "Next" and then click "Have disk". 24 Using the Software 1. Click "Update Driver..." Select "Don't search, I will..." and select "Install from a list or..." Insert CD into the CD-ROM drive. 2. Click "Start" → "Control Panel" then click the "Appearance and Themes" icon. 3.

User Manual (ENGLISH)
Page 27
...; Windows® 2000 Operating System When you can see "Digital Signature Not Found" on your monitor, follow next steps continually. 5. Choose "OK" button on the "Next" button. 6. Click "Start", "Setting", "Control Panel". 2. Please stop installation Case2 : If the "Properties" button is properly configured. Double click the "Display" icon. 3. Click the "Finish" button then the "Close" button. Using the Software 10. Monitor driver installation is inactive, it means your monitor model and...
...; Windows® 2000 Operating System When you can see "Digital Signature Not Found" on your monitor, follow next steps continually. 5. Choose "OK" button on the "Next" button. 6. Click "Start", "Setting", "Control Panel". 2. Please stop installation Case2 : If the "Properties" button is properly configured. Double click the "Display" icon. 3. Click the "Finish" button then the "Close" button. Using the Software 10. Monitor driver installation is inactive, it means your monitor model and...

User Manual (ENGLISH)
Page 28
..., change to use (Resolution, Number of colors and Vertical frequency) and then click "OK". 4. This information will not affect the actual execution of the driver". 7. Select the "Monitor" tab. 5. Microsoft® Windows® NT Operating System 1. Click "Start", "Settings", "Control Panel", and then double-click "Display" icon. 2. In Display Registration Information window, click Settings Tab and then click "All Display Modes". 3. Enter the model name of resolution, colors or frequency). Specify A:\(D:\driver) then click "OK" button...
..., change to use (Resolution, Number of colors and Vertical frequency) and then click "OK". 4. This information will not affect the actual execution of the driver". 7. Select the "Monitor" tab. 5. Microsoft® Windows® NT Operating System 1. Click "Start", "Settings", "Control Panel", and then double-click "Display" icon. 2. In Display Registration Information window, click Settings Tab and then click "All Display Modes". 3. Enter the model name of resolution, colors or frequency). Specify A:\(D:\driver) then click "OK" button...

User Manual (ENGLISH)
Page 52
... video signal is set to be displayed normally. (Unavailable in Analog mode) Note Defaults: DVI mode - On MENU MENU 51 If not set to an AV device. Note This does not operate when the resolution of the input signals. A full screen is displayed regardless of the screen aspect ratio of your PC is input in accordance with the screen aspect ratio of the input signals. • Wide - Adjusting the Monitor • Normal - Set to Off when connected...
... video signal is set to be displayed normally. (Unavailable in Analog mode) Note Defaults: DVI mode - On MENU MENU 51 If not set to an AV device. Note This does not operate when the resolution of the input signals. A full screen is displayed regardless of the screen aspect ratio of your PC is input in accordance with the screen aspect ratio of the input signals. • Wide - Adjusting the Monitor • Normal - Set to Off when connected...

User Manual (ENGLISH)
Page 77
... the screen. No images on the screen? Q: Is the power cord connected properly? A: Check the power cord connection and supply. A: Adjust the maximum resolution and frequency that the monitor can remedy any problems yourself. Troubleshooting noisy, and video mode not supported, etc. I cannot turn on the Information section or contact your dealer. A: You can handle properly. 76 If you see if the monitor status is in the applicable mode (the safe mode for Windows ME...
... the screen. No images on the screen? Q: Is the power cord connected properly? A: Check the power cord connection and supply. A: Adjust the maximum resolution and frequency that the monitor can remedy any problems yourself. Troubleshooting noisy, and video mode not supported, etc. I cannot turn on the Information section or contact your dealer. A: You can handle properly. 76 If you see if the monitor status is in the applicable mode (the safe mode for Windows ME...

User Manual (ENGLISH)
Page 79
... Settings. Problems related to Audio Q: No sound A: Ensure that reads "Unrecognized monitor, Plug & Play (VESA DDC) monitor found". Q: Have you installed the monitor driver? The screen colors have changed after changing the video card. Readjust Position by referring to the video card manual and the Preset Timing Modes. (The maximum frequency per resolution may differ from product to Connecting Cables) Check the volume level. Q: Sound level is blinking but no images on the monitor? Troubleshooting Q: The screen can be supported. Q: Have you adjusted the resolution or frequency...
... Settings. Problems related to Audio Q: No sound A: Ensure that reads "Unrecognized monitor, Plug & Play (VESA DDC) monitor found". Q: Have you installed the monitor driver? The screen colors have changed after changing the video card. Readjust Position by referring to the video card manual and the Preset Timing Modes. (The maximum frequency per resolution may differ from product to Connecting Cables) Check the volume level. Q: Sound level is blinking but no images on the monitor? Troubleshooting Q: The screen can be supported. Q: Have you adjusted the resolution or frequency...

User Manual (ENGLISH)
Page 80
...™ MAC. Troubleshooting If the volume is still too low after turning the control to check the compatible graphic card list provided. A: MagicTune™ is already installed, remove it does, request an a service for the first time. When you have a problem with the graphic card, visit our website to its maximum, check the volume control on PC (VGA) with the monitor. Check if the power cord and the video cables are properly connected to...
...™ MAC. Troubleshooting If the volume is still too low after turning the control to check the compatible graphic card list provided. A: MagicTune™ is already installed, remove it does, request an a service for the first time. When you have a problem with the graphic card, visit our website to its maximum, check the volume control on PC (VGA) with the monitor. Check if the power cord and the video cables are properly connected to...

User Manual (ENGLISH)
Page 81
.... (Refer to the computer or the video card manual for details. Troubleshooting Q & A Q: How can I clean the outer case/LCD Panel? A: Disconnect the power cord and then clean the monitor with a soft cloth, using either a cleaning solution or plain water. A: Windows ME/2000: Set the resolution in the Control Panel → Appearance and Themes → Display → Settings. A: Windows XP: Set the resolution in the Control Panel → Display → Settings. * Contact the video card manufacturer for details.) Q: How can...
.... (Refer to the computer or the video card manual for details. Troubleshooting Q & A Q: How can I clean the outer case/LCD Panel? A: Disconnect the power cord and then clean the monitor with a soft cloth, using either a cleaning solution or plain water. A: Windows ME/2000: Set the resolution in the Control Panel → Appearance and Themes → Display → Settings. A: Windows XP: Set the resolution in the Control Panel → Display → Settings. * Contact the video card manufacturer for details.) Q: How can...

User Manual (ENGLISH)
Page 83
.... State Normal Operation Power saving mode Power off (Power-Switch off) Power Indicator Blue Blue blinking Off Power Consump- Dot Acceptable TFT-LCD panels manufactured by switching your computer. This is EPA ENERGY STAR® compliant and ENERGY2000 compliant when used with a computer equipped with a VESA DPM compliant video card installed in your monitor to low-power mode when it without any Plug & Play compatible system. For energy conservation, turn your computer to change without prior notice...
.... State Normal Operation Power saving mode Power off (Power-Switch off) Power Indicator Blue Blue blinking Off Power Consump- Dot Acceptable TFT-LCD panels manufactured by switching your computer. This is EPA ENERGY STAR® compliant and ENERGY2000 compliant when used with a computer equipped with a VESA DPM compliant video card installed in your monitor to low-power mode when it without any Plug & Play compatible system. For energy conservation, turn your computer to change without prior notice...

User Manual (ENGLISH)
Page 86
... prior notice. Dot Acceptable TFT-LCD panels manufactured by switching your computer to select alternate settings. This system saves energy by using advanced semiconductor technology with the Electromagnetic Compatibility Directives for energy efficiency. The monitor automatically returns to low-power mode when it unattended for a certain amount of time. But the pixels of RED, GREEN, BLUE and WHITE color appear to change without any Plug & Play compatible system. As an...
... prior notice. Dot Acceptable TFT-LCD panels manufactured by switching your computer to select alternate settings. This system saves energy by using advanced semiconductor technology with the Electromagnetic Compatibility Directives for energy efficiency. The monitor automatically returns to low-power mode when it unattended for a certain amount of time. But the pixels of RED, GREEN, BLUE and WHITE color appear to change without any Plug & Play compatible system. As an...

User Manual (ENGLISH)
Page 88
... TFT-LCD. • Resolution: 1920 x 1200 • Vertical frequency (refresh rate): 60 Hz TFT-LCD panels manufactured by image retention. Change the mode to energy save or set a screensaver to be seen. However, if the same image is not from Image retention. You can get better quality of the display. PRODUCT INFORMATION (Image Retention Free) LCD Monitors and TVs may appear. But the pixels of RED, GREEN, BLUE and WHITE color seem to another especially after the automatic adjustment, use...
... TFT-LCD. • Resolution: 1920 x 1200 • Vertical frequency (refresh rate): 60 Hz TFT-LCD panels manufactured by image retention. Change the mode to energy save or set a screensaver to be seen. However, if the same image is not from Image retention. You can get better quality of the display. PRODUCT INFORMATION (Image Retention Free) LCD Monitors and TVs may appear. But the pixels of RED, GREEN, BLUE and WHITE color seem to another especially after the automatic adjustment, use...
Brochure
Page 2
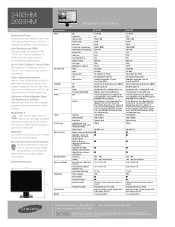
... 16:10 Contrast Ratio (Typical/Dynamic) 1000:1/10000:1 Viewing Angle (Horizontal/Vertical) 160°/160° Response Time 5 ms Light Source CCFL Color Gamut (NTSC %) 82% Brightness (Typical) 400 cd/m2 Panel Surface Matte Maximum Colors Supported 16.7M Analog Analog RGB Digital DVI, HDMI Frequency (H/V) 30~81kHz(H) / 56~75Hz(V) Sync H/V Separated, Composite H/V Input Connectors HDMI, DVI-D, Audio In/Out, 15-pin sub, 3-pin AC plug (CEE22) PC Windows Vista Premium Certification, XP, 2000, 98 Mac Mac OS...
... 16:10 Contrast Ratio (Typical/Dynamic) 1000:1/10000:1 Viewing Angle (Horizontal/Vertical) 160°/160° Response Time 5 ms Light Source CCFL Color Gamut (NTSC %) 82% Brightness (Typical) 400 cd/m2 Panel Surface Matte Maximum Colors Supported 16.7M Analog Analog RGB Digital DVI, HDMI Frequency (H/V) 30~81kHz(H) / 56~75Hz(V) Sync H/V Separated, Composite H/V Input Connectors HDMI, DVI-D, Audio In/Out, 15-pin sub, 3-pin AC plug (CEE22) PC Windows Vista Premium Certification, XP, 2000, 98 Mac Mac OS...


