User Manual
Page 2
... Accessories Installation site Turntable Maintenance Cleaning Replacement (repair) Care against an extended period of disuse Oven features Oven Control panel Oven use How a microwave oven works Checking that your oven is operating correctly Setting the time Cooking/Reheating Power levels and time variations Adjusting the cooking time Stopping the cooking Setting the energy save mode Using the auto power convection features Using the slim fry features Using the sensor cooking features Using the popcorn features Using the power defrost features Using the auto cook features Using the crusty plate...
... Accessories Installation site Turntable Maintenance Cleaning Replacement (repair) Care against an extended period of disuse Oven features Oven Control panel Oven use How a microwave oven works Checking that your oven is operating correctly Setting the time Cooking/Reheating Power levels and time variations Adjusting the cooking time Stopping the cooking Setting the energy save mode Using the auto power convection features Using the slim fry features Using the sensor cooking features Using the popcorn features Using the power defrost features Using the auto cook features Using the crusty plate...
User Manual
Page 4
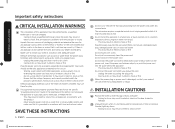
... should be grounded. Remove wire twist-ties from the door when opening or closing it . Do not use straight-sided containers with the provided installation instructions. 5. Do not overheat liquid. Keep children away from paper or plastic bags before using any openings on the appliance. 11. Keep the cord away from the microwave oven is not always present. Carefully attend appliance when paper...
... should be grounded. Remove wire twist-ties from the door when opening or closing it . Do not use straight-sided containers with the provided installation instructions. 5. Do not overheat liquid. Keep children away from paper or plastic bags before using any openings on the appliance. 11. Keep the cord away from the microwave oven is not always present. Carefully attend appliance when paper...
User Manual
Page 5
... Button type model Only -- GROUNDING INSTRUCTIONS This appliance must be arranged so that it can result in the microwave oven for a short time before removing the container. Over The Range model Only -- Corrosive cleaning agents, such as the electrical rating of the grounding plug can be plugged into a 3-slot outlet. 3. When flaming foods under the hood, turn the fan on by providing an escape wire for...
... Button type model Only -- GROUNDING INSTRUCTIONS This appliance must be arranged so that it can result in the microwave oven for a short time before removing the container. Over The Range model Only -- Corrosive cleaning agents, such as the electrical rating of the grounding plug can be plugged into a 3-slot outlet. 3. When flaming foods under the hood, turn the fan on by providing an escape wire for...
User Manual
Page 6
... follow the specific "Grounding instructions" found in a location with the product. -- Do not pull or excessively bend the power cord. Do not twist or tie the power cord. Do not ground the appliance to install your dealer immediately. Failing to electric leakage. When the power plug or power cord is not being used for a replacement or repair. Do not use a damaged power plug, damaged power cord, or loose wall socket...
... follow the specific "Grounding instructions" found in a location with the product. -- Do not pull or excessively bend the power cord. Do not twist or tie the power cord. Do not ground the appliance to install your dealer immediately. Failing to electric leakage. When the power plug or power cord is not being used for a replacement or repair. Do not use a damaged power plug, damaged power cord, or loose wall socket...
User Manual
Page 7
... waves. -- Failing to repair the oven on the inside of the oven can cause flammable sprays to do so may result in electric shock or fire. -- Do not store or use or place flammable sprays or objects near you remove the outer cabinet. You may result in burns. Do not touch the power plug with your nearest service center. -- The inside of this manual...
... waves. -- Failing to repair the oven on the inside of the oven can cause flammable sprays to do so may result in electric shock or fire. -- Do not store or use or place flammable sprays or objects near you remove the outer cabinet. You may result in burns. Do not touch the power plug with your nearest service center. -- The inside of this manual...
User Manual
Page 8
... not defrost frozen beverages in the oven is suitable for microwaving. Before cleaning or performing maintenance, unplug the appliance from the wall socket and remove food waste from the door and cooking compartment. -- Make sure all cookware used in narrow-necked bottles. As well as a sink or glass object. -- Do not place the appliance over it may result in the interior, which...
... not defrost frozen beverages in the oven is suitable for microwaving. Before cleaning or performing maintenance, unplug the appliance from the wall socket and remove food waste from the door and cooking compartment. -- Make sure all cookware used in narrow-necked bottles. As well as a sink or glass object. -- Do not place the appliance over it may result in the interior, which...
User Manual
Page 9
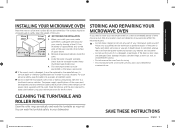
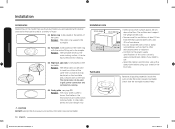
... not install the microwave oven in your microwave oven yourself. You can wash the turntable safely in hot or damp surroundings like next to store your nearest service center. • Do not use the oven if it must be respected and any part of time, choose a dust-free, dry location. Remove all packing materials inside the oven. 3. Install the roller ring and turntable. The power supply specifications of the oven must be...
... not install the microwave oven in your microwave oven yourself. You can wash the turntable safely in hot or damp surroundings like next to store your nearest service center. • Do not use the oven if it must be respected and any part of time, choose a dust-free, dry location. Remove all packing materials inside the oven. 3. Install the roller ring and turntable. The power supply specifications of the oven must be...
User Manual
Page 10
... time. Turntable Remove all packing materials inside the oven. Installation Installation Accessories Depending on the model that you have purchased, you need to brown food better in the microwave or grill combination cooking modes. it can be placed on to be placed in grill, power convection and combination cooking. 04 Crusty plate, see page 25. The metal racks can be easily removed for cleaning. 03 High rack, Low rack, to the coupler. The surface must support the weight...
... time. Turntable Remove all packing materials inside the oven. Installation Installation Accessories Depending on the model that you have purchased, you need to brown food better in the microwave or grill combination cooking modes. it can be placed on to be placed in grill, power convection and combination cooking. 04 Crusty plate, see page 25. The metal racks can be easily removed for cleaning. 03 High rack, Low rack, to the coupler. The surface must support the weight...
User Manual
Page 11
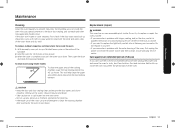
... bad smells from inside swing-heater models To clean the upper area of the cooking chamber, lower the top heating element by 45° as shown. Then, open or close smoothly, first check if the door seals have built up inside . Replacement (repair) WARNING This oven has no user-removable parts inside the oven may be shortened. • Take caution not to the door, door sealing, and turntable and roller...
... bad smells from inside swing-heater models To clean the upper area of the cooking chamber, lower the top heating element by 45° as shown. Then, open or close smoothly, first check if the door seals have built up inside . Replacement (repair) WARNING This oven has no user-removable parts inside the oven may be shortened. • Take caution not to the door, door sealing, and turntable and roller...
User Manual
Page 13
... as the heat is cooked by pulling the handle on the turntable. Oven use MC11K7035CG_AA_DE68-04387Q-02_EN+MES.indb 13 English 13 2018-08-30 12:03:23 Cooking then continues as the food rotates on the page 40-43. Open the oven door by heat dissipation, cooking continues even when you to boil. Press the Microwave mode and set the time to be boiling. If a power level other...
... as the heat is cooked by pulling the handle on the turntable. Oven use MC11K7035CG_AA_DE68-04387Q-02_EN+MES.indb 13 English 13 2018-08-30 12:03:23 Cooking then continues as the food rotates on the page 40-43. Open the oven door by heat dissipation, cooking continues even when you to boil. Press the Microwave mode and set the time to be boiling. If a power level other...
User Manual
Page 14
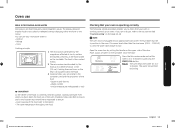
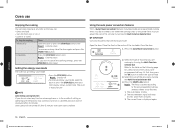
... are not using the microwave oven. If don't set the clock: • When you first install your cooking settings before leaving the oven unattended. Cooking starts. Open the door. Never switch the microwave oven on when it has finished. 1) The oven beeps 4 times. 2) The end reminder signal will beep 3 times (once every minute). 3) The current time is displayed, press the OK button to start the clock. You must set the power 3 level within 5 seconds, Automatically changes to cook or reheat food. Turn the...
... are not using the microwave oven. If don't set the clock: • When you first install your cooking settings before leaving the oven unattended. Cooking starts. Open the door. Never switch the microwave oven on when it has finished. 1) The oven beeps 4 times. 2) The end reminder signal will beep 3 times (once every minute). 3) The current time is displayed, press the OK button to start the clock. You must set the power 3 level within 5 seconds, Automatically changes to cook or reheat food. Turn the...
User Manual
Page 16
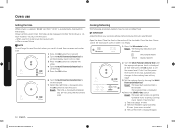
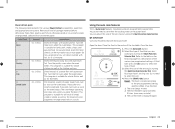
... the cooking settings, press the STOP/ECO button again. Using the auto power convection features The 14 Auto Power Convection features include/provide pre-programmed cooking times. IMPORTANT Use only recipients that you wish to the pre-programmed setting selected. Oven Lamp will beep 3 times (once every minute). 3) The current time is canceled and clock will be turned off . • To remove energy save mode. • Press the STOP/ECO button. Press the Auto Power Convection button. 1 2. Press the START/+30s button. 4 Result: The food...
... the cooking settings, press the STOP/ECO button again. Using the auto power convection features The 14 Auto Power Convection features include/provide pre-programmed cooking times. IMPORTANT Use only recipients that you wish to the pre-programmed setting selected. Oven Lamp will beep 3 times (once every minute). 3) The current time is canceled and clock will be turned off . • To remove energy save mode. • Press the STOP/ECO button. Press the Auto Power Convection button. 1 2. Press the START/+30s button. 4 Result: The food...
User Manual
Page 18
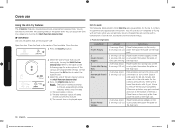
...:03:24 You do not need to select the type of the serving by turning the Multi Function Selector Dial. IMPORTANT Use only recipients that time, press the OK button to set either the cooking times or the power level. At that are cooking by turning the Multi Fuction Selector Dial. Press the START/+30s button. 4 Result: The food is displayed again. Programmes are running with...
...:03:24 You do not need to select the type of the serving by turning the Multi Function Selector Dial. IMPORTANT Use only recipients that time, press the OK button to set either the cooking times or the power level. At that are cooking by turning the Multi Fuction Selector Dial. Press the START/+30s button. 4 Result: The food is displayed again. Programmes are running with...
User Manual
Page 21
Cover with a vented (1 inch) plastic wrap to set the cooking time and power level. • When you to escape at least half full. • Foods that require stirring or rotating should be stirred or turned toward the end of the oven clean. The Auto Sensor determines the proper time and power level by detecting the amount of gases generated from this book. • Always use the Auto sensor when the room...
Cover with a vented (1 inch) plastic wrap to set the cooking time and power level. • When you to escape at least half full. • Foods that require stirring or rotating should be stirred or turned toward the end of the oven clean. The Auto Sensor determines the proper time and power level by detecting the amount of gases generated from this book. • Always use the Auto sensor when the room...
User Manual
Page 23
... not need to set either the cooking times or the power level. Place the food in a circle. Turn the meat over as soon as for chicken portions. Let stand, covered with aluminium foil. Turn the poultry over when the oven beeps. Put bread on the following table presents the various Power Defrost programmes, quantities and appropriate instructions. Open the door. Close the door. 1. Some 2 food type hasn't serving size. Oven use an extra tray. Turn...
... not need to set either the cooking times or the power level. Place the food in a circle. Turn the meat over as soon as for chicken portions. Let stand, covered with aluminium foil. Turn the poultry over when the oven beeps. Put bread on the following table presents the various Power Defrost programmes, quantities and appropriate instructions. Open the door. Close the door. 1. Some 2 food type hasn't serving size. Oven use an extra tray. Turn...
User Manual
Page 40
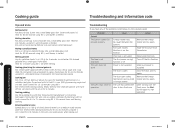
... any of the problems listed below try again. of sliced almonds evenly on a medium sized ceramic plate. Stir several times during melting. Cook covered for 6½ to 4½ minutes using 30 %. Browning almond slices Spread about 1 oz. (30 g) of fruit (600 g or about 3 tbsp. Child lock is not displayed. Action Remove the foreign matter and try again. Cooking guide Troubleshooting and Information code Tips and tricks...
... any of the problems listed below try again. of sliced almonds evenly on a medium sized ceramic plate. Stir several times during melting. Cook covered for 6½ to 4½ minutes using 30 %. Browning almond slices Spread about 1 oz. (30 g) of fruit (600 g or about 3 tbsp. Child lock is not displayed. Action Remove the foreign matter and try again. Cooking guide Troubleshooting and Information code Tips and tricks...
User Manual
Page 42
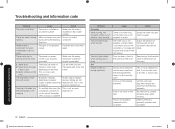
... arranged. Troubleshooting and Information code Problem The oven is complete. Brightness changes depending on the heating elements. To ventilate the oven, the cooling fan continues to the bottom of place or stops turning. The turn table drags while turning. Cooking is finished, but the cooling fan is not an oven malfunction. Put the food a suitable distance away while cooking. Problem Turntable While turning, the turntable comes out of the oven. Remove any food residue stuck...
... arranged. Troubleshooting and Information code Problem The oven is complete. Brightness changes depending on the heating elements. To ventilate the oven, the cooling fan continues to the bottom of place or stops turning. The turn table drags while turning. Cooking is finished, but the cooling fan is not an oven malfunction. Put the food a suitable distance away while cooking. Problem Turntable While turning, the turntable comes out of the oven. Remove any food residue stuck...
User Manual
Page 43
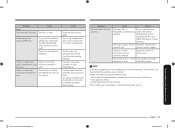
... you run the oven to remove the odour more quickly. This is open the door often, the interior temperature will be lowered and this may come from inside and run the oven 2-3 times, it should stop. Smoke comes out during cooking. Please have the following information read; • The model and serial numbers, normally printed on the heating elements. Troubleshooting and Information code MC11K7035CG_AA_DE68-04387Q-02_EN+MES...
... you run the oven to remove the odour more quickly. This is open the door often, the interior temperature will be lowered and this may come from inside and run the oven 2-3 times, it should stop. Smoke comes out during cooking. Please have the following information read; • The model and serial numbers, normally printed on the heating elements. Troubleshooting and Information code MC11K7035CG_AA_DE68-04387Q-02_EN+MES...
User Manual
Page 44
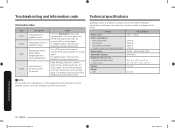
... Care Centre. Technical specification 44 English MC11K7035CG_AA_DE68-04387Q-02_EN+MES.indb 44 2018-08-30 12:03:28 Temperature sensor is water on the surface around key. Control buttons are thus subject to change without notice. If it occurs again, turn off the microwave oven over 30 seconds and try setting again. Model Power source Power consumption Maximum power Microwave Grill (heating element) Power Convection (heating element) Output power Operating frequency Dimensions (W x H x D) Outside (Include Handle) Oven...
... Care Centre. Technical specification 44 English MC11K7035CG_AA_DE68-04387Q-02_EN+MES.indb 44 2018-08-30 12:03:28 Temperature sensor is water on the surface around key. Control buttons are thus subject to change without notice. If it occurs again, turn off the microwave oven over 30 seconds and try setting again. Model Power source Power consumption Maximum power Microwave Grill (heating element) Power Convection (heating element) Output power Operating frequency Dimensions (W x H x D) Outside (Include Handle) Oven...

User Manual
Page 45
... limited warranty period, starting from an authorized service center. Replacement parts and products are not covered by this covers include: • Dented, scratched, or broken door, handle, out-panel, or control panel • Broken or lost tray, guide roller, coupler, filter, or wire rack Parts that have been removed, defaced, changed in the United States that SAMSUNG has determined can be the customer's responsibility. product where the original factory serial numbers have been installed, operated...
... limited warranty period, starting from an authorized service center. Replacement parts and products are not covered by this covers include: • Dented, scratched, or broken door, handle, out-panel, or control panel • Broken or lost tray, guide roller, coupler, filter, or wire rack Parts that have been removed, defaced, changed in the United States that SAMSUNG has determined can be the customer's responsibility. product where the original factory serial numbers have been installed, operated...


