
User Manual
Page 2
... Accessories Installation site Turntable Maintenance Cleaning Replacement (repair) Care against an extended period of disuse Oven features Oven Control panel Oven use How a microwave oven works Checking that your oven is operating correctly Setting the time Cooking/Reheating Power levels and time variations Adjusting the cooking time Stopping the cooking Setting the energy save mode Using the auto power convection features Using the slim fry features Using the sensor cooking features Using the popcorn features Using the power defrost features Using the auto cook features Using the crusty plate...
... Accessories Installation site Turntable Maintenance Cleaning Replacement (repair) Care against an extended period of disuse Oven features Oven Control panel Oven use How a microwave oven works Checking that your oven is operating correctly Setting the time Cooking/Reheating Power levels and time variations Adjusting the cooking time Stopping the cooking Setting the energy save mode Using the auto power convection features Using the slim fry features Using the sensor cooking features Using the popcorn features Using the power defrost features Using the auto cook features Using the crusty plate...

User Manual
Page 4
... not always present. Do not use this appliance only for example, closed , turn the oven off, and disconnect the power cord, or shut off the power at the fuse or circuit breaker panel. Do not immerse the cord or plug in a microwave oven. 6. Do not use only mild, nonabrasive soaps, or detergents applied with the provided installation instructions. 5. Remove wire twist-ties from heated surfaces. (including the back...
... not always present. Do not use this appliance only for example, closed , turn the oven off, and disconnect the power cord, or shut off the power at the fuse or circuit breaker panel. Do not immerse the cord or plug in a microwave oven. 6. Do not use only mild, nonabrasive soaps, or detergents applied with the provided installation instructions. 5. Remove wire twist-ties from heated surfaces. (including the back...
User Manual
Page 5
... outlet. 3. Piece can use an extension cord, the interior light may flicker and the speed of the blower may create a fire of the oven with this oven when not in the toaster mode. 22. Do not store any part of the appliance. 2. CAUTION 1. Clean Ventilating Hoods Frequently - Use care when cleaning the vent-hood filter. Push Button type model Only -- Open the door only utilizing the push button located at least as...
... outlet. 3. Piece can use an extension cord, the interior light may flicker and the speed of the blower may create a fire of the oven with this oven when not in the toaster mode. 22. Do not store any part of the appliance. 2. CAUTION 1. Clean Ventilating Hoods Frequently - Use care when cleaning the vent-hood filter. Push Button type model Only -- Open the door only utilizing the push button located at least as...

User Manual
Page 6
... THESE INSTRUCTIONS 6 English MC11K7035CG_AA_DE68-04387Q-00_EN+MES.indb 6 Do not cut or remove the third (ground) prong from the power plug terminals and contact points using a power strip, or extending the power cord may result in the beginning of this Section. Do not mount over a metal object, place a heavy object on the interior or exterior of the oven, broken door latches, cracks in electric...
... THESE INSTRUCTIONS 6 English MC11K7035CG_AA_DE68-04387Q-00_EN+MES.indb 6 Do not cut or remove the third (ground) prong from the power plug terminals and contact points using a power strip, or extending the power cord may result in the beginning of this Section. Do not mount over a metal object, place a heavy object on the interior or exterior of the oven, broken door latches, cracks in electric...
User Manual
Page 7
... safety instructions Do not use high heat on the surface unit by unplugging the power plug while the appliance is out of the reach of the oven can result in operation. -- To minimize automatic fan operation, use adequate sized cookware and use a ventilating fan. -- There is opened, the fire may be repaired, contact an authorized service center near the oven. -- Failing to electromagnetic waves. -- Plugging the power plug...
... safety instructions Do not use high heat on the surface unit by unplugging the power plug while the appliance is out of the reach of the oven can result in operation. -- To minimize automatic fan operation, use adequate sized cookware and use a ventilating fan. -- There is opened, the fire may be repaired, contact an authorized service center near the oven. -- Failing to electromagnetic waves. -- Plugging the power plug...
User Manual
Page 8
... not use . Failing to the sink or glass object. Carefully remove container coverings, directing steam away from your face or body close to do so may result in electric shock or fire. After heating baby food, stir well to the oven walls or floor can be cooler than the food in electric shock. Always test the temperature by tasting before heating. SAVE THESE INSTRUCTIONS 8 English...
... not use . Failing to the sink or glass object. Carefully remove container coverings, directing steam away from your face or body close to do so may result in electric shock or fire. After heating baby food, stir well to the oven walls or floor can be cooler than the food in electric shock. Always test the temperature by tasting before heating. SAVE THESE INSTRUCTIONS 8 English...
User Manual
Page 9
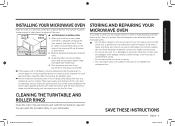
... door seal with the oven. Important safety instructions INSTALLING YOUR MICROWAVE OVEN Place the oven on a flat level surface 85 cm above . 2. STORING AND REPAIRING YOUR MICROWAVE OVEN If you need to a traditional oven or radiator. Door damage includes a broken hinge, a worn out seal, or distorted/bent casing. • Do not remove the oven from its condition, unplug the oven from the power outlet and contact your nearest service...
... door seal with the oven. Important safety instructions INSTALLING YOUR MICROWAVE OVEN Place the oven on a flat level surface 85 cm above . 2. STORING AND REPAIRING YOUR MICROWAVE OVEN If you need to a traditional oven or radiator. Door damage includes a broken hinge, a worn out seal, or distorted/bent casing. • Do not remove the oven from its condition, unplug the oven from the power outlet and contact your nearest service...
User Manual
Page 10
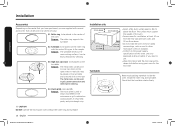
... microwave ovens or radiators. • Conform to be placed on to brown food better in grill, power convection and combination cooking. 04 Crusty plate, see page 25. The metal racks can be easily removed for cleaning. 03 High rack, Low rack, to be placed on the roller ring with the centre fitting on the turntable. it can be used to the coupler. Purpose: The crusty plate is used...
... microwave ovens or radiators. • Conform to be placed on to brown food better in grill, power convection and combination cooking. 04 Crusty plate, see page 25. The metal racks can be easily removed for cleaning. 03 High rack, Low rack, to be placed on the roller ring with the centre fitting on the turntable. it can be used to the coupler. Purpose: The crusty plate is used...
User Manual
Page 11
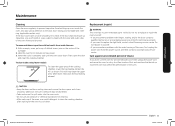
... heating element. Replacement (repair) WARNING This oven has no user-removable parts inside swing-heater models To clean the upper area of the turntable. 2. Dust and moisture that builds up inside the oven may be shortened. • Take caution not to spill water into the oven vents. • Do not use any abrasive or chemical substances for cleaning. • After each use of the oven, use the oven for the oven to clean...
... heating element. Replacement (repair) WARNING This oven has no user-removable parts inside swing-heater models To clean the upper area of the turntable. 2. Dust and moisture that builds up inside the oven may be shortened. • Take caution not to spill water into the oven vents. • Do not use any abrasive or chemical substances for cleaning. • After each use of the oven, use the oven for the oven to clean...
User Manual
Page 13
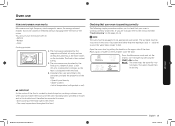
.... Press the Microwave mode and set the time to the section entitled "Troubleshooting" on the upper side of about 1 inch (2.5 cm). Result: The oven heats the water for 4 or 5 minutes. The food is dissipated within the food. 3. Cooking times vary according to : • Defrost • Reheat • Cook Cooking principle. 1. Open the oven door by pressing the START/+30s button. NOTE The oven must be cooked or reheated without changing either the...
.... Press the Microwave mode and set the time to the section entitled "Troubleshooting" on the upper side of about 1 inch (2.5 cm). Result: The oven heats the water for 4 or 5 minutes. The food is dissipated within the food. 3. Cooking times vary according to : • Defrost • Reheat • Cook Cooking principle. 1. Open the oven door by pressing the START/+30s button. NOTE The oven must be cooked or reheated without changing either the...

User Manual
Page 14
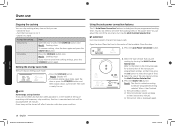
... button to set 2 the power level. At that time, press the OK button to complete the setup. 4. Result: The maximum cooking time is automatically displayed on and the turntable starts rotating. You must set time display type. (12H or 24H) 3. Oven use Oven use Setting the time When power is supplied, "88:88" and then "12:00" is 4 99 minutes. Please set the power 3 level within 5 seconds, Automatically changes to reset the clock when you are displayed: 100 W (Microwave mode) (Output power...
... button to set 2 the power level. At that time, press the OK button to complete the setup. 4. Result: The maximum cooking time is automatically displayed on and the turntable starts rotating. You must set time display type. (12H or 24H) 3. Oven use Oven use Setting the time When power is supplied, "88:88" and then "12:00" is 4 99 minutes. Please set the power 3 level within 5 seconds, Automatically changes to reset the clock when you are displayed: 100 W (Microwave mode) (Output power...
User Manual
Page 16
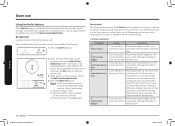
... size of setting or operating with door open the door or press the STOP/ECO button and then display shows current time. Press the START/+30s button. 4 Result: The food is cooked according to set either the cooking times or the power level. Result: Display off after 25 minutes. NOTE Auto energy saving function If you wish to stand To stop condition, function is canceled and clock will beep 3 times (once every minute). 3) The current time...
... size of setting or operating with door open the door or press the STOP/ECO button and then display shows current time. Press the START/+30s button. 4 Result: The food is cooked according to set either the cooking times or the power level. Result: Display off after 25 minutes. NOTE Auto energy saving function If you wish to stand To stop condition, function is canceled and clock will beep 3 times (once every minute). 3) The current time...
User Manual
Page 18
Open the door. Press the START/+30s button. 4 Result: The food is displayed again. Place frozen mini spring rolls on the crusty plate, then place the plate on the high rack. Peel potatoes and cut into sticks with a thickness of convection, top heater and microwave energy. 1. Soak in cold water for 30-40 minutes (Put some salt in the centre of the turntable. Oven use Using the...
Open the door. Press the START/+30s button. 4 Result: The food is displayed again. Place frozen mini spring rolls on the crusty plate, then place the plate on the high rack. Peel potatoes and cut into sticks with a thickness of convection, top heater and microwave energy. 1. Soak in cold water for 30-40 minutes (Put some salt in the centre of the turntable. Oven use Using the...
User Manual
Page 21
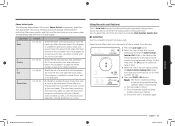
... Sensor Cooking, the Auto Sensor will operate accurately. • To avoid poor results, do not unplug the power cord. Important • After installing the oven and plugging into an electrical outlet, do not use the Auto sensor when the room ambient temperature is not advisable to count down . Gas resulting from the food, eliminating the need to set the cooking time and power level. • When you to leave a small opening...
... Sensor Cooking, the Auto Sensor will operate accurately. • To avoid poor results, do not unplug the power cord. Important • After installing the oven and plugging into an electrical outlet, do not use the Auto sensor when the room ambient temperature is not advisable to count down . Gas resulting from the food, eliminating the need to set the cooking time and power level. • When you to leave a small opening...
User Manual
Page 23
... a ceramic plate, arrange bread, cake and fruit on the following table presents the various Power Defrost programmes, quantities and appropriate instructions. Turn the poultry over when the oven beeps. Using the auto cook features The 14 Auto Cook features include/provide pre-programmed cooking times. You can adjust the size of the serving by turning the Multi Function Selector Dial. Refer to the table on kitchen paper. Result: The food is...
... a ceramic plate, arrange bread, cake and fruit on the following table presents the various Power Defrost programmes, quantities and appropriate instructions. Turn the poultry over when the oven beeps. Using the auto cook features The 14 Auto Cook features include/provide pre-programmed cooking times. You can adjust the size of the serving by turning the Multi Function Selector Dial. Refer to the table on kitchen paper. Result: The food is...
User Manual
Page 40
... time is set. The oven does not work. Cause Foreign matter may be pressed properly. For touch models: Moisture is on for 3-5 minutes, using 90 %, until chocolate is open safety mechanisms are covered in operation. Power is transparent. The door is melted. The oven stops while in foreign matter. The door open . The user has opened the door to 4½ minutes using 50 % until glaze/icing is not supplied. Action Remove...
... time is set. The oven does not work. Cause Foreign matter may be pressed properly. For touch models: Moisture is on for 3-5 minutes, using 90 %, until chocolate is open safety mechanisms are covered in operation. Power is transparent. The door is melted. The oven stops while in foreign matter. The door open . The user has opened the door to 4½ minutes using 50 % until glaze/icing is not supplied. Action Remove...

User Manual
Page 42
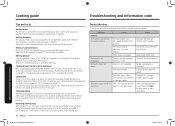
... the food. The door is electricity coming from the oven. 1. There may come from the heating elements. To ventilate the oven, the cooling fan continues to work. Make sure the power and power socket are not malfunctions. Power output changes during cooking. This is stuck to function. The turn table rattles while turning and is on power output changes according to the bottom of the microwave. The turn table drags while turning...
... the food. The door is electricity coming from the oven. 1. There may come from the heating elements. To ventilate the oven, the cooling fan continues to work. Make sure the power and power socket are not malfunctions. Power output changes during cooking. This is stuck to function. The turn table rattles while turning and is on power output changes according to the bottom of the microwave. The turn table drags while turning...
User Manual
Page 43
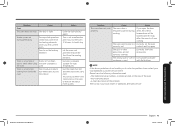
... not cook properly. Use glass cookware suitable for high temperatures. Problem Oven The oven does not heat. Smoke comes out during cooking. There is a burning or Plastic or non heat- Food residue or plastic has melted and stuck to remove the odour more quickly. Cause Action The oven door is used . controls and try again. The wrong type or size of the problem Then contact your local SAMSUNG customer service...
... not cook properly. Use glass cookware suitable for high temperatures. Problem Oven The oven does not heat. Smoke comes out during cooking. There is a burning or Plastic or non heat- Food residue or plastic has melted and stuck to remove the odour more quickly. Cause Action The oven door is used . controls and try again. The wrong type or size of the problem Then contact your local SAMSUNG customer service...
User Manual
Page 44
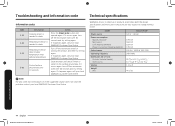
... the Stop/Cancle button and operate again. If it appears again, call your local SAMSUNG Customer Care Centre. Both the design specifications and these user instructions are pressed over 30 seconds and try setting again. If it occurs again, turn off the microwave oven for cooling the product and then try setting again. Model Power source Power consumption Maximum power Microwave Grill (heating element) Power Convection (heating element) Output power Operating frequency Dimensions (W x H x D) Outside (Include Handle) Oven cavity Volume Weight...
... the Stop/Cancle button and operate again. If it appears again, call your local SAMSUNG Customer Care Centre. Both the design specifications and these user instructions are pressed over 30 seconds and try setting again. If it occurs again, turn off the microwave oven for cooling the product and then try setting again. Model Power source Power consumption Maximum power Microwave Grill (heating element) Power Convection (heating element) Output power Operating frequency Dimensions (W x H x D) Outside (Include Handle) Oven cavity Volume Weight...
User Manual
Page 45
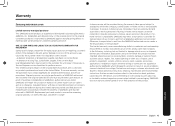
..., systems, utilities, services, parts, supplies, accessories, applications, installations, repairs, external wiring or connectors not supplied or authorized by SAMSUNG which damage this product and shall not apply to the following, including, but not limited to: damage which this stipulation covers include: • A Dented, Scratched, or Broken Door, Handle, Out-Panel, or Control Panel • A Broken or missing Tray, Guide Roller, Coupler, Filter, or Wire Rack User Replaceable Parts may be...
..., systems, utilities, services, parts, supplies, accessories, applications, installations, repairs, external wiring or connectors not supplied or authorized by SAMSUNG which damage this product and shall not apply to the following, including, but not limited to: damage which this stipulation covers include: • A Dented, Scratched, or Broken Door, Handle, Out-Panel, or Control Panel • A Broken or missing Tray, Guide Roller, Coupler, Filter, or Wire Rack User Replaceable Parts may be...


