
User Manual
Page 2
... safety instructions Setting up your new microwave oven Checking the parts Warranty and service information Setting up your microwave oven Checking the control panel Setting the time Child Lock Using your microwave oven Kitchen Timer button +30 sec button Vent buttons (2 Speed & On/Off) Light Hi/Lo/Off button Cooking Presets buttons Reheat button Auto Defrost button Soften/Melt button Microwave Cooking Times & Power Levels Eco Mode Cookware guide Microwave-safe utensils Cooking guide General microwave tips Cooking techniques Cooking meat Cooking poultry Cooking seafood Cooking eggs Cooking...
... safety instructions Setting up your new microwave oven Checking the parts Warranty and service information Setting up your microwave oven Checking the control panel Setting the time Child Lock Using your microwave oven Kitchen Timer button +30 sec button Vent buttons (2 Speed & On/Off) Light Hi/Lo/Off button Cooking Presets buttons Reheat button Auto Defrost button Soften/Melt button Microwave Cooking Times & Power Levels Eco Mode Cookware guide Microwave-safe utensils Cooking guide General microwave tips Cooking techniques Cooking meat Cooking poultry Cooking seafood Cooking eggs Cooking...
User Manual
Page 3
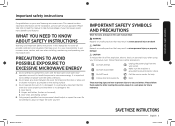
... adjust or repair the oven yourself. Please take time to read this manual to operate this user manual mean: WARNING Hazards or unsafe practices that may occur. WHAT YOU NEED TO KNOW ABOUT SAFETY INSTRUCTIONS Warnings and Important Safety Instructions in this section, keep it is grounded to use and care of fire, explosion, electric shock, or personal injury when using your microwave oven, follow them...
... adjust or repair the oven yourself. Please take time to read this manual to operate this user manual mean: WARNING Hazards or unsafe practices that may occur. WHAT YOU NEED TO KNOW ABOUT SAFETY INSTRUCTIONS Warnings and Important Safety Instructions in this section, keep it is grounded to use and care of fire, explosion, electric shock, or personal injury when using your microwave oven, follow them...

User Manual
Page 4
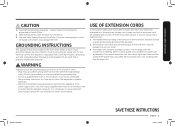
..., near a kitchen sink, in the microwave oven for a short time before removing the container. Do not cover or block any adjustments or repairs to the door. 12. Do not use this manual. 4. Do not overcook food. c. Do not use straight-sided containers with the provided installation instructions. 5. Use extreme care when inserting a spoon or other combustible materials are placed inside the oven ignite, keep the oven door closed glass jars, can...
..., near a kitchen sink, in the microwave oven for a short time before removing the container. Do not cover or block any adjustments or repairs to the door. 12. Do not use this manual. 4. Do not overcook food. c. Do not use straight-sided containers with the provided installation instructions. 5. Use extreme care when inserting a spoon or other combustible materials are placed inside the oven ignite, keep the oven door closed glass jars, can...
User Manual
Page 5
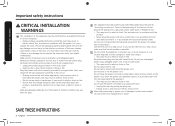
... foods under the hood, turn the fan on by providing an escape wire for the electrical current. GROUNDING INSTRUCTIONS This appliance must be longer, too. WARNING Improper use them if you can use of filter. 2. If the power-supply cord is necessary to use an extension cord, the interior light may flicker and the speed of the appliance. 2. Cooking times may be grounded. In the event of an electrical...
... foods under the hood, turn the fan on by providing an escape wire for the electrical current. GROUNDING INSTRUCTIONS This appliance must be longer, too. WARNING Improper use them if you can use of filter. 2. If the power-supply cord is necessary to use an extension cord, the interior light may flicker and the speed of the appliance. 2. Cooking times may be grounded. In the event of an electrical...
User Manual
Page 6
... may result in electric shock or fire. Do not mount over a metal object, place a heavy object on a regular basis. • Unplug the power plug and clean it is damaged, contact your oven in accordance with adequate space. Do not pull or excessively bend the power cord. Children may use them for a replacement or repair. Do not cut or remove the third (ground...
... may result in electric shock or fire. Do not mount over a metal object, place a heavy object on a regular basis. • Unplug the power plug and clean it is damaged, contact your oven in accordance with adequate space. Do not pull or excessively bend the power cord. Children may use them for a replacement or repair. Do not cut or remove the third (ground...
User Manual
Page 7
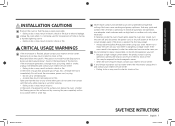
... is not being used for long periods of the other parts do not come into contact with a lid, a cookie sheet or a flat tray. Never try to repair the oven on your oven unattended at the fuse or circuit breaker panel. If the oven needs to be exposed to electromagnetic waves. • When the oven requires repair, contact your oven. Important safety instructions INSTALLATION CAUTIONS Position the oven so that...
... is not being used for long periods of the other parts do not come into contact with a lid, a cookie sheet or a flat tray. Never try to repair the oven on your oven unattended at the fuse or circuit breaker panel. If the oven needs to be exposed to electromagnetic waves. • When the oven requires repair, contact your oven. Important safety instructions INSTALLATION CAUTIONS Position the oven so that...
User Manual
Page 8
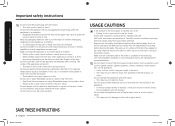
Important safety instructions Important safety instructions Do not touch the power plug with wet hands. • This may result in electric shock. Do not let children or any adjustments or repairs to the door. Under no circumstances should you remove the outer cabinet. Carefully remove container coverings, directing steam away from baby food before feeding the baby. Remove lids from your hands and face. The glass jar...
Important safety instructions Important safety instructions Do not touch the power plug with wet hands. • This may result in electric shock. Do not let children or any adjustments or repairs to the door. Under no circumstances should you remove the outer cabinet. Carefully remove container coverings, directing steam away from baby food before feeding the baby. Remove lids from your hands and face. The glass jar...
User Manual
Page 9
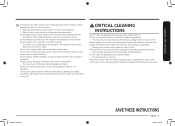
... use sealed containers. CRITICAL CLEANING INSTRUCTIONS Do not clean the appliance by pouring water over the door when opening the door just after cooking. • Take care that children do not come too close to the appliance. • Failing to do so may result in burns or injury. Before cleaning or performing maintenance, unplug the appliance from the wall socket and remove food...
... use sealed containers. CRITICAL CLEANING INSTRUCTIONS Do not clean the appliance by pouring water over the door when opening the door just after cooking. • Take care that children do not come too close to the appliance. • Failing to do so may result in burns or injury. Before cleaning or performing maintenance, unplug the appliance from the wall socket and remove food...
User Manual
Page 10
...Registration Card Manuals (User & Installation) 10 English ME16K3000A_AA_EN.indd 10 Templates (Top & Wall) 1/21/2016 2:54:27 PM When contacting Samsung, please provide the specific model and serial number information which is missing, you 've received all the parts, contact Samsung Customer Service. (Refer to the Samsung Authorized Service Center. Keep this page.) Microwave oven (ME16K3000A*) * Glass Tray * Roller Guide Ring * Exhaust adaptor * Grease Filter (2 ea) * Charcoal filter * Hardware kit (Screws & Brackets) NOTE If you should require warranty service, provide the...
...Registration Card Manuals (User & Installation) 10 English ME16K3000A_AA_EN.indd 10 Templates (Top & Wall) 1/21/2016 2:54:27 PM When contacting Samsung, please provide the specific model and serial number information which is missing, you 've received all the parts, contact Samsung Customer Service. (Refer to the Samsung Authorized Service Center. Keep this page.) Microwave oven (ME16K3000A*) * Glass Tray * Roller Guide Ring * Exhaust adaptor * Grease Filter (2 ea) * Charcoal filter * Hardware kit (Screws & Brackets) NOTE If you should require warranty service, provide the...
User Manual
Page 12
.../START button. Press the Kitchen Timer button. 2. To cancel timer setting: Press STOP/CLEAR button once. +30 sec button This simplified control saves you time, letting you to use your microwave oven and after a power failure. Press the +30 sec button for one minute, and then press the ENTER/START button to a cooking program already in clock. Vent buttons (2 Speed & On/Off) The vent removes steam and other vapors from the cooking surface. Use the number buttons to turn the vent on. 3. Kitchen Timer button...
.../START button. Press the Kitchen Timer button. 2. To cancel timer setting: Press STOP/CLEAR button once. +30 sec button This simplified control saves you time, letting you to use your microwave oven and after a power failure. Press the +30 sec button for one minute, and then press the ENTER/START button to a cooking program already in clock. Vent buttons (2 Speed & On/Off) The vent removes steam and other vapors from the cooking surface. Use the number buttons to turn the vent on. 3. Kitchen Timer button...
User Manual
Page 13
... or vented plastic wrap to Press once twice Instructions Cook only one microwave popcorn bag at least 5 minutes before putting them on average 8-10 oz. Auto cook table Cooking Preset Button Popcorn Amount or Type 3.5 oz. 1 package 3.0-3.5 oz. 1 package Number of Times to cook. Place them in a microwave-safe ceramic, glass or plastic dish and add 2-4 Tbs. Do not let slices overlap. Be careful when removing and opening the heated...
... or vented plastic wrap to Press once twice Instructions Cook only one microwave popcorn bag at least 5 minutes before putting them on average 8-10 oz. Auto cook table Cooking Preset Button Popcorn Amount or Type 3.5 oz. 1 package 3.0-3.5 oz. 1 package Number of Times to cook. Place them in a microwave-safe ceramic, glass or plastic dish and add 2-4 Tbs. Do not let slices overlap. Be careful when removing and opening the heated...
User Manual
Page 14
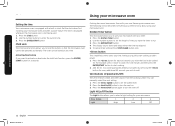
... beeps will sound and End is not as hot as you would like after cooking. Cover the plate with care. meat, poultry or fish (up to 14 oz. Do not cover. Let oven cool for covering and standing. Follow the package instructions for at least 5 minutes before using again. If the food is displayed. Place the beverage in the oven. Do not overlap. Reheat button The...
... beeps will sound and End is not as hot as you would like after cooking. Cover the plate with care. meat, poultry or fish (up to 14 oz. Do not cover. Let oven cool for covering and standing. Follow the package instructions for at least 5 minutes before using again. If the food is displayed. Place the beverage in the oven. Do not overlap. Reheat button The...
User Manual
Page 15
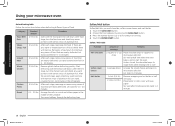
.../START button. At this time, open the door and turn over the food during the defrost cycle. Use the auto defrost cycle for a shorter defrosting time) to prevent the food from 0.1 to enter the weight. 3. For added convenience, the auto defrost function beeps to 6 oz. If the food is stored outside the freezer for up to remind you would like after using the reheat function, continue heating using auto defrost, the entered weight is not as hot...
.../START button. At this time, open the door and turn over the food during the defrost cycle. Use the auto defrost cycle for a shorter defrosting time) to prevent the food from 0.1 to enter the weight. 3. For added convenience, the auto defrost function beeps to 6 oz. If the food is stored outside the freezer for up to remind you would like after using the reheat function, continue heating using auto defrost, the entered weight is not as hot...
User Manual
Page 16
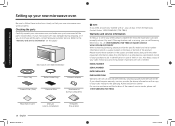
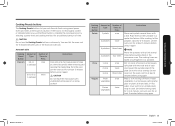
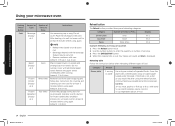
....) Remove wrapping and cut butter in a microwave-safe dish. Using your microwave oven Using your microwave oven Auto defrosting table Follow the instructions below when defrosting different types of aluminum foil. Whole Chicken 2.5-6.0 lbs. Let stand for 5 - 10 minutes. Steaks, Chops, Fish 0.5-3.0 lbs. Let stand, covered for 10 - 20 minutes. After each stage, rearrange the food. Remove giblets before defrosting poultry. Press the number button (1,2 or 3) for amount or serving. 4. Start defrosting...
....) Remove wrapping and cut butter in a microwave-safe dish. Using your microwave oven Using your microwave oven Auto defrosting table Follow the instructions below when defrosting different types of aluminum foil. Whole Chicken 2.5-6.0 lbs. Let stand for 5 - 10 minutes. Steaks, Chops, Fish 0.5-3.0 lbs. Let stand, covered for 10 - 20 minutes. After each stage, rearrange the food. Remove giblets before defrosting poultry. Press the number button (1,2 or 3) for amount or serving. 4. Start defrosting...
User Manual
Page 20
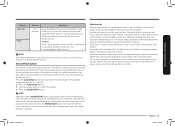
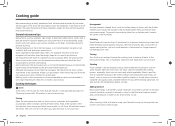
... when removing food from the microwave and instruct children to avoid becoming tough. Food at a low power level to do not heat the cookware, the heat from the outside of aluminum foil. Stirring Open the microwave door and stir foods such as roasts and whole vegetables. Turning Turn foods over and cause severe burns. General microwave tips Dense foods, such as soup or hot chocolate should be shaken or stirred when cooking...
... when removing food from the microwave and instruct children to avoid becoming tough. Food at a low power level to do not heat the cookware, the heat from the outside of aluminum foil. Stirring Open the microwave door and stir foods such as roasts and whole vegetables. Turning Turn foods over and cause severe burns. General microwave tips Dense foods, such as soup or hot chocolate should be shaken or stirred when cooking...
User Manual
Page 26
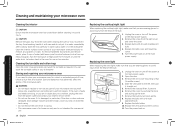
... microwave parts. Replace the bulb holder. 10. Replace the vent grille and the 3 screws. 11. To prevent the tray from the heat of the bulb. 1. Remove the cover by turning it in your microwave oven Cleaning the interior CAUTION Ensure that you are wearing gloves to perform repairs. Run the microwave at the main power supply. 2. Open the door. 3. Remove the vent cover mounting screws (3 middle screws). 4. Remove the charcoal filter, if present. 6. Cleaning and maintaining your microwave oven Cleaning and maintaining your dishwasher. Cleaning the turntable...
... microwave parts. Replace the bulb holder. 10. Replace the vent grille and the 3 screws. 11. To prevent the tray from the heat of the bulb. 1. Remove the cover by turning it in your microwave oven Cleaning the interior CAUTION Ensure that you are wearing gloves to perform repairs. Run the microwave at the main power supply. 2. Open the door. 3. Remove the vent cover mounting screws (3 middle screws). 4. Remove the charcoal filter, if present. 6. Cleaning and maintaining your microwave oven Cleaning and maintaining your dishwasher. Cleaning the turntable...

User Manual
Page 27
... operate the oven hood without the filters in hot water and a mild detergent. Remove the vent grille mounting screws (3 middle screws). 4. Open the door. 3. Slide the vent grille to 12 months and more often if necessary. Soak the grease filter in place. 1. WARNING Do not use ammonia or put the grease filter in the microwave oven. The aluminum will darken. 3. Replace the vent grille and 3 screws and close the door. Cleaning and maintaining your Samsung dealer. The charcoal filter cannot be replaced...
... operate the oven hood without the filters in hot water and a mild detergent. Remove the vent grille mounting screws (3 middle screws). 4. Open the door. 3. Slide the vent grille to 12 months and more often if necessary. Soak the grease filter in place. 1. WARNING Do not use ammonia or put the grease filter in the microwave oven. The aluminum will darken. 3. Replace the vent grille and 3 screws and close the door. Cleaning and maintaining your Samsung dealer. The charcoal filter cannot be replaced...
User Manual
Page 28
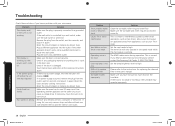
... circuit. Remove any blown fuses. Operating noise is stuck in the user's manual. Difficult to high. Turntable rotates improperly. Make sure the turntable and roller ring are positioned correctly. Move your microwave: Problem The display and/ or the oven is too large or too heavy, the turntable may operate improperly. The Vent Fan will display: 88:88. The MWO makes noise during operation. This is working . Set the lamp brightness level to replace Charcoal Filter...
... circuit. Remove any blown fuses. Operating noise is stuck in the user's manual. Difficult to high. Turntable rotates improperly. Make sure the turntable and roller ring are positioned correctly. Move your microwave: Problem The display and/ or the oven is too large or too heavy, the turntable may operate improperly. The Vent Fan will display: 88:88. The MWO makes noise during operation. This is working . Set the lamp brightness level to replace Charcoal Filter...
User Manual
Page 29
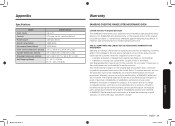
...to SAMSUNG or SAMSUNG's authorized service center. Appppeennddixix Specifications Model Oven Cavity 1.6 cu ft ME16K3000A* Controls 10 power levels, including Defrost Power Source Power Consumption 120 VAC, 60 Hz 1580 Watts Microwave Power Output Oven Cavity Dimensions (inches) Outside Dimensions (inches) Shipping Dimensions (inches) Net/Shipping Weight 1000 Watts 19 5/16"(W) X 9 5/8"(H) X 14 3/8"(D) 29 7/8"(W) X 16 1/2"(H) X 15 1/8"(D) 33 3/8"(W) X 19 15/16"(H) X 19 13/32"(D) ST : 44.2 / 51.8 lbs B / W : 43.3 / 50.8 lbs Warranty SAMSUNG OVER-THE-RANGE (OTR) MICROWAVE OVEN Limited...
...to SAMSUNG or SAMSUNG's authorized service center. Appppeennddixix Specifications Model Oven Cavity 1.6 cu ft ME16K3000A* Controls 10 power levels, including Defrost Power Source Power Consumption 120 VAC, 60 Hz 1580 Watts Microwave Power Output Oven Cavity Dimensions (inches) Outside Dimensions (inches) Shipping Dimensions (inches) Net/Shipping Weight 1000 Watts 19 5/16"(W) X 9 5/8"(H) X 14 3/8"(D) 29 7/8"(W) X 16 1/2"(H) X 15 1/8"(D) 33 3/8"(W) X 19 15/16"(H) X 19 13/32"(D) ST : 44.2 / 51.8 lbs B / W : 43.3 / 50.8 lbs Warranty SAMSUNG OVER-THE-RANGE (OTR) MICROWAVE OVEN Limited...
User Manual
Page 30
... limited warranty covers manufacturing defects in materials and workmanship encountered in normal, noncommercial use of products, equipment, systems, utilities, services, parts, supplies, accessories, applications, installations, repairs, external wiring or connectors not supplied or authorized by user; This warranty gives you specific legal rights, and you . If during the warranty labor period subject to normal aging. SAMSUNG does not warrant uninterrupted or error-free operation of incidental...
... limited warranty covers manufacturing defects in materials and workmanship encountered in normal, noncommercial use of products, equipment, systems, utilities, services, parts, supplies, accessories, applications, installations, repairs, external wiring or connectors not supplied or authorized by user; This warranty gives you specific legal rights, and you . If during the warranty labor period subject to normal aging. SAMSUNG does not warrant uninterrupted or error-free operation of incidental...


