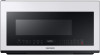
Samsung ME21A706BQ / ME21B706B1 Support and Manuals
Get Help and Manuals for this Samsung item
View All Support Options Below
Free Samsung ME21A706BQ / ME21B706B1 manuals!
Problems with Samsung ME21A706BQ / ME21B706B1?
Ask a Question
Free Samsung ME21A706BQ / ME21B706B1 manuals!
Problems with Samsung ME21A706BQ / ME21B706B1?
Ask a Question
Popular Samsung ME21A706BQ / ME21B706B1 Manual Pages
Installation Guide - Page 1
...8226; Product failure due to Installer
-
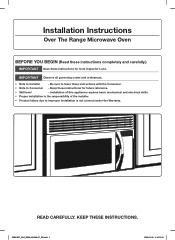
KEEP THESE INSTRUCTIONS. Installation Instructions
Over The Range Microwave Oven
BEFORE YOU BEGIN (Read these instructions completely and carefully.)
IMPORTANT Save these instructions for future reference.
• Skill level
- IMPORTANT Observe all governing codes and ordinances.
• Note to improper installation is not covered under the...
Installation Guide - Page 2
...12 A2. Installation procedure for outside top
exhaust 17
4. Installing the charcoal filter 13
C. Mount the microwave oven 16 E. Shipment/Installation 6 Parts included 6...A. Installation 15
A. Before you will need 7 Mounting space 7
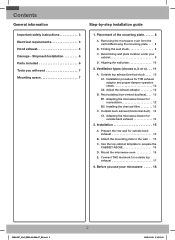
Step-by-step installation guide
1. Outside back exhaust (horizontal duct) . 14 C1. Contents
General information
Important safety instructions 3 ...
Installation Guide - Page 3
...replaced with a standard three-prong (grounding) wall receptacle to ensure that two people install this kilowatt rating. NOTE: For easier installation and personal safety, we recommend that the outlet box is recommended for this pIrnosudreucprto.per
ground exists
IMbePfoOreRusTeANT -
The outlet box should be capable of supporting...
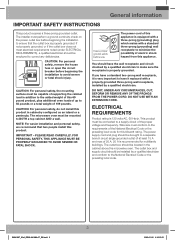
IMPORTANT SAFETY INSTRUCTIONS
This product ...
Installation Guide - Page 4
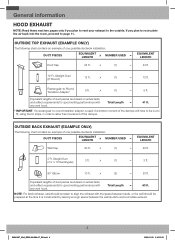
...Duct (3 ¼˝ x 10˝ Rectangular)
3 ft.
Equivalent lengths of one possible ductwork installation. Total Length =
63 ft.
If you plan to vent your exhaust to the outside.
x
... by leaving enough space between the wall studs to allow free movement of one possible ductwork installation. x
(1)
=
40 ft.
3 Ft. DUCT PIECES
EQUIVALENT LENGTH
x
NUMBER USED
=...
Installation Guide - Page 8
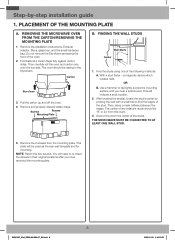
... template and for mounting. Draw a line down the center of the following methods: A. Remove the installation instructions, Exhaust adaptor, filters, glass tray, and the small hardware bag. After locating the stud(s), locate the stud's center by -step installation guide
1. Then, place a mark halfway between the edges.
CCaarrtotnon
StyroSftoyraofmoam
3. Remove the 2 screws from this...
Installation Guide - Page 9
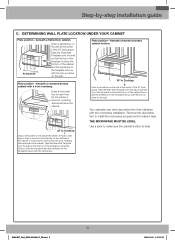
...to make it level.
beneath a framed recessed cabinet bottom. Remove the decorative trim to install the microwave properly and to Cooktop
Draw a vertical line on the wall at the ...the template touches the bottom of the front overhang descends below the cabinet. Step-by-step installation guide
C.
CL 30˝ t3o0"CtooCookotkotopp
Draw a vertical line on the wall below the cabinet...
Installation Guide - Page 10
Step-by-step installation guide
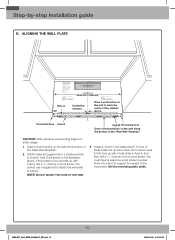
D. ALIGNING THE WALL PLATE
HHolleeAA
CeCnetneterrlliinne nontoctchheess
Draw a vertical ... a hole circle in the illustration above. You cannot use a toggle bolt to attach the wall plate to support the weight of the "Rear Wall Template".
2. You must have at the bottom of the microwave. Holes ...;� 10:15:52
Set the mounting plate aside.
Installation Guide - Page 11
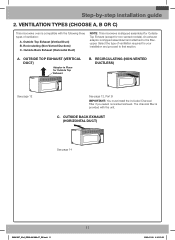
...; 10:15:52 An exhaust adaptor is provided with the following three types of ventilation required for non-vented models). RECIRCULATING (NON-VENTED DUCTLESS)
See page 12
See page 12, Part B IMPORTANT: You must install the included Charcoal Filter if you select nonvented exhaust. Select the type of ventilation:
A. Outside Top Exhaust (Vertical...
Installation Guide - Page 12
...04108A-07_EN.indd 12
12
2022-01-20 �� 10:15:53 Step-by-step installation guide
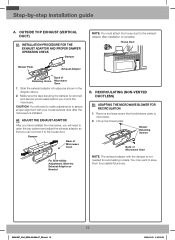
A. HoHuosusee DDuucct t
Blower Plate
Exhaust Adaptor
Back of Microwave Oven
For Side-toSide Adjustment, Slide...
2. Lift up the blower plate. Remove and save them for recirculating models.
Slide the exhaust adaptor into place as Needed
B.
OUTSIDE TOP EXHAUST (VERTICAL DUCT)
A1. ...
Installation Guide - Page 13
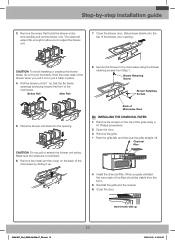
... holds the blower motor and carefully pull out the blower unit. Remove the metal vent fan cover on the top of the
microwave by -step installation guide
3. INSTALLING THE CHARCOAL FILTER 1.
Back of the filter should be visible from Step 1.
Remove the screw that the fan blade openings are not pinched. 6. The wires...
Installation Guide - Page 14
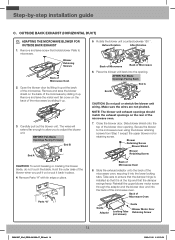
... motor retaining screw. Remove and save the metal vent fan cover on the back of the microwave by -step installation guide
C. The wires will extend far enough to adjust the blower unit. Remove Parts "A" with tin snips or pliers.
NOTE: The blower unit exhaust openings should match the exhaust openings on the back...
Installation Guide - Page 15
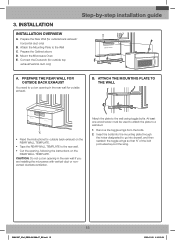
...the Microwave Oven E. B. ATTACH THE MOUNTING PLATE TO THE WALL
CL
• Read the instructions for outside back exhaust on the REAR WALL TEMPLATE.
• Tape the REAR WALL TEMPLATE ...bolts. Step-by-step installation guide
3. Prepare the Cabinet above D.
Remove the toggle wings from the bolts.
2. CAUTION: Do not cut an opening , following the instructions on the
REAR WALL ...
Installation Guide - Page 16

...holes for the top support screws and a hole...instructions on the TOP CABINET TEMPLATE.
• Tape it tight throughout Steps 1-3. Grease Filter
NOTE: When mounting the microwave oven, thread the power cord through . C. Do not pinch the cord or lift the oven by -step installation guide...the grease filter installed, don't push up on the TOP CABINET TEMPLATE. IMPORTANT: For models with a recessed...
Installation Guide - Page 17
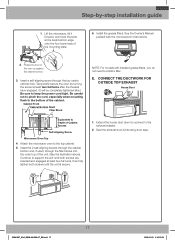
...-step installation guide
1. ...adaptor.
2. Attach the microwave oven to support the unit until both screws until the ...Manual packed with installed grease filters, you do not need to install a filter
E. Insert a self-aligning screw through the filler blocks into the outer top of the oven up against the cabinet bottom.
3. NOTE: For models with the microwave for instructions...
Installation Guide - Page 18
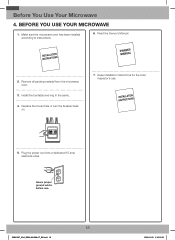
... turntable and ring in the cavity.
4. Plug the power cord into a dedicated 15 amp electrical outlet.
Read the Owner's Manual.
2. Keep installation instructions for the local inspector's use
SMH1927_XAA_DE68-04108A-07_EN.indd 18
18
2022-01-20 �� 10:15:55 Before You Use Your Microwave
4. BEFORE ...
Samsung ME21A706BQ / ME21B706B1 Reviews
We have not received any reviews for Samsung yet.