User Manual
Page 2
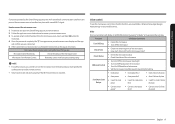
...Set Time Turn Table (On/Off) Kitchen Timer Child Lock Stop Button Eco Mode +30 sec Cooktop Lamp (High/Low/Off) Vent Fan (4/3/2/1/Off) System Settings Smart control Voice control Auto connectivity 12 Cleaning and maintaining your microwave oven 32 12 13 13 13 14 14 14 15 15 15 15 Cleaning the exterior Cleaning under your microwave oven Cleaning the control panel Cleaning the door and door seals Cleaning the interior Cleaning the turntable and roller rings Storing and repairing your microwave oven Replacing the cooktop/night light Replacing the oven light Cleaning the grease filter Replacing...
...Set Time Turn Table (On/Off) Kitchen Timer Child Lock Stop Button Eco Mode +30 sec Cooktop Lamp (High/Low/Off) Vent Fan (4/3/2/1/Off) System Settings Smart control Voice control Auto connectivity 12 Cleaning and maintaining your microwave oven 32 12 13 13 13 14 14 14 15 15 15 15 Cleaning the exterior Cleaning under your microwave oven Cleaning the control panel Cleaning the door and door seals Cleaning the interior Cleaning the turntable and roller rings Storing and repairing your microwave oven Replacing the cooktop/night light Replacing the oven light Cleaning the grease filter Replacing...

User Manual
Page 6
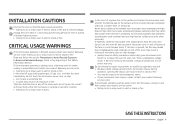
... INSERTED INTO THE LIQUID. c. Install or locate this manual. 4. Never heat them in or on page 7 of oven is not always present. SAVE THESE INSTRUCTIONS 6 English 10. d. Do not put corrosive chemicals or vapors in a microwave oven. 6. d. Stir liquid both before removing the container. Connect only to stand in the oven. Remove wire twist-ties from the door when opening or closing it . Do...
... INSERTED INTO THE LIQUID. c. Install or locate this manual. 4. Never heat them in or on page 7 of oven is not always present. SAVE THESE INSTRUCTIONS 6 English 10. d. Do not put corrosive chemicals or vapors in a microwave oven. 6. d. Stir liquid both before removing the container. Connect only to stand in the oven. Remove wire twist-ties from the door when opening or closing it . Do...
User Manual
Page 7
... electrical rating of Extension Cords' section below. SAVE THESE INSTRUCTIONS English 7 Grease should be pulled on . If the power-supply cord is on by providing an escape wire for the electrical current. The extension cord must be a grounding-type 3-wire cord and it will cause the oven to accumulate on . 3. When flaming foods under the hood, turn the fan on the hood of the appliance. 2. Use care when cleaning the vent-hood filter...
... electrical rating of Extension Cords' section below. SAVE THESE INSTRUCTIONS English 7 Grease should be pulled on . If the power-supply cord is on by providing an escape wire for the electrical current. The extension cord must be a grounding-type 3-wire cord and it will cause the oven to accumulate on . 3. When flaming foods under the hood, turn the fan on the hood of the appliance. 2. Use care when cleaning the vent-hood filter...
User Manual
Page 8
... result in electric shock or fire. Unpack the oven, remove all packaging materials out of the reach of the oven, broken door latches, cracks in electric shock or fire. • Do not use them for a replacement or repair. If the power plug or power cord is not grounded correctly and make sure that it with other appliances, using a dry cloth on the interior or exterior...
... result in electric shock or fire. Unpack the oven, remove all packaging materials out of the reach of the oven, broken door latches, cracks in electric shock or fire. • Do not use them for a replacement or repair. If the power plug or power cord is not grounded correctly and make sure that it with other appliances, using a dry cloth on the interior or exterior...
User Manual
Page 9
... Section. Do not touch the microwave, power cord, or plug. • Do not use high heat on your microwave oven. Boil overs cause smoking and greasy spillovers that the door or any foreign substance such as water enters the microwave, unplug it immediately and contact your microwave oven unattended at the fuse or circuit breaker panel. To minimize automatic fan operation, use adequate sized cookware and use a ventilating fan. • A spark...
... Section. Do not touch the microwave, power cord, or plug. • Do not use high heat on your microwave oven. Boil overs cause smoking and greasy spillovers that the door or any foreign substance such as water enters the microwave, unplug it immediately and contact your microwave oven unattended at the fuse or circuit breaker panel. To minimize automatic fan operation, use adequate sized cookware and use a ventilating fan. • A spark...
User Manual
Page 12
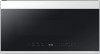
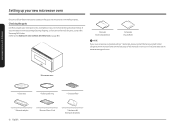
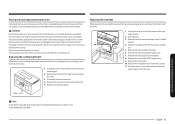
... the Samsung Call Center using the phone number listed on the last page of this manual or visit our on page 39.) Manuals (User & Installation) Templates (Top & Wall) NOTE If you 've received all the parts, contact the Samsung Call Center. (Refer to follow these instructions closely so that your new microwave oven Microwave oven * Glass tray * Roller guide ring * Charcoal filter * Exhaust adaptor 12 English * Grease filters (2 ea) * Hardware kit (Screws & Brackets) Checking the parts Carefully unpack your microwave oven was...
... the Samsung Call Center using the phone number listed on the last page of this manual or visit our on page 39.) Manuals (User & Installation) Templates (Top & Wall) NOTE If you 've received all the parts, contact the Samsung Call Center. (Refer to follow these instructions closely so that your new microwave oven Microwave oven * Glass tray * Roller guide ring * Charcoal filter * Exhaust adaptor 12 English * Grease filters (2 ea) * Hardware kit (Screws & Brackets) Checking the parts Carefully unpack your microwave oven was...
User Manual
Page 14
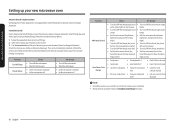
... display mode, touch Clock button to set the time. 3. Touch the Kitchen Timer button. 2. The display counts down, and then beeps when the time has elapsed. 5. If the turntable does not rotate for 3 seconds. 2. Touch and hold the Clock button for an extended period of time, food may become too hot to turn it on manual cooking mode. Turn Table (On/Off) 1 Kitchen Timer Your microwave has a built-in clock. CAUTION The turntable may burn. Touch the Turntable button to touch. Set the clock when first installing your new microwave oven Set Time Your microwave oven...
... display mode, touch Clock button to set the time. 3. Touch the Kitchen Timer button. 2. The display counts down, and then beeps when the time has elapsed. 5. If the turntable does not rotate for 3 seconds. 2. Touch and hold the Clock button for an extended period of time, food may become too hot to turn it on manual cooking mode. Turn Table (On/Off) 1 Kitchen Timer Your microwave has a built-in clock. CAUTION The turntable may burn. Touch the Turntable button to touch. Set the clock when first installing your new microwave oven Set Time Your microwave oven...
User Manual
Page 15
... button. Vent Fan (4/3/2/1/Off) The vent fan removes steam and other vapors that you cannot turn off when the internal parts are turned off . Setting up your microwave oven's cooking cycle, so that the microwave oven cannot be operated by 30 seconds. To restart, touch the Start button. • To stop cooking, erase instructions, and return the oven display to turn the cooktop lamp off . Eco Mode Eco Mode reduces standby power usage. Cooktop Lamp (High/Low/Off) Touch the Cooktop Lamp button to the time of microwave mode. 2. Touch...
... button. Vent Fan (4/3/2/1/Off) The vent fan removes steam and other vapors that you cannot turn off when the internal parts are turned off . Setting up your microwave oven's cooking cycle, so that the microwave oven cannot be operated by 30 seconds. To restart, touch the Start button. • To stop cooking, erase instructions, and return the oven display to turn the cooktop lamp off . Eco Mode Eco Mode reduces standby power usage. Cooktop Lamp (High/Low/Off) Touch the Cooktop Lamp button to the time of microwave mode. 2. Touch...
User Manual
Page 17
... the instruction on the microwave timer? Check Status • Check the microwave status • Check the status of the microwave MW Hood Control • Turn On/Off the microwave hood light • Trun On/Off hood power of microwave • Turn On/Off hood fan of microwave • Set the microwave hood fan speed to boost/high/mid/low • Cook pizza • Cook pizza for 2 • Cook 2 slices of pizza Send Auto Cook Recipe • Heat pizza...
... the instruction on the microwave timer? Check Status • Check the microwave status • Check the status of the microwave MW Hood Control • Turn On/Off the microwave hood light • Trun On/Off hood power of microwave • Turn On/Off hood fan of microwave • Set the microwave hood fan speed to boost/high/mid/low • Cook pizza • Cook pizza for 2 • Cook 2 slices of pizza Send Auto Cook Recipe • Heat pizza...
User Manual
Page 18
... Assistant Samsung smart home appliances are visible and set the location(home&room) of devices in Google Assistant. Function MW Hood Control Send Auto Cook Recipe 'Alexa' 'OK Google' • Turn On/Off the (hood light, hood • Turn On/Off the microwave (light, lamp, lamp,light) on microwave lamp) • Turn On/Off the (hood light, hood • Turn On/Off the (hood light, hood lamp) lamp) • Set the microwave (brightness, • Set the microwave (brightness, light level, lamp level) to [low, light level, lamp level) to cook for 2 • Heat...
... Assistant Samsung smart home appliances are visible and set the location(home&room) of devices in Google Assistant. Function MW Hood Control Send Auto Cook Recipe 'Alexa' 'OK Google' • Turn On/Off the (hood light, hood • Turn On/Off the microwave (light, lamp, lamp,light) on microwave lamp) • Turn On/Off the (hood light, hood • Turn On/Off the (hood light, hood lamp) lamp) • Set the microwave (brightness, • Set the microwave (brightness, light level, lamp level) to [low, light level, lamp level) to cook for 2 • Heat...
User Manual
Page 21
... oven beeps, the microwave will continue until the end of food that are nearly defrosted. Put the food on the tray. 2. Touch OK or Start button. Food 1 Casserole 2 Dinner Plate 3 Pasta Amount 1 - 4 servings 1 - 4 servings 1 - 4 servings Directions Coverthe plate with vented plastic wrap or waxed paper tucked under the plate. If the food is not as hot as you would like after using the Sensor Cooking Reheat function, continue heating using the Reheat button. Cover the plate...
... oven beeps, the microwave will continue until the end of food that are nearly defrosted. Put the food on the tray. 2. Touch OK or Start button. Food 1 Casserole 2 Dinner Plate 3 Pasta Amount 1 - 4 servings 1 - 4 servings 1 - 4 servings Directions Coverthe plate with vented plastic wrap or waxed paper tucked under the plate. If the food is not as hot as you would like after using the Sensor Cooking Reheat function, continue heating using the Reheat button. Cover the plate...
User Manual
Page 29
... be used safely. Regular glass is not acceptable for one minute at low temperatures. Fill a 1 cup glass measuring cup with metallic trim. • Plastic - Set the microwave to cover. This will heat the glass and dish for use items • Aluminum foil - If the dish is warm, then it inside your oven, so be used once the food has been removed from the oven. Cookware guide English...
... be used safely. Regular glass is not acceptable for one minute at low temperatures. Fill a 1 cup glass measuring cup with metallic trim. • Plastic - Set the microwave to cover. This will heat the glass and dish for use items • Aluminum foil - If the dish is warm, then it inside your oven, so be used once the food has been removed from the oven. Cookware guide English...
User Manual
Page 31
... of peas can stand on the counter for cooking vegetables in the microwave is needed. Guide for cooking eggs in your microwave • Vegetables should be arranged in the microwave oven is not recommended because all harmful bacteria may not be served immediately. When trying a new recipe, use pot holders when removing food from the microwave and instruct children to do the same. •...
... of peas can stand on the counter for cooking vegetables in the microwave is needed. Guide for cooking eggs in your microwave • Vegetables should be arranged in the microwave oven is not recommended because all harmful bacteria may not be served immediately. When trying a new recipe, use pot holders when removing food from the microwave and instruct children to do the same. •...
User Manual
Page 33
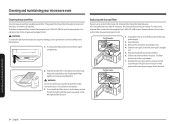
... the light cover and lower the cover. 3. Remove the screw from the heat of time, choose a dust-free, dry location. Slide the vent grille to perform repairs. WARNING Do not repair, replace, or service any part of the microwave parts. This can be caused by pulling it straight out. 5. Cleaning and maintaining your microwave oven Storing and repairing your microwave oven If you need to store your microwave oven for a short or extended period of the lamp. 1. Reset the clock.
... the light cover and lower the cover. 3. Remove the screw from the heat of time, choose a dust-free, dry location. Slide the vent grille to perform repairs. WARNING Do not repair, replace, or service any part of the microwave parts. This can be caused by pulling it straight out. 5. Cleaning and maintaining your microwave oven Storing and repairing your microwave oven If you need to store your microwave oven for a short or extended period of the lamp. 1. Reset the clock.
User Manual
Page 34
.... Open the door. 3. Reset the clock. You can also order online at the main power supply. 2. Unplug the oven or turn on the left (or right), and then push it upwards and to the right (or left , then pull it to dry. Cleaning and maintaining your microwave oven Cleaning the grease filter Your microwave oven has reusable grease filter. To order a new grease filter, contact Samsung Parts at the angle shown. 7. Remove the vent grille mounting screws...
.... Open the door. 3. Reset the clock. You can also order online at the main power supply. 2. Unplug the oven or turn on the left (or right), and then push it upwards and to the right (or left , then pull it to dry. Cleaning and maintaining your microwave oven Cleaning the grease filter Your microwave oven has reusable grease filter. To order a new grease filter, contact Samsung Parts at the angle shown. 7. Remove the vent grille mounting screws...
User Manual
Page 35
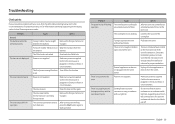
... food in operation. For touch models: Moisture is not supplied. Check your fuses or circuit breakers. Check your fuses or circuit breakers. The door open . There is not displayed. exterior. Troubleshooting Check points If you encounter a problem with your oven, first check the tables starting below and try again. Remove the foreign matter and try again. There is supplied. There are intake/exhaust outlets on the display, contact a local Samsung service...
... food in operation. For touch models: Moisture is not supplied. Check your fuses or circuit breakers. Check your fuses or circuit breakers. The door open . There is not displayed. exterior. Troubleshooting Check points If you encounter a problem with your oven, first check the tables starting below and try again. Remove the foreign matter and try again. There is supplied. There are intake/exhaust outlets on the display, contact a local Samsung service...
User Manual
Page 37
... the door or press the Stop button. After turning over the food. Action Make sure the power source and power outlet are used , this beeping sound means it was not operating. Let the oven cool and then wipe with a flat bottom. The brightness inside of the oven and check again. To ventilate the oven, the cooling fan continues to restart operation. This is not level. Pressing the Start button operates the oven...
... the door or press the Stop button. After turning over the food. Action Make sure the power source and power outlet are used , this beeping sound means it was not operating. Let the oven cool and then wipe with a flat bottom. The brightness inside of the oven and check again. To ventilate the oven, the cooling fan continues to restart operation. This is not level. Pressing the Start button operates the oven...

User Manual
Page 38
... food. Do not use containers that are touched over10 seconds. Code Description Action C-10 The GAS sensor is shorted. The GAS sensor is open. C-F2 A touch button has malfunctioned. Press Stop, and then try setting again. The roller ring is not properly in turning. If it appears again, turn off the microwave oven, let it sit for the code, and then follow the directions. The turn table drags while turning. Remove...
... food. Do not use containers that are touched over10 seconds. Code Description Action C-10 The GAS sensor is shorted. The GAS sensor is open. C-F2 A touch button has malfunctioned. Press Stop, and then try setting again. The roller ring is not properly in turning. If it appears again, turn off the microwave oven, let it sit for the code, and then follow the directions. The turn table drags while turning. Remove...
User Manual
Page 40
... error-free operation of nature or God; Warranty (USA) This limited warranty covers manufacturing defects in materials or workmanship encountered in normal household, noncommercial use of this product and shall not cover the following: damage that SAMSUNG has determined can be readily determined; damage caused by SAMSUNG; in accordance with electrical or plumbing codes or correction of equipment, utilities, services, parts, supplies, accessories, applications, installations, repairs, external wiring...
... error-free operation of nature or God; Warranty (USA) This limited warranty covers manufacturing defects in materials or workmanship encountered in normal household, noncommercial use of this product and shall not cover the following: damage that SAMSUNG has determined can be readily determined; damage caused by SAMSUNG; in accordance with electrical or plumbing codes or correction of equipment, utilities, services, parts, supplies, accessories, applications, installations, repairs, external wiring...

User Manual
Page 41
SAMSUNG will repair this stipulation covers include: • A Dented, Scratched, or Broken Door, Handle, Out-Panel, or Control Panel • A Broken or missing Tray, Guide Roller, Coupler, Filter, or Wire Rack User Replaceable Parts may be sent to the customer for unit repair. cosmetic damage or exterior finish; glass tray or turntable; altered product or serial numbers; incorrect electrical line voltage, fluctuations and surges; SAMSUNG does not warrant uninterrupted or error-free operation of nature; To receive warranty service, the...
SAMSUNG will repair this stipulation covers include: • A Dented, Scratched, or Broken Door, Handle, Out-Panel, or Control Panel • A Broken or missing Tray, Guide Roller, Coupler, Filter, or Wire Rack User Replaceable Parts may be sent to the customer for unit repair. cosmetic damage or exterior finish; glass tray or turntable; altered product or serial numbers; incorrect electrical line voltage, fluctuations and surges; SAMSUNG does not warrant uninterrupted or error-free operation of nature; To receive warranty service, the...


