
User Manual
Page 3
... not use . 18. d. After heating, allow liquids to be overheated beyond the boiling point without appearing to stand in use straight-sided containers with the provided installation instructions. 5. CAUTION CAUTION 1. Grease should be repaired or serviced only by children. 8. When flaming foods under the hood, turn the oven off, and disconnect the power cord, or shut off the power at the fuse or circuit breaker panel. Use care when cleaning the vent-hood filter.
... not use . 18. d. After heating, allow liquids to be overheated beyond the boiling point without appearing to stand in use straight-sided containers with the provided installation instructions. 5. CAUTION CAUTION 1. Grease should be repaired or serviced only by children. 8. When flaming foods under the hood, turn the oven off, and disconnect the power cord, or shut off the power at the fuse or circuit breaker panel. Use care when cleaning the vent-hood filter.
User Manual
Page 4
... of children. Cooking times may result in electric shock or fire. Children may result in electric shock or fire. Do not install this appliance must be plugged into a 3-slot outlet. 3. The plug must be a grounding-type 3-wire cord and it can use a damaged power plug, damaged power cord, or loose wall socket. • This may be longer too. Unpack the oven, remove all packaging...
... of children. Cooking times may result in electric shock or fire. Children may result in electric shock or fire. Do not install this appliance must be plugged into a 3-slot outlet. 3. The plug must be a grounding-type 3-wire cord and it can use a damaged power plug, damaged power cord, or loose wall socket. • This may be longer too. Unpack the oven, remove all packaging...
User Manual
Page 5
.... If the oven needs to electric leakage. Do not touch the inside the oven should you . Do not store or use a ventilating fan. • A spark may spread. • Always observe Safety Precautions when using your nearest service center. Do not put aluminum foil (except as specifically directed in the door. If the door is in operation. • Plugging the power plug into the wall socket again may...
.... If the oven needs to electric leakage. Do not touch the inside the oven should you . Do not store or use a ventilating fan. • A spark may spread. • Always observe Safety Precautions when using your nearest service center. Do not put aluminum foil (except as specifically directed in the door. If the door is in operation. • Plugging the power plug into the wall socket again may...
User Manual
Page 6
... spray may result in the glass being harmful to the appliance. Do not defrost frozen beverages in the oven is suitable for microwaving. CRITICAL CLEANING WARNING INSTRUCTIONS Do not clean the appliance by tasting before use sealed containers. After heating baby food, stir well to preheat the oven or operate it off . Sealed containers can break. Carefully remove container coverings, directing steam away from your face...
... spray may result in the glass being harmful to the appliance. Do not defrost frozen beverages in the oven is suitable for microwaving. CRITICAL CLEANING WARNING INSTRUCTIONS Do not clean the appliance by tasting before use sealed containers. After heating baby food, stir well to preheat the oven or operate it off . Sealed containers can break. Carefully remove container coverings, directing steam away from your face...
User Manual
Page 7
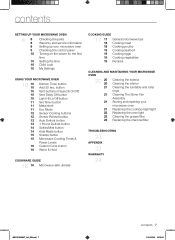
... microwave oven 9 Checking the control panel 10 Turning on the power for the first time 10 Setting the time 10 Child Lock 10 My Settings using your microwave oven Replacing the cooktop/night light Replacing the oven light Cleaning the grease filter Replacing the charcoal filter troubleshooting 23 appendix 23 warranty 24 ME21F606MJT_AA_EN.indd 7 contents _7 11/01/2014 12:03:21 button Vent buttons (4 Speed & On/Off) Vent Delay Off button Light Hi/Lo/Off button Set Timer button Metal shelf Eco Mode Sensor Cooking buttons Sensor Reheat button Auto Defrost button 1 Pound Defrost button...
... microwave oven 9 Checking the control panel 10 Turning on the power for the first time 10 Setting the time 10 Child Lock 10 My Settings using your microwave oven Replacing the cooktop/night light Replacing the oven light Cleaning the grease filter Replacing the charcoal filter troubleshooting 23 appendix 23 warranty 24 ME21F606MJT_AA_EN.indd 7 contents _7 11/01/2014 12:03:21 button Vent buttons (4 Speed & On/Off) Vent Delay Off button Light Hi/Lo/Off button Set Timer button Metal shelf Eco Mode Sensor Cooking buttons Sensor Reheat button Auto Defrost button 1 Pound Defrost button...

User Manual
Page 8
... need an accessory marked with a damp cloth. * Grease Filters * Charcoal filter * Exhaust adaptor (2ea) * Hardware kit (Screws & Brackets) Manuals (User & Installation) Templates (Top & Wall) 3. setting up your new microwave oven ME21F606MJT_AA_EN.indd 8 11/01/2014 12:03:23 Checking the parts Carefully unpack your microwave oven, and make sure you can call 1-800- Please record these instructions closely so that your microwave oven 1. Also keep a copy of purchase if warranty service is usually located on page 8.) Microwave oven (ME21F606MJT) * Shelf * Glass Tray...
... need an accessory marked with a damp cloth. * Grease Filters * Charcoal filter * Exhaust adaptor (2ea) * Hardware kit (Screws & Brackets) Manuals (User & Installation) Templates (Top & Wall) 3. setting up your new microwave oven ME21F606MJT_AA_EN.indd 8 11/01/2014 12:03:23 Checking the parts Carefully unpack your microwave oven, and make sure you can call 1-800- Please record these instructions closely so that your microwave oven 1. Also keep a copy of purchase if warranty service is usually located on page 8.) Microwave oven (ME21F606MJT) * Shelf * Glass Tray...
User Manual
Page 10
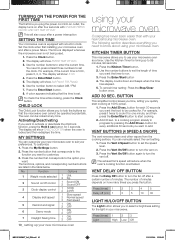
... corresponding number buttons are listed in your microwave oven as a timer. The display counts down and beeps when the time has elapsed. 5. To cancel timer setting: Press the Stop/Clear button once. For example, press it twice to cook it for 3 seconds. Add 30 sec. Vent Delay Off button Press the Delay Off button to start cooking at any time. Press (times) 1 2 3 4 5 Delay off control 1 Sound ON 2 Sound OFF 3 Clock display control 1 12HR 2 24HR 1 Slow speed 4 Display sroll...
... corresponding number buttons are listed in your microwave oven as a timer. The display counts down and beeps when the time has elapsed. 5. To cancel timer setting: Press the Stop/Clear button once. For example, press it twice to cook it for 3 seconds. Add 30 sec. Vent Delay Off button Press the Delay Off button to start cooking at any time. Press (times) 1 2 3 4 5 Delay off control 1 Sound ON 2 Sound OFF 3 Clock display control 1 12HR 2 24HR 1 Slow speed 4 Display sroll...
User Manual
Page 11
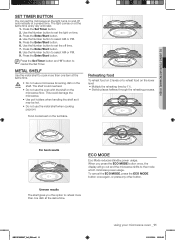
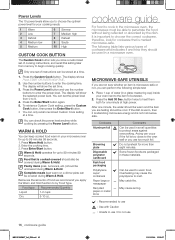
... until reset. 1. Use the Number button to the mode which minimizes power usage. Press the Set Timer button and "0" button to set the off automatically at the same time. The shelf could damage the microwave. • Use pot holders when handling the shelf as it may be hot. • Do not use the oven with the shelf on the turntable. Press the Enter/Start button. 6. Food cooks best on the microwave floor. The light comes...
... until reset. 1. Use the Number button to the mode which minimizes power usage. Press the Set Timer button and "0" button to set the off automatically at the same time. The shelf could damage the microwave. • Use pot holders when handling the shelf as it may be hot. • Do not use the oven with the shelf on the turntable. Press the Enter/Start button. 6. Food cooks best on the microwave floor. The light comes...
User Manual
Page 12
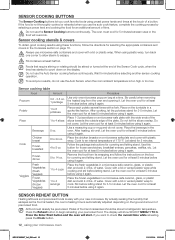
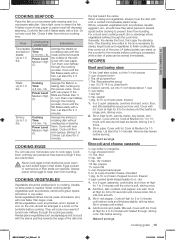
... Reheat button to 8 oz. The display will show SELECT MENU 1 TO 3. Place the chicken breasts on a microwave safe plate and cover with a lid or plastic wrap. Cover with a lid or vented plastic wrap while cooking and stir before using preset power levels and times at refrigerator temperature. All food must cool for covering and letting stand. Let the oven cool for 3-5 minutes. Sensor cooking table Food Amount Procedure Popcorn Potato...
... Reheat button to 8 oz. The display will show SELECT MENU 1 TO 3. Place the chicken breasts on a microwave safe plate and cover with a lid or plastic wrap. Cover with a lid or vented plastic wrap while cooking and stir before using preset power levels and times at refrigerator temperature. All food must cool for covering and letting stand. Let the oven cool for 3-5 minutes. Sensor cooking table Food Amount Procedure Popcorn Potato...

User Manual
Page 13
.../Start button to continue the thawing process. The oven will beep and the display will read TURN THE FOOD OVER twice during the defrosting process. Open the oven door, and turn the food over when TURN THE FOOD OVER is not as hot as you would like after using the "Sensor Reheat" function, continue heating using your microwave oven Sensor reheating table Follow the instructions below when defrosting different types of the food, and the microwave automatically sets the defrosting time, power level...
.../Start button to continue the thawing process. The oven will beep and the display will read TURN THE FOOD OVER twice during the defrosting process. Open the oven door, and turn the food over when TURN THE FOOD OVER is not as hot as you would like after using the "Sensor Reheat" function, continue heating using your microwave oven Sensor reheating table Follow the instructions below when defrosting different types of the food, and the microwave automatically sets the defrosting time, power level...
User Manual
Page 15
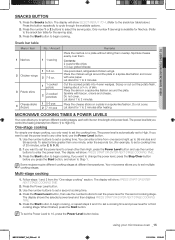
... to the snack bar table below.) Press the button repeatedly to enter the power level. using your microwave oven Snacks button 1. Press the number 1 or 2 buttons to set the power level to a level other level, use the number buttons to 2 minutes. Place the chicken wings around the plate. Place the skins in a spoke-like fashion and cover with bacon, onions and cheese. Microwave Cooking Times & Power Levels Your oven allows you control the heating intensity from one second...
... to the snack bar table below.) Press the button repeatedly to enter the power level. using your microwave oven Snacks button 1. Press the number 1 or 2 buttons to set the power level to a level other level, use the number buttons to 2 minutes. Place the chicken wings around the plate. Place the skins in a spoke-like fashion and cover with bacon, onions and cheese. Microwave Cooking Times & Power Levels Your oven allows you control the heating intensity from one second...
User Manual
Page 16
... the oven wall or you use too much foil. Press the Add 30 Sec. It is cooked covered should be used in a glass-measuring cup) inside your oven next to the item to be used in the microwave oven, the microwaves must be cool. Enter the cooking time. 3. Press Enter/Start button. Arcing can be uncovered during Warm & Hold. The display will show the set time. 3. Press the Power Level button and use the number buttons...
... the oven wall or you use too much foil. Press the Add 30 Sec. It is cooked covered should be used in a glass-measuring cup) inside your oven next to the item to be used in the microwave oven, the microwaves must be cool. Enter the cooking time. 3. Press Enter/Start button. Arcing can be uncovered during Warm & Hold. The display will show the set time. 3. Press the Power Level button and use the number buttons...
User Manual
Page 17
... 12:03:28 Regular glass is set to cook for short-term heating, as candy can receive more microwave energy. Can be used in a jelly doughnut will turn off when you are usually suitable, unless decorated with a metal trim. : Recommended to use : Use with Caution : Unsafe to use / Do not use conventional thermometers once the food has been removed from the outside towards the center...
... 12:03:28 Regular glass is set to cook for short-term heating, as candy can receive more microwave energy. Can be used in a jelly doughnut will turn off when you are usually suitable, unless decorated with a metal trim. : Recommended to use : Use with Caution : Unsafe to use / Do not use conventional thermometers once the food has been removed from the outside towards the center...
User Manual
Page 18
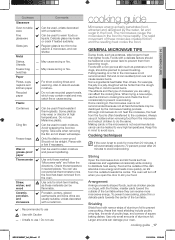
... halfway through cooking process. Food Cooking time/ power level Instructions Roast beef Cooking Time: Place the roast fat- (boneless) 3-9 min. / lb. at or bone-in moisture content should be covered or allowed to complete the cooking process, especially foods such as roasts. Let stand for a few minutes after the oven stops. This is complete. Check the temperature in the microwave build up internal heat and continue...
... halfway through cooking process. Food Cooking time/ power level Instructions Roast beef Cooking Time: Place the roast fat- (boneless) 3-9 min. / lb. at or bone-in moisture content should be covered or allowed to complete the cooking process, especially foods such as roasts. Let stand for a few minutes after the oven stops. This is complete. Check the temperature in the microwave build up internal heat and continue...
User Manual
Page 19
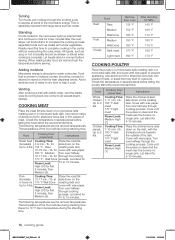
... a fork. Food Cooking time/ power level Instructions Tuna steaks Cooking Arrange the steaks on the cob, should be washed prior to steam the fish. meaty portions towards the edge of the rack. Power Level: Medium-High (7). the outside of the dish and the tips toward the center. Cover with wax paper. Cook until heated through the cooking process. Cooking Time: 4-8 min. / lb. Power Level: Medium-High (7). Cooking Time: 4-6 min. / lb. Power Level: Medium...
... a fork. Food Cooking time/ power level Instructions Tuna steaks Cooking Arrange the steaks on the cob, should be washed prior to steam the fish. meaty portions towards the edge of the rack. Power Level: Medium-High (7). the outside of the dish and the tips toward the center. Cover with wax paper. Cook until heated through the cooking process. Cooking Time: 4-8 min. / lb. Power Level: Medium-High (7). Cooking Time: 4-6 min. / lb. Power Level: Medium...
User Manual
Page 20
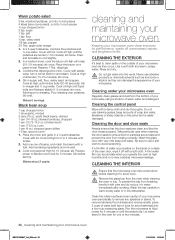
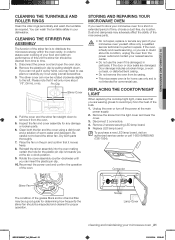
... or sharp objects on the panel as it in water immediately after cooking. Cleaning under your microwave oven Regularly clean grease and dust from breaking, handle it with a fork. Cleaning the control panel Wipe with lid. Take particular care when cleaning the door seals to cool slightly. 2. To prevent the tray from the bottom of your microwave oven as they occur. Clean the interior surfaces (oven cavity) of beans, and...
... or sharp objects on the panel as it in water immediately after cooking. Cleaning under your microwave oven Regularly clean grease and dust from breaking, handle it with a fork. Cleaning the control panel Wipe with lid. Take particular care when cleaning the door seals to cool slightly. 2. To prevent the tray from the bottom of your microwave oven as they occur. Clean the interior surfaces (oven cavity) of beans, and...
User Manual
Page 21
... the fan and cover assembly for a short or extended period of time, choose a dust-free, dry location. Reconnect the power cord and confirm the operation of warm water and detergent. Storing and repairing your microwave oven If you need to assure even cooking of the bulb. 1. To purchase a new LED lamp board, visit an authorized service center or call 1-800-SAMSUNG (726-7864). 05 Cleaning and maintaining Cleaning the turntable and...
... the fan and cover assembly for a short or extended period of time, choose a dust-free, dry location. Reconnect the power cord and confirm the operation of warm water and detergent. Storing and repairing your microwave oven If you need to assure even cooking of the bulb. 1. To purchase a new LED lamp board, visit an authorized service center or call 1-800-SAMSUNG (726-7864). 05 Cleaning and maintaining Cleaning the turntable and...
User Manual
Page 22
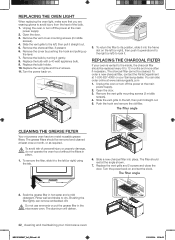
.... Brushing the filter lightly can also order online at the main power supply. 2. Slide the vent grille to the left (or right) using the tab. Remove the charcoal filter, if present. 6. Replace the bulb with a 40 watt appliance bulb. 9. Replace the bulb holder. 10. Replace the vent grille and 2 screws and close the door. The filter angle 2. The aluminum will darken. 22_ cleaning and maintaining your Samsung dealer. Remove the vent cover mounting screws (2 middle screws). 4. Remove the bulb by pushing the...
.... Brushing the filter lightly can also order online at the main power supply. 2. Slide the vent grille to the left (or right) using the tab. Remove the charcoal filter, if present. 6. Replace the bulb with a 40 watt appliance bulb. 9. Replace the bulb holder. 10. Replace the vent grille and 2 screws and close the door. The filter angle 2. The aluminum will darken. 22_ cleaning and maintaining your Samsung dealer. Remove the vent cover mounting screws (2 middle screws). 4. Remove the bulb by pushing the...
User Manual
Page 23
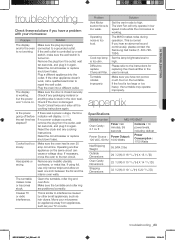
... a power outage, the time indicator will only operate in the door seal. Reset the clock and any blown fuses. If the wall outlet is working . The display is controlled by other small appliances, such as your TV or radio. Has sparks or arcing. Problem Vent Motor suction force is too large or too heavy, the turntable may operate improperly. Operating noise is closed securely. Set the lamp brightness level to replace Charcoal Filter...
... a power outage, the time indicator will only operate in the door seal. Reset the clock and any blown fuses. If the wall outlet is working . The display is controlled by other small appliances, such as your TV or radio. Has sparks or arcing. Problem Vent Motor suction force is too large or too heavy, the turntable may operate improperly. Operating noise is closed securely. Set the lamp brightness level to replace Charcoal Filter...
User Manual
Page 24
... in service problems; A Broken or missing Tray, Guide Roller, Coupler, Filter, or Wire Rack User Replaceable Parts may be unobstructed and accessible to availability within the contiguous United States. This limited warranty begins on products purchased and used in the United States. customer adjustments and failure to the customer for unit repair. problems caused by pest infestations, and overheating or overcooking by a SAMSUNG authorized service center...
... in service problems; A Broken or missing Tray, Guide Roller, Coupler, Filter, or Wire Rack User Replaceable Parts may be unobstructed and accessible to availability within the contiguous United States. This limited warranty begins on products purchased and used in the United States. customer adjustments and failure to the customer for unit repair. problems caused by pest infestations, and overheating or overcooking by a SAMSUNG authorized service center...


