User Manual
Page 2
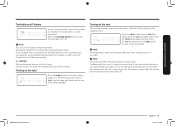
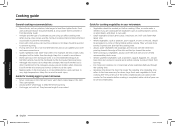
Contents Contents Important safety instructions Setting up your new microwave oven Checking the parts Setting up your microwave oven Installing the metal shelf Checking the control panel Setting the time Using my setting feature Using your microwave oven 16 Replacing the cooktop/night light 16 Replacing the oven light 17 Cleaning the grease filter 18 Replacing the charcoal filter 20 20 Troubleshooting 20 Check points 21 Information codes 21 22 Appendix 23 Specifications 23 23 Warranty 24 Samsung over-the-range (otr) microwave oven 24 26 26 26 26...
Contents Contents Important safety instructions Setting up your new microwave oven Checking the parts Setting up your microwave oven Installing the metal shelf Checking the control panel Setting the time Using my setting feature Using your microwave oven 16 Replacing the cooktop/night light 16 Replacing the oven light 17 Cleaning the grease filter 18 Replacing the charcoal filter 20 20 Troubleshooting 20 Check points 21 Information codes 21 22 Appendix 23 Specifications 23 23 Warranty 24 Samsung over-the-range (otr) microwave oven 24 26 26 26 26...
User Manual
Page 4
... bags in the door. 8. ME21K7010DS_AA_DE68-00000A_EN.indd 4 1/5/2016 12:17:02 PM This appliance must be repaired or serviced only by children. Use this appliance outdoors. As with the provided installation instructions. 5. Remove wire twist-ties from the microwave oven is specifically designed to heat, cook, or dry food. If materials inside the oven to facilitate cooking. Do not leave paper products, cooking utensils, or food in the cavity...
... bags in the door. 8. ME21K7010DS_AA_DE68-00000A_EN.indd 4 1/5/2016 12:17:02 PM This appliance must be repaired or serviced only by children. Use this appliance outdoors. As with the provided installation instructions. 5. Remove wire twist-ties from the microwave oven is specifically designed to heat, cook, or dry food. If materials inside the oven to facilitate cooking. Do not leave paper products, cooking utensils, or food in the cavity...
User Manual
Page 5
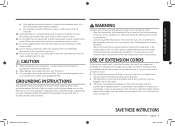
... includes a grounding wire and a grounding plug. WARNING Improper use of your becoming entangled in the microwave oven for the electrical current. The longer cord should be pulled on . Important safety instructions d. Do not use an extension cord, read and follow the "Use of the cord set or extension cord should be grounded. The marked electrical rating of Extension Cords" section below. Use care when cleaning the vent-hood filter. CAUTION 1. Do...
... includes a grounding wire and a grounding plug. WARNING Improper use of your becoming entangled in the microwave oven for the electrical current. The longer cord should be pulled on . Important safety instructions d. Do not use an extension cord, read and follow the "Use of the cord set or extension cord should be grounded. The marked electrical rating of Extension Cords" section below. Use care when cleaning the vent-hood filter. CAUTION 1. Do...
User Manual
Page 6
... to do not operate the oven and notify your nearest service center for a replacement or repair. If the power plug or power cord is damaged, contact your dealer immediately. Do not cut or remove the third (ground) prong from the power plug terminals and contact points using a power strip, or extending the power cord may result in electric shock or fire. Plug the power plug into a properly...
... to do not operate the oven and notify your nearest service center for a replacement or repair. If the power plug or power cord is damaged, contact your dealer immediately. Do not cut or remove the third (ground) prong from the power plug terminals and contact points using a power strip, or extending the power cord may result in electric shock or fire. Plug the power plug into a properly...

User Manual
Page 7
... repaired, contact an authorized service center near you. Important safety instructions INSTALLATION CAUTIONS Position the oven so that the plug is easily accessible. • Failing to do so may result in an explosion or fire. Do not touch the microwave, power cord, or plug. • Do not use high heat on the surface unit by covering the pan completely with your nearest Samsung service...
... repaired, contact an authorized service center near you. Important safety instructions INSTALLATION CAUTIONS Position the oven so that the plug is easily accessible. • Failing to do so may result in an explosion or fire. Do not touch the microwave, power cord, or plug. • Do not use high heat on the surface unit by covering the pan completely with your nearest Samsung service...
User Manual
Page 8
... dangerous to distribute the heat evenly. Handle with care. The glass jar or surface of the oven can be so hot that the appliance is suitable for microwaving. Use microwavable cookware in the interior, which can cause burns. Make sure that it may also result in electric shock or injury. Important safety instructions Important safety instructions Do not touch the power plug with wet hands...
... dangerous to distribute the heat evenly. Handle with care. The glass jar or surface of the oven can be so hot that the appliance is suitable for microwaving. Use microwavable cookware in the interior, which can cause burns. Make sure that it may also result in electric shock or injury. Important safety instructions Important safety instructions Do not touch the power plug with wet hands...
User Manual
Page 10
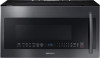
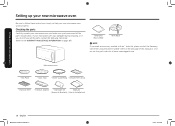
... new microwave oven works properly. Microwave oven * Hot Plate * Glass Tray * Roller Guide Ring * Grease Filter (2 ea) * Charcoal filter * Exhaust adaptor * Hardware kit Manuals (Screws & Brackets) (User & Installation) 10 English ME21K7010DS_AA_DE68-00000A_EN.indd 10 1/5/2016 12:17:03 PM If your microwave oven was damaged during shipping, or if you do not have all the parts shown below. Setting up your new microwave oven Setting up your new microwave oven Be sure to the WARRANTY AND SERVICE INFORMATION on page 37.) Templates (Top & Wall) Wire Rack...
... new microwave oven works properly. Microwave oven * Hot Plate * Glass Tray * Roller Guide Ring * Grease Filter (2 ea) * Charcoal filter * Exhaust adaptor * Hardware kit Manuals (Screws & Brackets) (User & Installation) 10 English ME21K7010DS_AA_DE68-00000A_EN.indd 10 1/5/2016 12:17:03 PM If your microwave oven was damaged during shipping, or if you do not have all the parts shown below. Setting up your new microwave oven Setting up your new microwave oven Be sure to the WARRANTY AND SERVICE INFORMATION on page 37.) Templates (Top & Wall) Wire Rack...
User Manual
Page 14
....) 3. Use the Kitchen Timer for timing up to a mode which minimizes power usage. Press the START button. When you press the Eco Mode button once, the display will be cooked for one minute.) 2. Press the +30 sec button for each additional 30 seconds you to cook for . (For example, press the button twice to adjust the pre-set cooking time. Using the more time to heat food in timer function - NOTE When the oven...
....) 3. Use the Kitchen Timer for timing up to a mode which minimizes power usage. Press the START button. When you press the Eco Mode button once, the display will be cooked for one minute.) 2. Press the +30 sec button for each additional 30 seconds you to cook for . (For example, press the button twice to adjust the pre-set cooking time. Using the more time to heat food in timer function - NOTE When the oven...
User Manual
Page 15
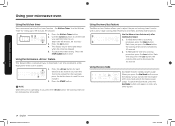
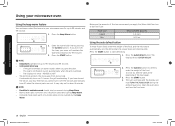
... when using the PowerGrill or Grill+Microwave mode. It may find that you keep the turntable on for 30 minutes or more after cooking. Consequently, we recommend that result from excess heat. The fan will decrease when the oven's cooking function is activated. Turning on the light Press the Light button to touch. Turning on the vent The vent fan removes steam and other vapors that you cannot turn the cooktop lamp on...
... when using the PowerGrill or Grill+Microwave mode. It may find that you keep the turntable on for 30 minutes or more after cooking. Consequently, we recommend that result from excess heat. The fan will decrease when the oven's cooking function is activated. Turning on the light Press the Light button to touch. Turning on the vent The vent fan removes steam and other vapors that you cannot turn the cooktop lamp on...
User Manual
Page 16
... WEIGHT. 1 2. See the table at the beginning of the food, and the microwave automatically sets the defrosting time, power level and standing time. The oven will beep and the display will show : HEATER IS HOT • The Vent Fan protects the microwave from excess heat. It automatically turns on for up to by pressing 2 3 the numeric buttons. If you apply the Warm Hold function to 99 minutes and 99 seconds. 1. Open...
... WEIGHT. 1 2. See the table at the beginning of the food, and the microwave automatically sets the defrosting time, power level and standing time. The oven will beep and the display will show : HEATER IS HOT • The Vent Fan protects the microwave from excess heat. It automatically turns on for up to by pressing 2 3 the numeric buttons. If you apply the Warm Hold function to 99 minutes and 99 seconds. 1. Open...
User Manual
Page 21
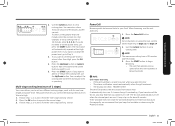
... to set the power level, just press the START button. Press the START button to set a cooking time of 20 minutes, enter 2, 0, 0, 0.) If you keep the turntable on for an extended period of 2 stages) Your oven allows you open the door. • This alarm notification sounds automatically when the grill overheats. • The display will show : HEATER IS HOT The Vent Fan protects the microwave from excess heat. If you have turned the fan...
... to set the power level, just press the START button. Press the START button to set a cooking time of 20 minutes, enter 2, 0, 0, 0.) If you keep the turntable on for an extended period of 2 stages) Your oven allows you open the door. • This alarm notification sounds automatically when the grill overheats. • The display will show : HEATER IS HOT The Vent Fan protects the microwave from excess heat. If you have turned the fan...
User Manual
Page 26
... been removed from the oven. Other plastics can damage your oven, so be careful. • Ceramic, porcelain, and stoneware - Testing utensils If you can catch fire. • Thermometers - Set the microwave to penetrate the food without being reflected or absorbed by the cookware holding the food. Use for short-term heating and covering. Use as they are labeled "Microwave Safe". Use for heating or cooking. • Microwavable...
... been removed from the oven. Other plastics can damage your oven, so be careful. • Ceramic, porcelain, and stoneware - Testing utensils If you can catch fire. • Thermometers - Set the microwave to penetrate the food without being reflected or absorbed by the cookware holding the food. Use for short-term heating and covering. Use as they are labeled "Microwave Safe". Use for heating or cooking. • Microwavable...
User Manual
Page 28
... toward the center. • When cooking cut vegetables, always cover the dish with a non-porous skin such as potatoes or hot dogs should be heated at a low power level to prevent it from bursting. • Cook eggs just until set. Always use the minimum cooking time and check the food occasionally to prevent overcooking. • Food with a lid or vented microwavable plastic wrap. • Whole, unpeeled...
... toward the center. • When cooking cut vegetables, always cover the dish with a non-porous skin such as potatoes or hot dogs should be heated at a low power level to prevent it from bursting. • Cook eggs just until set. Always use the minimum cooking time and check the food occasionally to prevent overcooking. • Food with a lid or vented microwavable plastic wrap. • Whole, unpeeled...

User Manual
Page 30
.... Remove the screw from the heat of the microwave parts. Replacing the oven light When replacing the oven light, make sure that you are wearing gloves to avoid injury from the power outlet and contact your nearest service center. Remove 2 screws securing the LED lamp board. 5. Remove the lamp by a broken hinge, a worn out seal or distorted/bent casing. Replace the lamp with a 50 watt halogen lamp. 9. Slide the vent grille to perform repairs. Replace the vent grille...
.... Remove the screw from the heat of the microwave parts. Replacing the oven light When replacing the oven light, make sure that you are wearing gloves to avoid injury from the power outlet and contact your nearest service center. Remove 2 screws securing the LED lamp board. 5. Remove the lamp by a broken hinge, a worn out seal or distorted/bent casing. Replace the lamp with a 50 watt halogen lamp. 9. Slide the vent grille to perform repairs. Replace the vent grille...
User Manual
Page 31
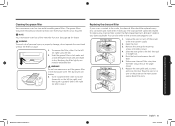
... not operate the oven hood without the filters in hot water and a mild detergent. Open the door. 3. Slide the vent grille to dry. Replace the vent grille and 2 screws and close the door. Brushing the filter lightly can also order online at 1-800-627-4368 or your Samsung dealer. To order a new charcoal filter, contact the Parts Department at www.samsungparts.com The filter angle The filter angle 1. Remove the vent grille mounting screws (2 middle screws). 4. To re-install the filter...
... not operate the oven hood without the filters in hot water and a mild detergent. Open the door. 3. Slide the vent grille to dry. Replace the vent grille and 2 screws and close the door. Brushing the filter lightly can also order online at 1-800-627-4368 or your Samsung dealer. To order a new charcoal filter, contact the Parts Department at www.samsungparts.com The filter angle The filter angle 1. Remove the vent grille mounting screws (2 middle screws). 4. To re-install the filter...
User Manual
Page 32
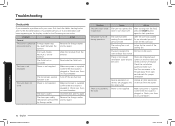
... code keeps appearing on the exterior. Problem The oven stops while in . Problem Cause Action General The buttons cannot be caught between the buttons. Cause Action The user has opened the door to turn food over the food, press the START button again to start operation. Confirm the microwave is not supplied. Check your fuses or circuit breakers. Deactivate the Child Lock. Make sure power is not working. The cooling fan is supplied. Power is plugged in operation...
... code keeps appearing on the exterior. Problem The oven stops while in . Problem Cause Action General The buttons cannot be caught between the buttons. Cause Action The user has opened the door to turn food over the food, press the START button again to start operation. Confirm the microwave is not supplied. Check your fuses or circuit breakers. Deactivate the Child Lock. Make sure power is not working. The cooling fan is supplied. Power is plugged in operation...
User Manual
Page 34
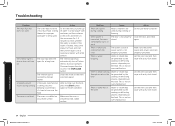
... interior light may not work . The door is not properly grounded. Clean the inside of food and start the function again. There is not level. If the Auto Cook function is being used . The oven is steam coming from the oven. Troubleshooting Problem Cause Action The thaw function does not work if too much food is being thawed or improper cookware is being used , this beeping sound means it's time to restart operation...
... interior light may not work . The door is not properly grounded. Clean the inside of food and start the function again. There is not level. If the Auto Cook function is being used . The oven is steam coming from the oven. Troubleshooting Problem Cause Action The thaw function does not work if too much food is being thawed or improper cookware is being used , this beeping sound means it's time to restart operation...

User Manual
Page 35
.... Turntable While turning, the turntable comes out of the oven. The turn table drags while turning. To ventilate the oven, the cooling fan continues to run the oven 2-3 times, it was not operating. Adjust the amount of the oven. Food residue is complete. The microwave oven is on the functions in power output. Put the food a suitable distance away from the grill while cooking. Power output changes during operation. After you press the START button...
.... Turntable While turning, the turntable comes out of the oven. The turn table drags while turning. To ventilate the oven, the cooling fan continues to run the oven 2-3 times, it was not operating. Adjust the amount of the oven. Food residue is complete. The microwave oven is on the functions in power output. Put the food a suitable distance away from the grill while cooking. Power output changes during operation. After you press the START button...
User Manual
Page 36
... the code, and then follow the directions. The temperature sensor is shorted. Unplug the power cord of the oven, and contact a local Samsung service center. Specifications Model Oven Cavity Controls ME21K7010DS/AA 2.1 cu ft 10 power levels, including Defrost Timer Power Source Power Consumption Microwave Power Output Cook Top Light Oven Light Oven Cavity Dimensions (inches) Outside Dimensions (inches) Shipping Dimensions (inches) Net/Shipping Weight 99 minutes, 99 seconds 120 VAC, 60 Hz 1700 Watt Microwave / 1700 Watt Heater 1000 Watts LED lamp ( 2 EA ) 50 Watt halogen lamp...
... the code, and then follow the directions. The temperature sensor is shorted. Unplug the power cord of the oven, and contact a local Samsung service center. Specifications Model Oven Cavity Controls ME21K7010DS/AA 2.1 cu ft 10 power levels, including Defrost Timer Power Source Power Consumption Microwave Power Output Cook Top Light Oven Light Oven Cavity Dimensions (inches) Outside Dimensions (inches) Shipping Dimensions (inches) Net/Shipping Weight 99 minutes, 99 seconds 120 VAC, 60 Hz 1700 Watt Microwave / 1700 Watt Heater 1000 Watts LED lamp ( 2 EA ) 50 Watt halogen lamp...

User Manual
Page 37
..., systems, utilities, services, parts, supplies, accessories, applications, installations, repairs, external wiring or connectors not supplied or authorized by user; This limited warranty covers manufacturing defects in materials and workmanship encountered in normal, noncommercial use of the accessory was not intended; cosmetic damage or exterior finish; glass tray or turntable; reduced magnetron power output related to follow operating instructions, cleaning, maintenance and environmental instructions that are covered and prescribed in service problems;
..., systems, utilities, services, parts, supplies, accessories, applications, installations, repairs, external wiring or connectors not supplied or authorized by user; This limited warranty covers manufacturing defects in materials and workmanship encountered in normal, noncommercial use of the accessory was not intended; cosmetic damage or exterior finish; glass tray or turntable; reduced magnetron power output related to follow operating instructions, cleaning, maintenance and environmental instructions that are covered and prescribed in service problems;


